1. Introduction
The YM519 Fault Code Scanner is a multi-functional diagnostic tool designed for vehicles supporting OBDII/EOBD+CAN protocols. It allows users to read and clear diagnostic trouble codes (DTCs), perform battery tests, monitor real-time vehicle data, and access various other diagnostic functions. Its user-friendly interface and robust design make it an essential tool for vehicle maintenance and troubleshooting.

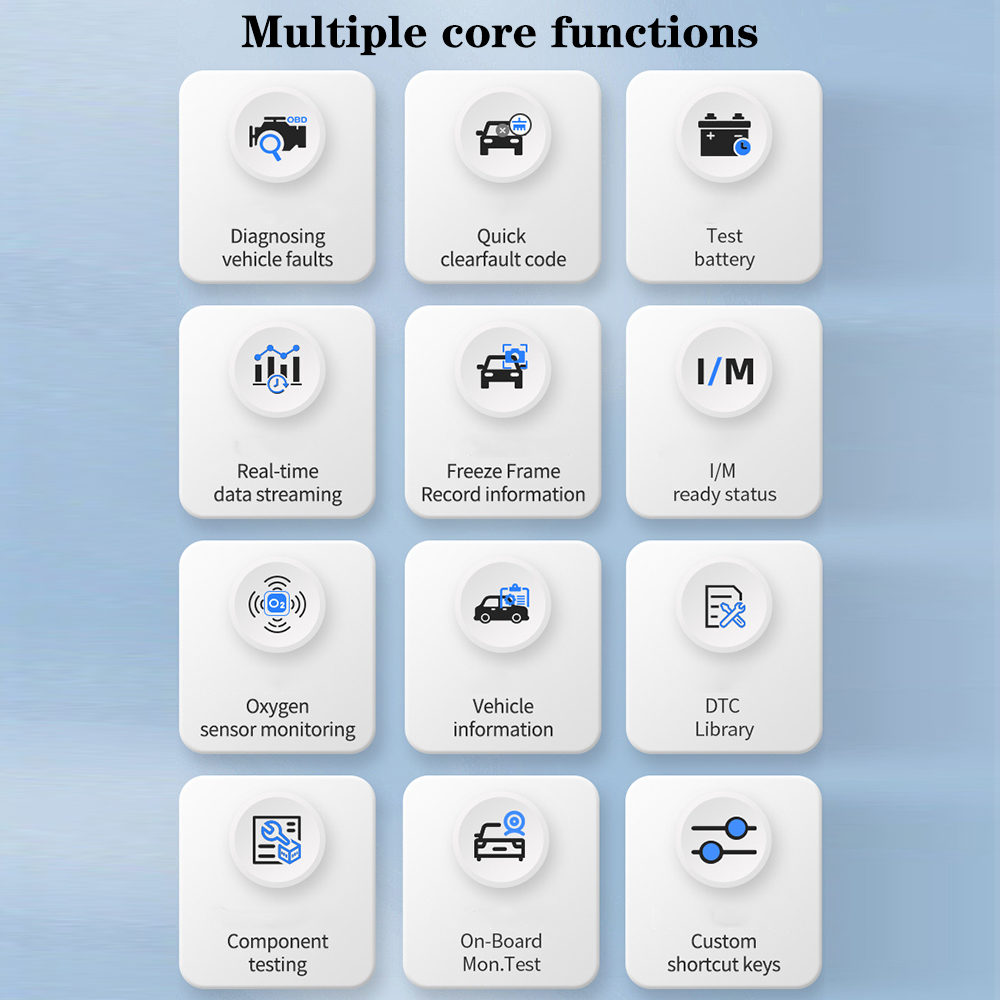
2. Key Features
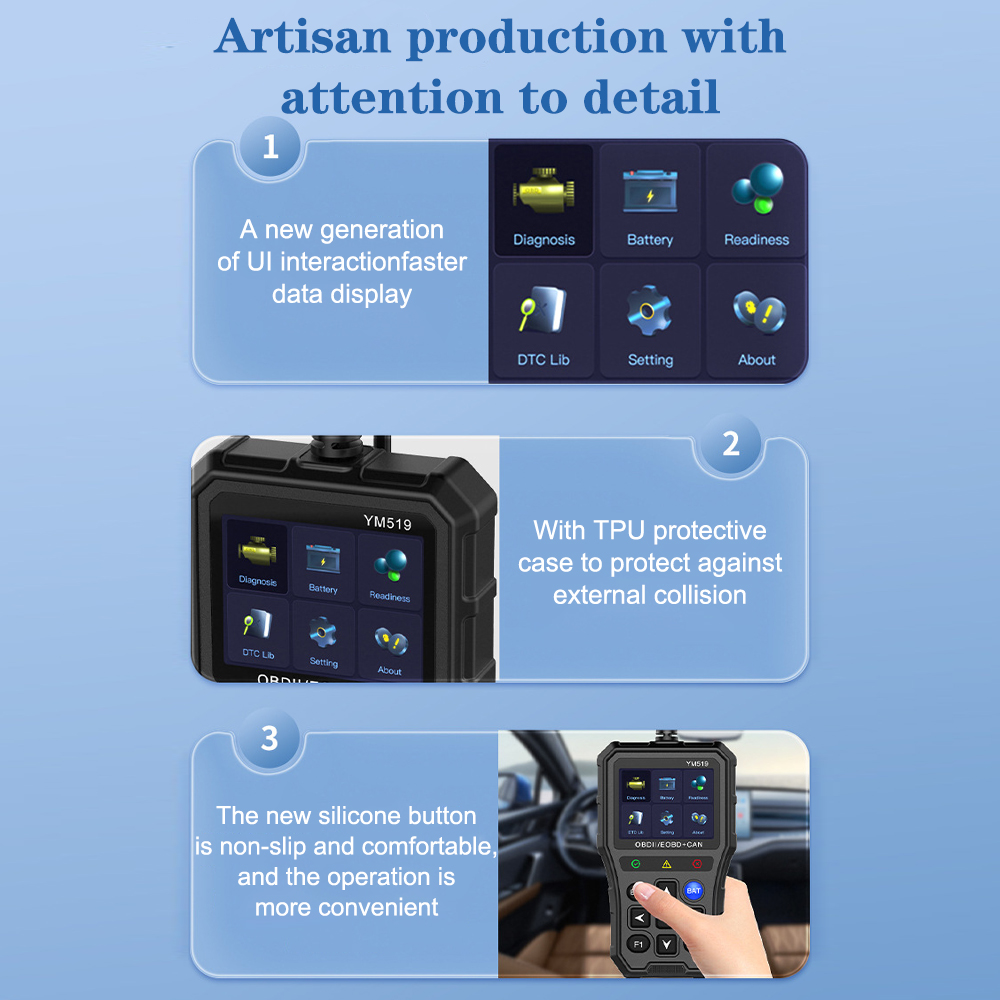
- Advanced User Interface: Features a new generation UI with picture overlay, changeable themes, and GPU Turbo for faster response and data display.
- Durable Design: Equipped with a TPU protective case for enhanced durability and protection against external collision.
- Ergonomic Buttons: New silicone buttons provide a non-slip, comfortable, and convenient operation.
- Clear Indicators: Three high-brightness indicator lights for quick status checks.
- Multi-language Support: Built-in support for 13 languages including Chinese, English, Korean, Japanese, Russian, Polish, Portuguese, Finnish, Italian, French, Spanish, Dutch, and German.
- Comprehensive Diagnostic Modes: Supports all 10 OBDII diagnostic modes.
- Live Data Stream: View real-time sensor data and graphical representations.
- Battery Test Function: Includes vehicle battery voltage reading, monitoring, and life assessment.
- Extensive DTC Library: Built-in library with 35,901 DTCs for quick reference.

3. Specifications
3.1 General Specifications
- Item Type: Code Readers & Scan Tools
- Certification: CE
- Origin: Mainland China
- High-concerned chemical: None
- Screen: 2.8-inch color screen
3.2 Diagnostic Functions
- Support OBDII/EOBD nine standard protocols to read car engine fault codes
- Clear the engine fault code
- Freeze frame of automobile fault
- I/M readiness status
- Vehicle information
- Automobile real-time data flow
- Real-time curve of automobile data
- Mode 6 test (component system test)
- Oxygen sensor test
- Parts test
- Fault code query
- Vehicle battery voltage reading
- Vehicle battery voltage monitoring
- Vehicle battery life assessment (exclusive feature)
3.3 Supported Protocols
- SAE J1850 PWM (41.6Kbaud)
- SAE J1850 VPW (10.4Kbaud)
- ISO9141-2 (5 baud init, 10.4Kbaud)
- ISO14230-4 KWP (5 baud init, 10.4 Kbaud)
- ISO14230-4 KWP (fast init, 10.4 Kbaud)
- ISO15765-4 CAN (11bit ID, 500 Kbaud)
- ISO15765-4 CAN (29bit ID, 500 Kbaud)
- ISO15765-4 CAN (11bit ID, 250 Kbaud)
- ISO15765-4 CAN (29bit ID, 251 Kbaud)
3.4 Dimensions
- Length: 14.50 cm (5.70 inch)
- Width: 8.50 cm (3.34 inch)
- Thickness: 2.10 cm (0.82 inch)
4. Package Contents
Upon opening your YM519 Fault Code Scanner package, please ensure all items listed below are present and in good condition:
- 1 x YM519 OBD2 Scanner
- 1 x English User Manual
5. Setup and Connection
Follow these steps to connect your YM519 Fault Code Scanner to your vehicle:
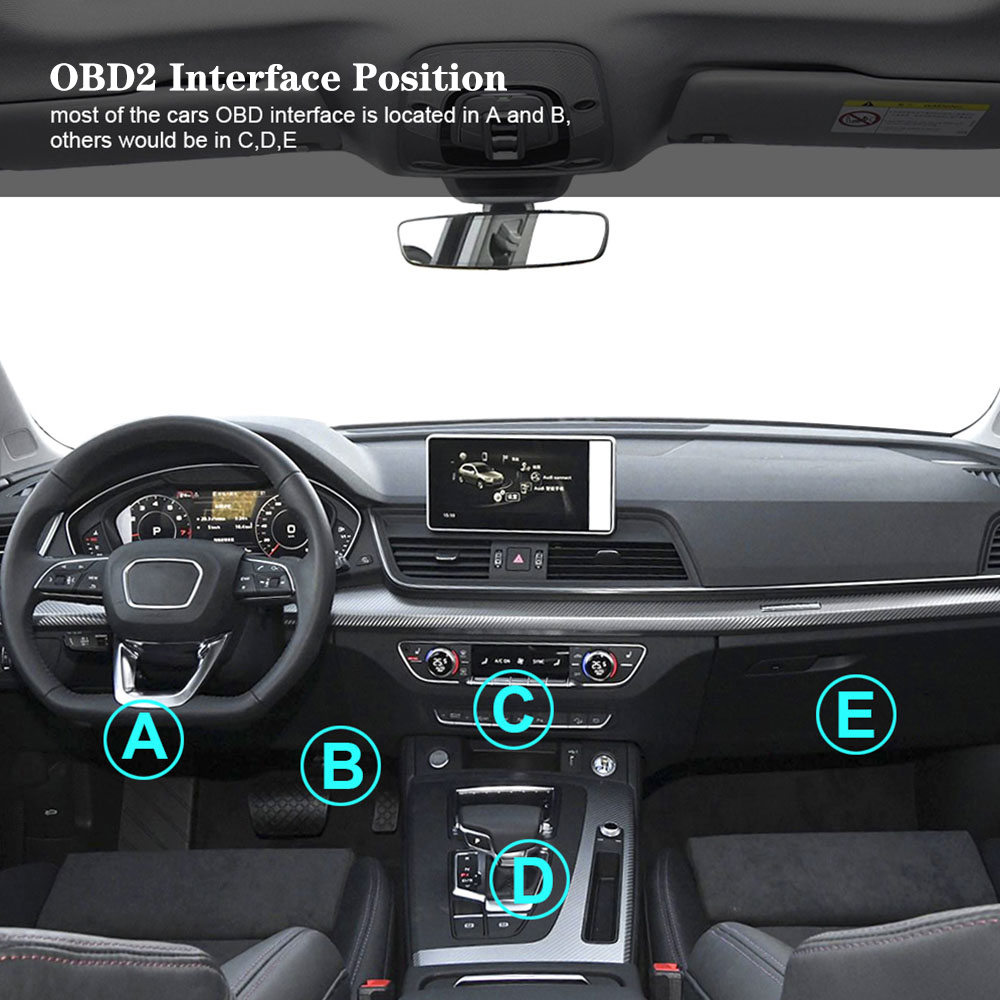
- Locate the OBD2 Port: The OBD2 (On-Board Diagnostics II) port is typically located under the dashboard on the driver's side, often near the steering column (positions A or B). In some vehicles, it might be found in the center console or glove compartment (positions C, D, or E).
- Ensure Vehicle is Off: Make sure the vehicle's ignition is turned off before connecting the scanner.
- Connect the Scanner: Plug the YM519 scanner's OBD2 connector firmly into your vehicle's OBD2 port.
- Power On Vehicle: Turn the vehicle's ignition to the "ON" position (do not start the engine). The scanner should power on automatically. If it does not, check the connection and your vehicle's battery.
6. Operating Instructions
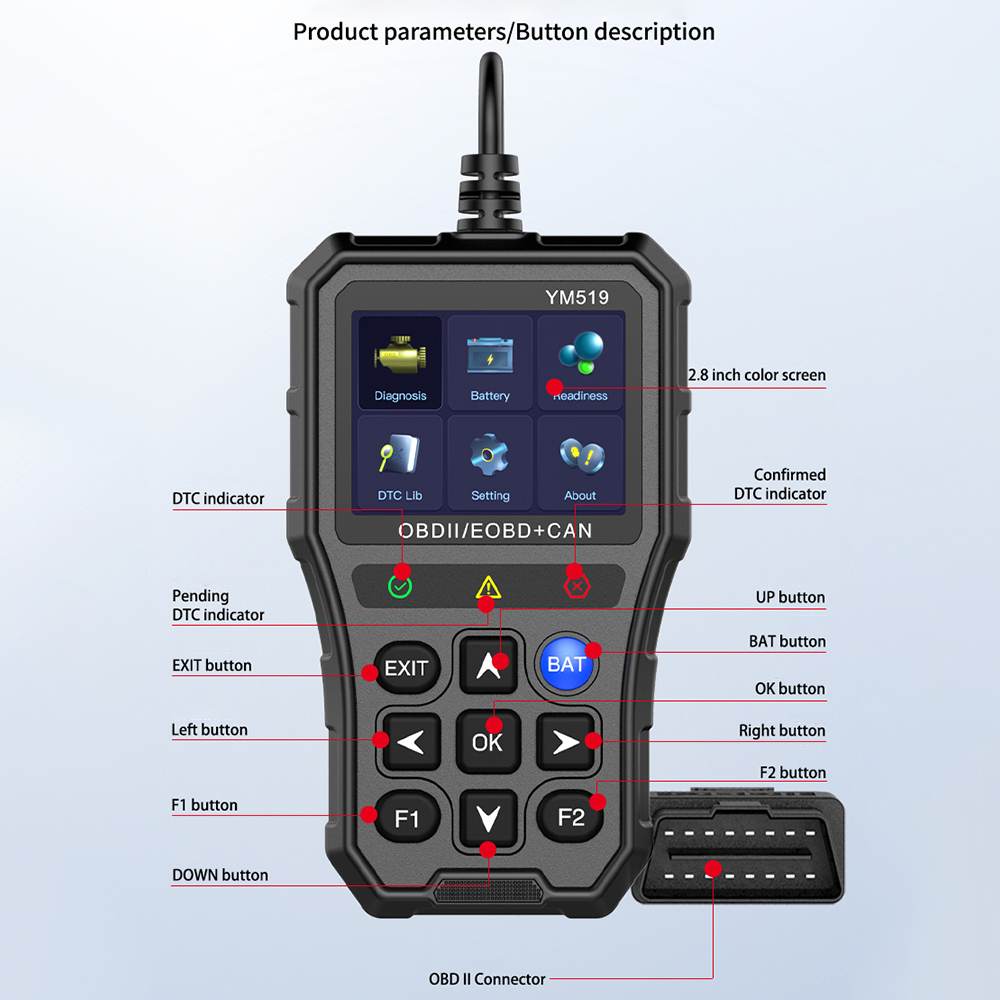
6.1 Device Layout and Buttons
Familiarize yourself with the scanner's layout and button functions:
- 2.8 inch color screen: Displays diagnostic information.
- DTC indicator (Green): Indicates no pending DTCs.
- Pending DTC indicator (Yellow): Indicates pending DTCs.
- Confirmed DTC indicator (Red): Indicates confirmed DTCs.
- EXIT button: Returns to the previous menu or exits a function.
- UP/DOWN buttons: Navigate through menu options.
- LEFT/RIGHT buttons: Navigate horizontally or adjust settings.
- OK button: Confirms a selection or action.
- BAT button: Shortcut for battery test functions.
- F1/F2 buttons: Function keys, context-sensitive based on the current screen.
- OBD II Connector: Connects to the vehicle's OBD2 port.
6.2 Basic Navigation
Use the UP, DOWN, LEFT, and RIGHT arrow buttons to move through menu options. Press the OK button to select an item. Press the EXIT button to go back to the previous screen or menu.
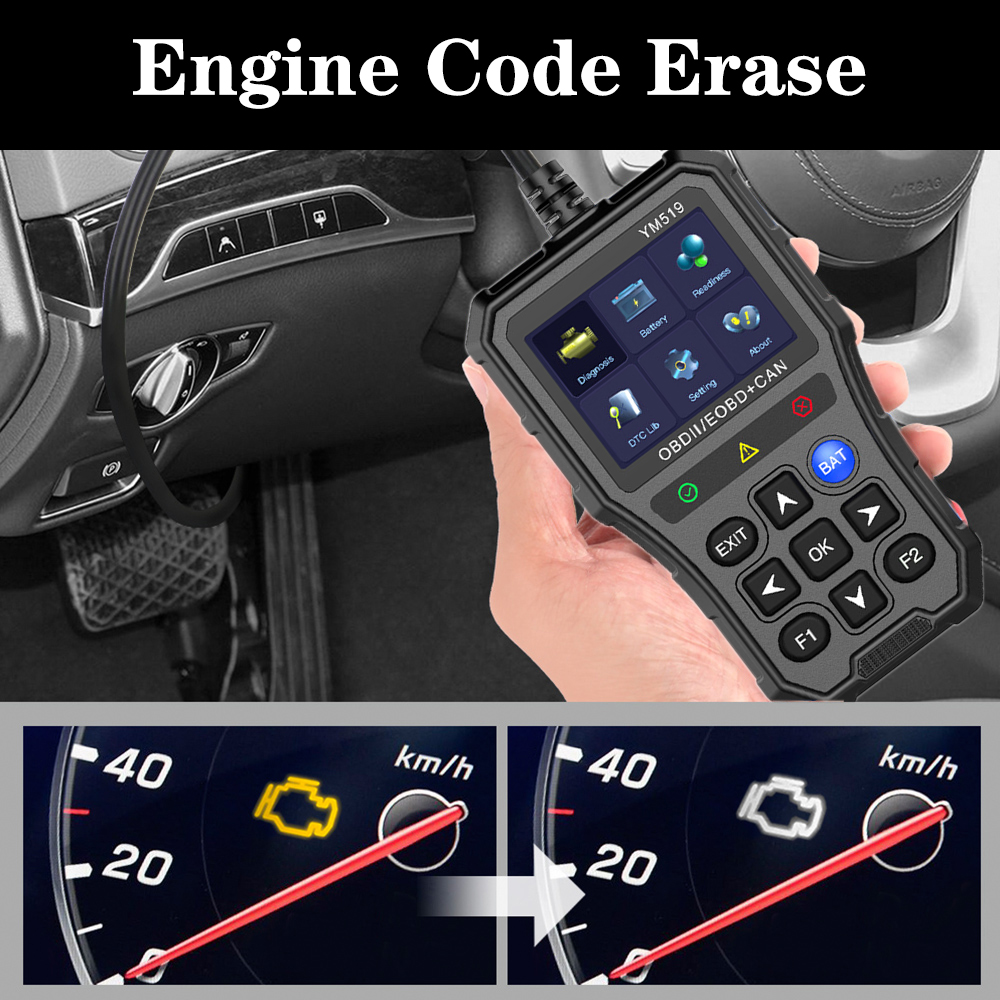
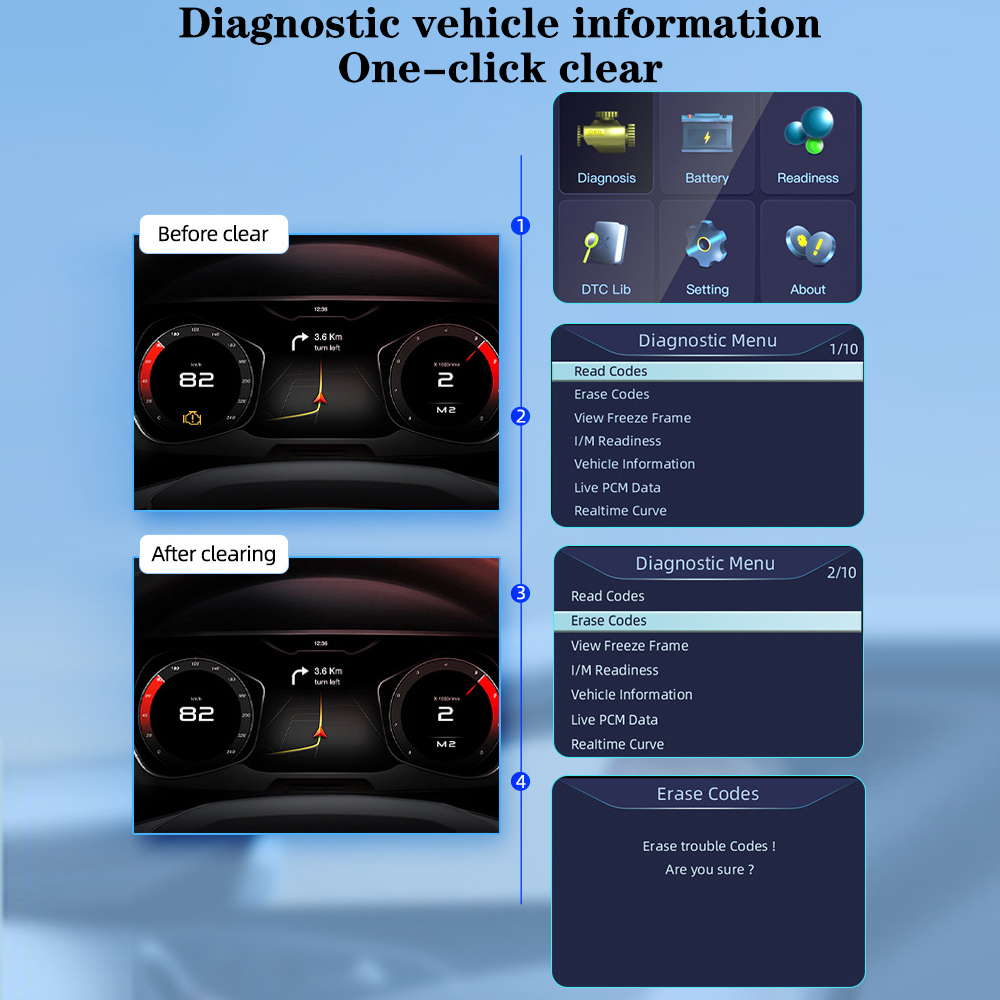
6.3 Reading and Clearing Fault Codes
- From the main menu, select "Diagnosis".
- To view Diagnostic Trouble Codes (DTCs), select "Read Codes". The scanner will display any current, pending, or permanent codes.
- To clear codes, select "Erase Codes" from the Diagnostic Menu.
- A confirmation prompt will appear. Select "Yes" to proceed.
- Important: Clearing codes will turn off the Check Engine Light but will not fix the underlying issue. Ensure any necessary repairs are made before clearing codes to prevent them from reappearing.

6.4 Battery Test
The YM519 scanner can perform various battery-related tests:
- From the main menu, select "Battery" or press the BAT button.
- Follow the on-screen prompts to perform functions such as voltage reading, real-time voltage monitoring, and battery life assessment.
6.5 I/M Readiness
This function checks if the vehicle's emission-related systems are operating correctly and are ready for an inspection or emissions test.
- From the main menu, select "Readiness" or "I/M Readiness".
- The scanner will display the status of various monitors (e.g., O2 Sensor Monitor, Catalyst Monitor).
6.6 Live Data Stream
View real-time operational parameters from the vehicle's sensors.
- From the Diagnostic Menu, select "Live PCM Data" to view numerical data.
- Select "Realtime Curve" to view sensor data graphically.
6.7 Vehicle Information
Retrieve important vehicle identification information.
- From the Diagnostic Menu, select "Vehicle Information".
- The scanner will display information such as Vehicle Identification Number (VIN), Calibration ID (CALID), and Calibration Verification Number (CVN).
6.8 DTC Library
Look up definitions for Diagnostic Trouble Codes.
- From the main menu, select "DTC Lib".
- Enter the DTC code to view its definition and potential causes.
7. Maintenance
- Cleaning: Use a soft, dry cloth to clean the scanner's screen and body. Avoid using abrasive cleaners or solvents.
- Storage: Store the device in a cool, dry place, away from direct sunlight and extreme temperatures. It is recommended to store it in its protective TPU case when not in use.
- Handling: Avoid dropping the device or subjecting it to strong impacts.
- Disassembly: Do not attempt to disassemble the scanner. Any repairs should be performed by qualified personnel.
8. Troubleshooting
8.1 Device Not Powering On
- Ensure the OBD2 connector is securely plugged into the vehicle's port.
- Verify that the vehicle's ignition is in the "ON" position (engine off).
- Check the vehicle's battery to ensure it has sufficient power.
8.2 Communication Error
- Confirm that your vehicle is OBD2 compliant (most vehicles manufactured after 1996 in the US, 2001 in the EU for gasoline, and 2004 for diesel).
- Check the connection between the scanner and the vehicle's OBD2 port.
- Try connecting the scanner to another OBD2-compliant vehicle to rule out a scanner issue.
8.3 Diagnostic Trouble Codes (DTCs) Won't Clear
- If the underlying issue causing the DTCs has not been resolved, the codes may reappear immediately or after a driving cycle. Address the root cause of the fault first.
- Some codes may require specific driving conditions or multiple driving cycles to clear.
8.4 Screen Issues or Freezing
- Check for any physical damage to the screen.
- Try restarting the device by disconnecting it from the vehicle and reconnecting.
- If the issue persists, contact customer support.
9. User Tips
- Always consult your vehicle's service manual for specific diagnostic procedures and code definitions relevant to your car model.
- Ensure the vehicle's battery is adequately charged before performing extensive diagnostic tests to avoid interruptions.
- When clearing codes, remember that this only resets the warning light; it does not fix the problem. Always diagnose and repair the underlying issue.
- Keep the scanner's software updated (if updates are available) to ensure compatibility with the latest vehicle models and diagnostic protocols.
10. Warranty and Support
For any questions, technical assistance, or warranty claims regarding your YM519 Fault Code Scanner, please contact the seller or manufacturer directly. Please refer to your purchase documentation for specific warranty terms and contact information.