
1. Introduction
This manual provides detailed instructions for the installation, operation, maintenance, and troubleshooting of your MakeSkyBlue 60A MPPT Solar Charge Controller. This intelligent device is designed to optimize power harvesting from your solar panels and efficiently charge various battery types in 12V, 24V, or 48V solar systems.

2. Key Features
- 100% MPPT (Maximum Power Point Tracking) technology for optimal solar energy harvesting.
- Built-in DSP controller for high performance.
- Automatic battery voltage detection for 12V, 24V, and 48V systems.
- Three-stage charging process (Constant Current, Constant Voltage, Floating Charge) to optimize battery performance and lifespan.
- Multi-function LCD for real-time monitoring and settings.
- Comprehensive protection features: Output limited current, Overcharge, Over-temperature, PV Reverse Polarity, PV Over-voltage, Battery Overcharge Current, Battery Overcharge Voltage, and Battery Low Voltage.
- Easy wall-mounted installation.
- Designed for parallel operation without additional devices, with no quantity limit.
- Compatible with various battery types: Sealed Lead Acid, Vented, Gel, AGM, Lithium, and NiCd batteries.

3. Package Contents
Upon opening the package, please verify that all items are present and undamaged:
- One (1) MakeSkyBlue MPPT Solar Charge Controller (Model: 60A-V123)
- One (1) Set of mounting brackets and screws
- One (1) User Manual

4. Setup and Installation
The MakeSkyBlue MPPT Solar Charge Controller is designed for easy wall mounting. Ensure the installation location is well-ventilated and protected from direct sunlight, moisture, and extreme temperatures. Allow sufficient clearance around the unit for proper air circulation and cooling.
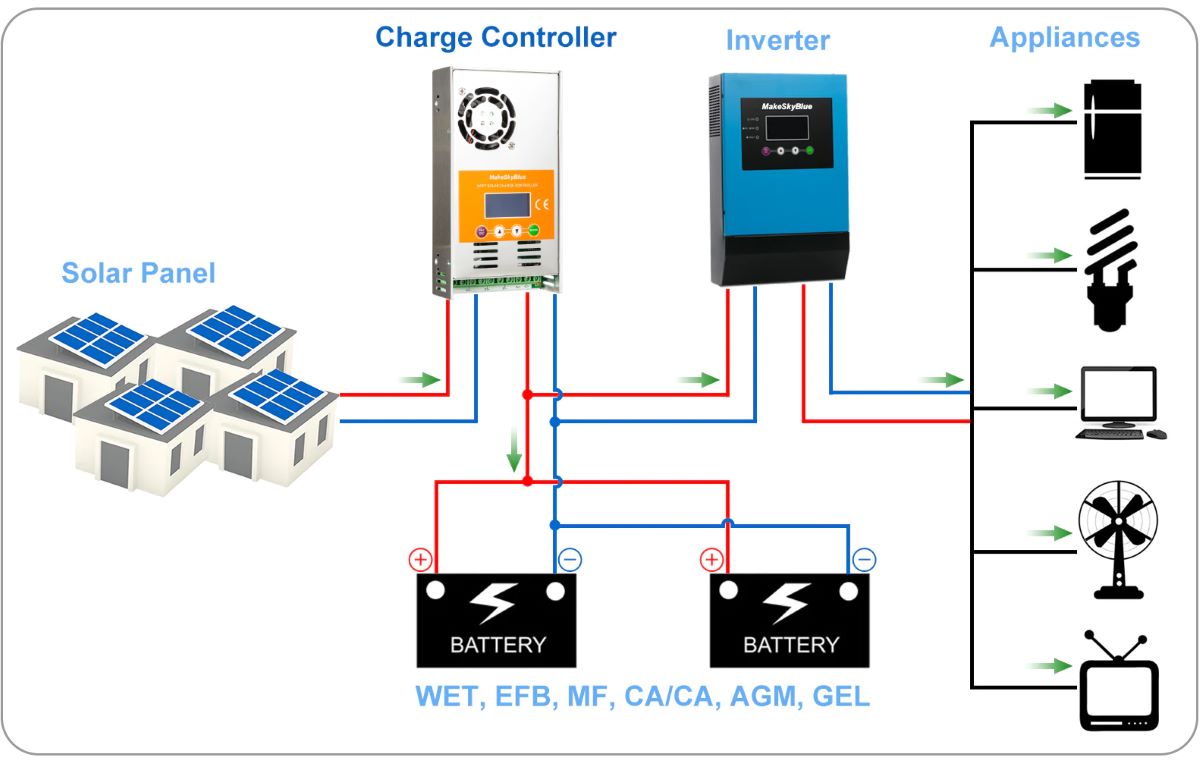
4.1 Wiring Diagram
Proper wiring is crucial for the safe and efficient operation of your solar system. Refer to the diagram below for correct connections between the solar panel array, the charge controller, the battery bank, and the inverter/appliances.
4.2 Connection Steps
- Connect the Battery: First, connect the battery to the charge controller. The controller will automatically detect the battery voltage (12V/24V/48V). Ensure correct polarity.
- Connect the Solar Panels: Next, connect the solar panel array to the charge controller. Ensure the PV array's open circuit voltage (Voc) is within the specified range for your battery system (see Specifications).
- Connect the Load (Optional): If your system includes a DC load directly connected to the controller, connect it last.
Important: Always connect the battery first and disconnect the battery last to prevent damage to the controller.
5. Operation
5.1 Automatic System Voltage Recognition
The controller automatically recognizes 12V, 24V, or 48V battery systems. The automatic select voltage ranges are:
- 12V system: DC9V-DC15V
- 24V system: DC18V-DC29V
- 48V system: DC40V-DC60V
5.2 Charging Mode
The controller employs a 3-stage charging process to optimize battery health:
- Constant Current (MPPT): The controller operates at the maximum power point of the solar array to deliver the highest possible current to the battery.
- Constant Voltage (Absorption Voltage): Once the battery reaches a certain voltage, the controller maintains a constant voltage while the current gradually decreases.
- Floating Charge: After the battery is fully charged, the controller reduces the voltage to a lower 'float' level to maintain the battery at full capacity and prevent self-discharge.
5.3 Selectable Battery Types
The controller supports various battery types, including Vented, Sealed, Gel, AGM, Lithium, and NiCd batteries. Specific voltage settings for Absorption and Floating Charge may need to be configured by the user depending on the battery type. Refer to the manual for detailed instructions on setting these voltages.

5.4 LCD Display
The multi-function LCD provides real-time information about your solar system's performance. Refer to the full manual for detailed explanations of all LCD indicators and navigation.
6. Maintenance
To ensure optimal performance and longevity of your MakeSkyBlue MPPT Solar Charge Controller, regular maintenance is recommended:
- Visual Inspection: Periodically check all wiring connections for tightness and signs of corrosion. Ensure no dust or debris has accumulated on the controller's vents.
- Cleaning: Keep the controller clean and free from dust. Use a dry, soft cloth for cleaning. Do not use liquid cleaners.
- Ventilation: Ensure the area around the controller remains clear to allow for proper forced air cooling. The fan will activate when the internal temperature exceeds 45°C (113°F) and turn off below 40°C (104°F).
- Environmental Conditions: The controller is designed for indoor use. Ensure it operates within the specified environmental conditions (Operating Temperature: -20℃ to +55℃ / -4℉ to +131℉; Storage Temperature: -40℃ to +75℃ / -40℉ to +167℉).
7. Troubleshooting and Protection Functions
The controller is equipped with several protection functions to safeguard itself and your solar system:
- Temperature Protection: The controller will limit output or shut down if its internal temperature reaches 75°C (167°F).
- PV Reverse Polarity Protection: Protects against incorrect connection of solar panel polarity (effective when Voc < 100V only).
- PV Over-voltage Protection: Protects against excessive voltage from solar panels. Warning: If PV Voc > 180V, the controller will be permanently damaged.
- Battery Overcharge Current Protection: Prevents excessive current from flowing into the battery.
- Battery Overcharge Voltage Protection: Prevents the battery from being charged beyond its safe voltage limit (e.g., 15V for 12V system, 30V for 24V system, 60V for 48V system).
- Battery Low Voltage Protection: Disconnects the load to prevent deep discharge of the battery.

7.1 Common Issues & User Tips
- LiFePO4 Battery Compatibility: Yes, the controller works excellently with LiFePO4 batteries. Ensure correct voltage settings are configured for optimal charging.
- Optimal PV Voc: For best efficiency, ensure the open circuit voltage (Voc) of your PV array is 1.5 to 2 times the battery voltage.
- Smart Device Connectivity: The device is indicated as a 'Smart Device'. For specific Wi-Fi or other smart access features, refer to the full manual or manufacturer's support.
8. Specifications
| Feature | Specification |
|---|---|
| Model No. | 60A-V123 |
| Charging Technology | MPPT / Maximum power point tracking |
| Charging Mode | 3-stage: Constant current (MPPT), Constant voltage (Absorption voltage), Floating charge |
| System Type | DC12V/24V/48V Recognition automatically |
| Automatic Select Voltage Range | 12V system (DC9V-DC15V), 24V system (DC18V-DC29V), 48V system (DC40V~DC60V) |
| Soft Start Time | ≤1S |
| Dynamic Response and Recovery Time | 100us |
| Max Efficiency | ≥98.2% |
| PV Utilization | ≥99% |
| Self Consumption | ≤1.2W |
| Voc Range of PV | 12V system (DC20V~DC80V), 24V system (DC37V~DC105V), 48V system (DC72V~DC160V) |
| Maximum PV Module Open Circuit Voltage | For 12V battery: 80V, For 24V battery: 105V, For 48V battery: 160V |
| The Maximum Nominal PV power | 12V system (720W), 24V system (1440W), 48V system (2800W) |
| Selectable Battery Type | Vented/ Sealed / Gel / NiCd battery (Defined voltage by user) |
| Overcharging Protection Voltage | 12V system (15V), 24V system (30V), 48V system (60V) |
| Rated Output Current | 60A |
| Output Voltage Ripple-peak | 100mV |
| Output Voltage Accuracy | ≤±1% |
| Temperature Protection | 75 °C / 167℉ |
| Fan-on Temperature | >45 °C / 113℉ |
| Fan-off Temperature | <40 °C / 104℉ |
| Acoustic Noise | ≤40dB |
| Cooling Way | Forced air cooling |
| Components | Industrial grade |
| Size (cm/in) | 21.5*11.5*5 cm / 8.46*4.52*1.96 in |
| Net Weight (Kg/lb) | 1.3kg / 2.86lb |
| Gross Weight (Kg/lb) | 1.4kg / 3.08lb |
| Safety Certification | EN 62109-1, EN 60730-1, EN IEC 61000-6-3, EN IEC 61000-6-1 |
| Protection Category | IP21 |
| Environmental Condition | Indoor |
| Operating Temperature | -20℃ ~ +55℃ / -4℉ ~ +131℉ |
| Storage Temperature | -40℃ ~ +75℃ / -40℉ ~ +167℉ |

9. Warranty and Support
For warranty information, technical support, or service inquiries, please refer to the documentation included with your product or contact MakeSkyBlue Official Store directly. Keep your purchase receipt as proof of purchase.