1. Introduction
Thank you for choosing the VEVOR 2-in-1 Cordless Pole Saw & Mini Chainsaw. This versatile tool is designed for both high-reach branch trimming and close-range wood cutting, offering convenience and efficiency for your gardening and landscaping needs. Please read this manual thoroughly before operation to ensure safe and effective use of the product.

2. General Safety Instructions
Always follow basic safety precautions to reduce the risk of fire, electric shock, and serious personal injury. Keep this manual for future reference.
2.1 Personal Safety
- Always wear appropriate personal protective equipment (PPE) including safety glasses, gloves, hearing protection, and sturdy footwear.
- Do not operate the tool when tired, under the influence of drugs, alcohol, or medication.
- Keep children and bystanders away while operating the tool.
- Dress properly. Do not wear loose clothing or jewelry. Keep hair, clothing, and gloves away from moving parts.
2.2 Work Area Safety
- Keep the work area clean and well-lit. Cluttered or dark areas invite accidents.
- Do not operate power tools in explosive atmospheres, such as in the presence of flammable liquids, gases, or dust.
- Ensure a stable footing, especially when using the pole saw extension.
2.3 Tool Use and Care
- Do not force the tool. Use the correct tool for your application.
- Disconnect the battery pack from the tool before making any adjustments, changing accessories, or storing power tools.
- Store idle tools out of the reach of children and do not allow persons unfamiliar with the power tool or these instructions to operate the power tool.
- Maintain power tools. Check for misalignment or binding of moving parts, breakage of parts, and any other condition that may affect the power tool’s operation.
- Keep cutting tools sharp and clean. Properly maintained cutting tools with sharp cutting edges are less likely to bind and are easier to control.
3. Package Contents
Carefully unpack all items and ensure you have received the following:
- Cordless Chainsaw Unit (Mini Chainsaw)
- Extension Pole(s)
- 20V Battery (2Ah or 4Ah, depending on model)
- Battery Charger
- Chain
- Guide Bar
- Oil Bottle (for lubrication)
- Safety Goggles
- Chain Tensioning Tool
If any items are missing or damaged, please contact customer support.
4. Product Overview
The VEVOR 2-in-1 Cordless Pole Saw & Mini Chainsaw features a detachable design, allowing it to function as a compact mini chainsaw or an extended pole saw. Key components include:
- Chainsaw Head: Contains the motor, guide bar, and chain.
- Handle: Ergonomic grip with trigger and safety lock.
- Battery Compartment: Houses the 20V battery.
- Extension Pole: Connects to the chainsaw head for extended reach.
- Tension Lock: Mechanism to prevent chain slippage and ensure proper tension.
- Automatic Lubrication System: Dispenses oil to the chain during operation.
- Double Locking Mechanism: Enhances safety during use.

5. Setup
5.1 Battery Charging
- Insert the 20V battery into the charger.
- Plug the charger into a standard power outlet.
- Allow the battery to charge fully before first use. The charger indicator light will typically change color when charging is complete.
5.2 Chain and Guide Bar Installation (if not pre-assembled)
- Ensure the battery is removed from the chainsaw unit.
- Remove the chain cover.
- Place the chain around the guide bar, ensuring the cutting edges are facing the correct direction.
- Fit the guide bar and chain onto the chainsaw unit, aligning the chain with the sprocket.
- Replace the chain cover and secure it.
5.3 Lubrication System Setup
The tool features an automatic lubrication system to reduce friction and extend lifespan.
- Locate the oil reservoir cap on the chainsaw unit.
- Unscrew the cap and fill the reservoir with appropriate chain lubricant (not included).
- Replace the cap securely.
- Before initial use and periodically during operation, press the lubrication button 3-4 times to ensure the chain is adequately oiled.

5.4 Chain Tension Adjustment
Proper chain tension is crucial for safe and efficient operation. The tool includes a built-in tension lock to prevent chain slippage.
- Ensure the battery is removed.
- Use the provided tensioning tool to adjust the chain tension. The chain should be snug against the guide bar but still able to be pulled freely by hand.
- Refer to the diagram on the tool for visual guidance on tensioning.

6. Operating Instructions
6.1 General Operation
- Insert a fully charged battery into the chainsaw unit until it clicks into place.
- To start the tool, press the safety lock button and then squeeze the trigger. Release the safety lock once the tool is running.
- To stop the tool, release the trigger.
6.2 Using as a Mini Chainsaw
For cutting wood and trimming low bushes, use the chainsaw unit without the extension pole.
- Hold the chainsaw firmly with both hands.
- Ensure a stable stance.
- Allow the chain to reach full speed before engaging the material.
- Cut with a smooth, controlled motion.
6.3 Using as a Cordless Pole Saw
For trimming high branches, attach the extension pole.
- Ensure the battery is removed.
- Connect the extension pole(s) to the chainsaw unit and secure them firmly.
- Insert the battery.
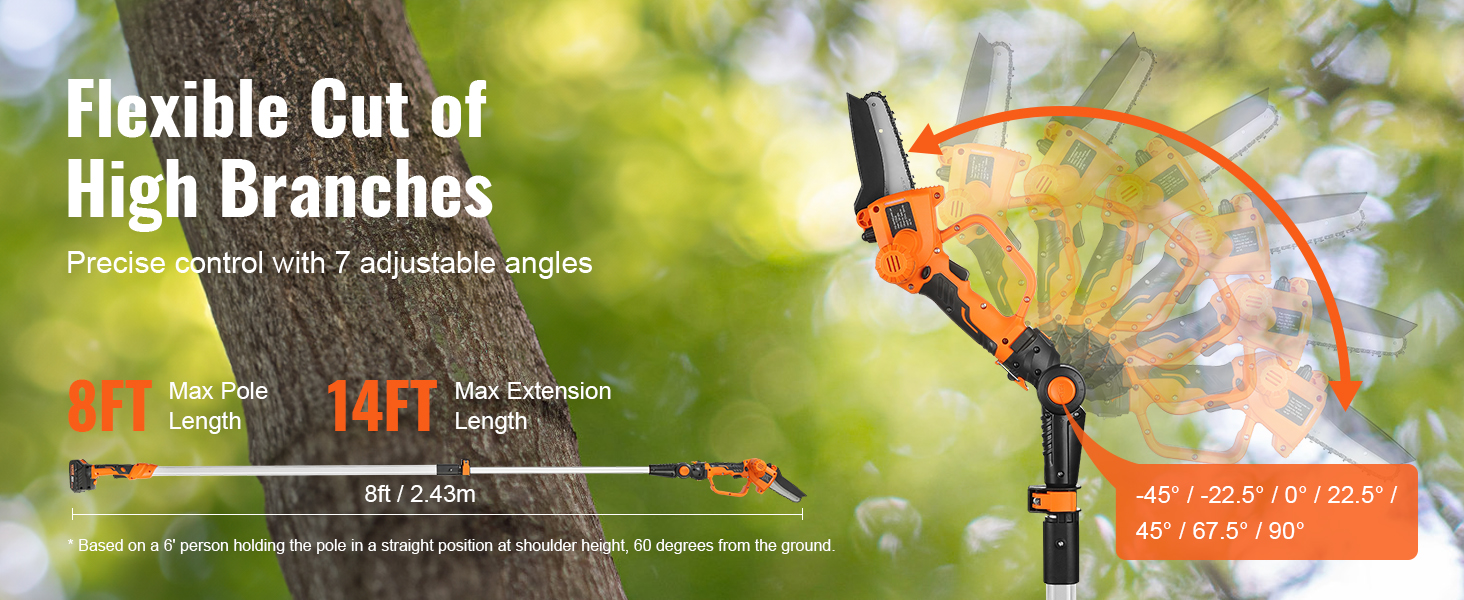
- Adjust the saw head to one of the 7 available angles (-45°, -22.5°, 0°, 22.5°, 45°, 67.5°, 90°) to suit the branch you are cutting.
- Maintain a safe distance from the cutting area. The pole saw can reach up to 14 feet (based on a 6' person holding the pole at shoulder height, 60 degrees from the ground).
- Start the saw and allow the chain to reach full speed before making contact with the branch.
- Use a controlled, steady motion to cut through the branch. Avoid twisting or forcing the saw.

7. Maintenance
7.1 Cleaning
- Always remove the battery before cleaning.
- Clean the tool after each use. Remove sawdust, debris, and sap from the guide bar, chain, and motor housing.
- Use a soft brush or compressed air. Do not use water or harsh chemicals.
7.2 Lubrication
- Regularly check the oil level in the reservoir. Refill as needed.
- Ensure the automatic lubrication system is functioning by pressing the button periodically during operation.
7.3 Chain Care
- Inspect the chain for sharpness and damage before each use.
- A dull chain will cut slowly and can cause kickback. Sharpen or replace the chain as necessary.
- Ensure the chain tension is correct. Adjust using the tensioning tool if the chain is too loose or too tight.
7.4 Battery Care
- Store batteries in a cool, dry place away from direct sunlight and extreme temperatures.
- Do not store batteries in a discharged state. Charge them fully before storage.
- Do not expose batteries to water or moisture.
8. Troubleshooting
| Problem | Possible Cause | Solution |
|---|---|---|
| Saw does not start | Battery not charged or improperly inserted Safety lock not engaged/released Tool malfunction | Ensure battery is fully charged and correctly inserted. Press safety lock button before squeezing trigger. Contact customer support. |
| Chain not cutting efficiently | Dull chain Incorrect chain tension Insufficient lubrication | Sharpen or replace chain. Adjust chain tension as per instructions. Check oil reservoir and press lubrication button. |
| Chain slips or comes off | Loose chain tension Worn chain or guide bar | Adjust chain tension immediately. Inspect chain and guide bar for wear and replace if necessary. |
| Tool overheats | Overuse or forcing the tool Blocked ventilation slots | Allow the tool to cool down. Do not force cuts. Clean ventilation slots to ensure proper airflow. |
9. Specifications
| Feature | Specification |
|---|---|
| Model Number | ET2008 |
| Cutting Thickness | 5 inches |
| Weight | 5.5 lbs / 2.5 kg |
| Product Length (Pole Saw) | 3.5-8 ft / 1.08-2.43 m (Max extension 14 ft with user) |
| Motor Voltage | 18VDC |
| Motor Speed | 22000 RPM |
| No-load Power | 80W |
| Torque | 0.035 N.m |
| Battery Voltage | 20V |
| Battery Capacity | 2Ah / 4Ah (depending on model) |
| Cutting Speed | Up to 19 ft/s |
| Certification | CE |
| Power Source (Charger) | AC |
| Application | Wood Saw, Branch Trimming |

10. User Tips
- Spare Battery: For extended work sessions, consider having a second fully charged battery on hand to avoid interruptions.
- Battery Compatibility: The VEVOR 20V battery pack is often compatible with other VEVOR outdoor tools, offering convenience if you own multiple VEVOR products.
- Chain Maintenance: Regularly check and adjust chain tension, especially after the first few cuts, as new chains can stretch slightly.
- Lubrication Check: Always ensure the oil reservoir is filled and the automatic lubrication system is working before and during operation to prevent premature wear.
11. Warranty & Support
For warranty information, technical support, or service inquiries, please refer to the warranty card included with your product or visit the official VEVOR website. Keep your purchase receipt as proof of purchase.


