1. Introduction
Thank you for choosing the PaiPaitek PD 520V-1 Dog Training Collar. This device is designed to assist in humane and effective dog training through sound and vibration modes, without the use of static shock. Please read this manual thoroughly before using the product to ensure proper operation and the safety of your pet.
2. Product Overview
2.1 Components

- Remote Transmitter: Handheld device for controlling the collar.
- Receiver Collar: Worn by the dog, receives signals from the remote.
- Adjustable Collar Strap: For securing the receiver to your dog's neck.
- USB Charging Cable: For recharging both the remote and receiver.
2.2 Key Features

- **3 Training Modes**: Beep, Vibration (1-10 levels), Beep + Vibration (1-10 levels).
- **No Shock Design**: Humane training without static shock.
- **Remote Range**: Up to 1600ft (approximately 500 meters) in open areas.
- **Waterproof Receiver**: IP67 standard, suitable for swimming, rain, snow, or mud puddles.
- **Rechargeable Batteries**: Long-lasting battery life for both remote and receiver.
- **Adjustable Sensitivity**: 1-10 adjustable vibration levels.
- **Suitable for All Sized Dogs**: Fits dogs weighing 4-66 lbs with an 8-27 inch neck circumference.
3. Specifications
| Feature | Detail |
|---|---|
| Model Number | PD 520V-1 |
| Brand Name | PaiPaitek |
| Item Type | Training Collars |
| Working Mode | Sound and Vibration (Beep, Vibration, Beep+Vibration) |
| Remote Range | Up To 1600ft (500M) |
| Waterproof Standard | Receiver Collar has IP67 Waterproof Standard |
| Vibration Sensitivity | 1-10 Adjustable Sensitivity Levels |
| Battery Type | Rechargeable Lithium Polymer |
| Charging Time | 2 hours for full charge |
| Battery Life (Receiver) | Up to 20 days |
| Battery Life (Remote) | Up to 180 days |
| Collar Type | Adjustable Black TPU Collar + Blue Nylon (or Orange TPU) |
| Collar Fit | 8-27 inches neck circumference, for dogs 4-66 lbs |
| Product Certification | CE, ROHS, FCC |
4. Setup
4.1 Charging the Device

- Connect the USB charging cable to the charging ports on both the remote transmitter and the receiver collar.
- Plug the USB cable into a power source such as a power bank, wall charger (not included), or a laptop.
- Allow approximately 2 hours for a full charge. The indicator light will change to show charging status.
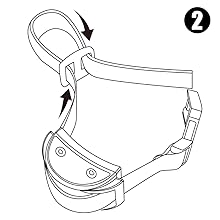
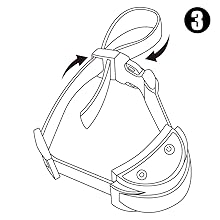
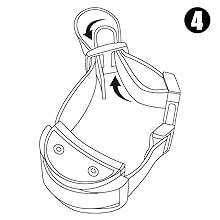
4.2 Attaching the Collar Strap to the Receiver
Follow these steps to properly attach the nylon strap to the receiver:

4.3 Fitting the Collar on Your Dog
- Place the receiver collar around your dog's neck, ensuring the receiver unit is positioned centrally under their chin or on the side of the neck.
- Adjust the strap so it is snug but not too tight. You should be able to fit two fingers comfortably between the strap and your dog's neck.
- Trim any excess strap if necessary, and use the tri-glides buckle to secure it.

5. Operating Instructions
5.1 Turning On/Off
- **Remote**: Press and hold the power button until the screen illuminates.
- **Receiver**: Press and hold the power button on the receiver until the indicator light flashes.
- To turn off, press and hold the power button on each device until the lights/screen turn off.
5.2 Pairing the Remote and Receiver
The devices are usually pre-paired. If re-pairing is needed:
- Ensure both devices are fully charged and turned off.
- Turn on the remote transmitter.
- Press and hold the power button on the receiver collar until the indicator light flashes rapidly.
- Within 10 seconds, press any training mode button (Beep or Vibration) on the remote. The receiver's indicator light will stop flashing and remain solid, indicating successful pairing.
5.3 Training Modes

- **Beep Mode**: Press the 'Sound' button on the remote. The receiver will emit an audible beep. This is often used as a warning or for positive reinforcement.
- **Vibration Mode**: Press the 'Vibration' button on the remote. The intensity can be adjusted from 1 to 10 levels using the '+' and '-' buttons on the remote.
- **Beep + Vibration Mode**: Press the 'Sound and Vibration' button. The receiver will emit a beep followed by vibration. The vibration intensity is also adjustable from 1 to 10 levels.
Always start with the lowest vibration level and increase gradually to find the appropriate level for your dog's sensitivity.
6. Maintenance
- **Cleaning**: Wipe the remote and receiver with a soft, damp cloth. Do not use harsh chemicals or abrasive cleaners.
- **Water Exposure**: While the receiver is IP67 waterproof, it is recommended to dry it thoroughly after exposure to water to prevent long-term damage.
- **Storage**: Store the device in a cool, dry place when not in use.
- **Battery Care**: Recharge the batteries regularly, even if not used frequently, to maintain battery health.
- **Collar Fit**: Regularly check the fit of the collar to ensure it is not too tight or causing irritation.
7. Important Safety Information
- This product is intended for dog training purposes only. It is not a toy and should not be used by children.
- Do not allow your dog to chew on the device, as it contains plastic and electronic components that could be harmful if ingested.
- Avoid leaving the collar on your dog for extended periods (more than 8-10 hours a day). Allow your dog to rest for 3-5 hours daily without the collar to prevent skin irritation.
- Always supervise your dog when using the training collar.
- Dog training is a gradual process. Do not discontinue use too early for consistent results.
8. Troubleshooting
| Problem | Possible Cause / Solution |
|---|---|
| Collar not responding to remote. |
|
| Vibration is too weak/strong. | Adjust the vibration sensitivity levels (1-10) using the '+' and '-' buttons on the remote. |
| Receiver indicator light not working. | Ensure the receiver is turned on and has sufficient battery charge. If the issue persists, contact support. |
| Can the responder be turned off? | Yes, the receiver collar can be turned off by pressing and holding its power button until the indicator light turns off. |
9. User Tips
- **Positive Reinforcement**: Combine the collar's signals with positive reinforcement (treats, praise) for more effective training.
- **Consistency is Key**: Use the collar consistently during training sessions to help your dog understand commands.
- **Start Low**: Always begin with the lowest vibration setting and only increase if your dog does not respond. The goal is to get their attention, not to cause discomfort.
- **Short Sessions**: Keep training sessions short and positive to maintain your dog's engagement.
- **Monitor Skin**: Regularly check your dog's neck for any signs of irritation or redness from the collar.
10. Certifications
The PaiPaitek PD 520V-1 Dog Training Collar is certified to meet international safety and quality standards.

11. Warranty and Support
For any questions, concerns, or technical support regarding your PaiPaitek PD 520V-1 Dog Training Collar, please contact the seller or manufacturer directly. Keep your purchase receipt for warranty claims.


