1. Introduction
This manual provides essential information for the safe and efficient installation, operation, and maintenance of your VEVOR Wind Turbine Generator. Please read this manual thoroughly before installation and use, and keep it for future reference.
The VEVOR Wind Turbine Generator is designed to convert wind energy into electrical power, suitable for various applications such as marine, RVs, backyard power, and other off-grid home charging needs. It features a robust design, efficient power generation, and low wind speed startup capabilities.
2. Safety Information
WARNING: Improper installation or operation can lead to serious injury or damage to the equipment.
- Always ensure the turbine is securely mounted to prevent falling.
- Do not attempt to install or service the turbine during high winds or stormy weather.
- Keep hands and loose clothing away from rotating blades.
- Ensure all electrical connections are properly insulated and secured to prevent short circuits and electric shock.
- Disconnect power before performing any maintenance or inspection.
- Installation should be performed by qualified personnel or under professional supervision.
- The steel pipe/mounting pole is NOT included. Ensure you use a sturdy and appropriate pole for installation.
3. Package Contents
Please check the package contents upon receipt to ensure all parts are present and undamaged. The typical package includes:
- 1 x Wind Turbine Generator (Main body with tail)
- 1 x MPPT Controller (or Charge Controller, depending on model)
- 1 x Set of Screws and Nuts
- 1 x Instruction Manual
- 3 or 5 x Nylon Blades (depending on model)
- (Optional: 1 x Anemometer for some 400W 5 Blades models)
Note: The steel pipe/mounting pole is NOT included and must be sourced separately.

4. Specifications
The VEVOR Wind Turbine Generator is available in various configurations. Please refer to your specific model for exact specifications. Below are general specifications for common models:
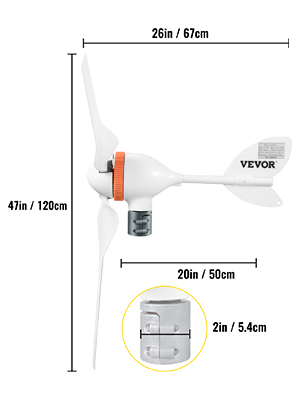
4.1. 500W 5 Blades Model (VV-FLFDJ-S7-5Y500W12VKZQ)
| Feature | Specification |
|---|---|
| Rated Power | 500W |
| Max Power | 500W |
| Rated Voltage | 12V/AC |
| Rated Current | 29A |
| Hoop Diameter | 2in / 54mm |
| Rotor Diameter | 47in / 1.2m |
| Net Weight | 21lb / 9.5kg |
| Blade Numbers | 5 |
| Blade Material | Nylon Fiber |
| Start-up Wind Speed | 6.56ft/s (2m/s) |
| Rated Wind Speed | 42.65ft/s (13m/s) |
| Survival Wind Speed | 164ft/s (50m/s) |
| Rated Speed | 900r/min |
| Working Temperature | -104℉~176℉ (-40℃~80℃) |
| Package Dimension | 27x11.5x7.5in (69x29.5x19.5cm) |
| Generator Type | 3-Phase AC Permanent Magnet |
| Magnetic Material | Neodymium Iron Boron |
| Controller System | Electromagnetic/Yaw |
| Regulating Way | Automatic Adjustment |
| Cabin Material | Die Casting Aluminum with Paint Coated Finish |
| Tail Material | Stainless Steel with Paint Coated Finish |
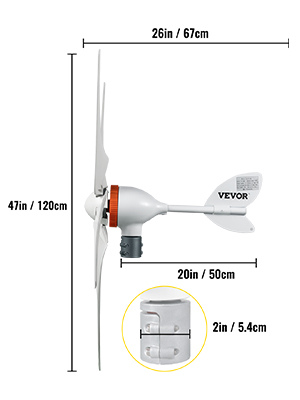
4.2. 400W 5 Blades Model (VV-FLFDJ-S7-5Y400W12VKZQFSY)
| Feature | Specification |
|---|---|
| Rated Power | 400W |
| Max Power | 400W |
| Rated Voltage | 12V/AC |
| Rated Current | 23A |
| Hoop Diameter | 2in / 54mm |
| Rotor Diameter | 47in / 1.2m |
| Net Weight | 21lb / 9.5kg |
| Blade Numbers | 5 |
| Blade Material | Nylon Fiber |
| Start-up Wind Speed | 6.56ft/s (2m/s) |
| Rated Wind Speed | 42.65ft/s (13m/s) |
| Survival Wind Speed | 147.6ft/s (45m/s) |
| Rated Speed | 900r/min |
| Working Temperature | -104℉~176℉ (-40℃~80℃) |
| Package Dimension | 27x11.5x7.5in (69x29.5x19.5cm) |
| Generator Type | 3-Phase AC Permanent Magnet |
| Magnetic Material | Neodymium Iron Boron |
| Controller System | Electromagnetic/Yaw |
| Regulating Way | Automatic Adjustment |
| Cabin Material | Die Casting Aluminum with Paint Coated Finish |
| Tail Material | Stainless Steel with Paint Coated Finish |
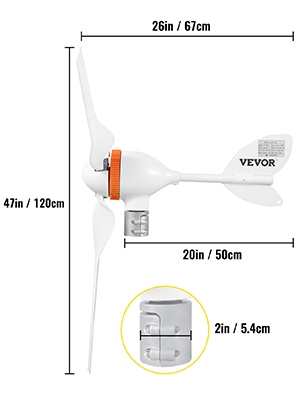
4.3. 400W 3 Blades Model (VV-FLFDJ-S7-3Y400W12VKZQ)
| Feature | Specification |
|---|---|
| Rated Power | 400W |
| Max Power | 400W |
| Rated Voltage | 12V |
| Rated Current | 24A |
| Hoop Diameter | 2in / 54mm |
| Rotor Diameter | 47in / 1.2m |
| Net Weight | 20lb / 9kg |
| Blade Numbers | 3 |
| Blade Material | Nylon Fiber |
| Start-up Wind Speed | 6.56ft/s (2m/s) |
| Rated Wind Speed | 42.65ft/s (13m/s) |
| Survival Wind Speed | 164ft/s (50m/s) |
| Rated Speed | 900r/min |
| Working Temperature | -104℉~176℉ (-40℃~80℃) |
| Package Dimension | 27x11.5x7.5in (69x29.5x19.5cm) |
| Generator Type | 3-Phase AC Permanent Magnet |
| Magnetic Material | Neodymium Iron Boron |
| Controller System | Electromagnetic/Yaw |
| Regulating Way | Automatic Adjustment |
| Cabin Material | Die Casting Aluminum with Paint Coated Finish |
| Tail Material | Stainless Steel with Paint Coated Finish |
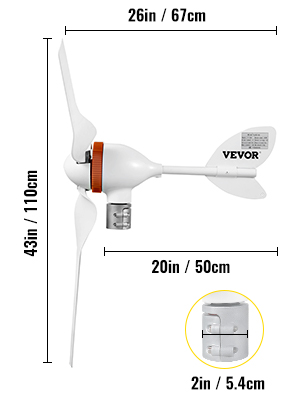
4.4. 300W 5 Blades Model (VV-FLFDJ-S7-5Y300W12VKZQ)
| Feature | Specification |
|---|---|
| Rated Power | 300W |
| Max Power | 330W |
| Rated Voltage | 12V/AC |
| Rated Current | 18A |
| Hoop Diameter | 2in / 54mm |
| Rotor Diameter | 43in / 1.1m |
| Net Weight | 21lb / 9.5kg |
| Blade Numbers | 5 |
| Blade Material | Nylon Fiber |
| Start-up Wind Speed | 6.56ft/s (2m/s) |
| Rated Wind Speed | 42.65ft/s (13m/s) |
| Survival Wind Speed | 131ft/s (40m/s) |
| Rated Speed | 900r/min |
| Working Temperature | -104℉~176℉ (-40℃~80℃) |
| Package Dimension | 27x11.5x7.5in (69x29.5x19.5cm) |
| Generator Type | 3-Phase AC Permanent Magnet |
| Magnetic Material | Neodymium Iron Boron |
| Controller System | Electromagnetic/Yaw |
| Regulating Way | Automatic Adjustment |
| Cabin Material | Die Casting Aluminum with Paint Coated Finish |
| Tail Material | Stainless Steel with Paint Coated Finish |
5. Setup and Installation
The VEVOR Wind Turbine Generator is designed for relatively easy assembly. Follow these steps carefully for proper installation. A sturdy mounting pole (not included) is required.
Prepare the Mounting Pole:
Ensure your mounting pole has a diameter compatible with the 2-inch (54mm) hoop diameter of the turbine. The pole must be securely anchored and capable of withstanding wind forces appropriate for your location.
Attach Blades to the Hub:
Carefully attach each nylon blade to the turbine hub. The blades are designed with an accurate groove for precise fitting. Secure them using the provided screws and nuts. Ensure all blades are firmly attached and balanced.

Figure 5.1: Step-by-step blade and hub assembly. 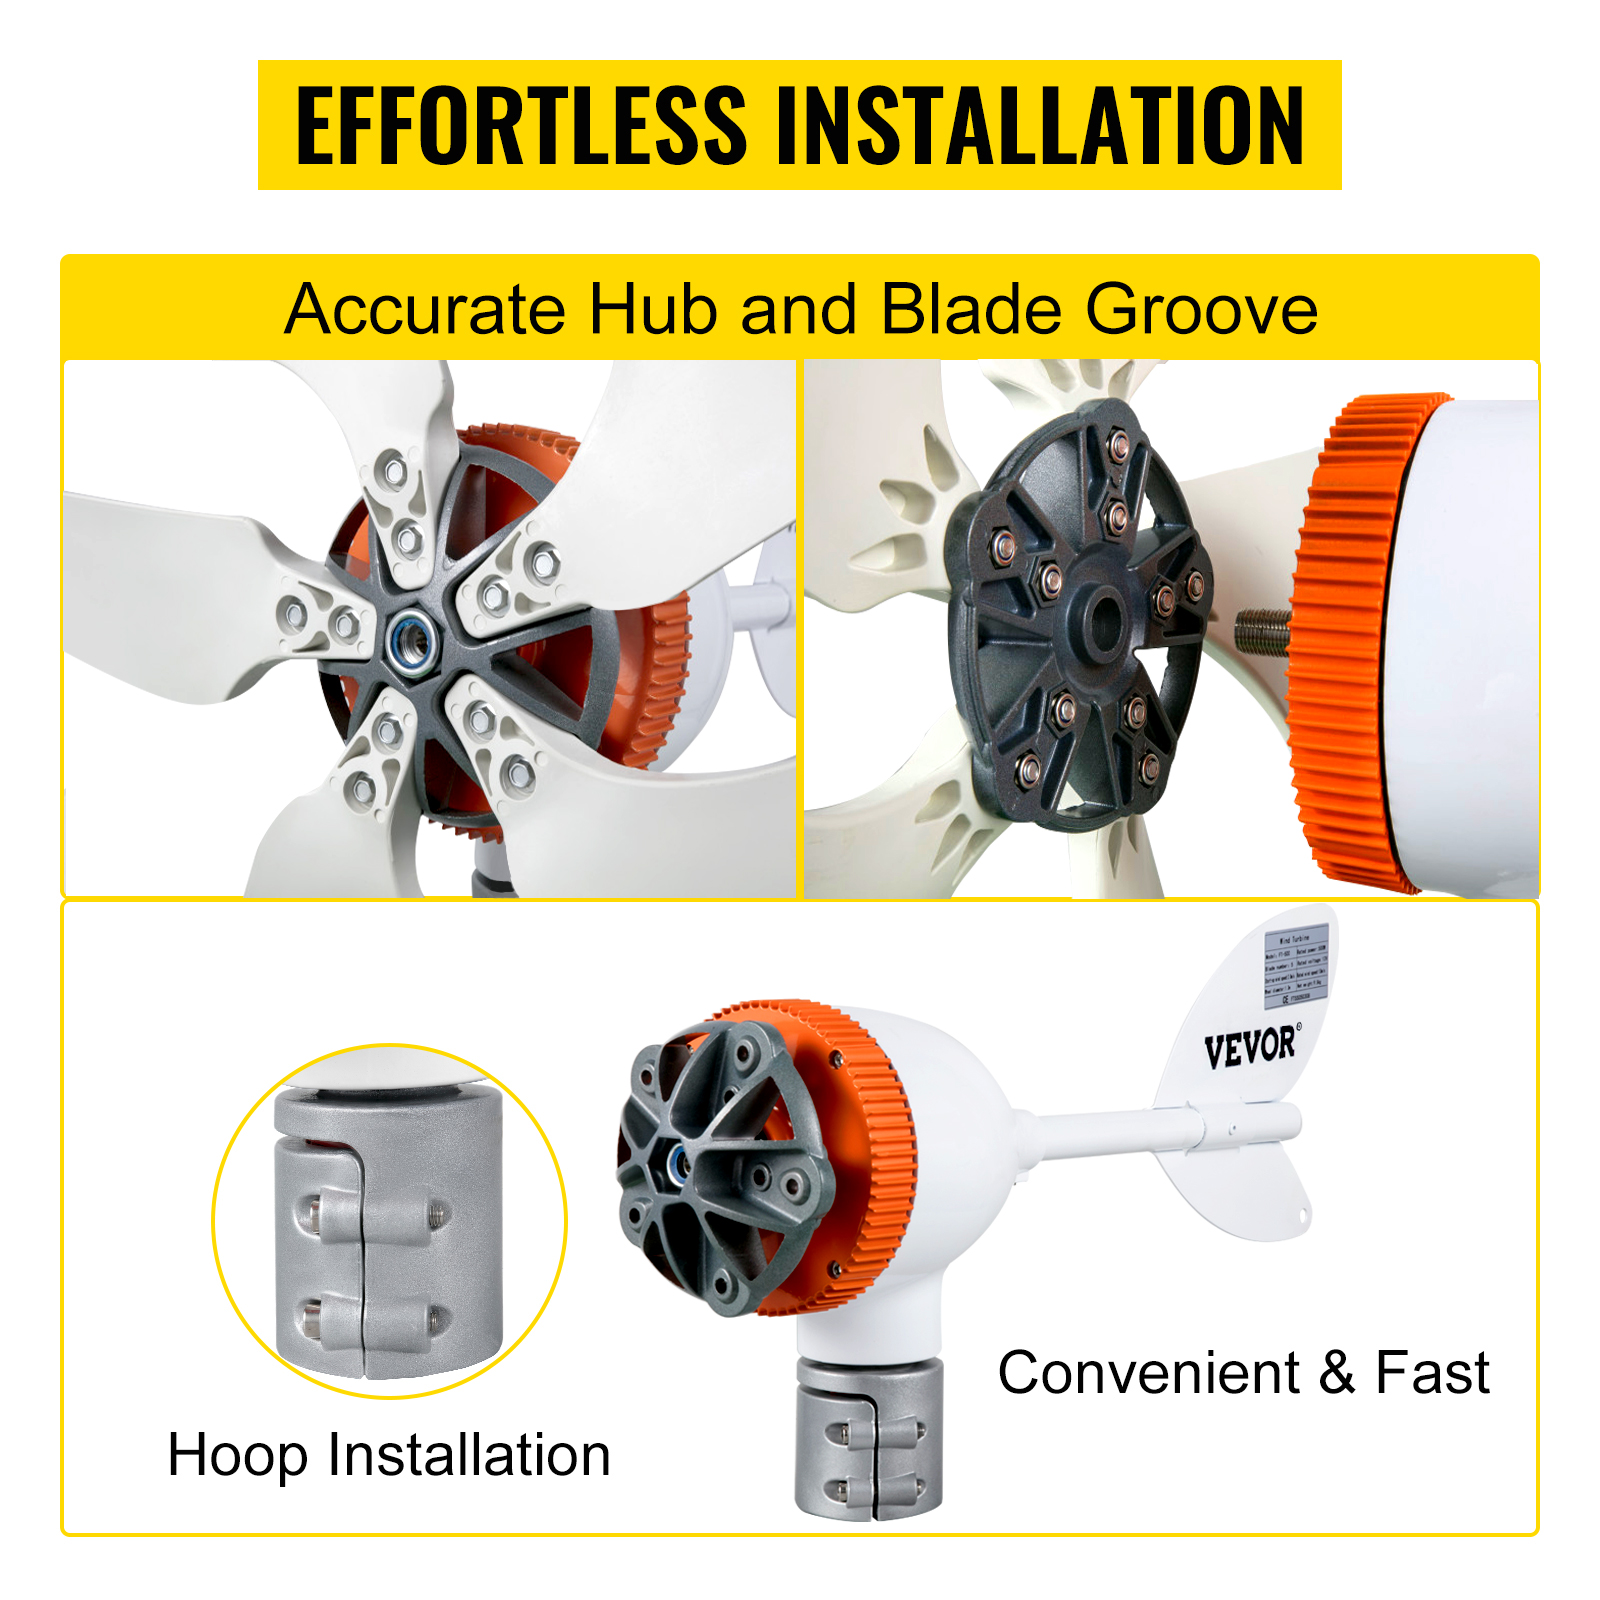
Figure 5.2: Detail of hub and blade groove for secure fitting. Mount the Turbine Body:
Slide the turbine body onto the prepared mounting pole. Secure it using the convenient hoop design and appropriate fasteners. Ensure the turbine is level and can rotate freely on its axis.
Connect the MPPT/Charge Controller:
The wind turbine generates 3-phase AC power. This must be connected to the included MPPT or Charge Controller. The controller converts the AC power to DC power suitable for charging batteries. Follow the wiring diagram provided with your specific controller model for correct connections to the turbine and your battery bank. Ensure correct polarity and secure connections.

Figure 5.3: MPPT Controller and wiring overview. Final Checks:
Before activating, double-check all connections, ensuring they are tight and insulated. Verify that the turbine can rotate freely and that there are no obstructions. Confirm that the controller is correctly configured for your battery voltage (12V or 24V).
6. Operating Instructions
Once installed and connected, the VEVOR Wind Turbine Generator operates largely automatically.
Automatic Operation:
The turbine is designed to start generating power at low wind speeds (as low as 2 m/s). Its yaw adjustment system automatically orientates the turbine to face the wind direction, maximizing energy capture.
Power Generation:
The 3-phase AC generator converts wind energy into electricity. The MPPT/Charge Controller then optimizes this power for efficient battery charging. The output voltage will match your selected controller (12V or 24V).
Overheating Protection:
The generator features overheating protection to ensure long-term safe operation. The outer shell is designed for fast heat dissipation.
High Wind Protection:
The electromagnetic/yaw control system provides protection against excessively high wind forces, helping to prevent damage to the turbine. The turbine is designed to survive wind speeds up to 50 m/s (164 ft/s).


7. Maintenance
Regular maintenance ensures the longevity and optimal performance of your wind turbine.
Visual Inspection:
Periodically inspect the blades, hub, tail, and main body for any signs of damage, cracks, or loose connections. Check the mounting pole for stability.
Cleaning:
Clean the blades and turbine body as needed to remove dirt, debris, or ice buildup. Use a soft cloth and mild detergent if necessary. The nylon fiber blades are waterproof and corrosion-proof, and the paint-coated aluminum body and stainless steel tail offer good resistance to environmental elements.
Electrical Connections:
Ensure all electrical connections, especially those to the controller and battery, remain tight and free from corrosion. Check wiring for any signs of wear or damage.
Bearing Check:
The turbine features double ball bearings for low vibration and smooth operation. Listen for unusual noises during operation, which might indicate bearing issues.
8. Troubleshooting
Here are some common issues and potential solutions:
| Problem | Possible Cause | Solution |
|---|---|---|
| No power output | Insufficient wind speed; Loose electrical connections; Controller malfunction; Damaged generator. | Check wind conditions (requires at least 2 m/s); Verify all wiring connections are secure; Inspect controller for error indicators; Contact support if generator is suspected to be damaged. |
| Low power output | Low wind speed; Obstructions near turbine; Dirty or damaged blades; Incorrect controller settings. | Ensure turbine is in an open area; Clean blades; Check blades for damage and replace if necessary; Verify controller settings match battery voltage. |
| Excessive vibration or noise | Unbalanced blades; Loose mounting; Damaged bearings. | Inspect blades for damage or imbalance; Tighten all mounting bolts; If bearings are damaged, contact support for replacement. |
| Turbine not facing wind | Yaw mechanism obstruction or damage. | Check for any physical obstructions preventing the tail from turning; Inspect yaw mechanism for damage. |
9. User Tips
Controller Selection:
The "MPPT Controller1" option typically refers to a 12V system, while "MPPT Controller2" (or similar naming) refers to a 24V system. Ensure you select the controller that matches your battery bank's voltage for optimal performance and to prevent damage.
Mounting Location:
For best performance, install the wind turbine in an elevated, open area free from obstructions like buildings or trees that could block wind flow. The higher the pole, the better the wind capture.
Off-Grid Use:
This wind turbine is primarily designed for off-grid applications, such as charging batteries for RVs, boats, or remote homes. It is not intended for direct connection to a residential grid (110V/220V AC mains) without additional grid-tie inverters and proper electrical system design.
Noise Level:
The turbine is designed for low noise operation, but some sound may be audible, especially in higher winds. This is generally considered normal for wind power generators.
Durability of Blades:
The nylon fiber blades are chosen for their lightweight, high intensity, and resistance to corrosion and water. While durable, prolonged extreme UV exposure can affect any material over time. Regular inspection as part of maintenance is recommended.
10. Warranty and Support
VEVOR products are designed for durability and performance. For warranty information, technical support, or service inquiries, please refer to the contact information provided with your purchase documentation or visit the official VEVOR website.
Please have your model number and purchase date ready when contacting support.


