1. Introduction
Thank you for choosing the VEVOR Multi-function Hand-push Seeder. This tool is designed to simplify and enhance your planting process, offering precision and efficiency for various seed types. With its durable construction and user-friendly features, you can achieve consistent seeding results with less effort.

Image 1: VEVOR Multi-function Hand-push Seeder with included 6 seed plates.
2. Safety Information
Please read and understand all safety instructions before operating the seeder. Failure to follow these instructions may result in injury or damage to the equipment.
- Always wear appropriate personal protective equipment (PPE), such as gloves and sturdy footwear, when operating the seeder.
- Ensure the seeder is stable on level ground before filling the seed tray or performing any adjustments.
- Keep hands and feet clear of moving parts, especially the seed plates and wheels, during operation.
- Do not allow children or untrained individuals to operate the seeder.
- Store the seeder in a dry, secure location, out of reach of children.
- Inspect the seeder for any damaged or loose parts before each use. Do not operate if damaged.
3. Product Components
The VEVOR Hand-push Seeder consists of the following main components:
- Curved Handle: Ergonomically designed for comfortable pushing.
- Adjustable Frame: Allows for height adjustment to suit different users.
- Seed Tray: Large capacity for holding seeds.
- Seed Plates (6 included): Interchangeable plates for various seed sizes and spacing.
- Pulley System: Drives the seed plate mechanism.
- Ditch Plow: Creates the furrow for seed placement.
- Metal Chain: Covers the seeds after planting.
- Wide Wheels: Provide stability and traction.
- Metal Support: For stable standing when not in use.
- Foldable Row Marker: Helps maintain fixed seeding line spacing and folds for storage.

Image 2: Key components of the VEVOR Hand-push Seeder.

Image 3: Large seed tray and interchangeable seed plates for different seed types.
4. Specifications
| Feature | Specification |
|---|---|
| Model | SS-KS-0001 |
| Material | Aluminum, ABS |
| Adjustable Height | 30.7"-33.1" / 78-84 cm |
| Seed Plate Quantity | 6 |
| Product Length | 30.7" / 78 cm |
| Front Wheel Width | 2.4" / 6 cm |
| Back Wheel Width | 2" / 5 cm |
| Product Weight | 14.6 lbs / 6.6 kg |
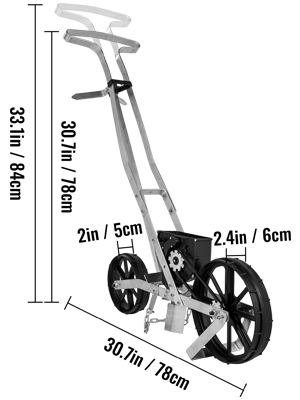
Image 4: Dimensional specifications of the seeder.
5. Setup and Assembly
The VEVOR Hand-push Seeder requires minimal assembly. Follow these steps for initial setup:
- Unpack Components: Carefully remove all parts from the packaging. Verify that all components listed in Section 3 are present.
- Attach Handle: Secure the curved handle to the main frame using the provided screws and fasteners. Ensure it is firmly attached.
- Adjust Height: Loosen the screw connections on the adjustable frame to set the handle height to a comfortable level for operation. Tighten the screws securely once adjusted.
- Install Seed Plate: Select the appropriate seed plate for your desired seed type (refer to Image 3 for examples). Open the seed tray cover, place the chosen seed plate onto the spindle, and close the cover.
- Position Row Marker: The row marker can be extended for use or folded for storage. Ensure it is in the desired position for fixed seeding line spacing.
- Check Wheels: Ensure both front and back wheels are securely attached and rotate freely.

Image 5: Adjusting the seeder height for user comfort.
6. Operating Instructions
Follow these steps for effective operation of your VEVOR Hand-push Seeder:
- Prepare the Soil: Ensure the soil is tilled and free of large debris for optimal seeding.
- Fill Seed Tray: Open the seed tray cover and fill it with your chosen seeds. Do not overfill.
- Select Seed Plate: Choose the correct seed plate for your seed type. The included plates are suitable for various seeds such as sweet corn, radish, carrots, beans, peas, and beets. For smaller seeds like grass seeds, select a plate with smaller, more numerous holes or consider a fine-seed attachment if available (not included).
- Start Seeding: Begin pushing the seeder at a steady, consistent pace. The ditch plow will create a furrow, the seed plate will drop seeds at regular intervals, and the metal chain will cover them.
- Use Row Marker: Utilize the foldable row marker to ensure straight rows and consistent spacing between planted lines.
- Monitor Seed Flow: Periodically check the seed tray to ensure a continuous flow of seeds and that the seed plate is not jamming.

Image 6: Operating the precision garden seeder in a prepared field.

Image 7: Examples of seeds suitable for planting with this seeder.
7. Maintenance
Regular maintenance will ensure the longevity and optimal performance of your seeder:
- Cleaning: After each use, empty any remaining seeds from the tray. Clean the seed tray, seed plates, and all moving parts to prevent residue buildup and potential jamming. Use a brush or cloth to remove soil and debris.
- Lubrication: Periodically apply a light lubricant to the pulley system and wheel axles to ensure smooth operation.
- Inspection: Regularly inspect all screws, bolts, and connections for tightness. Tighten any loose fasteners. Check for any signs of wear or damage to the wheels, seed plates, or frame.
- Storage: Store the seeder in a clean, dry place. The metal support provides stable standing, and the row marker can be folded to save space.

Image 8: Features for easy storage and stability.
8. Troubleshooting
| Problem | Possible Cause | Solution |
|---|---|---|
| Seeds not dropping | Incorrect seed plate for seed size; Seed tray empty; Seed plate jammed by debris. | Ensure correct seed plate is installed; Refill seed tray; Clean seed plate and mechanism. |
| Uneven seed spacing | Inconsistent pushing speed; Incorrect seed plate; Soil conditions. | Maintain a steady pushing pace; Verify seed plate matches seed size; Ensure soil is well-prepared. |
| Seeder difficult to push | Wheels clogged with mud/debris; Axles need lubrication; Soil too compact. | Clean wheels thoroughly; Lubricate axles; Loosen soil before seeding. |
| Frame feels wobbly | Loose screw connections. | Check and tighten all screws and fasteners on the frame. |
9. User Tips
- Seed Plate Selection: Always match the seed plate to the size of your seeds for optimal distribution. If a seed plate seems too large, seeds may drop too frequently; if too small, they may not drop at all or jam.
- Soil Preparation: For best results, ensure your soil is finely tilled and free of large clumps or rocks. This prevents jamming and ensures consistent seed depth.
- Rust Prevention: The seeder is constructed from aluminum and ABS, which are generally rust-resistant. However, to maintain its condition, always clean and dry the seeder thoroughly after use, especially if exposed to moisture, and store it in a dry environment.
- Grass Seeds: While primarily designed for larger vegetable and crop seeds, some users have successfully adapted the seeder for grass seeds by selecting the smallest hole seed plate or modifying a plate for very fine seeds. Test in a small area first to ensure desired density.
10. Warranty and Support
VEVOR products are built to last. For warranty information, technical support, or replacement parts, please refer to the official VEVOR website or contact customer service directly. Keep your purchase receipt as proof of purchase.


