ADAX NEO BASIC s5.1 Panel Heater

Product Specifications
- Model: NEO BASIC s5.1
- Power Supply: 230V, 50Hz, IP20
- Art. no.: 62235
Product Usage Instructions
Digital (DT) Thermostat User Manual
The thermostat display provides various settings and functions:
- Setting Menu: Press and hold OK button for 3 seconds to access the selection menu. Use the buttons to scroll through options and OK button to confirm.
- Options: Description of function includes setting the time of the heater, adjustment of weekly heating program, comfort temperature adjustment, setting lower temperature, window open detection, temperature calibration, adaptive start, and reset to factory settings.
- Program Menu: Allows access to the weekly heating program settings including P1, P2, P3, OFF, and NP options.
Ecodesign Information
Find detailed ecodesign information on pages 19-25 of the user manual.
Installation Manual
Refer to page 3 of the user manual for detailed installation instructions.
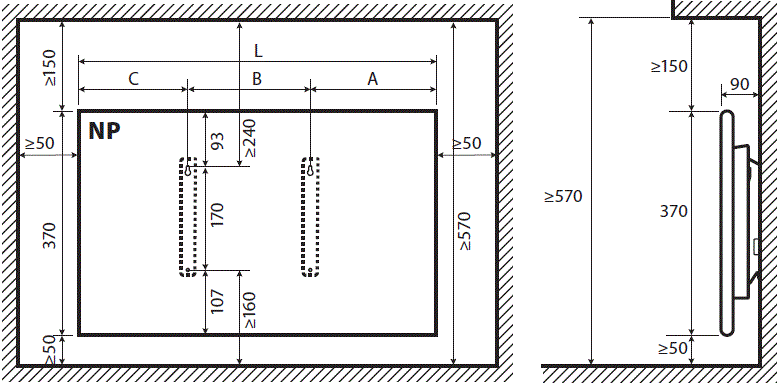
| NP | A | B | C | L |
| NP 04 | 148 | 202 | 123 | 474 |
| NP 06 | 203 | 202 | 184 | 589 |
| NP 08 | 212 | 302 | 190 | 704 |
| NP 10 | 241 | 302 | 219 | 762 |
| NP 12 | 174 | 605 | 155 | 934 |
| NP 14 | 230 | 605 | 214 | 1042 |
| NP 20 | 405 | 605 | 384 | 1394 |

| NL | A | B | C | L |
| NL 04 | 139 | 300 | 211 | 650 |
| NL 06 | 320 | 300 | 250 | 870 |
| NL 08 | 264 | 600 | 186 | 1050 |
| NL 10 | 379 | 600 | 301 | 1280 |
| NL 12 | 440 | 600 | 412 | 1450 |
| NL 15 | 263 | 1200 | 287 | 1750 |
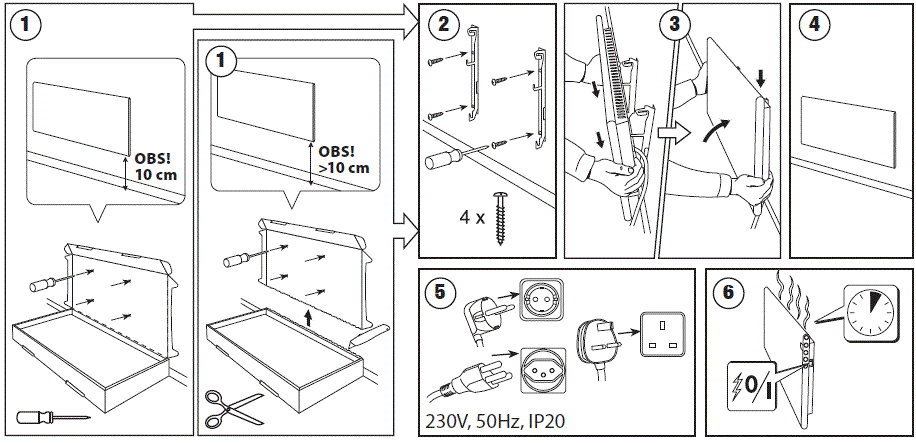

Fixed Installation Guide
For fixed installations, refer to page 4 of the user manual for step-by-step guidance.

- PE =Yellow/Green
- 1 = Brown
- 2 =Blue
Electric installation must be carried out by an authorised electrician.
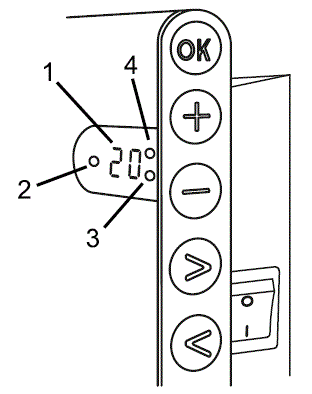
GENERAL OVERVIEW
GENERAL OVERVIEW OF THE THERMOSTAT DISPLAY LIGHT INDICATORS:
- Display showing temperature and control parameters.
- The red light is on when the heater is opera ng.
- Green light showing a reduced temperature. It is on when the heater is opera ng in accordance with the chosen program, maintaining the reduced temperature. (See Additional functions).
- Green light indicator showing the “comfort” temperature. It is on when the heater is opera ng in accordance with the chosen program, maintaining the “comfort” temperature. (See Additional functions).
 Increases temperature, me or other parameter.
 Decreases temperature, me or other parameter.
 Select on button meaning “less”.
 – Select on button meaning “more”.
 OK – Confirmation of selection.
HOW TO OPERATE
The appliance is switched on or off by pressing the button  on the right side of the heater. When the heater is switched on for the first me, it begins opera ng at the default “comfort” temperature of 22°C; meanwhile, the blinking screen will show that a clock me has not yet been set (See Setting menu). The heater will maintain the temperature displayed on the screen if the user does not select the desired program from the Program menu. You can create your own weekly heating program (P1) or you can use the existing standard programs “Office” (P2) or “Home” (P3). The weekly programs determine when it will maintain the comfort temperature (22°C) and when it will maintain the reduced temperature, which saves energy (17°C).
By pressing and holding button for 3 seconds, the selection menu can be turned on or off. Use the buttons to scroll through the list and use the button to select the necessary setting or confirm your selection:

Pushing the ![]() button, you will enter the selection menu of the weekly heating program .Use
button, you will enter the selection menu of the weekly heating program .Use![]() buttons to scroll through the following list:
buttons to scroll through the following list:
| Option | Function |
| P1 | The user’s weekly program will be turned on, which can be adjusted according to the user’s needs. |
| P2 | “Office” program will be turned on, providing a comfortable temperature during business hours. |
| P3 | “Home” program will be turned on, providing a comfortable temperature in the morning, in the evening and during weekends throughout the day. |
| OF | Sleep mode will be turned on, during which the heating is not operating but the clock settings are maintained. |
| nP | The weekly heating program will be turned off and the heater will operate in accordance with the values shown on the screen. |
The desired program can be selected by pressing
Times of the “comfort” temperature in the weekly heating program:
| Day | Times of “comfort” temperature | ||
| P1 | P2 | P3 | |
| Monday | 00-23 | 07-17 | 06-08, 15-23 |
| Tuesday | 00-23 | 07-17 | 06-08, 15-23 |
| Wednesday | 00-23 | 07-17 | 06-08, 15-23 |
| Thursday | 00-23 | 07-17 | 06-08, 15-23 |
| Friday | 00-23 | 07-17 | 06-08, 15-23 |
| Saturday | 00-23 | 07-23 | |
| Sunday | 00-23 | 07-23 | |
ADDITIONAL FUNCTIONS
- Permanent adjustment of temperature in the weekly program
If you adjust the existing temperature shown on the screen by using the + and – buttons and press OK when the comfort or reduced temperature light is on, the opera ng program will automatically override the temperature of the relevant mode. - Temporary adjustment of temperature in the weekly program
If you adjust the existing temperature shown on the screen by using the + and – buttons, but do not press the button when the comfort or reduced temperature light is on, the newly set temperature will be valid only until the next change of the heating temperature according to the set program. During the temporary adjustment(decreased temperature) or of the weekly temperature, a light indicator will blink above the < < (increased temperature) buttons. - Security against unauthorised use by children or other persons
The thermostat may be secured against unauthorised use by children or other persons. This function can be turned on/off by pressing and holding the buttons at the same me for 5 seconds un l you see “cc” on the screen. - Dimming the lighting (automatic reduction of screen brightness)
If the heater is in idle mode for 15 seconds, the screen’s brightness will be reduced. If you press any button on the display of the thermostat, the brightness will return. - 24-hour protection in case of power outage
The heater will maintain the opera on of the internal clock for up to 24 hours in case of power outage.
If the power outage lasts for more than 24 hours, the thermostat will revert to the last used temperature. The screen will blink, indicating a power outage. The blinking function will continue until you press any button.
Great Britain
Model identifier (s) Neo Basic
| Heat output | ||||||||||
| Pnom = Nominal heat output | ||||||||||
| Pmin = Minimum heat output (indicative) | ||||||||||
| Pmax,c = Maximum continuous heat output | ||||||||||
| NP 20 | ||||||||||
| Pnom kW (x,x) | 0,4 | 0,6 | 0,8 | 1,0 | 1,2 | 1,4 | 2,0 | |||
| Pmin kW (x,x) | 0,4 | 0,6 | 0,8 | 1,0 | 1,2 | 1,4 | 2,0 | |||
| Pmax,c kW (x,x) | 0,4 | 0,6 | 0,8 | 1,0 | 1,2 | 1,4 | 2,0 | |||
| Auxiliary electricity consumption | ||||||||||
| elmax = At nominal heat output | ||||||||||
| elmin = At minimum heat output | ||||||||||
| elSB = In standby mode | ||||||||||
| NP 20 | ||||||||||
| elmax kW (x,xxx) | 0,001 | 0,001 | 0,001 | 0,001 | 0,001 | 0,001 | 0,001 | |||
| elmin kW (x,xxx) | 0,001 | 0,001 | 0,001 | 0,001 | 0,001 | 0,001 | 0,001 | |||
| elSB kW (x,xxx) | 0,001 | 0,001 | 0,001 | 0,001 | 0,001 | 0,001 | 0,001 | |||
| Type of heat output/room temperature control (select one) | ||||||
| yes | no | yes | no | yes | no | |
| single stage heat output, no room temperature control | ||||||
| two or more manual stages, no room temperature control | ||||||
| with mechanical thermostat room temperature control | ||||||
| with electronic room temperature control | ||||||
| with electronic room temperature control plus day timer | ||||||
| with electronic room temperature control plus week timer | X | |||||
| Other control options (multiple selections possible) | ||||||
| yes | no | yes | no | yes | no | |
| room temperature control, with presence detection | X | |||||
| room temperature control, with open window detection | X | |||||
| with distance control option | X | |||||
| with adaptive start control | X | |||||
| with working time limitation | X | |||||
| with black bulb sensor | X | |||||
| Heat output | ||||||||||
| Pnom = Nominal heat output | ||||||||||
| Pmin = Minimum heat output (indicative) | ||||||||||
| Pmax,c = Maximum continuous heat output | ||||||||||
| Pnom kW (x,x) | 0,4 | 0,6 | 0,8 | 1,0 | 1,2 | 1,5 | ||||
| Pmin kW (x,x) | 0,4 | 0,6 | 0,8 | 1,0 | 1,2 | 1,5 | ||||
| Pmax,c kW (x,x) | 0,4 | 0,6 | 0,8 | 1,0 | 1,2 | 1,5 | ||||
| Auxiliary electricity consumption | ||||||||||
| elmax = At nominal heat output | ||||||||||
| elmin = At minimum heat output | ||||||||||
| elSB = In standby mode | ||||||||||
| elmax kW (x,xxx) | 0,001 | 0,001 | 0,001 | 0,001 | 0,001 | 0,001 | ||||
| elmin kW (x,xxx) | 0,001 | 0,001 | 0,001 | 0,001 | 0,001 | 0,001 | ||||
| elSB kW (x,xxx) | 0,001 | 0,001 | 0,001 | 0,001 | 0,001 | 0,001 | ||||
| Type of heat output/room temperature control (select one) | ||||||
| yes | no | yes | no | yes | no | |
| single stage heat output, no room temperature control | ||||||
| two or more manual stages, no room temperature control | ||||||
| with mechanical thermostat room temperature control | ||||||
| with electronic room temperature control | ||||||
| with electronic room temperature control plus day timer | ||||||
| with electronic room temperature control plus week timer | X | |||||
| Other control options (multiple selections possible) | ||||||
| yes | no | yes | no | yes | no | |
| room temperature control, with presence detection | X | |||||
| room temperature control, with open window detection | X | |||||
| with distance control option | X | |||||
| with adaptive start control | X | |||||
| with working time limitation | X | |||||
| with black bulb sensor | X | |||||
Contact details: Name and address of the manufacturer or its authorised representative
- Adax AS, Myhresgate 1, 3060 Svelvik, Norway,
- tell +47 33 77 17 50
- info@adax.no
DECLARATION OF CONFORMITY
ADAX AS
(Suppliers name)
- P.o. Box 38, 3061 SVELVIK, NORWAY
(Address) - declare under our sole responsibility that the product(s)
- Convector heater series Adax NEO Basic, NP and NL
(Name, type and model or series)
is/are in conformity with following Directives/Standards:
- LVD (2014/35/EU)
- EMF
- EMC (2014/30/EU)
- EN 60335-1
- EN 62233:2008
- EN 55014-2:2015
- EN 61000-3-2:2014
- EN 61000-3-3:2013
ECO design directive (2009/125/Ec)
- Class 1, IP20
- This declaration of conformity is issued under the responsibility of:
Frequently Asked Questions
- How do I adjust the comfort temperature?
- To adjust the comfort temperature, select the desired temperature by pressing the + and – buttons. Press OK to confirm the setting.
- How can I reset the thermostat to factory default settings?
- To reset the thermostat, press OK and hold it until the screen turns off. Then continue holding OK until you see ’00’ on the screen after every shown segment.
Documents / Resources
 |
ADAX NEO BASIC s5.1 Panel Heater [pdf] User Guide s5.1, 62041, 62235, NEO BASIC s5.1 Panel Heater, NEO BASIC s5.1, Panel Heater, Heater |