
 Security EC10 Elevator Control System
User Manual

Skip to content
Manuals+
User Manuals Simplified.
eSSL EC10 Elevator Control System User Manual
May 8, 2022May 9, 2022 Leave a comment on eSSL EC10 Elevator Control System User Manual
Home » eSSL » eSSL EC10 Elevator Control System User Manual
Installation Precautions
 Pay attention to the following safety items. Mis-operations may cause human danger or equipment faults:
- Before installation completes, do not power on the equipment or perform operations with electricity.
- Used dedicated elevator ethernet cable to connect the elevator controller and computer. Use 2 pin controller cable for the press button on each floor.
- Install the card reader with a height of 1.2 to 1.4 meters.
- Install the elevator main controller and expansion board on the elevator lift car.
- Install the emergency button in the management center or under the elevator button.
System Introductions
The E C 10 prevents unauthorized elevator users from accessing pre-defined restricted floors in the building. The E C 10 ( Elevator Control panel) controls access up to 10 floors.
Also available is the E X 16 ( Elevator Floor Expansion board) whic hallows for access control of up to 1 6 additional floors. A maximum three E X 16 boards can be daisy-c
hained toge the rand collectively control access of up to 58 floors. In order to gain access to a desired floor, authorized users must first sent either a valid fingerprint and/or RF ID
card when entering the elevator. For example, if an authorized user has access rights to only floor 3 and floor 10, the elevator will not move if that same user presses the elevator button for floor 4.

Technical Specifications
EC 10 Technical Specification
Floor button control relays: 1 0
Card capacity: 3 0,000
Fingerprint capacity: 3,000
Event capacity: 100,000
Power s upply: 12V DC 1A
Communication: T C P /I P, R s 4 8 5
Supported floor expansion board: 3pcs
EX 16 Technical Specification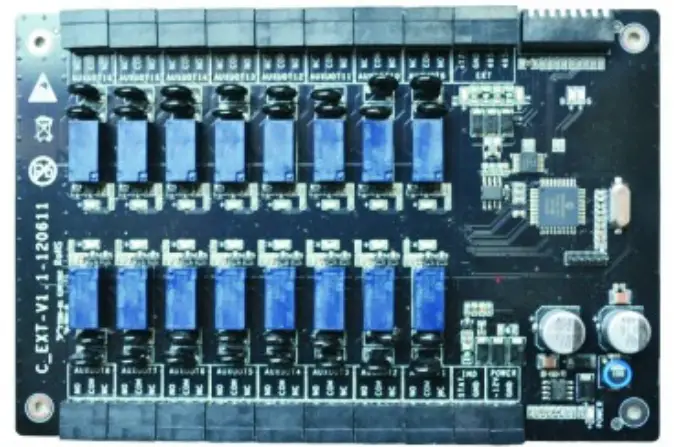
Floor button control relays:16
Communication to E C 10 panel: R S 485
Power supply: 1 2V DC 1 A
EX 16 D IP Switch Settings
DIP switche s 2 -4 are used to set each E X 16 Floor Extension Board’s unique device address using R S 485 communication. Please keep the E X 16 powered off before setting the device address. Each device address needs to be unique. See example below:
| R S 485 Device address 2 |  |
| R S 485 Device address 3 | |
| R S 485 Device adress 4 |
Wiring an Elevator Control System
Elevator Control Panel

EX 16 Elevator Wiring Diagram

EC10 Wiring Terminals Connection
Notes:
- The backup input is reserved for the elevator control system.
- Fire linkage and emergency button function require no software settings. These functions are available when the hardware is installed.
- GPRS, WIFI, and functions marked by * are optional. If these functions are required, contact our business representatives or pre-sale technical support.
- ” # ” indicates floor, “1# output” indicates that it is connected to the first-floor button, the first expansion board is connected to the 11th-floor button.


Notice:
- Open the elevator press button panel when connecting to the elevator button. Ask the supplier to provide the floor button control circuit. If the supplier can not provide the circuit, exclude the incorrect circuit one by one and ensure the correct connections.
- EC10 connects to the computer using TCP/IP or RS485.
- EC10 supports ZK fingerprint readers (model FR1200) and RFID card readers (model KR series).
- EC10 controls access up to 10 floors , EX16 controls access up to 16 floors. An EC10 carries a maximum of 3 expansion boards. Total 58 floors can be controlled when
combining EC10 with EX16. - The RS485 device address of the fingerprint reader (model FR1200) must be 1. The RS485 device address of the EX16 floor extension board must start from 2.
- Wiegand reader can connect to the elevator main controller Wiegand 1#~ 4#.
- IN9 functions as fire linkage signal input. When fire linkage signal works, elevator control system stops working and the elevator retains to original status. (Fire linkage must be passive dry contact signal)
- IN10 functions as an emergency button. When it is pressed, the whole elevator is not controlled by elevator controller. At this moment, up and down buttons are available. When the emergency button is not pressed, the elevator retains to the original status.
- 1 ~ 10 Output terminals connect to floor press button.
 http://goo.gl/E3YtKI
#24, Shambavi Building, 23rd Main, Marenahalli,
JP Nagar 2nd Phase, Bengaluru – 560078
Phone : 91-8026090500
Email : sales@esslsecurity.com
www.esslsecurity.com
Documents / Resources
eSSL EC10 Elevator Control System [pdf] User Manual EC10, Elevator Control System, EC10 Elevator Control System
Related Manuals / Resources
AMEYO USER MANUAL
AMEYO USER MANUAL – Download [optimized] AMEYO USER MANUAL – Download
Hydrow User Manual – Manuals+
Hydrow User Manual – Original PDF Hydrow User Manual – Optimized PDF
 Contour User Manual
 – Optimized PDF Contour User Manual – Original PDF Leave a comment
TX12 User Manual
TX12 User Manual – Download [optimized] TX12 User Manual – Download
Your email address will not be published.
Comment…………………..
Name…………………………………..
Email……………………………………..
Website………………………………….
Save my name, email, and website in this browser for the next time I comment.
Post Comment
manuals.plus – Manuals+
manuals.plus – Manuals+
Privacy Policy – Manuals+
Documents / Resources
 | EC10 Elevator Control System |
References
- mailto:sales@esslsecurity.comesslsecurity.com
- Home | eSSL Securitygoo.gl
- Home | eSSL Securitywww.esslsecurity.com
- User Manualmanual.tools
Super ! mais j’ ai un problème de le connecter sur le clavier d’ascenseur
How do I connect the EC10 Elevator Control System to the elevator keypad/button panel?
To connect the eSSL EC10 to your elevator's floor button panel, follow these instructions from the manual:
For technical support, eSSL recommends contacting your authorized installer or dealer directly.
Read the full Q&A page