
Retro Receiver for SNES
Instruction Manual
Supported controllers


For Nintendo Switch Joy-Con
1. Insert Retro Receiver into console and then press the pairing button (the LED will rapidly blink).
2. Press your Joy-Con’s sync button.
3. Wait until your Retro Receiver’s LED is solid blue and the controller’s #1 LED stay on.
4. For next connection only need to press A button.

For Nintendo Switch Pro controller
1. Insert Retro Receiver into console and then press the pairing button (the LED will rapidly blink).
2. Press your Switch Pro controller’s sync button.
3. Wait until your Retro Receiver’s LED is solid blue and the controller’s #1 LED stay on.
4. For next connection only need to press A button.

For 8Bitdo controllers
1. Power on 8Bitdo controller (Mode 1) to enter pairing mode.
2. Insert Retro Receiver into console and then press the pairing button (the LED will rapidly blink).
3. Wait until your Retro Receiver and your 8Bitdo controller’s LEDs are both solid blue.
4. Your controller is now paired.


For Wii Remote/Wii MotionPlus controller
1. Insert Retro Receiver into console and then press the pairing button (the LED will rapidly blink).
2. Press the Wii Remote/Wii MotionPlus controller’s sync button.
3. Wait until your Retro Receiver’s LED is solid blue and the controller’s #1 LED stay on.
4. To re-sync after powering your console down. For Wii Remote: press 1 and 2 buttons. For Wii MotionPlus: press A button.

For Wii U Pro controller
1. Insert Retro Receiver into console and then press the pairing button (the LED will rapidly blink).
2. Press your Wii U Pro controller’s sync button.
3. Wait until your Retro Receiver’s LED is solid blue and the controller’s #1 LED stay on.
4. For next connection only need to press A button.

For PS3 controller
1. Download and Run 8Bitdo Retro Receiver Tools on your PC available for Mac and PC.
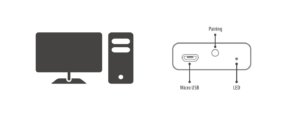
2. On your Retro Receiver, hold down the pairing button and connect it to your MAC/PC via USB.
3. Connect your PS3 controller to MAC/PC via USB.
4. Once your Retro Receiver and PS3 controller are both connected via USB, click the “Pair” button
in the software.
5. Once pairing is complete, you can insert your Retro Receiver into your console.
6. Now press the PS button on your PS3 controller.
7. Wait until your Retro Receiver’s LED is solid blue and the controller’s #1 LED stay on.
8. To re-sync after powering your console down, begin from step 6.

For PS4 Controller
1. Insert Retro Receiver into console and then press the pairing button (the LED will rapidly blink).
2. Press and hold the PS and Share buttons until the lightbar begins to strobe quickly in double.
3. Wait until your Retro Receiver’s LED is solid blue and the controller’s lightbar stay on.
4. For next connection only need to press PS button and wait until receiver’s LED is solid blue.

Instruction Manual for X-input
For 8Bitdo controllers
1. Power on 8Bitdo controller (Mode 1) to enter pairing mode.
2. Insert Retro Receiver into console and then press the pairing button (the LED will rapidly blink).
3. Wait until your Retro Receiver and your 8Bitdo controller’s LEDs are both solid blue.
4. Your controller is now paired.


For Wii Remote/Wii MotionPlus controller
1. Insert Retro Receiver into console and then press the pairing button (the LED will rapidly blink).
2. Press the Wii Remote/Wii MotionPlus controller’s sync button.
3. Wait until your Retro Receiver’s LED is solid blue and the controller’s #1 LED stay on.
4. To re-sync after powering your console down.
For Wii Remote: press 1 and 2 buttons.
For Wii MotionPlus: press A button.

For Wii U Pro controller
1. Insert Retro Receiver into console and then press the pairing button (the LED will rapidly blink).
2. Press your Wii U Pro controller’s sync button.
3. Wait until your Retro Receiver’s LED is solid blue and the controller’s #1 LED stay on.
4. For next connection only need to press A button.

For PS3 controller
1. Download and Run 8Bitdo Retro Receiver Tools on your PC available for Mac and PC.
2. On your Retro Receiver, hold down the pairing button and connect it to your MAC/PC via USB.
3. Connect your PS3 controller to MAC/PC via USB.
4. Once your Retro Receiver and PS3 controller are both connected via USB, click the “Pair” button
in the software.
5. Once pairing is complete, you can insert your Retro Receiver into your console.
6. Now press the PS button on your PS3 controller.
7. Wait until your Retro Receiver’s LED is solid blue and the controller’s #1 LED stay on.
8. To re-sync after powering your console down, begin from step 6.

For PS4 Controller
1. Insert Retro Receiver into console and then press the pairing button (the LED will rapidly blink).
2. Press and hold the PS and Share buttons until the lightbar begins to strobe quickly in double.
3. Wait until your Retro Receiver’s LED is solid blue and the controller’s lightbar stay on.
4. For next connection only need to press PS button and wait until receiver’s LED is solid blue.

Instruction Manual for PS3

For 8Bitdo controllers
1. Power on 8Bitdo controller (Mode 1) to enter pairing mode.
2. Insert Retro Receiver into console and then press the pairing button (the LED will rapidly blink).
3. Wait until your Retro Receiver and your 8Bitdo controller’s LEDs are both solid blue.
4. Your controller is now paired.

For Wii Remote/Wii MotionPlus controller
1. Insert Retro Receiver into console and then press the pairing button (the LED will rapidly blink).
2. Press the Wii Remote/Wii MotionPlus controller’s sync button.
3. Wait until your Retro Receiver’s LED is solid blue and the controller’s #1 LED stay on.
4. To re-sync after powering your console down.
For Wii Remote: press 1 and 2 buttons.
For Wii MotionPlus: press A button.

For Wii U Pro controller
1. Insert Retro Receiver into console and then press the pairing button (the LED will rapidly blink).
2. Press your Wii U Pro controller’s sync button.
3. Wait until your Retro Receiver’s LED is solid blue and the controller’s #1 LED stay on.
4. For next connection only need to press A button.

References
- User Manualmanual.tools
마이크로 usb로 외부전원이 공급되어 snes본체를 켜지 않았는데도 전원 표시등이 켜진다. 본체는 괜찬은걸까
Is it safe for the SNES console if the power indicator light turns on when the Retro Receiver is powered via micro USB, even if the console itself is off?
This behavior is common with the 8Bitdo SNES Retro Receiver. When you provide external power to the receiver via the micro USB port, it can back-feed a small amount of voltage into the SNES controller port, which often causes the console's power LED to glow dimly or turn on even if the main power switch is off.
While this is generally considered a known quirk of the hardware design and is unlikely to damage your SNES, it is recommended to unplug the micro USB cable when the console is not in use if you are concerned about the power indicator. The micro USB port on the receiver is primarily intended for firmware updates or providing extra power for specific setups; in most standard cases, the receiver draws sufficient power directly from the SNES console when it is turned on.
Read the full Q&A page