Alaye Aabo pataki
Jọwọ ka gbogbo awọn ilana ni pẹkipẹki ṣaaju apejọ ati lo. Daduro iwe afọwọkọ yii fun itọkasi ọjọ iwaju.
- Nigbagbogbo tẹle awọn ilana apejọ ni pẹkipẹki.
- Keep hands and fingers away from the sliding doors when opening and closing to prevent injury.
- Rii daju pe gbogbo awọn asopọ ti wa ni wiwọ ni aabo ṣaaju lilo. Lorekore ṣayẹwo ati tun-mu bi o ṣe pataki.
- Má ṣe pọ̀ jù àwọn sẹ́ẹ̀lì. Pín ìwọ̀n náà déédé.
- A ṣe apẹrẹ minisita yii fun lilo inu ile nikan.
- To prevent tip-over incidents, secure the cabinet to a wall using the provided anti-tip hardware. This is especially important in homes with children or pets.

Package Awọn akoonu
Rii daju pe gbogbo awọn paati wa ṣaaju ki o to bẹrẹ apejọ. Ti eyikeyi awọn ẹya ba sonu tabi bajẹ, jọwọ kan si atilẹyin alabara.
- Cabinet Panels (Top, Bottom, Sides, Back, Shelves)
- Sliding Door Components
- Irin Kapa
- Metal Support Legs
- Hardware Apejọ (skru, dowels, awọn titiipa kamẹra, ati bẹbẹ lọ)
- Anti-Tip Hardware
- Ilana itọnisọna
Awọn ilana Apejọ
Assembly typically requires two adults and basic tools (e.g., screwdriver, hammer). Follow the numbered steps provided in the included assembly guide for detailed instructions.
- Yọọ ati Ṣe idanimọ Awọn apakan: Carefully remove all components from the packaging. Lay them out on a clean, soft surface to prevent scratches. Identify each part using the provided diagrams in the separate assembly guide.
- Ṣe akojọpọ fireemu naa: Begin by connecting the side panels to the bottom panel using the designated hardware. Ensure all connections are snug.
- Fi sori ẹrọ Awọn apoti: Insert the fixed and adjustable shelves into their respective positions. Note that the second shelf is fixed for structural stability and cannot be adjusted.
- So Panel Pada: Ṣe aabo nronu ẹhin si fireemu ti o pejọ.
- Fi sori ẹrọ Awọn ilẹkun Sisun: Carefully install the fluted sliding doors into their tracks. Ensure they move freely.
- Attach Handles and Legs: Secure the metal handles to the doors and attach the metal support legs to the bottom of the cabinet.
- Final Placement and Anti-Tip Installation: Move the assembled cabinet to its desired location. Install the anti-tip hardware as shown in Figure 1 to secure the cabinet to the wall.
Ọja Awọn ẹya ara ẹrọ
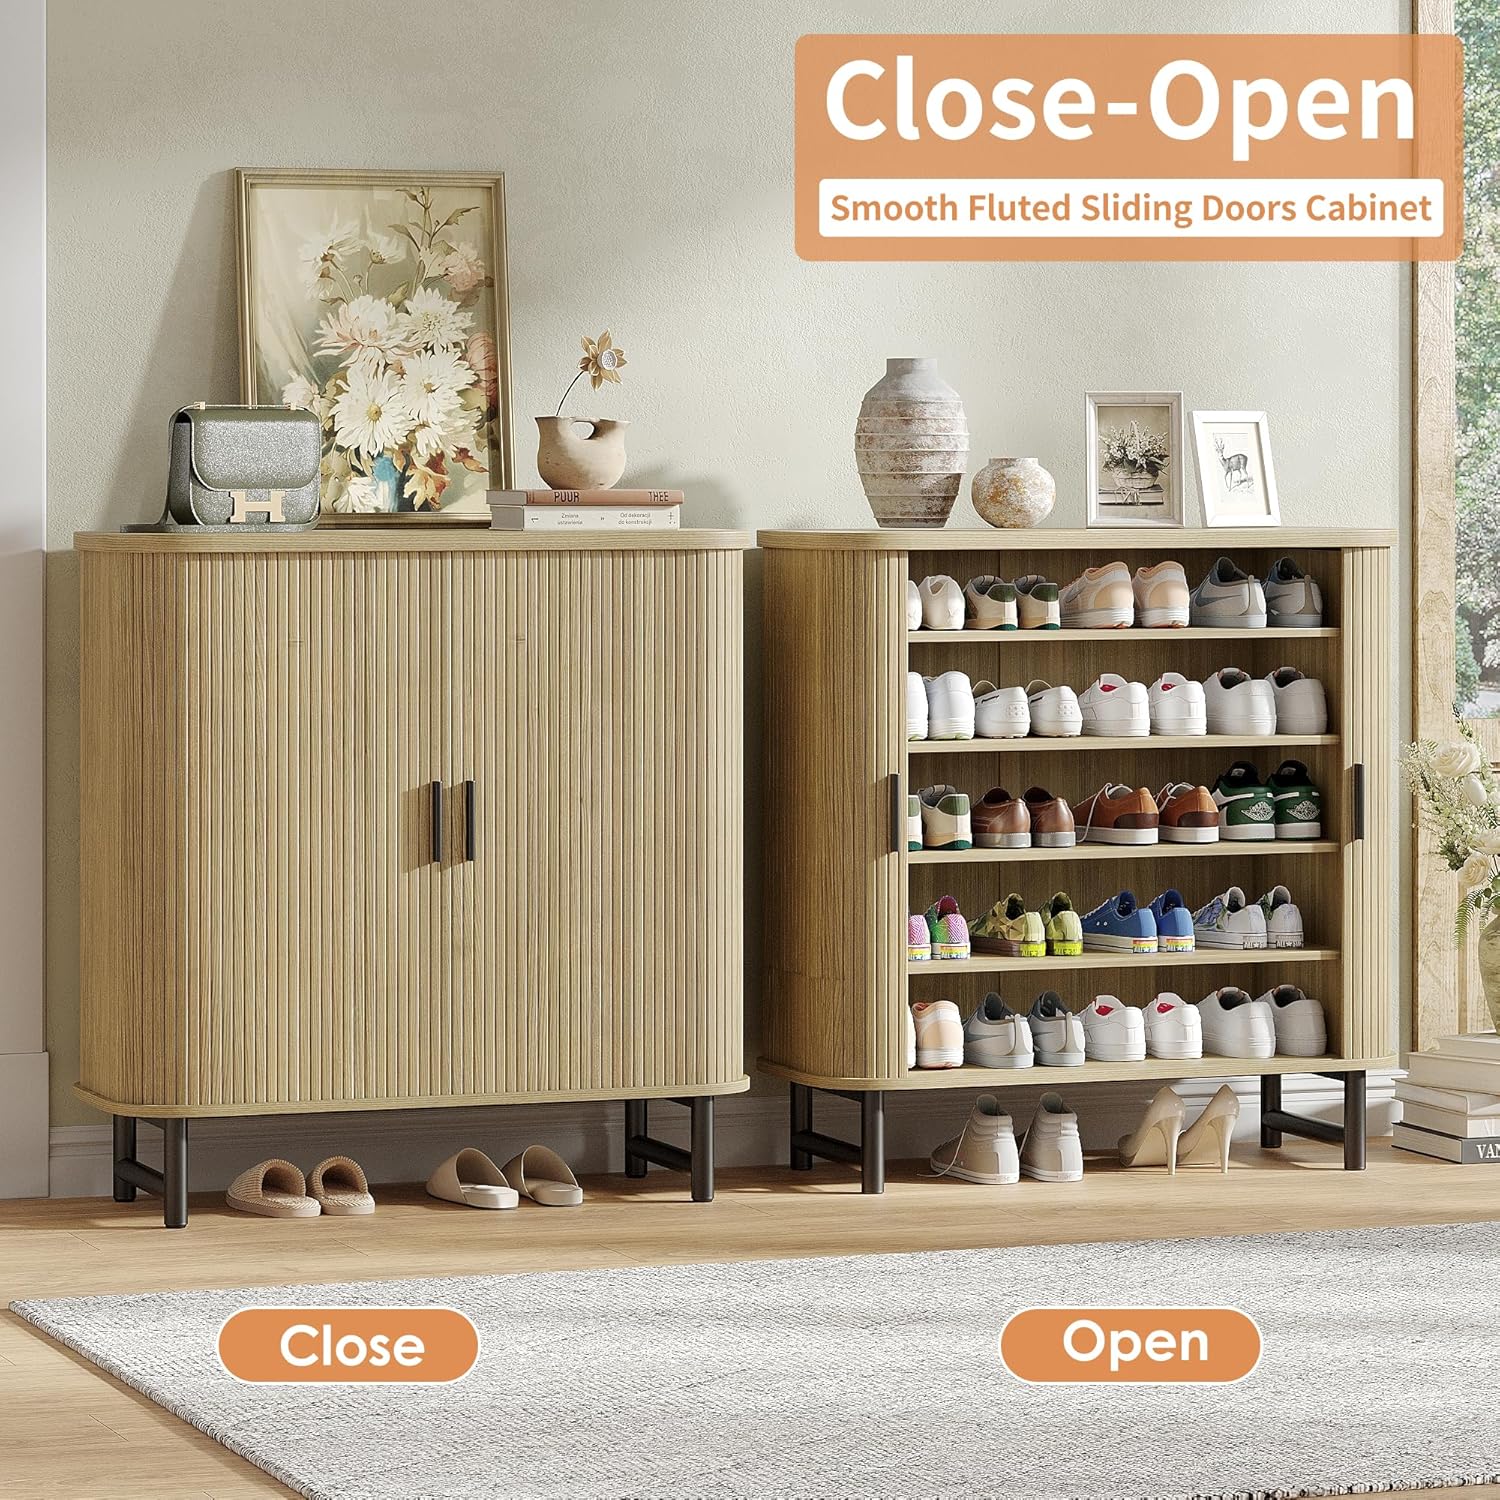
- Smooth Fluted Sliding Doors: Features a unique groove sliding door mechanism designed for smooth operation. The wood is polished and waxed, allowing the doors to become smoother with increased use.
- Elegant Wood Texture: Natural wood grain design provides a modern and elegant aesthetic, blending with various decor styles. The randomly distributed wood texture adds a natural atmosphere.
- Agbara Ibi ipamọ nla: Offers 5 layers of storage space behind the doors for shoes, 1 top storage space for display items, and 1 heightened bottom space for slippers or easy cleaning access.
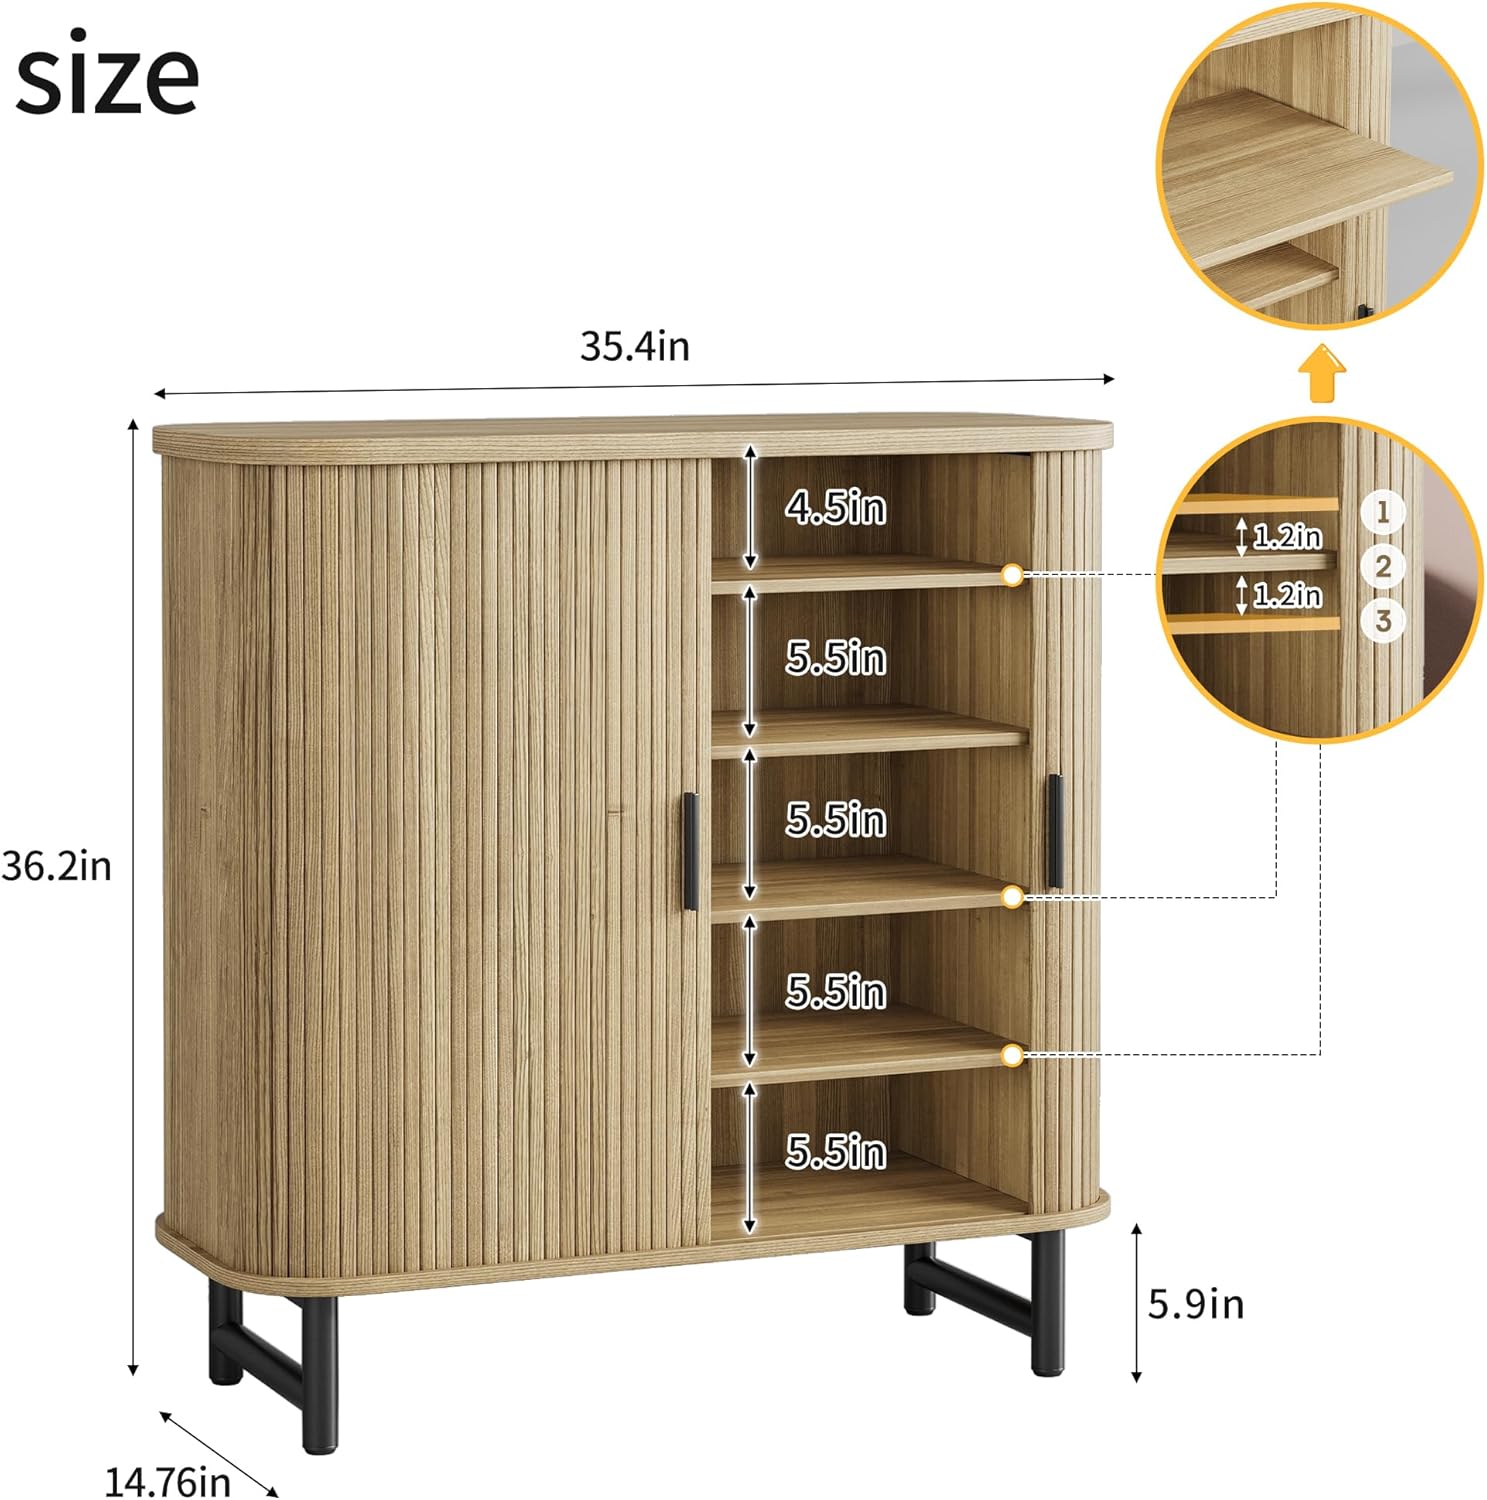
- Awọn selifu ti o le ṣatunṣe: Four shelves in the middle section are adjustable to 3 different height positions. Partitions can also be removed to accommodate taller items like boots. (Note: The second shelf is fixed).
- Apẹrẹ alapọ: Suitable for use in entryways, living rooms, as a kitchen pantry, coffee bar, or sideboard buffet.

Ṣeto
- Yan Ibi: Select a flat, stable surface for the cabinet. Ensure there is enough clearance for the sliding doors to operate smoothly.
- Ìpele: If the floor is uneven, use shims under the metal support legs to ensure the cabinet is level and stable.
- Ni aabo si Odi: As detailed in the "Important Safety Information" section and Figure 1, install the anti-tip hardware to secure the cabinet to a wall.
Awọn ilana Iṣiṣẹ
Sisun ilẹkun
The cabinet features smooth fluted sliding doors. To open, gently push the door panel towards the side. To close, pull the door panel back to the center. The doors are designed to become smoother with continued use.
Awọn selifu adijositabulu
The four middle shelves can be adjusted to three different height positions. To adjust a shelf:
- Sofo selifu ti gbogbo awọn akoonu.
- Carefully lift the shelf and remove it from its current supports.
- Relocate the shelf supports to the desired height.
- Place the shelf back onto the supports, ensuring it is level and secure.
For storing taller items like boots, shelves can be completely removed. Note that the second shelf from the top is fixed and cannot be adjusted or removed.
Itoju
- Ninu: Pa awọn ipele minisita nu pẹlu asọ, damp Aṣọ. Yẹra fún lílo àwọn kẹ́míkà líle, àwọn ohun ìfọmọ́ tí ó lè pa igi náà lára, tàbí àwọn ohun ìpara tí ó lè ba ìrísí igi náà jẹ́.
- Idasonu: Lẹsẹkẹsẹ mu ese eyikeyi ti o da silẹ lati dena ibajẹ omi tabi abawọn.
- Ilana ilekun: The sliding doors are designed to become smoother with use. If they become stiff, ensure the tracks are free of debris. Avoid applying lubricants unless specifically recommended by the manufacturer.
- Hardware: Periodically check all screws and fasteners to ensure they are tight. Re-tighten as needed to maintain stability.
Laasigbotitusita
| Isoro | Owun to le Fa | Ojutu |
|---|---|---|
| Awọn ilẹkun ko rọra laisiyonu. | New product stiffness; debris in tracks; uneven assembly. | Continue using the doors, as they are designed to become smoother over time. Check tracks for any obstructions and remove them. Verify that the cabinet is assembled correctly and is level. |
| Minisita kan lara riru tabi riru. | Uneven floor; loose hardware; anti-tip not installed. | Ensure the cabinet is on a level surface; use shims if necessary. Check and tighten all assembly hardware. Install the anti-tip hardware securely to a wall. |
| Awọn ẹya ti o padanu tabi awọn paati ti o bajẹ. | Àṣìṣe ìfipamọ́; ìbàjẹ́ ìfiránṣẹ́. | Do not proceed with assembly. Contact Maupvit customer support immediately for replacement parts. |
Awọn pato
| Brand | Maupvit |
| Nọmba awoṣe | B0F7LSG1KW |
| Àwọ̀ | Adayeba |
| Ohun elo | Igi |
| Awọn iwọn Ọja (D x W x H) | 14.76"D x 35.43"W x 36.22"H |
| Nọmba ti selifu | 5 (4 ti a le ṣatunṣe, 1 ti a ti tunṣe) |
| Nọmba ti ilẹkun | 2 (Yíyọ) |
| Iṣagbesori Iru | Floor Mount (Freestanding with anti-tip option) |
| Apejọ ti a beere | Bẹẹni |
Atilẹyin ọja ati Support
Maupvit is committed to product quality and customer satisfaction. This product comes with a 10-odun didara atilẹyin ọja ati lifetime maintenance support.
For any questions, missing parts, or support needs, please contact Maupvit customer service through the retailer's platform or the official Maupvit webojula.
For more information about Maupvit products, visit the Maupvit Store.