WUNDA Phase 4 Heat Source Connection and Control Setup
INTRODUCTION
Phase 4:
- Heat source connection & control setup – Professional installation guide Before proceeding to phase 4, ensure that phase 3 has been fully completed.
Phase 4 Professional – Heat source connection & control setup
- Ensure a qualified professional carries out the following steps. Please take care that all the necessary steps in the previous phases have been completed.
INSTALLATION
STEP 1
- Pre-Connection checklist
- Before connecting the manifold to the heat source, perform a pressure test on the floor heating system, pipes, and manifold. Rectify any sources of pressure loss.

STEP 2
- Connecting the manifold to the heat source
- Each manifold(s) must have independent feed(s) from the heat source.
- It is recommended for an s-plan/s-plan + to be configured so each system sharing the heat source has its own 2 port motorised valve. Allowing separation of the systems and each to have its own call to the heat source.
To connect to isolation valves on either side of the mixing valve, use a 1” male iron to 15mm, 22mm, or 28mm compression fitting.
- 2–4 port manifolds: 15mm feeds
- 4–8 port: 22mm feeds
- 8–12 port: 28mm feeds
Ensure the manifold blending valve is fully closed before introducing heated water.

STEP 3
- Venting air from the system
- When the manifold is connected to the heat source, and the feeds are filled ensure the floor heating loops remain isolated. Check that the flow meters and return valves are closed (rotated fully clockwise).

This will ensure that any air introduced from the feeds to the manifold can be vented using the manual air vents not allowing any air into the UFH loops.

STEP 4
- Adding inhibitor to the system
- Dose the system with a suitable inhibitor like any central heating system. Introduce the inhibitor at any suitable filling point. To calculate water volume:
- 16mm pipe: Total loop length × 0.113 = litres
- 12mm pipe: Total loop length × 0.061 = litres
- Use loop lengths from the pipe layout drawing.

For the HubSwitch guide please see:
https://www.wundagroup.com/wp-content/uploads/2025/03/HubSwitch-manual_v2.pdf
STEP 5
Wiring and control
- The following instructions are for Wunda smart controls. If you are using standard controls from Wunda, please follow the relevant fact sheet. If you are using third party controls, please ensure to follow their guidance.
Single-zone manifolds using Wunda smart controls
- For single-zone manifolds (all loops run together), electronic actuators and a connection box are not needed.
- Open all manual return valves by hand (anticlockwise).

Use a HubSwitch channel (230V) to trigger:
- Brown wire of manifold zone valve Live wire of the manifold pump
- Making appropriate connections for the pumps neutral and earth. The rest of the zone valve cables would come back to the s-plan wiring box next to the heat source, grey and orange being used to trigger the heat source.
- The HubSwitch needs to be configured to the appropriate channel mode using the dip switches and jumper connection. Please follow the HubSwitch instructions for appropriate configuration depending on what you are using it to trigger.
Wiring & control for multi-zone manifolds using Wunda smart controls
- Wiring of the connection box for multizone manifolds. Electronic actuators are used to allow loop(s) to flow independently of each other when different zones call for heat. These are wired into the connection box and are configured in the app. If installing more than one multizone manifold a connection box would be required for each, max of 4 connection boxes per hub.
- Mounting Note: Do not mount the connection box below the manifold to avoid water damage.

Remove all of the manual return valve caps and fit the electronic actuators in their place. Keep the manual caps for future use as they are useful if ever re-filling or purging the loops of air.
Wiring Instructions:
- Connect the actuator live and neutral wires to the appropriate actuator L & N terminals on the connection box. In order, 1-12 (depending on the manifold size).
- The zones will be configured later in the app when configuring the rooms as to which actuator(s) get triggered when each room calls for heat.
- Connect the manifold pump live, neutral and earth to the labelled terminals in the connection box.

- The brown of the zone valve for the floor heating manifold should go into the normally open (NO) terminal on the connection box with a link made between the AC out 230V L to COM.
- Optional: Use a 230V HubSwitch channel to trigger the manifold zone valve.
- If triggering the heat source directly (not part of an s-plan) the relay can be used, either volt free with no link or 230V with a link made to COM.
- The HubSwitch can also be used, refer to its instruction to configure for one channel 230V or volt free mode.
STEP 6
System pairing and configuration via app
- Testing before pairing:
- Connection box:
- To test outputs on the connection box, hold the test button for 5 seconds to enter test mode (Test LED will flash blue)
- Tap the test button to cycle outputs to the right, through each actuator an LED will illuminate to show which output is being tested.
- Tap the test button to cycle to the left to test the relay and manifold pump.
- When you have confirmed the wiring is correct exit test mode by holding the test button.

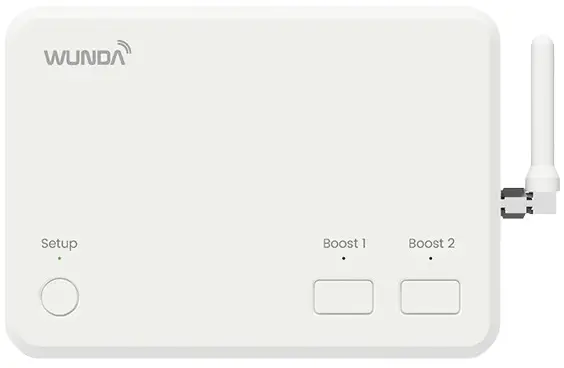
HubSwitch:
- To test outputs on the HubSwitch hold boost 1 & 2 buttons together for 5 seconds,
- Tapping boost 1 will allow you to cycle through each channel the LED flashes to show which channel is being tested (depending on how the Hub is configured).
- Tapping boost 2 will toggle that channel on/off showing a green LED when on, or a red LED when off.
- Hold both boost 1 & 2 to come out of test mode.

App setup process:
- Please ensure that your router is broadcasting a 2.4GHz WiFi. Some steps may need to be taken to ensure this in the router or with the broadband provider. This is necessary for any smart controls.
- Download WundaHome app, create an account, and select:
- Add System > Add HubSwitch
- Follow the instructions in the app to setup the HubSwitch connecting it to the internet and pairing it with your account (this can be transferred using a transfer code after commissioning).
- Pair the connection box(s) with the system by following the instructions in the app giving each an appropriate name if multiple connection boxes name them based on the manifold it is controlling.
- Create and name rooms in the app.
- Pair a thermostat with each room, following the instructions on the app.
- Go to Room Settings > Advanced Parameters > Connection Box Configuration:
- Highlight actuators for that room. And “Relay” if connection box relay is being used to trigger zone valve / heat source.
- If not using the connection box relay to trigger the zone valve/ heat source select the appropriate channel in “HubSwitch channel configuration”.
- Repeat this to configure the appropriate outputs for each room.
STEP 7
- Initial system start-up and flow rate setup
- Manually set the flow rates for each loop. Set the mixing valve to minimum to start, open it up to achieve a higher flow temperature, indicated on the top temperature gauge.
- Open the flow meters (and manual return valve caps if a single zone manifold).
- Call for heat on all floor heating rooms on the app by selecting a higher temperature than the current room temperature.
- Within 2-5 minutes the actuators should trigger, the manifold pump and the trigger to the heat source.
- The flow rates will need to be adjusted on the flow meters.
- Set the flow rates following the table on the pipe layout drawing. These may need slight adjustments, if flow rates are set correctly you should get a 7° differential between the flow and return temperature gauges. (5-10° is acceptable).

- The faster the rate of flow in a loop the lower the differential will be, slower rates of flow result in a higher differential.
- If struggling to achieve the correct rates of flow, check the pump is in the correct mode for underfloor heating. There may also be air still in the loops, repeat the filling procedure to ensure no air causing resistance in the loop slowing the rate of flow.
- These instructions are strictly for use with Wunda systems only — using them with any other system may result in serious performance issues, system failure, or invalidation of your warranty.
warranty
- These instructions are strictly for use with Wunda systems only — using them with any other system may result in serious performance issues, system failure, or invalidation of your warranty.
- www.wundagroup.com 01291 634 149
Frequently Asked Questions
Q: Can I use these instructions with systems other than Wunda?
A: No, these instructions are strictly for use with Wunda systems only. Using them with any other system may result in serious performance issues, system failure, or invalidation of your warranty.
Documents / Resources
 | WUNDA Phase 4 Heat Source Connection and Control Setup [pdf] Installation Guide Phase 4 Heat Source Connection and Control Setup, Heat Source Connection and Control Setup, Connection and Control Setup |