1. تعارف
Thank you for choosing the SOLPERK 10A 12V MPPT Solar Charge Controller. This device is designed to efficiently manage power from your solar panel to charge various 12V battery types, including Gel, AGM, Lead-Acid, and Lithium LiFePO4. It features an LCD display for clear status monitoring and incorporates multiple protection systems to ensure safe and reliable operation.
اہم نوٹس:
- This controller is specifically designed for 12V batteries and is not suitable for batteries with higher voltages
- When using the controller, please connect the battery first, then connect the solar panel.
- For any questions, please contact the SOLPERK service team via Amazon.
2. پیکیج کے مشمولات
پیکج کھولنے پر، آپ کو درج ذیل اشیاء ملنی چاہئیں:
- SOLPERK 10A 12V MPPT Solar Charge Controller (Model: HC-SM10A)
- صارف دستی
- SAE Connector

Image: The package contents including the MPPT controller, user manual, and SAE connector.
Video: An unboxing of the SOLPERK MPPT 10A 12V Solar Controller, showing the controller, manual, and SAE connector.
3. وضاحتیں
| فیچر | تفصیل |
|---|---|
| مصنوعات کے طول و عرض | 5 x 2.7 x 2.7 انچ |
| شے کا وزن | 7.8 اونس |
| کارخانہ دار | سولپرک |
| آئٹم ماڈل نمبر | HC-SM10A |
| رنگ | سیاہ |
| ڈسپلے کی قسم | LCD |
| کنٹرولر کی قسم | ایم پی پی ٹی |
| بیٹری والیومtage | 12V |
| زیادہ سے زیادہ کرنٹ | 10A |
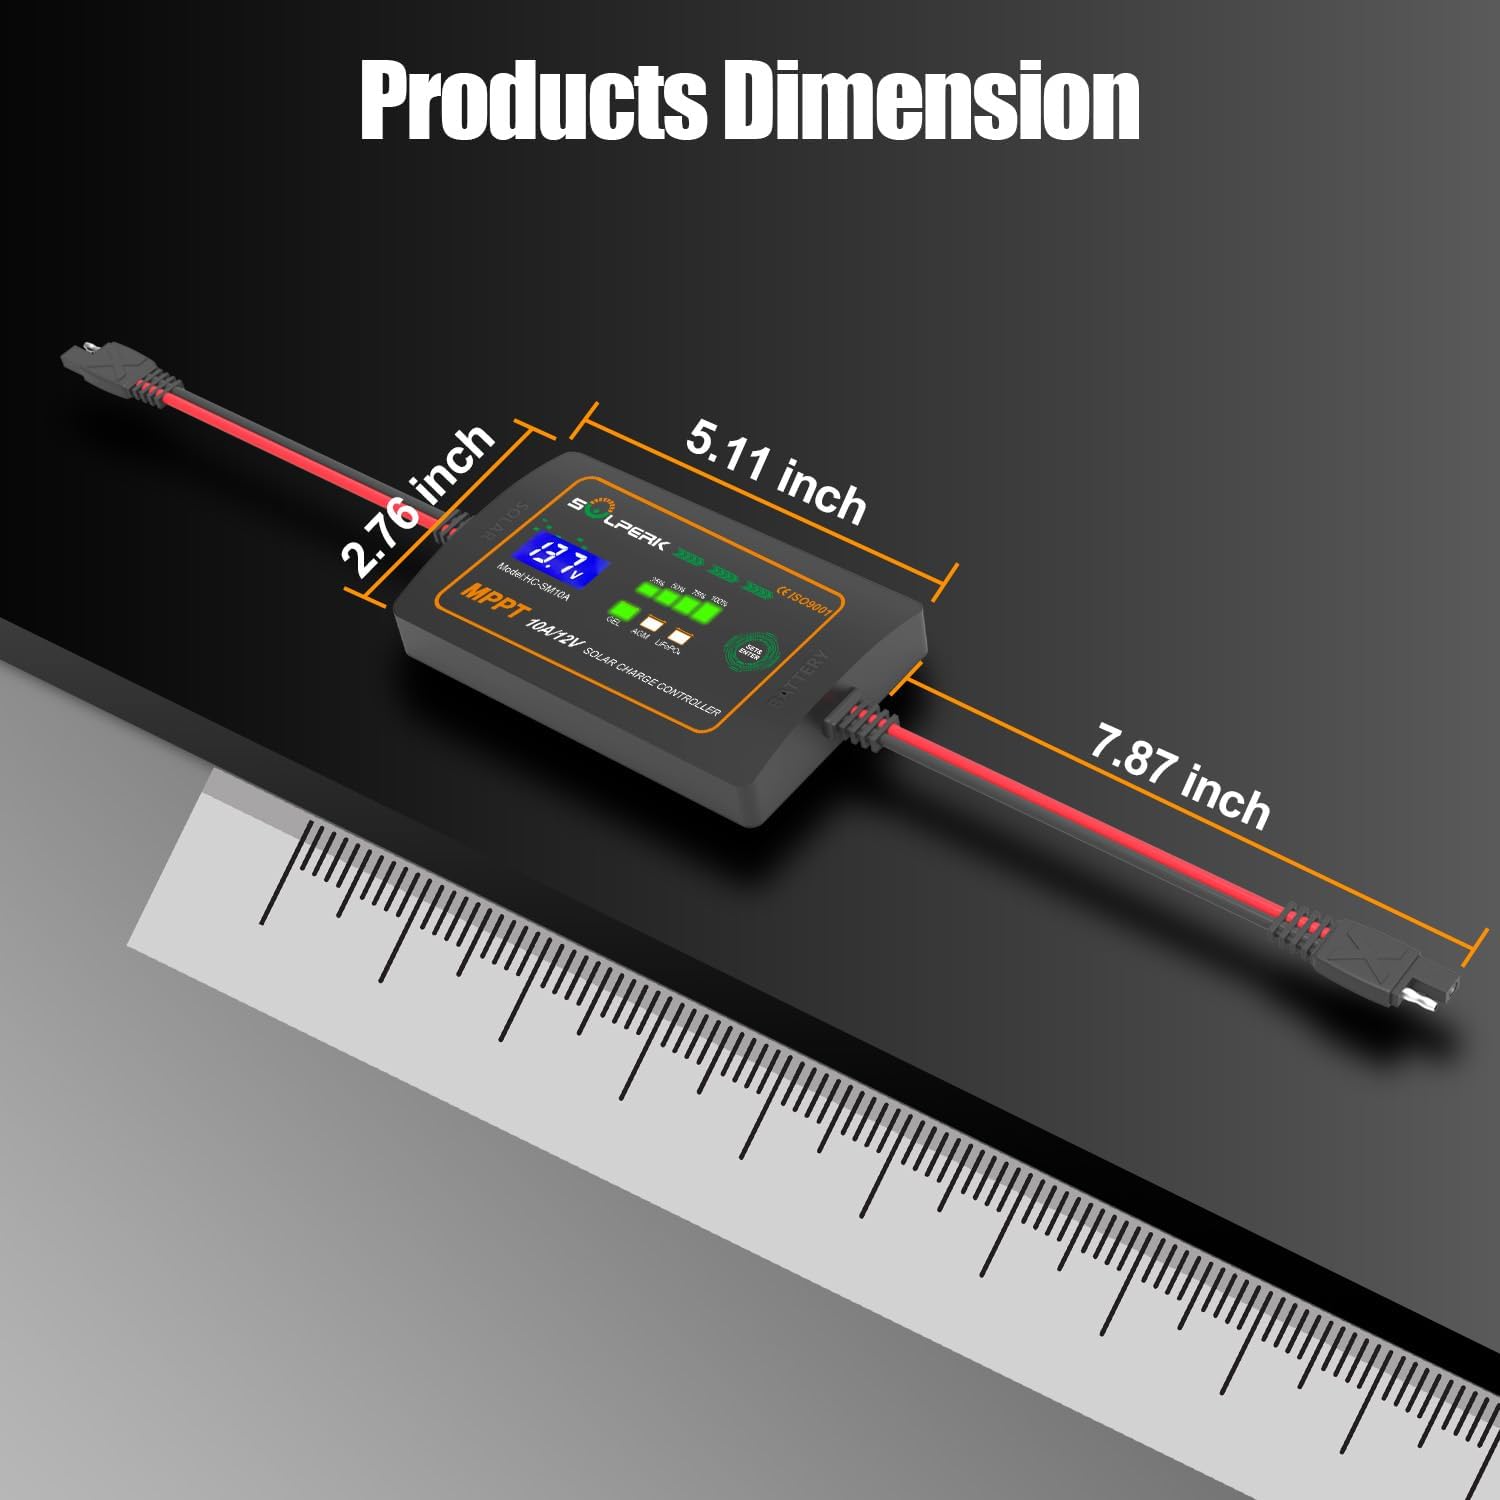
Image: The product dimensions are shown as 5.11 inches in length, 2.76 inches in width, and 7.87 inches including cables.
4. سیٹ اپ اور کنکشن
Follow these steps to properly set up your SOLPERK MPPT Solar Charge Controller:
- سولر پینل کی جگہ کا تعین: Install the solar panel in a location with ample sunlight. Ensure the panel is not covered by any shadows to maximize efficiency.
- Connect to Battery First: Connect the controller to your 12V battery. The controller is powered by the battery, so this step must be completed first. Ensure connections are secure and follow polarity markings.
- بیٹری کی قسم منتخب کریں: After connecting to the battery, use the "SET & ENTER" button on the controller to select the correct battery type (GEL, AGM, LiFePO4). The default setting is typically GEL.
- سولر پینل سے جڑیں: Once the battery is connected and the battery type is selected, connect the solar panel to the controller. The controller will begin charging the battery.
Video: A step-by-step guide demonstrating how to connect the solar panel, controller, and battery, including selecting the battery type.

تصویر: ایک دھماکہ view of the controller highlighting its internal components and various safety protections like reverse polarity, overcharge, discharge, over voltage, over temperature, short circuit, over current, and overload prevention.
5. آپریٹنگ ہدایات
The SOLPERK MPPT controller is designed for ease of use. Once connected, it will automatically begin charging based on the selected battery type and available solar power.
- LCD ڈسپلے: The LCD screen displays real-time charging status, including battery voltagای اور موجودہ.
- ایل ای ڈی اشارے: LED lights indicate the battery's State of Charge (SOC) at 25%, 50%, 75%, and 100%.
- بیٹری کی قسم کا انتخاب: Press the "SET & ENTER" button to cycle through and select the appropriate battery chemistry (GEL, AGM, LiFePO4). Hold the button for 3 seconds to confirm the selection.

Image: Close-up of the controller's LCD display and LED indicators, showing battery voltagای اور چارج فیصدtage for different battery types.
6 دیکھ بھال
To ensure the longevity and optimal performance of your SOLPERK MPPT Solar Charge Controller, consider the following maintenance tips:
- باقاعدہ معائنہ: Periodically check all connections for tightness and corrosion. Ensure cables are not damaged.
- صفائی: Keep the controller and solar panel clean from dust, dirt, and debris. Use a soft, dry cloth for cleaning.
- ماحولیاتی حالات: While the controller is designed for outdoor use, avoid prolonged exposure to extreme weather conditions if possible. Ensure proper ventilation around the unit.
- بیٹری کی صحت: Monitor your battery's health and ensure it is suitable for solar charging.
7 خرابیوں کا سراغ لگانا
If you encounter issues with your SOLPERK MPPT Solar Charge Controller, refer to the following common problems and solutions:
| مسئلہ | ممکنہ وجہ | حل |
|---|---|---|
| کنٹرولر آن نہیں ہو رہا ہے۔ | بیٹری منسلک نہیں ہے یا کم والیومtage; incorrect polarity. | Ensure battery is connected first and has sufficient charge. Verify correct polarity. |
| No charging from solar panel | Solar panel not connected; insufficient sunlight; damaged solar panel or cable. | Connect solar panel after battery. Ensure panel is in direct sunlight and free of shadows. Check panel and cable for damage. |
| Incorrect battery type displayed | Battery type not correctly selected. | Press and hold "SET & ENTER" button to cycle and select the correct battery type. |
| Overcharge/Over-discharge protection active | بیٹری جلدtage exceeded safe limits. | The controller's built-in protections will manage this. Ensure battery is healthy and correctly sized for your system. |
If the issue persists, please contact SOLPERK customer support for further assistance.
8. وارنٹی اور سپورٹ
SOLPERK products are designed for reliability and performance. This product typically comes with a 5-year warranty. For specific warranty details, please refer to the documentation included with your purchase or contact SOLPERK directly.
For technical support, troubleshooting, or warranty claims, please contact the SOLPERK service team via Amazon or through the contact information provided in your product packaging. You can also visit the official SOLPERK store on Amazon for more information and related products: SOLPERK Store.