
1. تعارف
Thank you for choosing the Fanttik T1 Max Soldering Iron Kit and E1 Ultra Mini Electric Screwdriver. This manual provides essential information for the safe and effective operation, maintenance, and troubleshooting of your new tools. Please read this manual thoroughly before use and retain it for future reference.

Image 1.1: The Fanttik T1 Max Soldering Iron and E1 Ultra Electric Screwdriver Kit, showcasing both tools and their respective cases.
2. پروڈکٹ ختمview اور اجزاء
2.1 Fanttik T1 Max Soldering Iron
The T1 Max is a portable soldering iron designed for precision work, featuring rapid heating and dual power modes.
- Soldering Iron Unit
- C210 Soldering Tips (I, IS, 2x K types)
- Soldering Iron Stand
- Solder Sucker
- صحت سے متعلق چمٹی
- ٹائپ سی چارجنگ کیبل

تصویر 2.1: تفصیلی view of the C210 precision soldering tips included with the T1 Max, showing various tip shapes and dimensions.
2.2 Fanttik E1 Ultra Mini Electric Screwdriver
The E1 Ultra is a compact electric screwdriver with precise torque control and an integrated bit storage system.
- E1 Ultra Electric Screwdriver
- 50 S2 اسٹیل پریسجن بٹس
- بار بار
- چمٹی
- ٹائپ سی چارجنگ کیبل

Image 2.2: The comprehensive set of 50 S2 steel precision bits, pry bar, and tweezer included with the E1 Ultra electric screwdriver.
3. سیٹ اپ
3.1 Fanttik T1 Max Soldering Iron Setup
- چارج کرنا: Connect the T1 Max to a Type-C power source using the provided cable. The indicator light will show charging status.
- Attaching Soldering Tip: Carefully insert the desired C210 soldering tip into the heating element opening until it is securely seated. Ensure the tip is fully inserted for optimal heat transfer.
- جگہ کا تعین: Always place the soldering iron in its stand when not actively soldering to prevent accidental burns or damage.
3.2 Fanttik E1 Ultra Mini Electric Screwdriver Setup
- چارج کرنا: Connect the E1 Ultra to a Type-C power source. The LED indicator will signal charging.
- Bit Selection and Installation: Select the appropriate S2 steel bit from the RevoStor™ storage system. Insert the bit into the magnetic bit holder at the tip of the screwdriver. Ensure it is firmly seated.
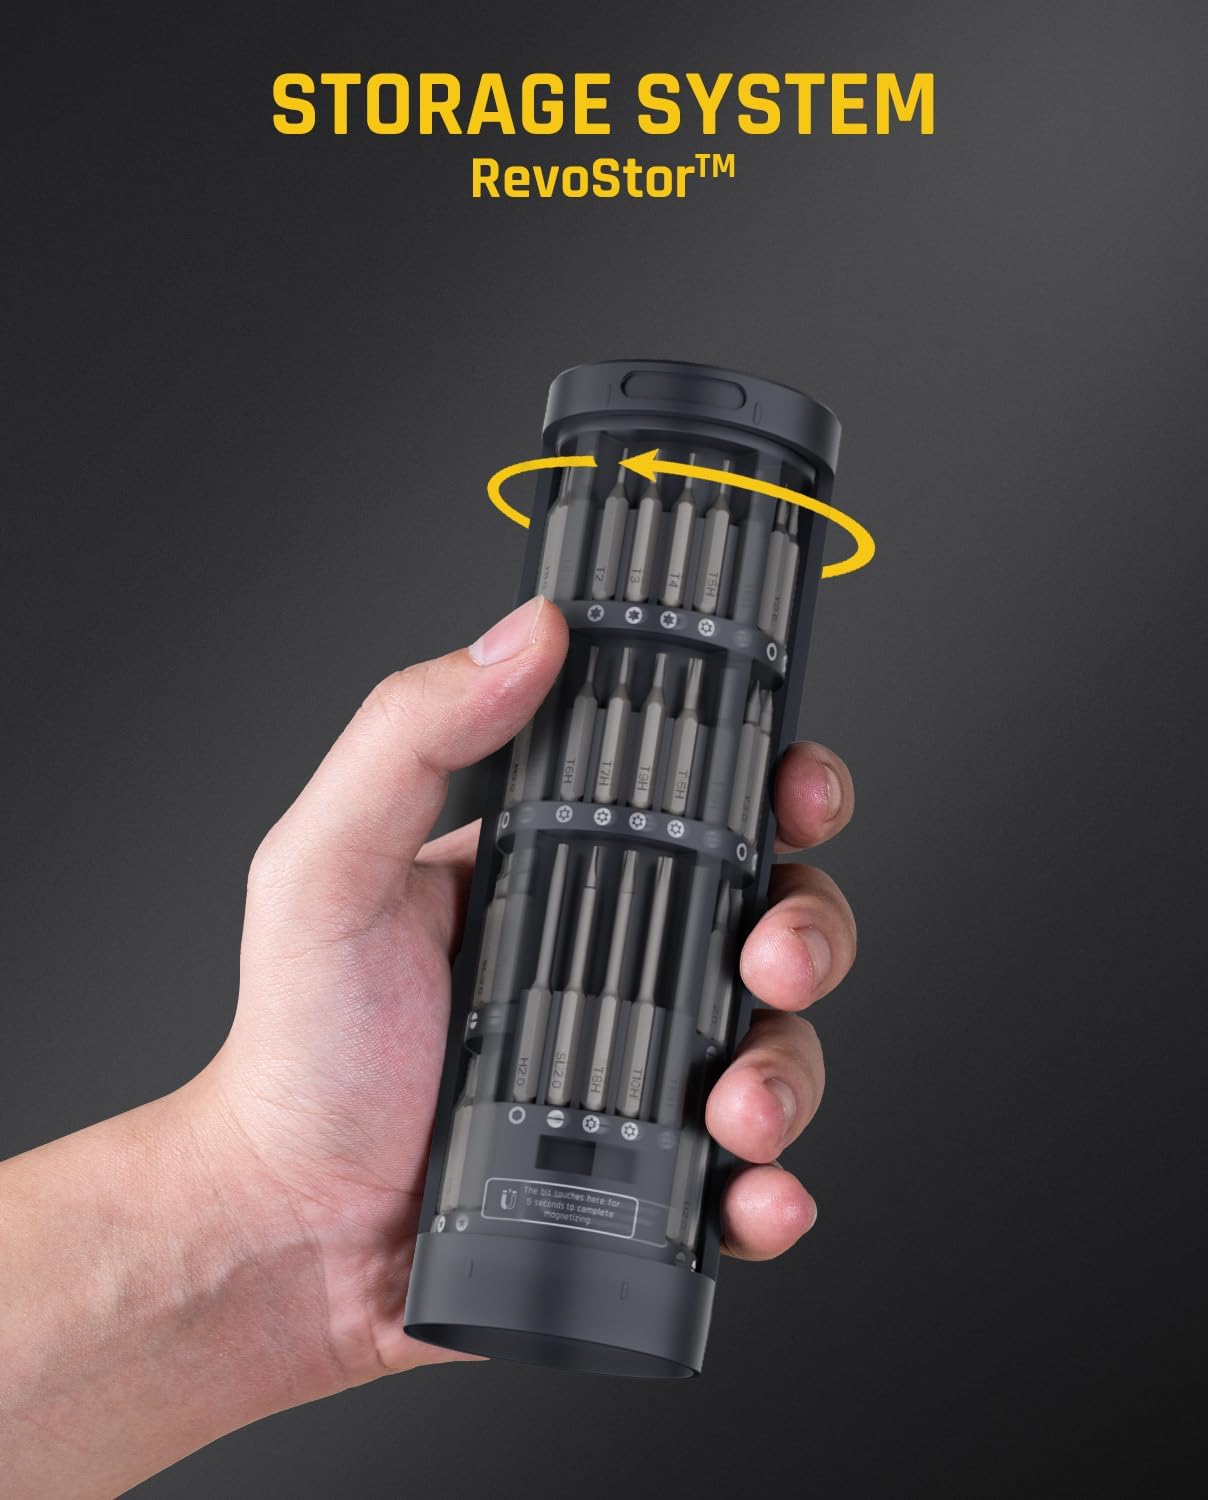
Image 3.1: The E1 Ultra's RevoStor™ internal rotating storage chamber, designed for convenient access and organization of precision bits.
4. آپریٹنگ ہدایات
4.1 Fanttik T1 Max Soldering Iron Operation
- پاور آن/آف: Press and hold the power button to turn the soldering iron on or off.
- درجہ حرارت کی ایڈجسٹمنٹ: Rotate the temperature adjustment ring to select one of the 6 available temperature levels, ranging from 390°F (200°C) to 840°F (450°C). The selected temperature will be displayed.

Image 4.1: The temperature adjustment mechanism on the T1 Max soldering iron, showing the 6 distinct temperature levels.
- تیز حرارت: The T1 Max features rapid heating, reaching operating temperature in as fast as 7 seconds.

Image 4.2: The T1 Max soldering iron in use, demonstrating its super-fast heating capability, reaching 840°F from 0°F in 7 seconds.
- وائرلیس موڈ: The built-in 2600mAh battery provides up to 60 minutes of working time at 840°F (450°C) with a maximum DC output of 11W.
- Corded Mode: For extended use, connect the T1 Max via its Type-C port to a charger or mobile power supply. In wired mode, the maximum AC output is 16W.

Image 4.3: Illustration of the T1 Max's wireless mode (battery-powered) and corded mode (Type-C powered) operation.
4.2 Fanttik E1 Ultra Mini Electric Screwdriver Operation
- ٹارک کی ترتیبات: The E1 Ultra offers three torque modes:
- Low Torque (L): 0.05 N·m, suitable for delicate tasks.
- High Torque (H): 0.2 N·m, for general precision work.
- دستی موڈ: Up to 3 N·m, for loosening stubborn screws before electric mode.
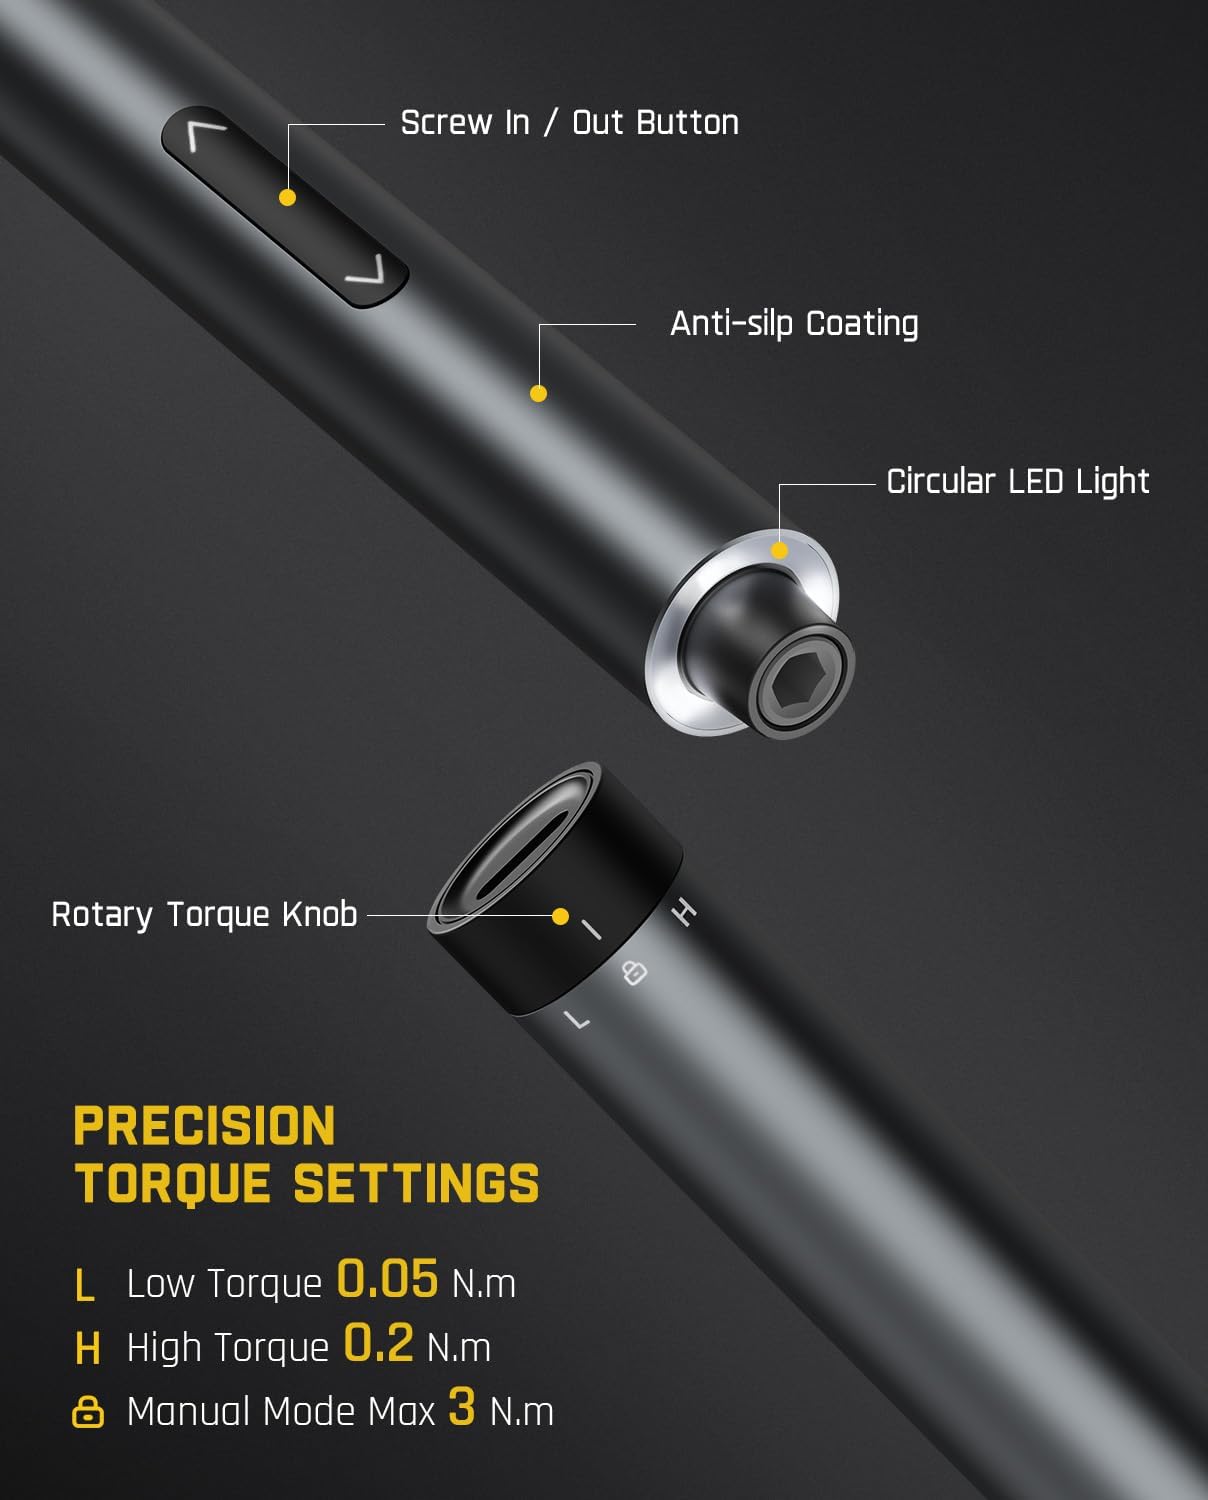
Image 4.4: Close-up of the E1 Ultra screwdriver, highlighting the rotary torque knob and its precision settings (Low, High, Manual).
- Screw In/Out: Use the designated screw in/out buttons to operate the screwdriver. The speed is independent of the torque setting.
- درخواست: The E1 Ultra is designed for precision repair tasks on electronic devices such as smartphones, laptops, cameras, and drones.
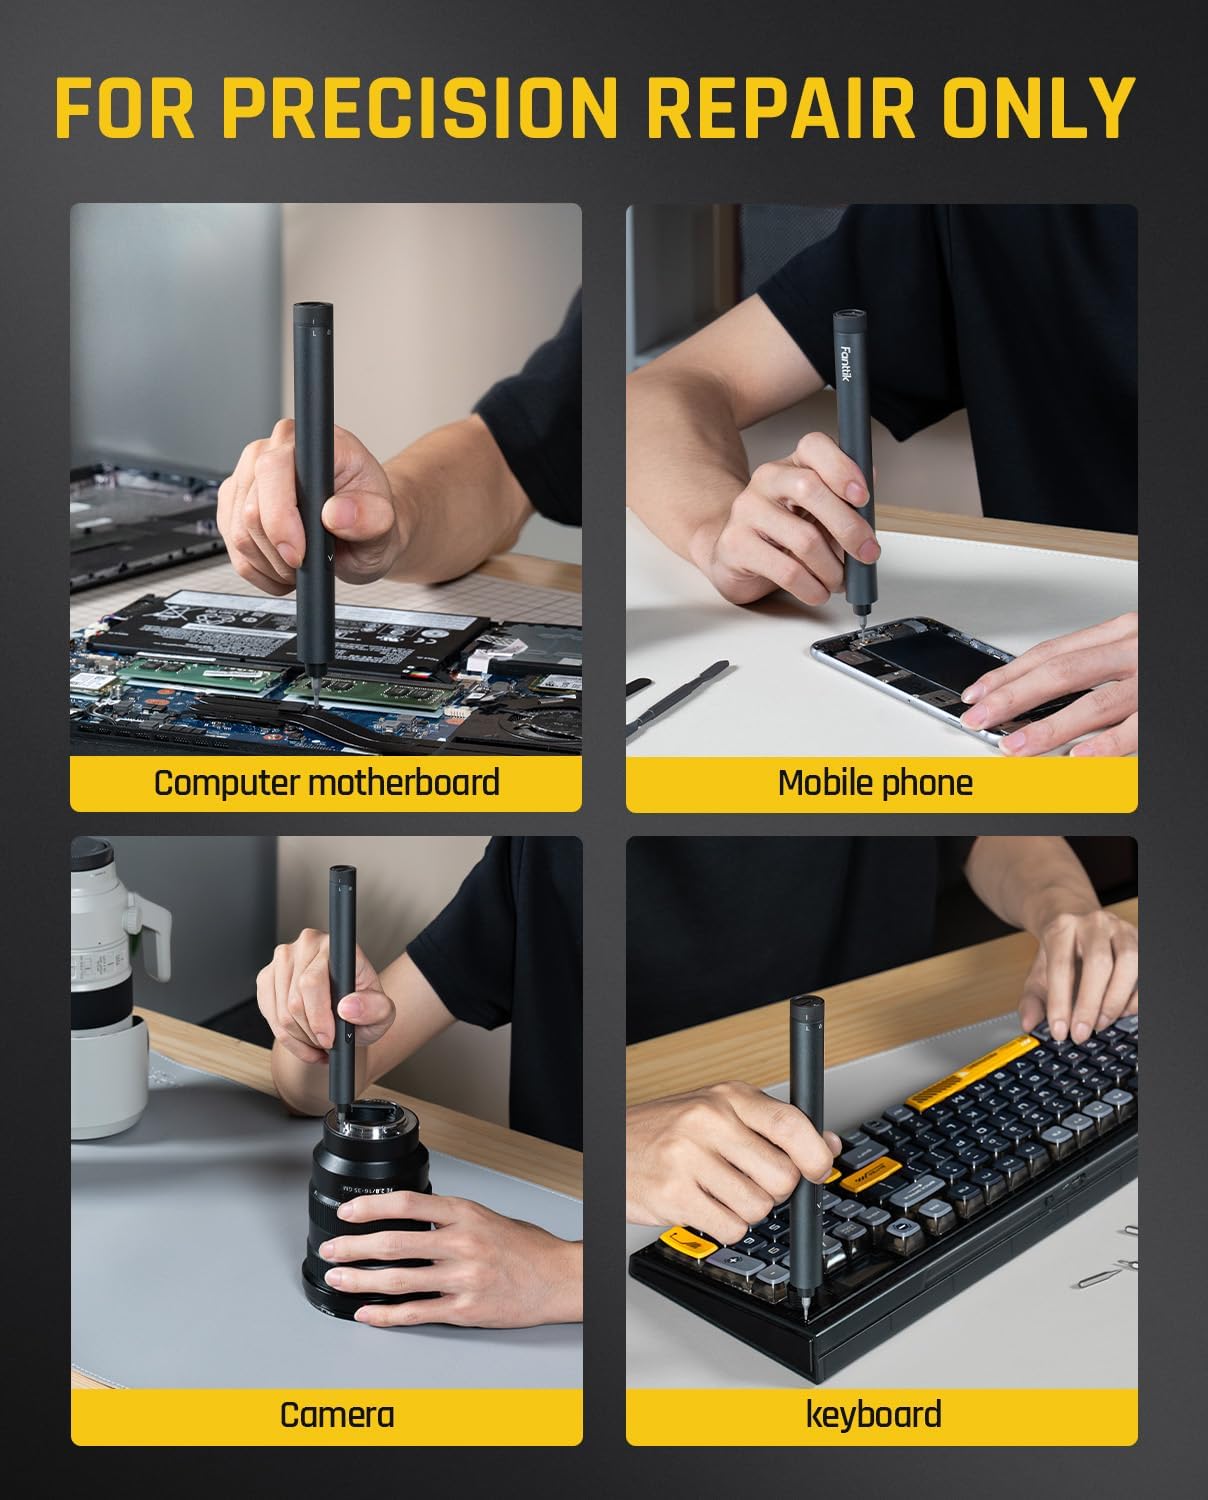
Image 4.5: The E1 Ultra electric screwdriver being used for precision repairs on various electronic devices, including computer motherboards, mobile phones, cameras, and keyboards.
5 دیکھ بھال
5.1 Fanttik T1 Max Soldering Iron Maintenance
- صفائی کا مشورہ: Regularly clean the soldering tip using the included sponge or brass wool to remove excess solder and oxidation. A clean tip ensures efficient heat transfer.
- Tinning: After cleaning and before storage, apply a small amount of solder to the tip (tinning) to prevent oxidation and prolong tip life.
- ذخیرہ: Store the soldering iron in a dry, safe place, preferably in its original packaging or a protective case, with the tip removed or properly tinned.
5.2 Fanttik E1 Ultra Mini Electric Screwdriver Maintenance
- بٹ کی دیکھ بھال: Keep the S2 steel bits clean and free from debris. Store them securely in the RevoStor™ system to prevent loss or damage.
- صفائی: Wipe the screwdriver body with a soft, dry cloth. Avoid using harsh chemicals or abrasive materials.
- چارج کرنا: Recharge the screwdriver when the battery is low to ensure it is ready for use. Avoid over-discharging for optimal battery life.
6 خرابیوں کا سراغ لگانا
| مسئلہ | ممکنہ وجہ | حل |
|---|---|---|
| T1 Max not heating up | Low battery; Loose tip; Power issue | Charge the device; Re-insert tip securely; Check Type-C connection. |
| T1 Max heats slowly or unevenly | Dirty/oxidized tip; Incorrect temperature setting | Clean and tin the tip; Adjust to a higher temperature. |
| E1 Ultra screwdriver not turning | Low battery; Bit not inserted correctly | Charge the device; Ensure bit is fully seated. |
| E1 Ultra struggles with screws | Incorrect torque setting; Stripped screw head; Bit wear | Switch to High Torque or Manual Mode; Use a different bit; Replace worn bits. |
7. وضاحتیں
7.1 Fanttik T1 Max Soldering Iron
- بیٹری کی صلاحیت: 2600mAh
- DC Output (Wireless): زیادہ سے زیادہ 11W
- AC Output (Corded): زیادہ سے زیادہ 16W
- Working Time (Wireless): Up to 60 minutes (at 840°F/450°C)
- درجہ حرارت کی حد: 390°F - 840°F (200°C - 450°C)
- حرارتی وقت: As fast as 7 seconds (0°F to 840°F)
- تجاویز: C210 series (I, IS, 2x K)
7.2 Fanttik E1 Ultra Mini Electric Screwdriver
- موٹر: 200 RPM Hollow Cup Motor
- Low Torque: 0.05 N·m
- ہائی ٹارک: 0.2 N·m
- Manual Torque: Max 3 N·m
- بٹس: 50 S2 اسٹیل پریسجن بٹس
- ذخیرہ: Internal rotating storage chamber (RevoStor™)
8. حفاظتی معلومات
- Always wear appropriate personal protective equipment, including safety glasses, when operating the soldering iron.
- The soldering iron tip reaches very high temperatures. Avoid direct contact with skin or flammable materials.
- دھوئیں کو سانس لینے سے بچنے کے لیے سولڈرنگ کرتے وقت مناسب وینٹیلیشن کو یقینی بنائیں۔
- Keep both tools out of reach of children.
- Do not use the tools in wet conditions or near flammable liquids or gases.
- Only use the provided charging cables and compatible power sources.
- Do not attempt to disassemble or modify the tools.
9. وارنٹی اور سپورٹ
Fanttik products are designed and manufactured to the highest quality standards. For information regarding warranty coverage, technical support, or service, please refer to the warranty card included with your product or visit the official Fanttik webسائٹ سپورٹ سے رابطہ کرتے وقت براہ کرم اپنے پروڈکٹ کا ماڈل اور خریداری کی تاریخ دستیاب رکھیں۔
For further assistance, you may also contact your retailer.