1. Вступ
This manual provides essential information for the safe and efficient operation of your MakeSkyBlue MPPT Solar Charge Controller, model 40A-V123. This device is designed to optimize power harvesting from your solar panels and efficiently charge your battery bank in 12V, 24V, or 48V solar systems. Please read this manual thoroughly before installation and use.
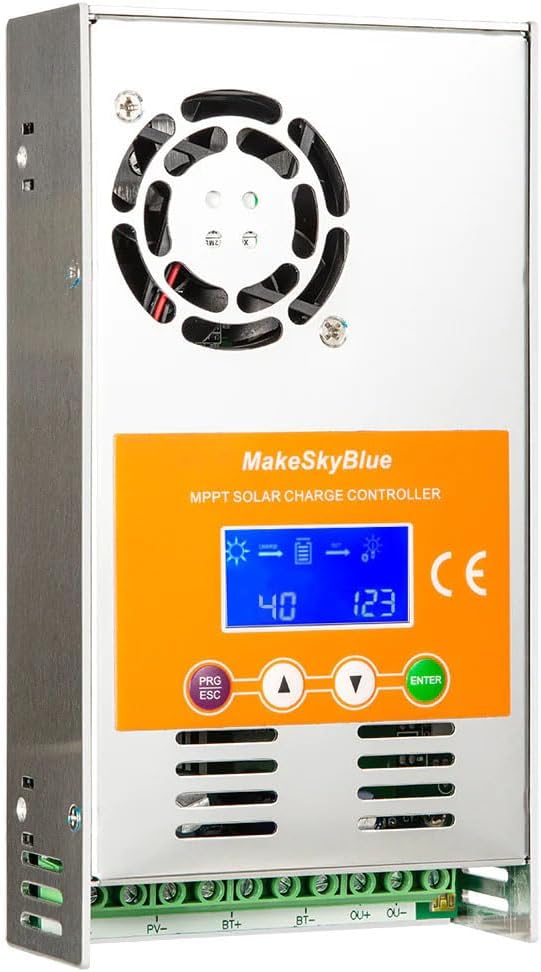
Figure 1: MakeSkyBlue 40A-V123 MPPT Solar Charge Controller
2. Техніка безпеки
Дотримуйтесь наступних запобіжних заходів під час встановлення та експлуатації:
- Ensure all wiring is correctly polarized and securely connected to prevent damage to the controller and other components.
- Always connect the battery to the charge controller перший, and disconnect it останній.
- Do not connect the solar panel array to the controller without a battery connected.
- Ensure the solar panel array's open circuit voltage (Voc) не перевищує максимальну вхідну гучність контролераtage.
- Встановіть контролер у добре провітрюваному приміщенні, подалі від легкозаймистих матеріалів та прямих сонячних променів.
- Use appropriate circuit breakers or fuses for all connections (solar, battery, load).
- Avoid touching live terminals. Only qualified personnel should perform electrical work.
3. Продукт закінчивсяview
The MakeSkyBlue 40A-V123 MPPT Solar Charge Controller features advanced Maximum Power Point Tracking technology to maximize energy harvest from your solar array. It includes a multi-function LCD for monitoring and parameter adjustment, and supports 12V, 24V, and 48V battery systems with automatic voltage виявлення.
3.1 Основні характеристики
- Intelligent Maximum Power Point Tracking (MPPT) technology.
- Вбудований DSP-контролер для високої продуктивності.
- Три-сtage charging algorithm to optimize battery performance and lifespan.
- Multi-function LCD display with backlight for real-time data and error codes.
- Автоматичний об’єм акумулятораtagвиявлення електронного струму (12 В/24 В/48 В).
- Compatible with various battery types including Lead-Acid, AGM, and Gel.
- Protection features: limited current, temperature, and overcharging.

Figure 2: Compatible Battery Types (Gel, Flooded, AGM)

Figure 3: Illustration of Maximum Power Point Tracking (MPPT) vs. PWM
4. Налаштування та встановлення
Follow these steps for proper installation of your MPPT solar charge controller. Refer to the wiring diagram for visual guidance.
4.1 Схема підключення

Figure 4: MPPT Charge Controller System Wiring Diagram
4.2 Етапи встановлення
- Монтаж: Mount the controller vertically on a non-flammable surface in a cool, dry, and well-ventilated area. Ensure adequate clearance around the unit for heat dissipation.
- Підключення акумулятора: Connect the battery cables to the controller's BAT+ and BAT- terminals. Ensure correct polarity. The controller will automatically detect the battery voltage (12 В, 24 В або 48 В).
- Підключення сонячної панелі: Connect the solar panel array cables to the controller's PV+ and PV- terminals. Ensure correct polarity. The controller will begin charging the battery.
- Підключення навантаження (необов'язково): If using the load output, connect your DC loads to the OUT+ and OUT- terminals. Ensure the total current draw does not exceed the controller's rated load current.
- Перевірте підключення: Перед увімкненням системи двічі перевірте всі з'єднання на міцність та правильність полярності.
Important: Always connect the battery first and disconnect it last. Failure to follow this sequence may damage the controller.
5. Інструкція з експлуатації
The controller's LCD display provides real-time system status and allows for parameter adjustments. The control buttons are PRG/ESC, Up (▲), Down (▼), and ENTER.
5.1 Функції РК-дисплея
The LCD cycles through various screens displaying system information. You can manually cycle through screens using the Up/Down buttons or enter parameter settings using PRG/ESC and ENTER.
- Основний дисплей: Shows charging status, battery level, and output status.
- Сукупне виробництво електроенергії: Displays total energy generated by the solar panels.
- PV Voltage and Load Power: Shows current solar panel voltage and load power consumption.
- Акумулятор Voltage and Load Current: Відображає поточний об'єм батареїtagе і струм навантаження.
- Accumulated Discharge: Shows total energy discharged from the battery.
- Внутрішня температура: Відображає внутрішню температуру контролера.
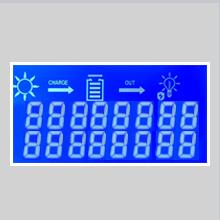
Figure 5: Main Display showing charge and output status.
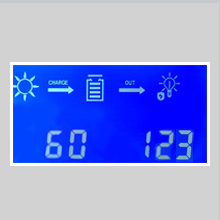
Figure 6: Display showing cumulative power generation.
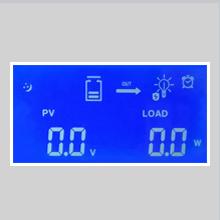
Figure 7: Display showing PV voltage and load power.
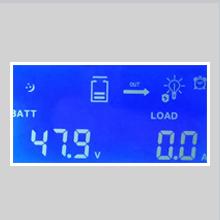
Figure 8: Display showing battery voltagе і струм навантаження.

Figure 9: Display showing accumulated discharge.
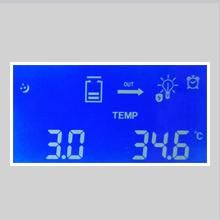
Figure 10: Display showing internal temperature.
5.2 Налаштування параметрів
To enter parameter adjustment mode, press the PRG/ESC кнопку. Використовуйте Up (▲) і вниз (▼) buttons to navigate through parameters and adjust values. Press ENTER to confirm changes. Press PRG/ESC ще раз, щоб вийти з режиму налаштування.
Звичайні регульовані параметри включають:
- b00: Load working mode (e.g., 24H for continuous, or timed modes).
- b01: Захист від перезаряду обtage (e.g., 55.2V for 48V system).
- b02: Відновлення зарядки томtage (e.g., 58.0V for 48V system).
- b03: Захист від перерозряду обtage (e.g., 40.0V for 48V system).
- b04: Відновлення надмірного розряду обtage.
- b06: Battery type setting (e.g., 47.9V for a specific battery type).
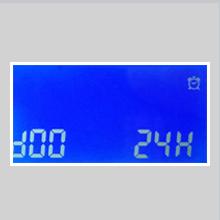
Figure 11: Parameter b00 for load working mode.
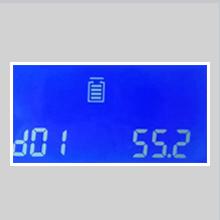
Figure 12: Parameter b01 for overcharge protection voltage.
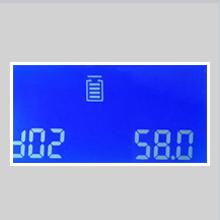
Figure 13: Parameter b02 for charging recovery voltage.
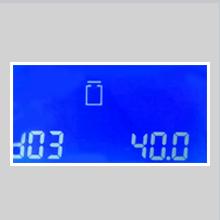
Figure 14: Parameter b03 for over-discharge protection voltage.
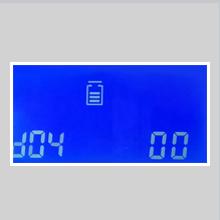
Figure 15: Parameter b04 for over-discharge recovery voltage.
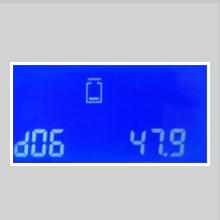
Figure 16: Parameter b06 for battery type setting.
Refer to the full product manual (if available from the manufacturer) for a complete list of parameters and their recommended settings for different battery types.
6. Технічне обслуговування
Регулярне технічне обслуговування забезпечує оптимальну продуктивність та довговічність вашого контролера сонячного заряду:
- Прибирання: Periodically clean the controller's exterior, especially the cooling fins and fan openings, to prevent dust buildup and ensure proper heat dissipation. Use a dry cloth.
- Перевірка підключення: Annually inspect all wiring connections for tightness and corrosion. Loose connections can cause overheating and power loss.
- Вентиляція: Переконайтеся, що місце встановлення добре провітрюється та не має перешкод.
- Перевірка батареї: Regularly check your battery bank for signs of damage, corrosion, or electrolyte levels (for flooded batteries).
7. Вирішення проблем
The LCD display can show error codes to indicate specific issues. If an error occurs, note the code and refer to the manufacturer's documentation for detailed troubleshooting steps. General troubleshooting tips include:
- Немає дисплея/немає живлення: Перевірте з'єднання акумулятора та переконайтеся, що акумулятор має достатній рівень зарядуtage.
- Без зарядки: Verify solar panel connections, ensure sufficient sunlight, and check for any shading on the panels. Confirm PV array voltage знаходиться в межах робочого діапазону контролера.
- Перезарядка/недозарядка: Check battery type settings and charging parameters (b01, b02). Ensure the battery is healthy.
- Навантаження не працює: Check load connections, ensure the load output is enabled (b00 setting), and verify the load current does not exceed the controller's rating. Check for over-discharge protection (b03).
- Over-temperature Error: Ensure adequate ventilation around the controller. Clean any dust from cooling fins.
If the issue persists, contact MakeSkyBlue customer support.
8. Технічні характеристики
Key technical specifications for the MakeSkyBlue 40A-V123 MPPT Solar Charge Controller:
| Особливість | Специфікація |
|---|---|
| Модель | 40A-V123 |
| System Voltage | 12V / 24V / 48V Auto |
| Максимальна потужність фотоелектричного масиву (акумулятор 12 В) | ≤ 720 Вт |
| Максимальна потужність фотоелектричного масиву (акумулятор 24 В) | ≤ 1440 Вт |
| Максимальна потужність фотоелектричного масиву (акумулятор 48 В) | ≤ 2800 Вт |
| Об'єм розімкнутого кола фотоелектричного масивуtage (Voc) (12V Battery) | 20 В - 80 В |
| Об'єм розімкнутого кола фотоелектричного масивуtage (Voc) (24V Battery) | 37 В - 105 В |
| Об'єм розімкнутого кола фотоелектричного масивуtage (Voc) (48V Battery) | 72 В - 160 В |
| Захист від обмеженого струму | 61А |
| Температурний захист | >75 ℃ |
| Температура при увімкненому вентиляторі | >45 ℃ |
| Температура вимкненого вентилятора | <40℃ |
| Захист від перезарядки Voltagе (акумулятор 12 В) | 15 В |
| Захист від перезарядки Voltagе (акумулятор 24 В) | 30 В |
| Захист від перезарядки Voltagе (акумулятор 48 В) | 60 В |
| Робоча температура | До 45℃ |
| Тип дисплея | ЖК |
| Вага товару | 2.87 фунта (1300 грам) |
| Розміри упаковки | 9.84 x 7.87 x 2.76 дюймів |
| UPC | 634769632563 |
8.1 Розміри виробу

Figure 17: Product Dimensions (approx. 21.65cm H x 14.96cm W x 8.66cm D)
9. Гарантія та підтримка
For warranty information, technical support, or service inquiries, please contact MakeSkyBlue directly through their official channels. Keep your purchase receipt as proof of purchase.
Ви можете відвідати MakeSkyBlue Store on Amazon для отримання додаткової інформації.