TP-Link XX530v
TP-Link XX530v AX3000 Wi-Fi 6 XPON Wireless Router User Manual
Model: XX530v
1. Giriş
This manual provides detailed instructions for setting up, operating, and maintaining your TP-Link XX530v AX3000 Wi-Fi 6 XPON Wireless Router. Please read this guide thoroughly to ensure proper installation and optimal performance of your device.
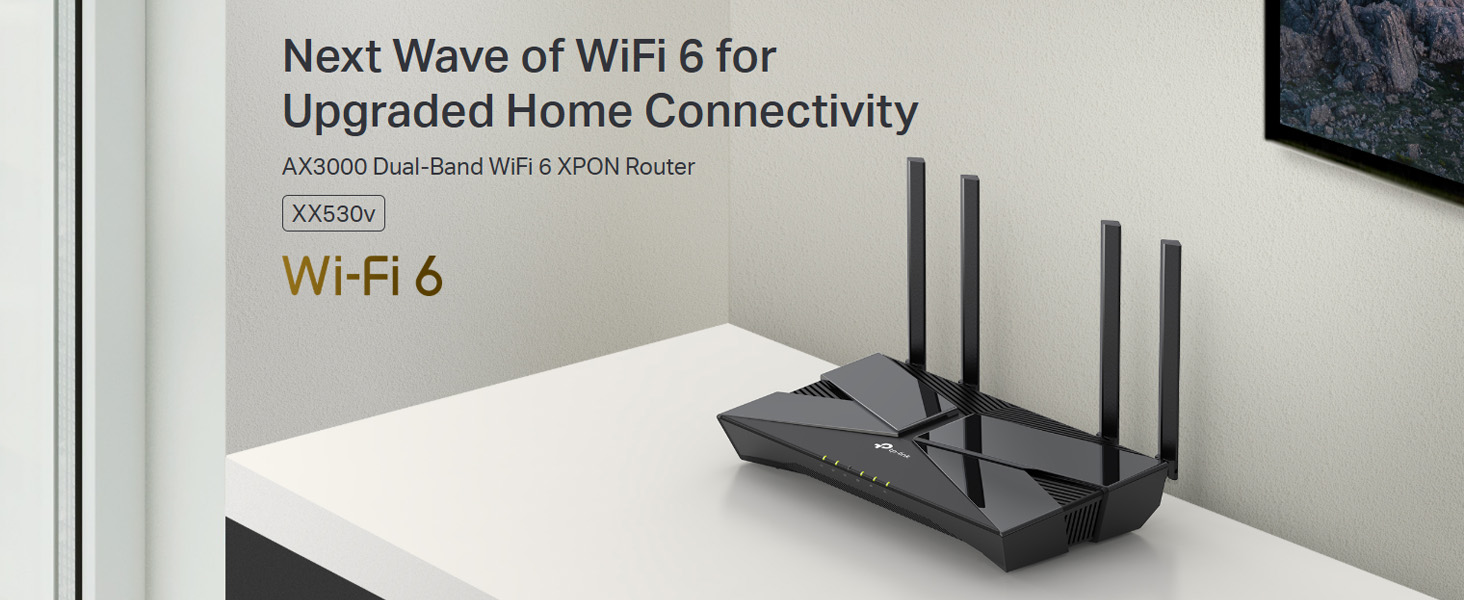
Image 1.1: The TP-Link XX530v AX3000 Wi-Fi 6 XPON Router, designed for enhanced home connectivity.
2. Paket İçeriği
Paketinizin aşağıdaki öğeleri içerdiğini doğrulayın:
- TP-Link XX530v AX3000 Wi-Fi 6 XPON Router
- RJ45 Ethernet Kablosu
- Güç Adaptörü
- Hızlı Kurulum Kılavuzu
3. Donanım Bittiview
Yönlendiricinizin fiziksel bileşenlerini yakından tanıyın.
3.1 Ön Panel

Resim 3.1: Ön view of the router, showing the LED indicators for power, internet, Wi-Fi, and LAN activity.
The front panel features LED indicators that display the router's status:
- Güç LED'i: Güç durumunu gösterir.
- İnternet LED'i: İnternet bağlantı durumunu gösterir.
- Wi-Fi LED'i: Kablosuz ağ etkinliğini gösterir.
- LAN LED'leri: Kablolu LAN portlarındaki etkinliği belirtin.
3.2 Arka Panel

Resim 3.2: Arka view of the router, highlighting the various ports and buttons for connectivity and control.
The rear panel includes various ports and buttons:
- Güç Açma/Kapatma Düğmesi: Yönlendiriciyi açmak veya kapatmak için.
- Güç girişi: Ürünle birlikte verilen güç adaptörüne bağlanır.
- USB Bağlantı Noktası: For connecting USB storage devices or 3G/4G dongles.
- LAN Bağlantı Noktaları (1-4): Gigabit Ethernet ports for wired connections. One port also functions as a WAN port.
- Fiber Port (SC/APC): For connecting to the fiber optic network.
- VoIP Port: For connecting an analog phone for VoIP calls.
- WPS/Sıfırlama Düğmesi: Press briefly for WPS, press and hold for factory reset.
4. Kurulum Kılavuzu
Follow these steps for initial setup of your TP-Link XX530v router.
4.1 Donanım Bağlantısı
- Kapat: Ensure your existing modem (if any) and the router are powered off.
- Fiber optik kabloyu bağlayın: Insert the SC/APC fiber optic cable from your Internet Service Provider (ISP) into the Fiber Port on the router. Ensure the connection is secure.
- Güç Adaptörünü Bağlayın: Connect the provided power adapter to the router's Power Port and plug it into a power outlet.
- Güç Açık: Press the Power On/Off button to turn on the router. Wait for the Power and Internet LEDs to stabilize.
- (İsteğe bağlı) Kablolu Bağlantı: For initial configuration, connect your computer to one of the router's LAN ports using an Ethernet cable.
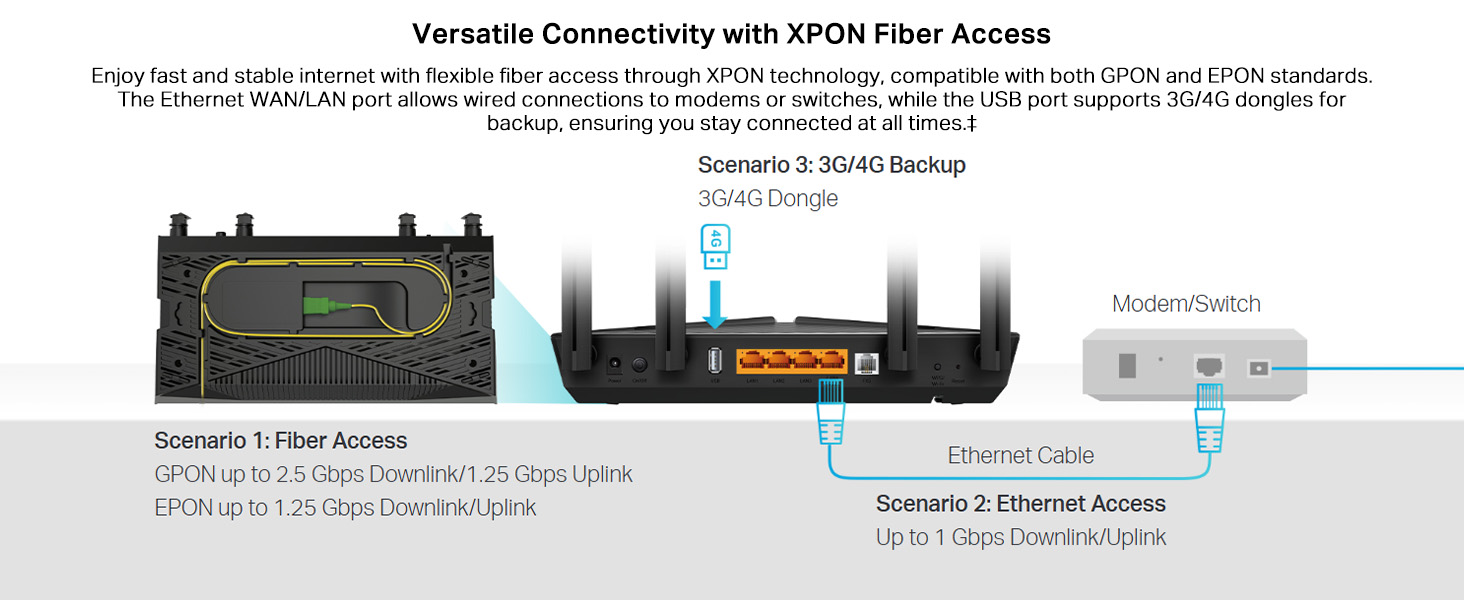
Image 4.1: Illustration of various connectivity options including fiber access, Ethernet access, and 3G/4G backup via the USB port.
4.2 Internet Configuration
The router supports both GPON and EPON standards for fiber access. Your ISP will provide the necessary connection details.
- Erişim Yönlendiricisi Yönetim Sayfası: Bir tane aç web browser and enter the default access address (usually http://tplinkmodem.net or http://192.168.1.1).
- Giriş yapmak: Enter the username and password (default is usually 'admin' for both, or as specified on the router label).
- Hızlı Kurulumu Çalıştır: Follow the on-screen instructions of the Quick Setup Wizard to configure your internet connection. This typically involves selecting your connection type (e.g., PPPoE, Dynamic IP, Static IP) and entering ISP-provided details like username, password, and VLAN ID if required.
- Bağlantıyı Doğrulayın: Once configured, check the Internet LED on the front panel. A solid green light indicates a successful internet connection.
4.3 Wi-Fi Ağ Kurulumu
Your router comes with a default Wi-Fi network name (SSID) and password printed on the label at the bottom of the device. You can customize these settings.
- Access Wireless Settings: In the router's management page, navigate to the Wireless section.
- SSID'yi değiştir: Modify the default Wi-Fi network names for both 2.4GHz and 5GHz bands to something memorable.
- Şifreyi belirle: Create a strong, unique password for your Wi-Fi networks. WPA2/WPA3 Personal is recommended for security.
- Ayarları Kaydet: Apply the changes. Your devices will need to reconnect using the new Wi-Fi name and password.
5. Kullanım Talimatları
5.1 Dual-Band Wi-Fi 6
The XX530v supports Wi-Fi 6 (802.11ax) technology, offering faster speeds and improved efficiency across both 2.4GHz and 5GHz bands.
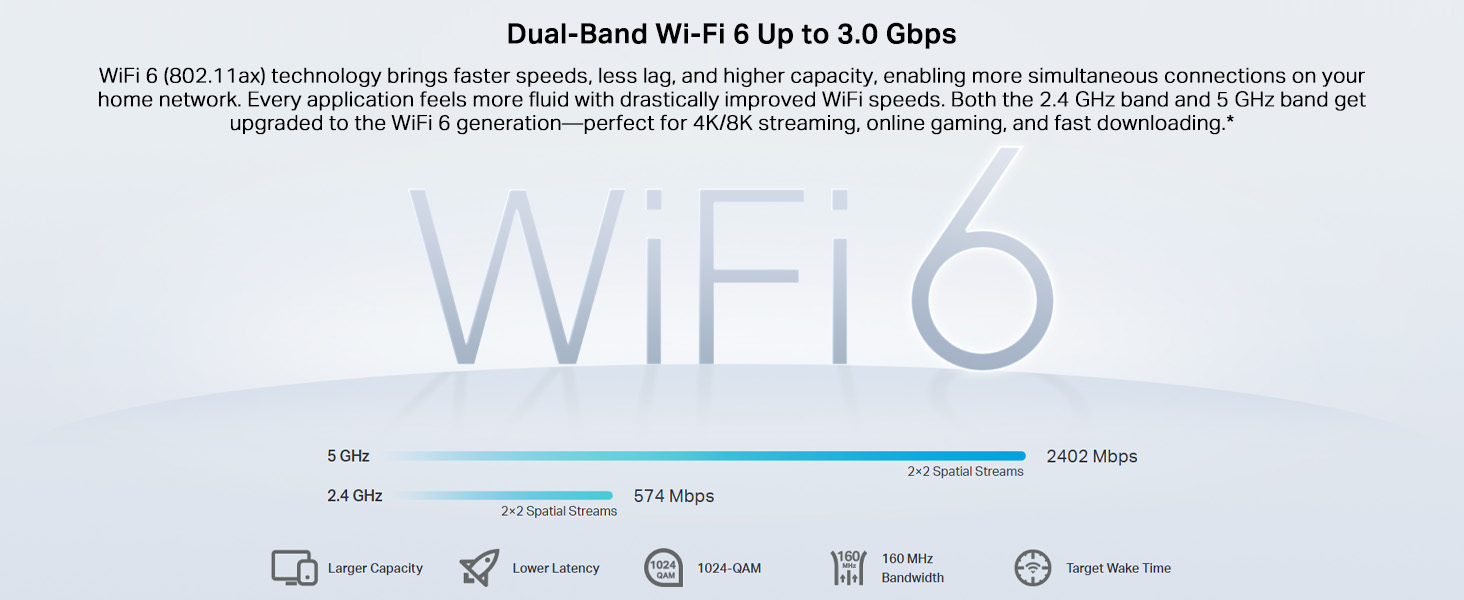
Image 5.1: Visual representation of the dual-band Wi-Fi 6 capabilities, showing 2.4 GHz and 5 GHz speeds.
- 2.4GHz Bandı: Provides wider coverage and is suitable for general internet use and older devices.
- 5GHz Bandı: Offers higher speeds and lower latency, ideal for streaming 4K/8K video, online gaming, and bandwidth-intensive tasks.
5.2 OFDMA and MU-MIMO
These technologies enhance network capacity and efficiency, allowing the router to communicate with multiple devices simultaneously.
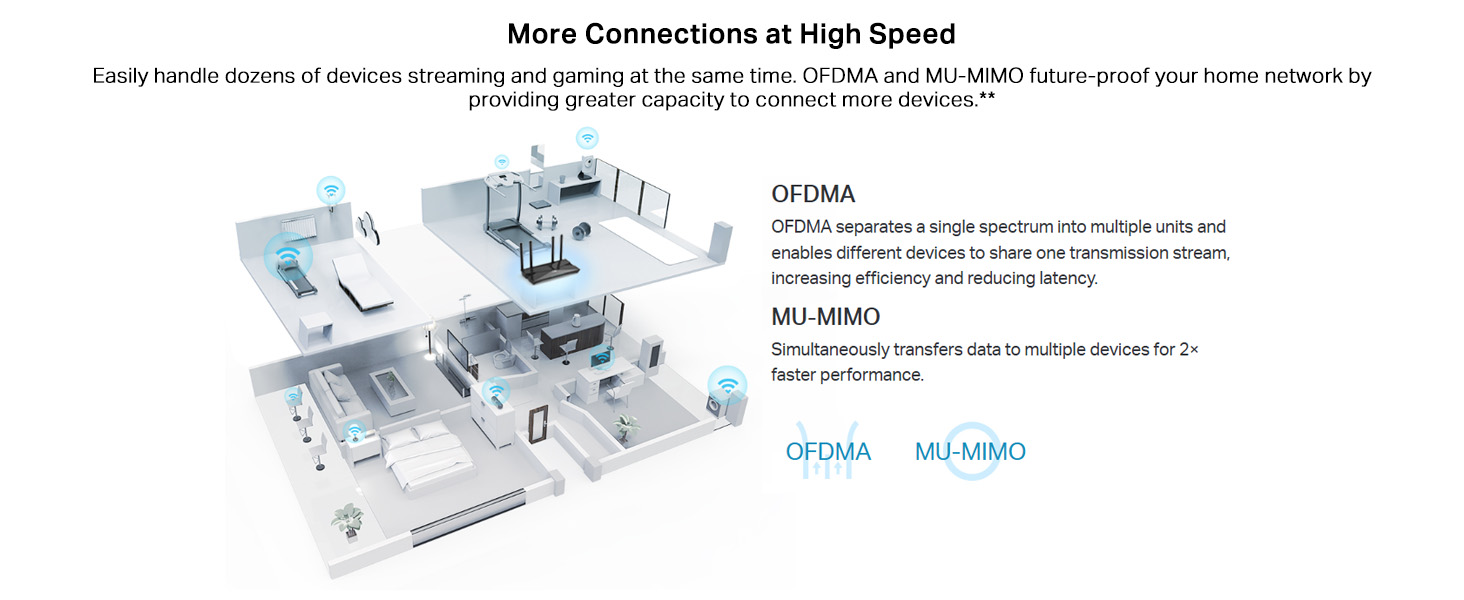
Image 5.2: An illustration detailing how OFDMA and MU-MIMO improve network efficiency and allow simultaneous data transmission to multiple devices.
- OFDMA'nın: Divides a single channel into smaller sub-channels, enabling multiple devices to transmit data concurrently.
- MÜ-MIMO: Allows the router to send and receive data from several devices at the same time, improving overall throughput.
5.3 VoIP Calls
The XX530v integrates a high-performance phone system, supporting multiple VoIP accounts and various call features.
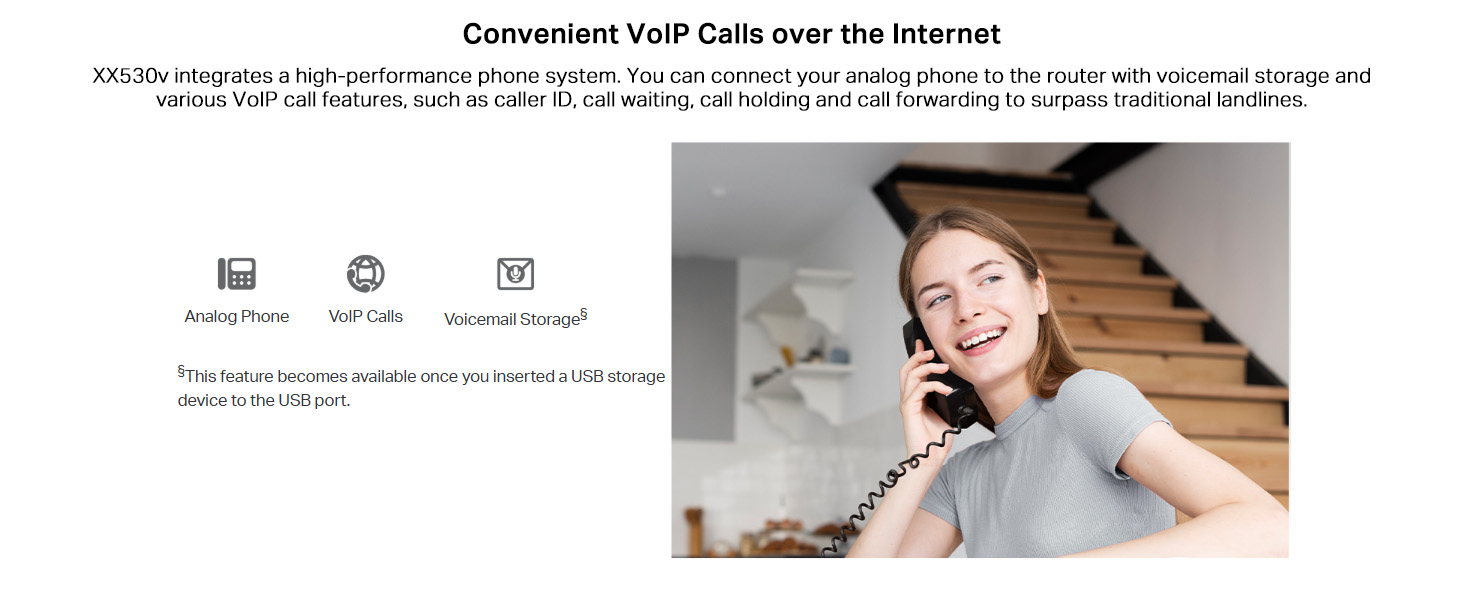
Image 5.3: A user making a call with an analog phone connected to the router's VoIP port, demonstrating the VoIP functionality.
To use VoIP:
- Connect an analog phone to the router's VoIP port.
- Configure your VoIP account settings (provided by your ISP) in the router's management interface under the VoIP section.
- Voicemail storage is available when a USB storage device is inserted into the USB port.
5.4 Gigabit Wired Connections and Media Sharing
The router features Gigabit Ethernet ports for high-speed wired connections and a USB port for media sharing.
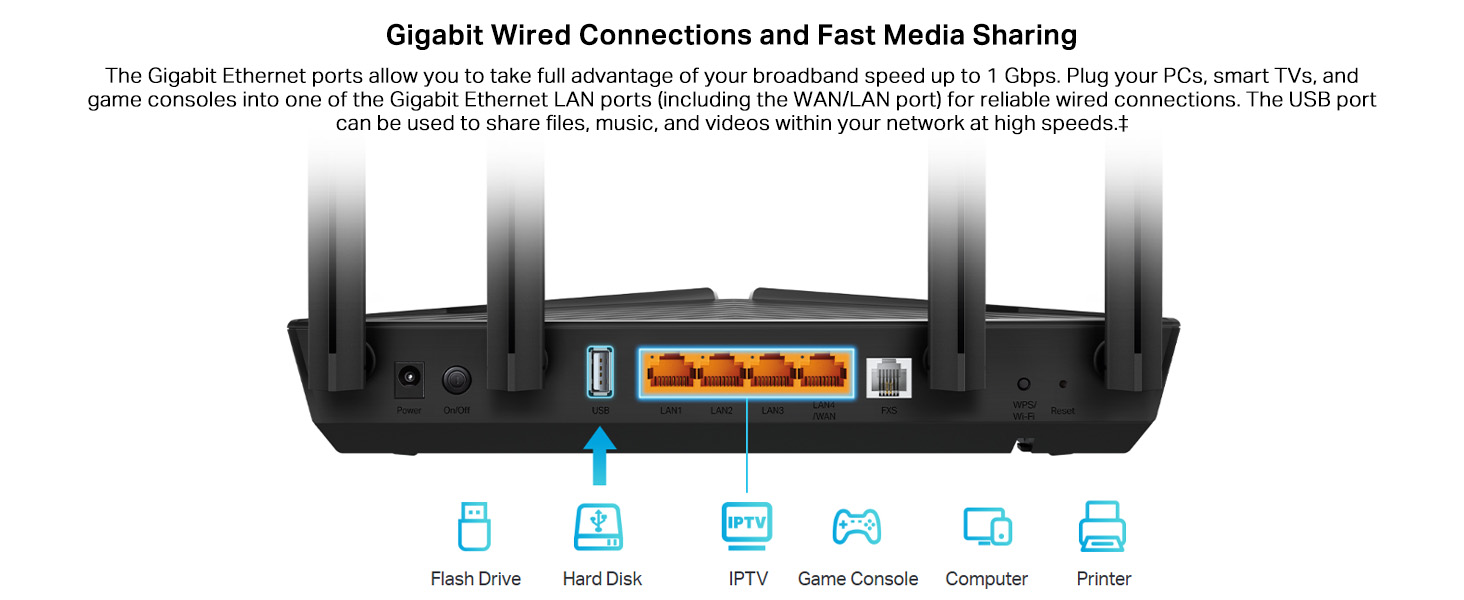
Image 5.4: Illustration of various devices like flash drives, hard disks, IPTV boxes, game consoles, computers, and printers connected to the router's Gigabit LAN and USB ports.
- Connect PCs, smart TVs, game consoles, and other wired devices to the Gigabit LAN ports for reliable, high-speed internet access.
- Plug a USB storage device into the USB port to share files, music, and videos across your network.
6. Gelişmiş Özellikler
6.1 EasyMesh Uyumluluğu
The XX530v supports EasyMesh, allowing you to create a unified mesh Wi-Fi network for seamless whole-home coverage.
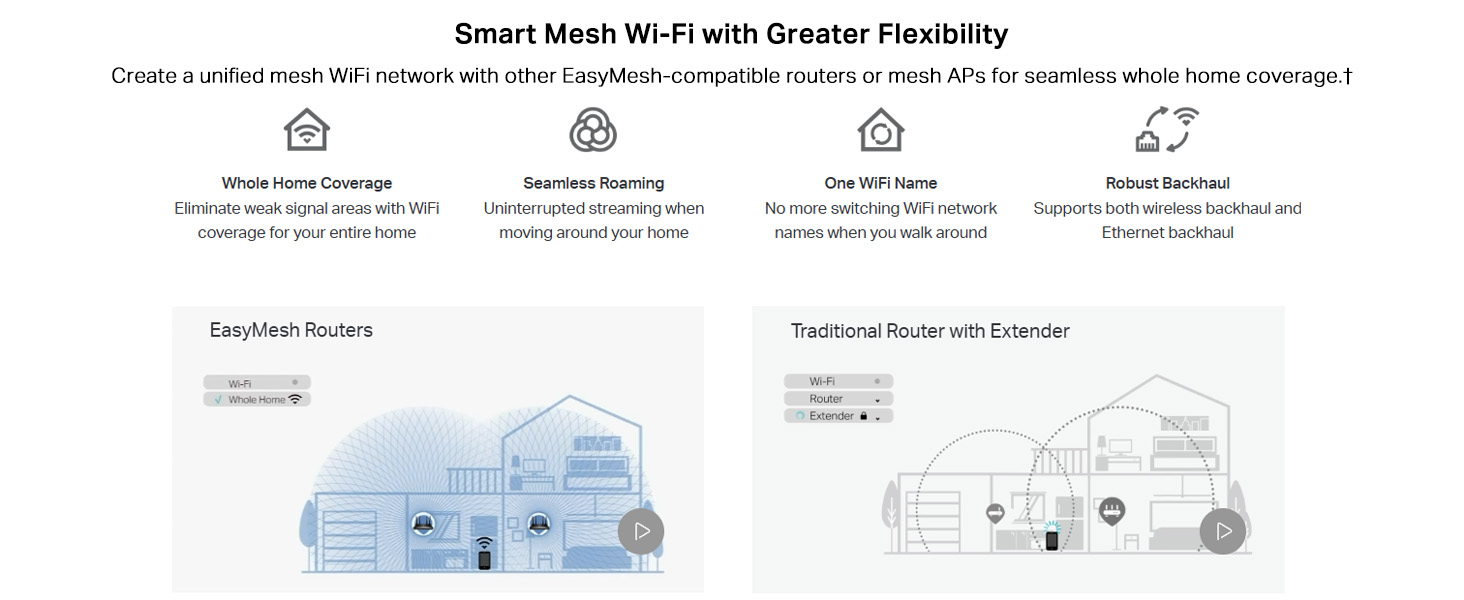
Image 6.1: A visual comparison demonstrating the benefits of an EasyMesh system for whole-home coverage and seamless roaming, contrasted with a traditional router and extender setup.
Benefits of EasyMesh:
- Tüm Ev Kapsamı: Eliminates weak signal areas.
- Sorunsuz Dolaşım: Uninterrupted streaming as you move around your home.
- Bir Wi-Fi Adı: No need to switch network names.
- Robust Backhaul: Supports both wireless and Ethernet backhaul.
6.2 Ağ Koruması
The router includes features to enhance your network security.

Image 6.2: Icons and descriptions for WPA3 Security, Parental Controls, and Multi-SSID features, highlighting robust network protection.
- WPA3 Güvenliği: Provides higher password safety and enhanced protection against attacks.
- Ebeveyn Kontrolleri: Allows you to block inappropriate content and restrict online time for specific devices.
- Çoklu SSID: Create separate Wi-Fi networks for guests or different purposes, keeping your main network secure.
6.3 Uzaktan Yönetim
The XX530v supports various protocols for remote management, beneficial for both users and Internet Service Providers.
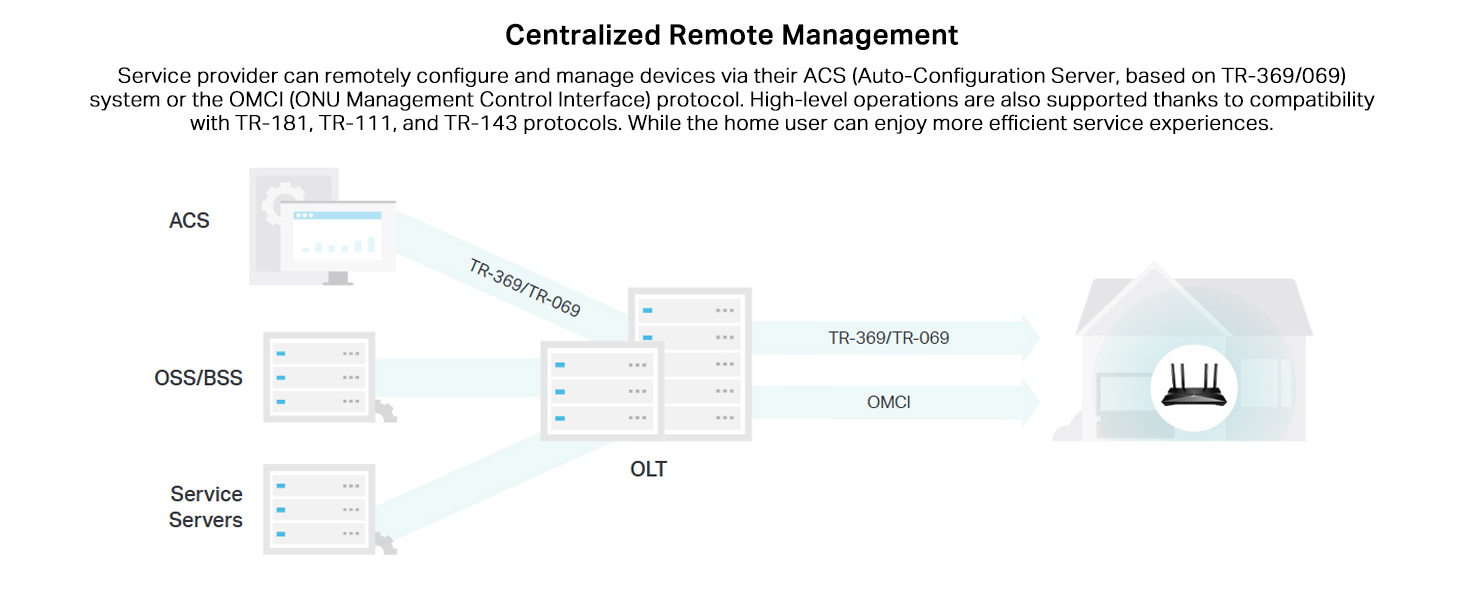
Image 6.3: A diagram showing how service providers can remotely configure and manage devices using an ACS (Auto-Configuration Server) via TR-369/TR-069 and OMCI protocols.
The router supports TAUC (TP-Link Aginet Unified Cloud, based on TR-369) along with OMCI, TR-069, TR-098, TR-181, TR-111, and TR-143 protocols for comprehensive remote management.
7. Bakım
7.1 Firmware Güncellemesi
En iyi performansı, güvenliği ve yeni özelliklere erişimi sağlamak için düzenli olarak aygıt yazılımı güncellemelerini kontrol edin ve yükleyin.
- Visit the TP-Link official webalan (www.tp-link.com) and navigate to the support section for your model (XX530v).
- En son aygıt yazılımını indirin file.
- Access the router's management page and go to System Tools > Firmware Upgrade.
- İndirilen ürün yazılımını yükleyin file and follow the instructions to complete the upgrade. Do not power off the router during the upgrade process.
7.2 Yönlendirici Yerleşimi
For optimal Wi-Fi coverage, place the router in a central location, away from obstructions and devices that emit strong electromagnetic interference (e.g., microwaves, cordless phones).

Image 7.1: The router positioned on a table, illustrating suitable placement for effective Wi-Fi signal distribution.
7.3 Temizlik
Use a soft, dry cloth to clean the router. Avoid using liquid cleaners or abrasive materials.
8. Sorun Giderme
Bu bölümde karşılaşabileceğiniz yaygın sorunlar ele alınmaktadır.
8.1 İnternet Erişimi Yok
- Kabloları Kontrol Edin: Ensure all cables are securely connected, especially the fiber optic cable and Ethernet cables.
- LED Göstergeleri: Verify that the Power and Internet LEDs are solid green. If the Internet LED is off or red, there might be an issue with your ISP connection.
- İSS Ayarları: Confirm that your internet connection settings (e.g., PPPoE username/password, VLAN ID) are correctly entered in the router's management page.
- Yeniden Başlatma: Power cycle the router (and your modem, if applicable) by unplugging it for 30 seconds and then plugging it back in.
8.2 Wi-Fi Sinyal Sorunları
- Yönlendirici Yerleşimi: Relocate the router to a more central position, away from obstacles and interference sources.
- Kanal Girişimi: In the router's wireless settings, try changing the Wi-Fi channel for both 2.4GHz and 5GHz bands to a less congested one.
- EasyMesh: If you have a large home, consider adding EasyMesh-compatible devices to extend coverage.
8.3 Forgotten Login Password
If you forget the login password for the router's management page, you can perform a factory reset.
- With the router powered on, press and hold the WPS/Reset button on the rear panel for approximately 10 seconds until all LEDs flash.
- The router will restart with factory default settings. You can then log in using the default username and password (usually 'admin' for both).
- Note: A factory reset will erase all your custom settings, requiring you to reconfigure your internet and Wi-Fi settings.
9. Özellikler
| Özellik | Detay |
|---|---|
| Örnek | XX530v |
| Wi-Fi standart | Kablosuz 6 (802.11ax) |
| Wi-Fi Hızları | AX3000 (2.4GHz: 574 Mbps, 5GHz: 2402 Mbps) |
| Antenler | 4 Fixed High-Gain Antennas |
| Ethernet Bağlantı Noktaları | 1x GbE WAN/LAN Port, 3x GbE LAN Ports |
| Fiber Bağlantı Noktası | 1x SC/APC Fiber Port (XPON: GPON/EPON compatible) |
| VoIP Bağlantı Noktası | 1x VoIP Port |
| USB Bağlantı Noktası | 1x USB Port (for storage/3G/4G dongle) |
| Boyutlar (U x G x Y) | 13.5x26x4.9 cm |
| Ağırlık | 510 gr |
| İşletim Sistemi Uyumluluğu | Microsoft Windows, MAC OS, NetWare, UNIX, Linux |
| Özel Özellikler | Beamforming, OFDMA, MU-MIMO, Parental Control, Remote Access, VoIP Calls, QoS, EasyMesh Compatible, WPA3 Encryption |
10. Garanti ve Destek
10.1 Garanti Bilgileri
Your TP-Link XX530v router comes with a limited warranty. Please refer to the warranty card included in your package or visit the official TP-Link webBölgenize özgü ayrıntılı garanti şartları ve koşulları için siteyi ziyaret edin.
10.2 Teknik Destek
For technical assistance, product registration, or to download the latest firmware and drivers, please visit the TP-Link support webalan:
- Webalan: www.tp-link.com/support
- Aginet App: For easy setup and management, download the Aginet app. Download Aginet App
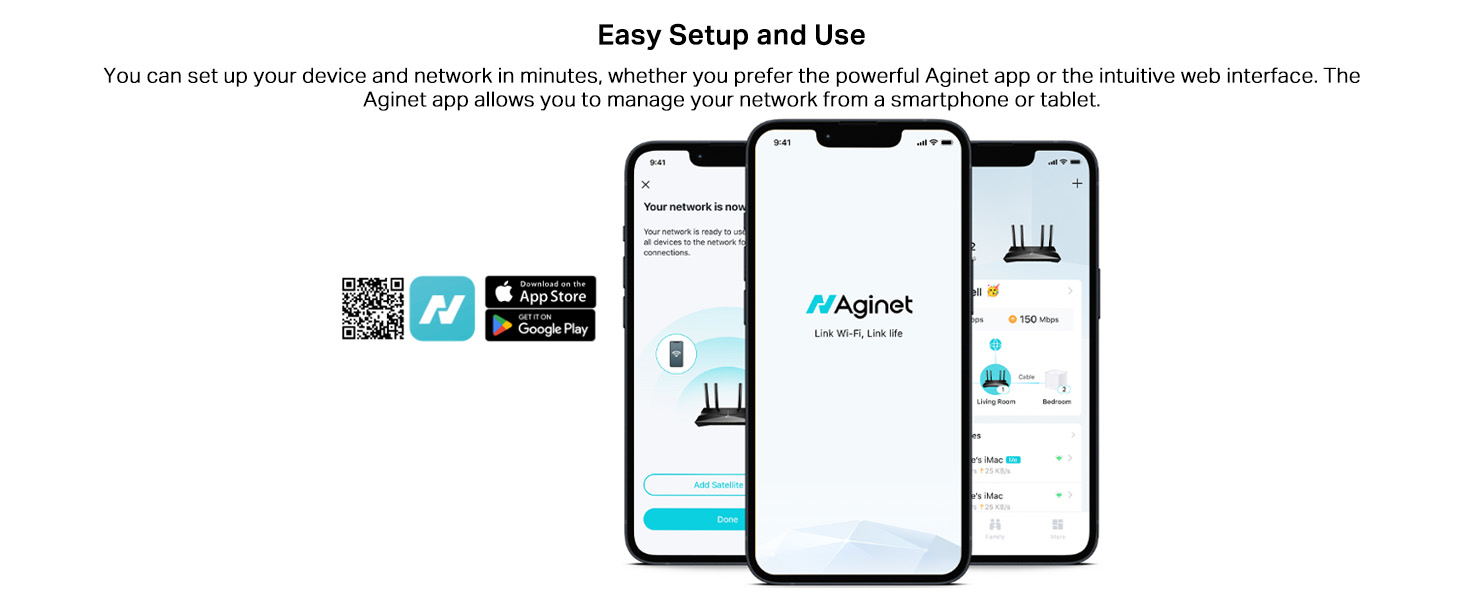
Image 10.1: The Aginet app interface, demonstrating its use for easy setup and network management from a smartphone or tablet.
You may also contact TP-Link customer support via the contact information provided on the support websitenizde veya ürün dokümanlarınızda.
İlgili Belgeler - XX530v
 |
AX3000 Çift Bantlı Wi-Fi 6 XPON Yönlendirici - TP-Link TP-Link AX3000 Dual Band Wi-Fi 6 XPON Router (XX530v) offers high-speed internet connectivity with advanced Wi-Fi 6 technology, supporting speeds up to 2402 Mbps on 5 GHz and 574 Mbps on 2.4 GHz. It features multiple Gigabit ports, VoIP telephony, EasyMesh support for seamless network expansion, and remote management capabilities via the Aginet APP. Compliant with ITU-T G.984 GPON standards, it's ideal for bandwidth-intensive applications like gaming and streaming. |
 |
TP-Link AX3000 Çift Bantlı Wi-Fi 6 GPON Yönlendirici (XX530v) - Özellikler ve Teknik Özellikler Kapsamlı birview TP-Link AX3000 Çift Bantlı Wi-Fi 6 GPON Yönlendiricisinin (Model XX530v) gelişmiş özelliklerini, teknik özelliklerini, donanım bileşenlerini, yazılım yeteneklerini ve ağ topolojisini detaylandıran bir inceleme. |
 |
TP-Link Archer AX3000 Çift Bantlı Wi-Fi 6 Yönlendirici Hızlı Kurulum Kılavuzu TP-Link Archer AX3000 Çift Bantlı Wi-Fi 6 Yönlendiricinizi Tether uygulaması veya başka bir yöntem kullanarak kurma ve ayarlama için adım adım kılavuz. web Tarayıcı, donanım bağlantısı ve sorun giderme dahil. |
 |
TP-Link Archer AX3000: Yüksek Performanslı Wi-Fi 6 Yönlendirici TP-Link Archer AX3000'i keşfedin; üstün bir ev ağı deneyimi için gelişmiş hız, genişletilmiş kapsama alanı ve HomeShield ve WPA3 gibi gelişmiş güvenlik özellikleri sunan güçlü bir Wi-Fi 6 yönlendirici. |
 |
TP-Link Archer Air R5 AX3000: Temizle ინსტალაცია Kablosuz Bağlantı TP-Link Archer Air R5 AX3000 Wi-Fi 6 Bağlantısı çok güzel, çok güzel bir şey teşekkürler, Anakart AX3000, yeni nesil AX3000 Destekleyiciler, OFDMA, MU-MIMO, WPA3 ve TP-Link Tether Çok güzel. |
 |
ASUS RT-AX3000 V2 Hızlı Başlangıç Kılavuzu: Kurulum ve Özellikler ASUS RT-AX3000 V2 Çift Bantlı Wi-Fi Yönlendiricisinin kurulumu için kapsamlı bir kılavuz. Donanım açıklamalarını, uygulama üzerinden adım adım kurulum talimatlarını ve daha fazlasını içerir. web Tarayıcı, sıkça sorulan sorular, küresel destek iletişim bilgileri ve önemli düzenleyici ve güvenlik uyarıları. |
Ask a question about this manual
Ask about setup, troubleshooting, compatibility, parts, safety, or missing instructions. Manuals+ will review the question and use this page’s manual context to help answer it.