1. Giriş
The FNIRSI DST-210 is a compact and versatile 3-in-1 handheld device designed for electronic testing and measurement. It integrates the functions of a digital oscilloscope, a true RMS multimeter, and a signal generator into a single portable unit. This manual provides detailed instructions to help you effectively use and maintain your device.
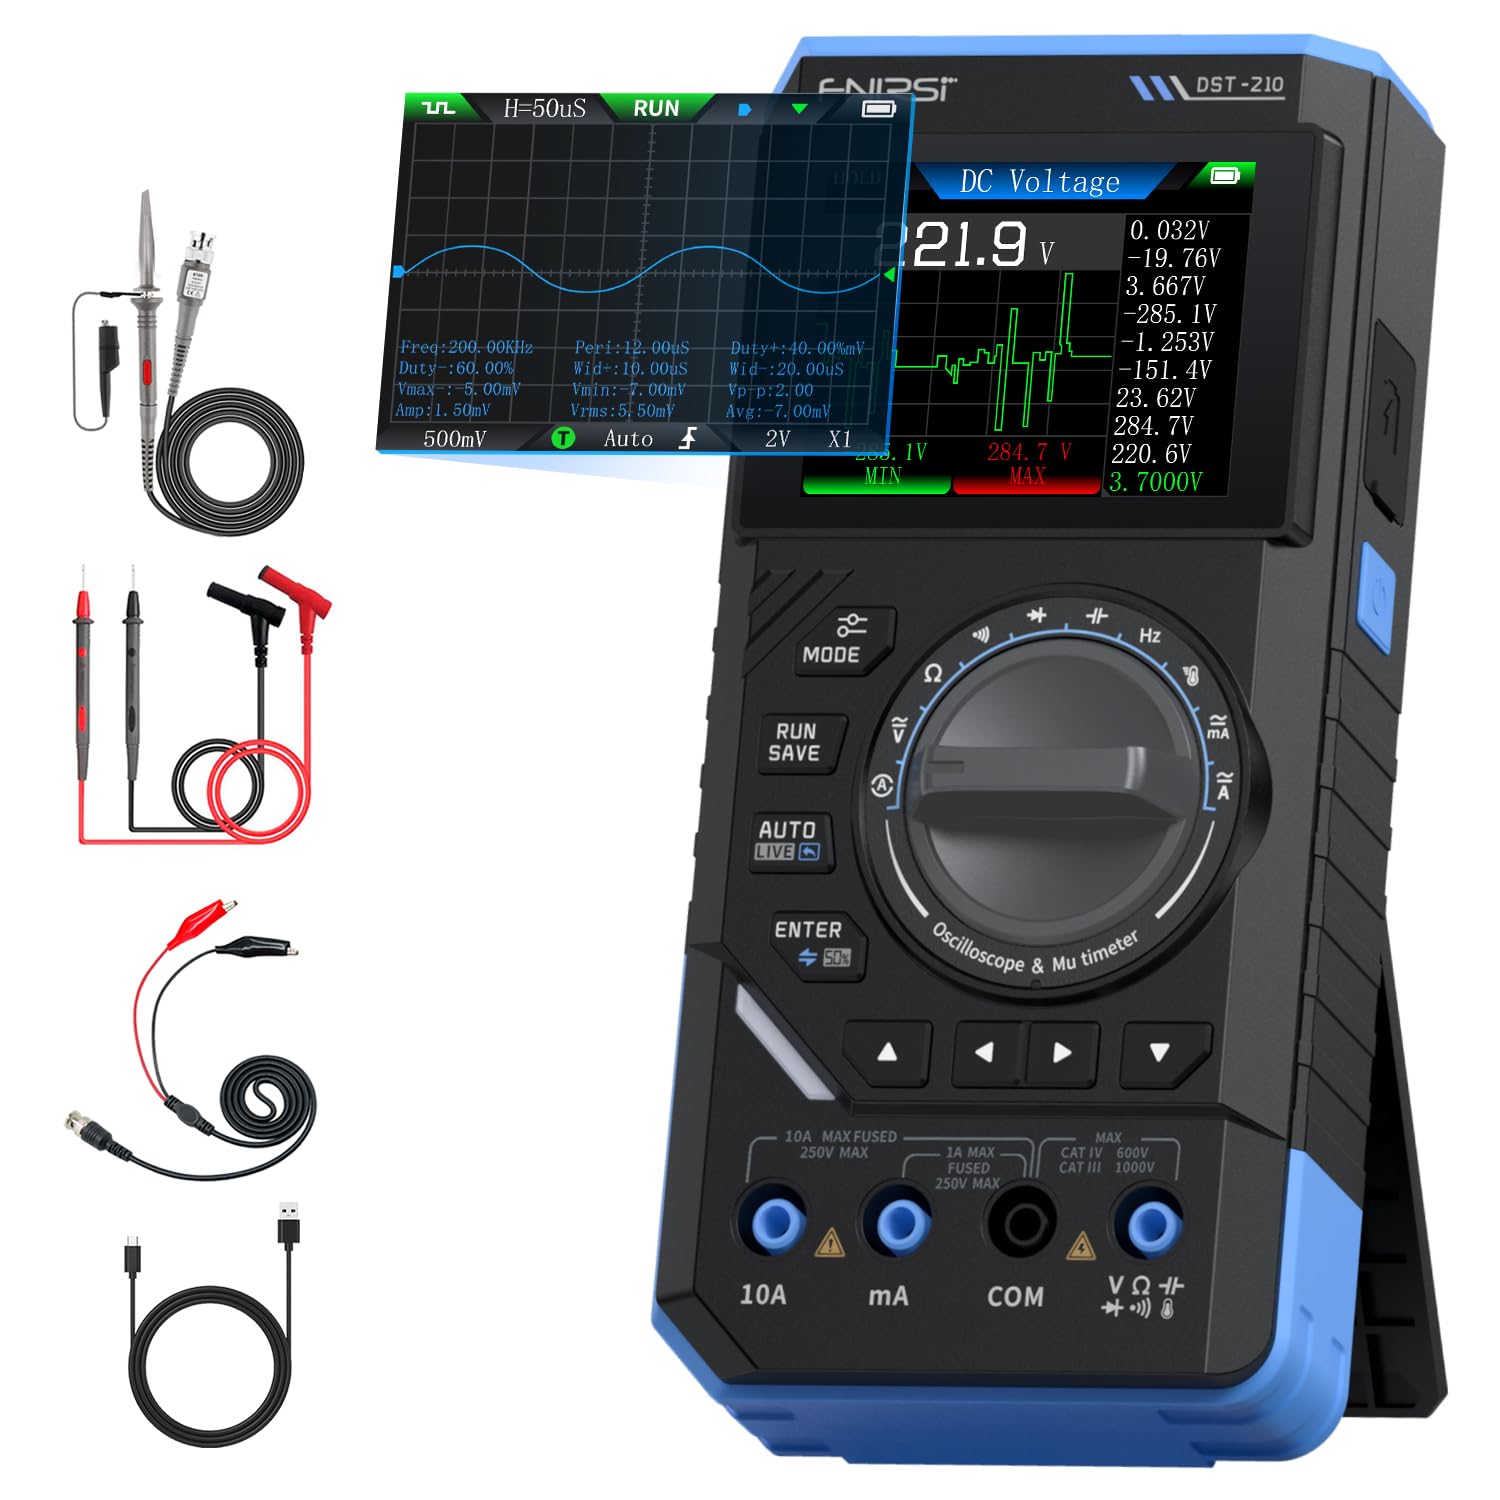
Figure 1: FNIRSI DST-210 3-in-1 Handheld Device
2. Ürün Bittiview
2.1 Temel Özellikler
- 3'si 1 arada İşlevsellik: Combines a digital oscilloscope, a true RMS multimeter, and a signal generator.
- Görüntülemek: 2.8-inch TFT color LCD for clear data visualization.
- Osiloskop: 10MHz analog bandwidth, 48MSa/s real-time sampling rate, supports Auto/Normal/Single trigger modes, waveform image saving and display.
- Multimetre: 19999-count true RMS measurement for DC/AC voltage, DC/AC current, resistance, capacitance, frequency, temperature, diode, and continuity. Features data hold, record mode with graphical display, and LIVE function for voltage presence detection.
- Sinyal Jeneratörü: Outputs 13 types of waveforms (Sine, Square, Sawtooth, Half-wave, Full-wave, Step, Reverse Step, Index Up/Down, DC, Multi-audio, Sink Pulse, Lorentz Wave) with adjustable frequency (0-50KHz), ampgenlik (0.1-3.0V) ve görev döngüsü (%0-100).
- Taşınabilirlik: Compact design with an integrated stand, powered by a 3000mAh rechargeable lithium battery providing up to 10 hours of continuous use. Type-C charging supported.
2.2 Paket İçeriği
Paketin içinde tüm öğelerin mevcut olduğundan emin olun:
- FNIRSI DST-210 Main Unit
- P6100 Yüksek Ses Seviyesitage sonda
- Test Kabloları (Kırmızı ve Siyah)
- Timsah klipsleri
- C Tipi Şarj Kablosu
- Instruction Manual (PDF version available online)
- Paketleme Kutusu

Şekil 2: Dahil Olan Aksesuarlar
3. Kurulum
3.1 Cihazı Şarj Etme
Before initial use, fully charge the DST-210. Connect the provided Type-C charging cable to the device's Type-C port and a compatible USB power adapter (5V/1A). The battery indicator on the display will show charging status.
3.2 Probların Bağlanması
For accurate measurements, ensure probes are correctly connected:
- Multimetre Ölçümleri: Insert the red test lead into the VΩHzmA or 10A jack (depending on the measurement) and the black test lead into the COM jack.
- Osiloskop Ölçümleri: Connect the P6100 high voltage probe to the oscilloscope input jack. Ensure the probe's attenuation setting (e.g., X1 or X10) matches the device's setting for accurate readings.
- Sinyal Jeneratörü Çıkışı: Connect the output cable to the signal generator output port.

Figure 3: Input Jacks and Controls
4. Kullanım Talimatları
4.1 Güç Açma/Kapatma
Press and hold the power button (located on the side) to turn the device on or off.
4.2 Mod Seçimi
Rotate the central knob to switch between Multimeter, Oscilloscope, and Signal Generator modes. Within each mode, further sub-functions can be selected using the knob or dedicated buttons.

Figure 4: Using the Oscilloscope Function
4.3 Multimetre Kullanımı
In Multimeter mode, the device offers various measurement functions:
- Cilttage/Current (DC/AC): Select the appropriate DC V, AC V, DC A, or AC A setting. Connect test leads to the circuit. The device supports a record mode that displays measurement trends graphically, and can store up to 10 sets of data.
- Direnç (Ω): Select the resistance function. Connect test leads across the component.
- Kapasite (F): Select the capacitance function. Connect test leads across the capacitor.
- Frekans (Hz): Select the frequency function. Connect test leads to the signal source.
- Diyot Testi: Select the diode function. Connect test leads across the diode to check its forward voltage damla.
- Süreklilik Testi: Select the continuity function. Connect test leads across a conductor; a beep indicates continuity.
- Sıcaklık: Use a K-type thermocouple (not included) connected to the appropriate jacks for temperature measurement.
- LIVE Function: For single-probe voltage presence detection.

Figure 5: Multimeter Measurement Examples
4.4 Osiloskop Çalışması
In Oscilloscope mode, the device displays waveforms:
- Dalga Formu Görüntüleme: Connect the oscilloscope probe to the circuit. The device automatically adjusts settings for stable waveform display.
- Tetikleme Modları: Select between Auto, Normal, and Single trigger modes to capture different types of signals.
- Waveform Saving: Press the 'RUN/SAVE' button to save the current waveform image. Saved images can be reviewdüzenlendi ve ihraç edildi.

Figure 6: Oscilloscope Waveform Display
4.5 Sinyal Jeneratörünün Çalışması
In Signal Generator mode, the device outputs various waveforms:
- Dalga Formu Seçimi: Choose from 13 different waveform types using the menu options.
- Parametre Ayarı: Adjust the frequency (0-50KHz), amplitude (0.1-3.0V), and duty cycle (0-100%) as required for your application.

Figure 7: Signal Generator Waveform Selection
4.6 Bilgisayar Bağlantısı ve Veri Dışa Aktarımı
The DST-210 can connect to a PC via its Type-C USB port for data management and firmware updates.
- Waveform Screenshots: Long-press the 'RUN/SAVE' button to save waveform screenshots.
- Veri İhracatı: Connect the device to a computer to view, save, and export recorded waveform images and data.
- Donanım Yazılımı Güncellemeleri: Resmi FNIRSI bilgilerini düzenli olarak kontrol edin. webEn iyi performansı sağlamak ve yeni özelliklere erişmek için aygıt yazılımı güncellemeleri için bu siteyi kullanın. Aygıt yazılımı güncelleme paketiyle birlikte verilen talimatları izleyin.

Figure 8: PC Connection for Data Management
5. Bakım
- Temizlik: Cihazı temizlemek için yumuşak ve kuru bir bez kullanın. Aşındırıcı temizleyiciler veya çözücüler kullanmayın.
- Depolamak: Cihazı serin, kuru ve doğrudan güneş ışığından ve aşırı sıcaklıklardan uzak bir yerde saklayın.
- Pil Bakım: Pil ömrünü uzatmak için, pili sık sık tamamen boşaltmaktan kaçının. Cihazı uzun süre kullanmasanız bile düzenli olarak şarj edin.
- Prob Bakımı: Inspect test leads and probes for damage before each use. Replace any damaged accessories immediately.
6. Sorun Giderme
| Sorun | Olası Neden | Çözüm |
|---|---|---|
| Cihaz açılmıyor. | Low battery or faulty power button. | Charge the device fully. If the issue persists, contact support. |
| Unstable or inaccurate readings in Multimeter mode. | Poor probe connection, incorrect mode selection, or external interference. | Ensure probes are securely connected. Verify the correct measurement mode is selected. Minimize external electrical interference. |
| Oscilloscope waveform is not stable. | Incorrect trigger settings or probe attenuation. | Adjust trigger level and mode. Ensure probe attenuation (X1/X10) matches the device setting. |
| Sinyal jeneratörünün çıkışı hatalı. | Incorrect waveform type, frequency, amplitude, or duty cycle settings. | Verify all signal generator parameters are set as desired. |
| Bilgisayara bağlanılamıyor veya veri dışa aktarılamıyor. | Faulty USB cable, incorrect PC driver, or software issue. | Try a different Type-C cable. Ensure necessary drivers are installed on your PC. Refer to the official website for software and driver downloads. |
7. Özellikler
7.1 Osiloskop Parametreleri
| Kategori | Şartname |
|---|---|
| Gerçek zamanlı Sampling Oranı | 48MSa / sn |
| Analog Bant Genişliği | 10MHz |
| Giriş Empedansı | 1MΩ |
| Bağlantı Yöntemi | AC/DC |
| Ölçüm Hacmitage Aralık | 1:1 Probe: ±80Vpp (±40V), 10:1 Probe: ±800Vpp (±400V) |
| Dikey Hassasiyet | 10mV/div ~ 10V/div (at X1) |
| Dikey Ofset | Adjustable (with indicator) |
| Yatay Zaman Tabanı Aralığı | 50ns ~ 20s |
| Tetikleme Modu | Otomatik, Normal, Tek |
| Kenar Tetikleyici | Rising/Falling Edge |
| Tetik Seviyesi | Adjustable (with indicator) |
| Dalga Formu Dondurma | Supported (HOLD function) |
| Otomatik Ölçüm | Max, Min, Average, RMS, Peak-to-Peak, Frequency, Duty Cycle, etc. |
7.2 Multimetre Parametreleri
| Ölçüm Fonksiyonu | Menzil | Kesinlik |
|---|---|---|
| DC Hacmitage | 1.9999V/19.999V/199.99V/1000V | ±(0.5%+3) |
| AC Hacmitage | 1.9999V/19.999V/199.99V/750V | ±(1.0%+3) |
| Doğru Akım | 19.999mA/199.99mA/1.9999A/9.999A | ±(1.2%+3) |
| AC Akım | 19.999mA/199.99mA/1.9999A/9.999A | ±(1.5%+3) |
| Rezistans | 19.999MΩ/199.99kΩ/19.999kΩ | ±(2.0%+5) |
| Kapasitans | 999.9uF/99.99uF/9.999uF/999.9nF/99.99nF, 9.999mF/99.99mF | ±(2.0%+5) |
| Sıklık | 9.999MHz/999.9kHz/99.99kHz/9.999kHz/999.9Hz/99.99Hz | ±(0.1%+2) |
| Sıcaklık | [-55~1300°C] / [-67~2372°F] | ±(2.5%+5) |
| Diyot/Süreklilik | Desteklenen | Yok |
| LIVE Function | Desteklenen | Yok |
7.3 Sinyal Üreteci Parametreleri
| Kategori | Şartname |
|---|---|
| Çıkış Dalga Formları | 13 tip |
| Dalga Formu Frekansı | 0 ~ 50KHz |
| Görev Döngüsü | 0 ~ 100% (adjustable) |
| Dalga formu Amplütuf | 0.1 ~ 3.0V |
7.4 Genel Özellikler
| Kategori | Şartname |
|---|---|
| Ürün Modeli | DST-210 |
| Görüntülemek | 2.8 inç TFT Renkli Ekran |
| Arka ışık | Parlaklık Ayarlanabilir |
| Güç Kaynağı | Tip-C (5V/1A) |
| Pil | 3000mAh |
| Dil Desteği | Çince, İngilizce |
| Ürün Boyutu | Yaklaşık 177.43 mm x 87 mm x 35 mm |
| Ürün Ağırlığı | Yaklaşık 300g |
8. Garanti ve Destek
For any questions, issues, or support needs regarding your FNIRSI DST-210, please contact us through the following methods:
- Amazon'un Mesajı: If you purchased the product on Amazon, you can contact us via the Amazon messaging system. Go to your 'Order History', select the relevant order, and click 'Problem with order' or 'Contact Seller'.
- E-posta Desteği: You can also reach our after-sales service center directly via email at destek@fnirsi.com. Please include your order number and a detailed description of your issue for faster assistance.
When attaching large photos or videos, email support is recommended due to potential attachment size limits on Amazon's messaging system.
Video 1: Demonstration of FNIRSI DST-210's Multimeter, Oscilloscope, and Signal Generator Functions.