giriiş
The ASUS PRIME Z270-A motherboard is engineered to provide maximum performance and customizable style for your PC build. Designed for 7th generation Intel Core processors, it offers advanced features for both enthusiasts and everyday users. Key technologies include 5-Way Optimization for intelligent auto-tuning, AURA Sync RGB lighting for personalized aesthetics, and robust connectivity options like Dual M.2 and USB 3.1 Type-A/C for high-speed data transfer.
Ürün Bittiview
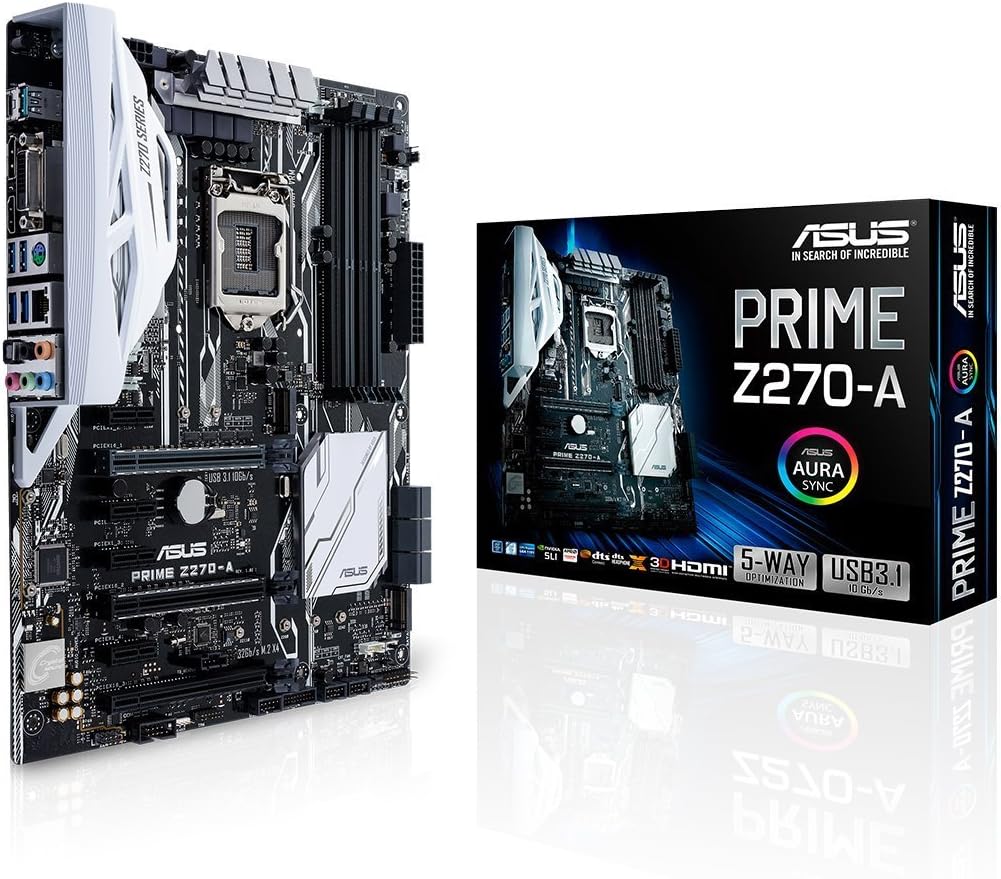
Figure 1: The ASUS PRIME Z270-A motherboard alongside its retail packaging, showcasintasarım ve markalaşması.

Şekil 2: Açılı bir view of the ASUS PRIME Z270-A motherboard, highlighting its various components and white accents.
Video 1: Resmi bir açıklamaview of the ASUS PRIME Z270-A Motherboard, detailing its features and capabilities.
Temel Özellikler
- 5 Yönlü Optimizasyon: Provides intelligent auto-tuning and dynamic fan calibration, automatically tailoring overclocking profiles for maximum performance and efficient cooling.
- Gelişmiş Bağlantı: Features integrated Dual M.2 slots for high-speed storage, Intel Optane Memory compatibility, and versatile USB 3.1 Type-A/Type-C connections.
- Safe Slot Technology: Dual patent-pending Safe Slots utilize an injection molding process with metal framing, providing stronger, firmly anchored PCIe slots for heavy graphics cards.
- AURA Sync RGB Lighting: Offers a vast spectrum of colors and effects that can be synchronized across an expanding ecosystem of AURA Sync enabled products, allowing for personalized lighting schemes.
- 3D Printing Mounts: On-board mounts enable users to integrate custom 3D-printed parts, allowing for unique aesthetic and functional enhancements to their build.
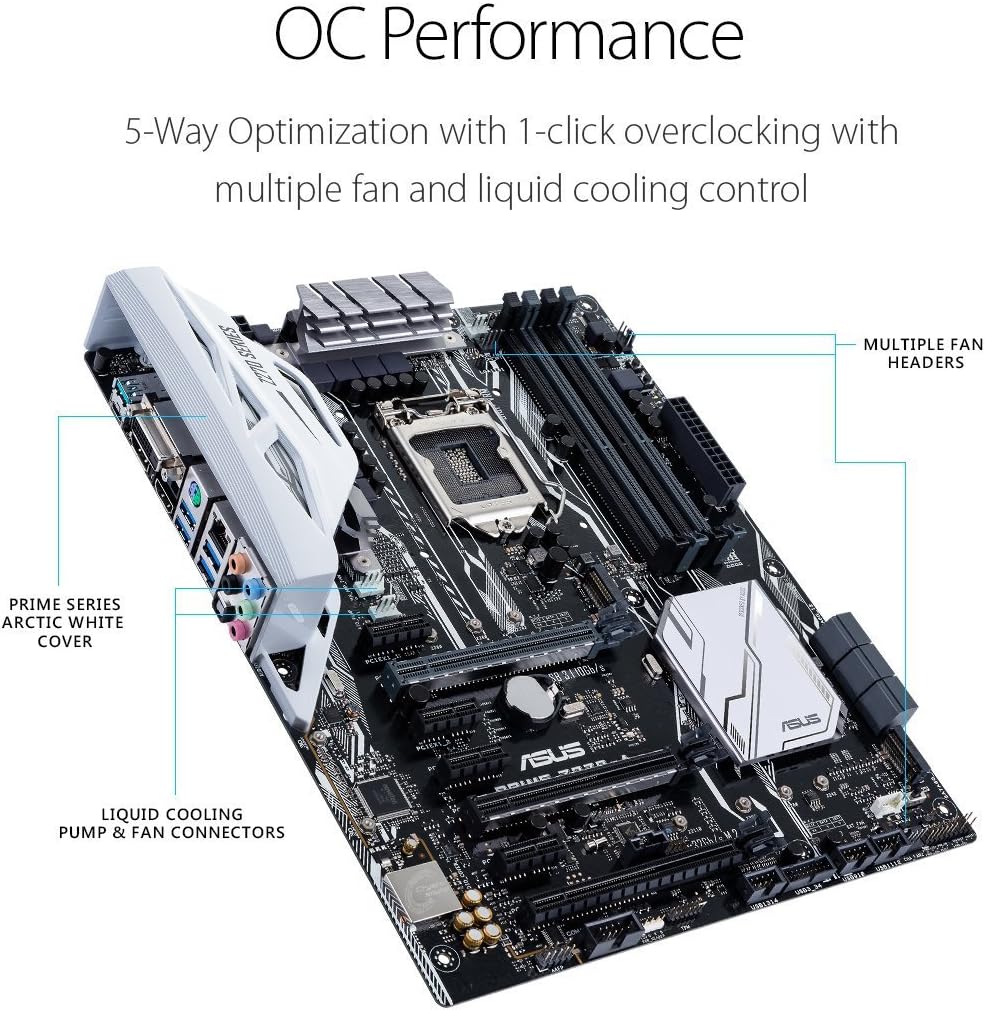
Figure 3: The motherboard highlighting features related to OC Performance, including multiple fan headers and liquid cooling pump/fan connectors.
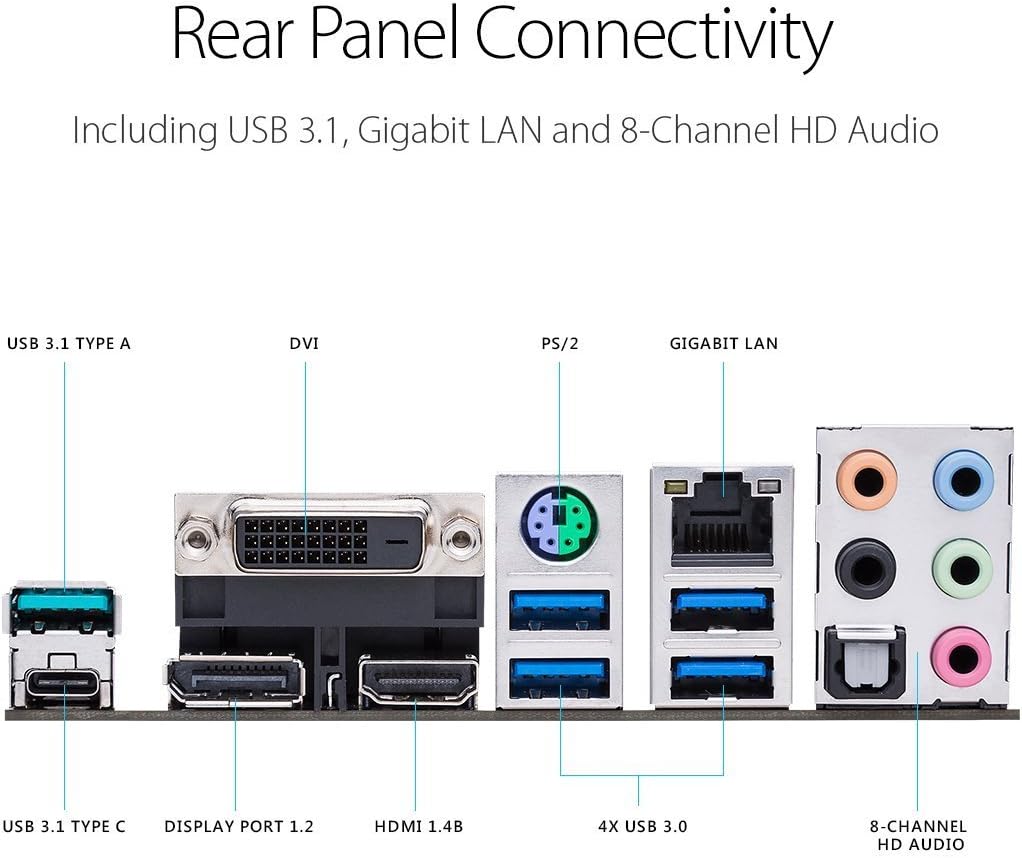
Şekil 4: Ayrıntılı view of the rear I/O panel, showing USB 3.1 Type-A and Type-C ports, DVI, DisplayPort 1.2, HDMI 1.4B, 4x USB 3.0, PS/2, Gigabit LAN, and 8-Channel HD Audio ports.
Kurmak
Paket İçeriği:
Before beginning installation, ensure all components listed below are present in your package:
- Kullanıcı kılavuzu
- Seri ATA 6.0Gb/s kabloları (3)
- SLI HB BRIDGE (2-WAY-M)
- ASUS Q-Shield
- Q-konnektör
- M.2 vida paketi
- CPU Kurulum Aracı
Kurulum Adımları:
- Şasiyi Hazırlayın: Ensure your computer case is ready for motherboard installation, with appropriate standoffs installed.
- CPU'yu takın: Carefully place the 7th Generation Intel Core processor into the LGA1151 socket. Refer to the CPU Installation Tool for proper alignment.
- CPU Soğutucusunu Takın: Seçtiğiniz işlemci soğutucusunu üreticinin talimatlarına göre takın.
- Belleği (RAM) Takın: Insert DDR4 memory modules into the DIMM slots. For dual-channel configuration, refer to the motherboard manual for correct slot pairing. The motherboard supports up to 64GB of DDR4 memory at speeds up to 3866MHz.
- Install M.2 SSDs (Optional): If using M.2 storage, install the M.2 SSDs into the dual M.2 slots and secure them with the provided M.2 screw package.
- Ekran Kartını (GPU) Takın: Insert your graphics card into one of the PCIe x16 slots. The Safe Slot technology provides enhanced support for heavier GPUs.
- Depolama Sürücülerini Bağlayın: Use the provided Serial ATA 6.0Gb/s cables to connect your SATA hard drives or SSDs to the motherboard.
- Güç Kaynağını Bağlayın: Güç kaynağınızdan gelen 24 pinli ATX güç konektörünü ve 8 pinli CPU güç konektörünü anakartınıza bağlayın.
- Ön Panel Kablolarını Bağlayın: Connect the front panel headers (power button, reset button, USB ports, audio jacks) using the Q-connector for easier installation.
- Anakartı Şasiye Takın: Carefully place the motherboard into the chassis, aligning it with the standoffs, and secure it with screws.
- Çevre Birimlerini Bağlayın: Monitörünüzü, klavyenizi, farenizi ve diğer çevre birimlerinizi arka giriş/çıkış bağlantı noktalarına bağlayın.
Kullanım Talimatları
First Boot and BIOS/UEFI Setup:
Upon the first power-on, the system will typically enter the BIOS/UEFI interface. Here, you can configure boot order, system time, and other essential settings. Press the SİL key during startup to enter the BIOS. The ASUS UEFI BIOS provides an intuitive graphical interface for easy navigation and configuration.
Sürücü Kurulumu:
After installing your operating system (e.g., Windows 10), it is crucial to install the latest drivers for your motherboard components. These can be found on the official ASUS support website for the PRIME Z270-A model. Key drivers include chipset, audio, LAN, and graphics drivers (if using integrated graphics).
AURA Sync Software:
To customize the RGB lighting on your motherboard and any connected AURA Sync compatible devices, download and install the ASUS AURA Sync software from the ASUS website. This software allows you to choose from various lighting effects and colors to personalize your system's aesthetics.
Bakım
- Toz Giderimi: Anakart ve bileşenlerin tozunu düzenli olarak basınçlı hava kullanarak temizleyin. Temizlemeden önce sistemin kapalı ve fişinin çekilmiş olduğundan emin olun.
- BIOS Güncellemeleri: ASUS desteğini periyodik olarak kontrol edin website for BIOS updates. Updating the BIOS can improve system stability, compatibility, and performance. Follow the instructions provided by ASUS carefully when performing a BIOS update.
- Sürücü Güncellemeleri: Keep all motherboard drivers updated to ensure optimal performance and compatibility with new software and hardware.
- Fiziksel Muayene: Anakartı zaman zaman hasar belirtileri, gevşek bağlantılar veya şişmiş kondansatörler açısından kontrol edin.
Sorun giderme
If you encounter issues with your ASUS PRIME Z270-A motherboard, consider the following common troubleshooting steps:
- Güç Yok/Önyükleme Yok:
- Tüm güç kablolarının (24-pin ATX, 8-pin CPU) güvenli bir şekilde bağlandığından emin olun.
- Güç kaynağının çalışır durumda olduğunu kontrol edin.
- Ön panel güç anahtarı kablosunun doğru şekilde bağlı olduğundan emin olun.
- Görüntü yok:
- Monitör kablosunun grafik kartına (veya entegre grafik kartı kullanıyorsanız anakarta) bağlı olduğundan emin olun.
- Ekran kartını ve RAM modüllerini yeniden yerleştirin.
- Sadece bir RAM çubuğuyla önyüklemeyi deneyin.
- Sistem Kararsızlığı/Çökmeler:
- BIOS'unuzu ve tüm sürücülerinizi en son sürümlere güncelleyin.
- Check CPU and GPU temperatures to ensure proper cooling.
- RAM hatalarını kontrol etmek için bellek tanılama araçlarını çalıştırın.
- Çevresel Algılama Sorunları:
- Ensure USB devices are connected to appropriate ports (USB 2.0, 3.0, 3.1).
- Install or update USB controller drivers.
For more detailed troubleshooting or advanced issues, please refer to the comprehensive user manual available on the ASUS support webSitemizi ziyaret edin veya ASUS müşteri desteğiyle iletişime geçin.
Özellikler
| Kategori | Şartname |
|---|---|
| Marka | ASUS |
| Seri | BAŞLANGIÇ Z270-A |
| Model Numarası | BAŞLANGIÇ Z270-A |
| CPU Soketi | LGA1151 |
| Uyumlu İşlemciler | 7. Nesil Intel Core |
| Yonga Seti Türü | Intel Z270 |
| RAM Bellek Teknolojisi | DDR4 |
| Bellek Saat Hızı | 2133 MHz (up to 3866 MHz OC) |
| Bellek Depolama Kapasitesi | 64 GB (Maks) |
| USB 2.0 Port Sayısı | 6 (via headers) |
| Ürün Boyutları (UxGxY) | 10.36 x 2.68 x 12.92 inç |
| Ürün Ağırlığı | 2.42 pound |
| Platform | Windows 10 |
Garanti ve Destek
The ASUS PRIME Z270-A motherboard comes with a manufacturer's warranty. For specific warranty terms, conditions, and duration, please refer to the warranty card included with your product or visit the official ASUS support webalan.
For further assistance, technical support, driver downloads, and detailed user guides, please visit the ASUS Desteği Webalan. You can also find the full user manual in PDF format via the following links: