NETGEAR XS712T
NETGEAR ProSAFE XS712T 12-Port 10GBase-T Gigabit Smart Managed Switch User Manual
Model: XS712T-100NES
1. Giriş
This manual provides detailed instructions for the installation, configuration, and operation of your NETGEAR ProSAFE XS712T 12-Port 10GBase-T Gigabit Smart Managed Switch. Designed for small to medium-sized businesses (SMBs), this switch offers high-performance 10-Gigabit connectivity, advanced Layer 2 features, and easy web-based management to meet diverse networking needs.
2. Temel Özellikler
- Advanced VLAN features such as MAC (Media Access Control), protocol-based VLAN and guest VLAN.
- Advanced QoS (Quality of Service) including Q-in-Q.
- Dynamic VLAN assignment - Increases security by imposing consistent policy and user credentials across the network, regardless of where users connect.
- MLD snooping - Increases network efficiency by forwarding multicast traffic to designated hosts only, rather than flooding multicast packets across all ports.
- Security management.
- IPv6 for management, QoS and ACL.
- Kullanımı kolay Webtemelli yönetim.
3. Paket İçeriği
Paketinizin aşağıdaki öğeleri içerdiğini doğrulayın:
- NETGEAR ProSAFE XS712T 12-Port 10GBase-T Gigabit Smart Managed Switch
- Güç Kablosu
- Raf montaj kiti (varsa)
- Kurulum Kılavuzu
4. Ürün Bittiview
The NETGEAR ProSAFE XS712T switch features a robust design with multiple ports and indicators for efficient network management.
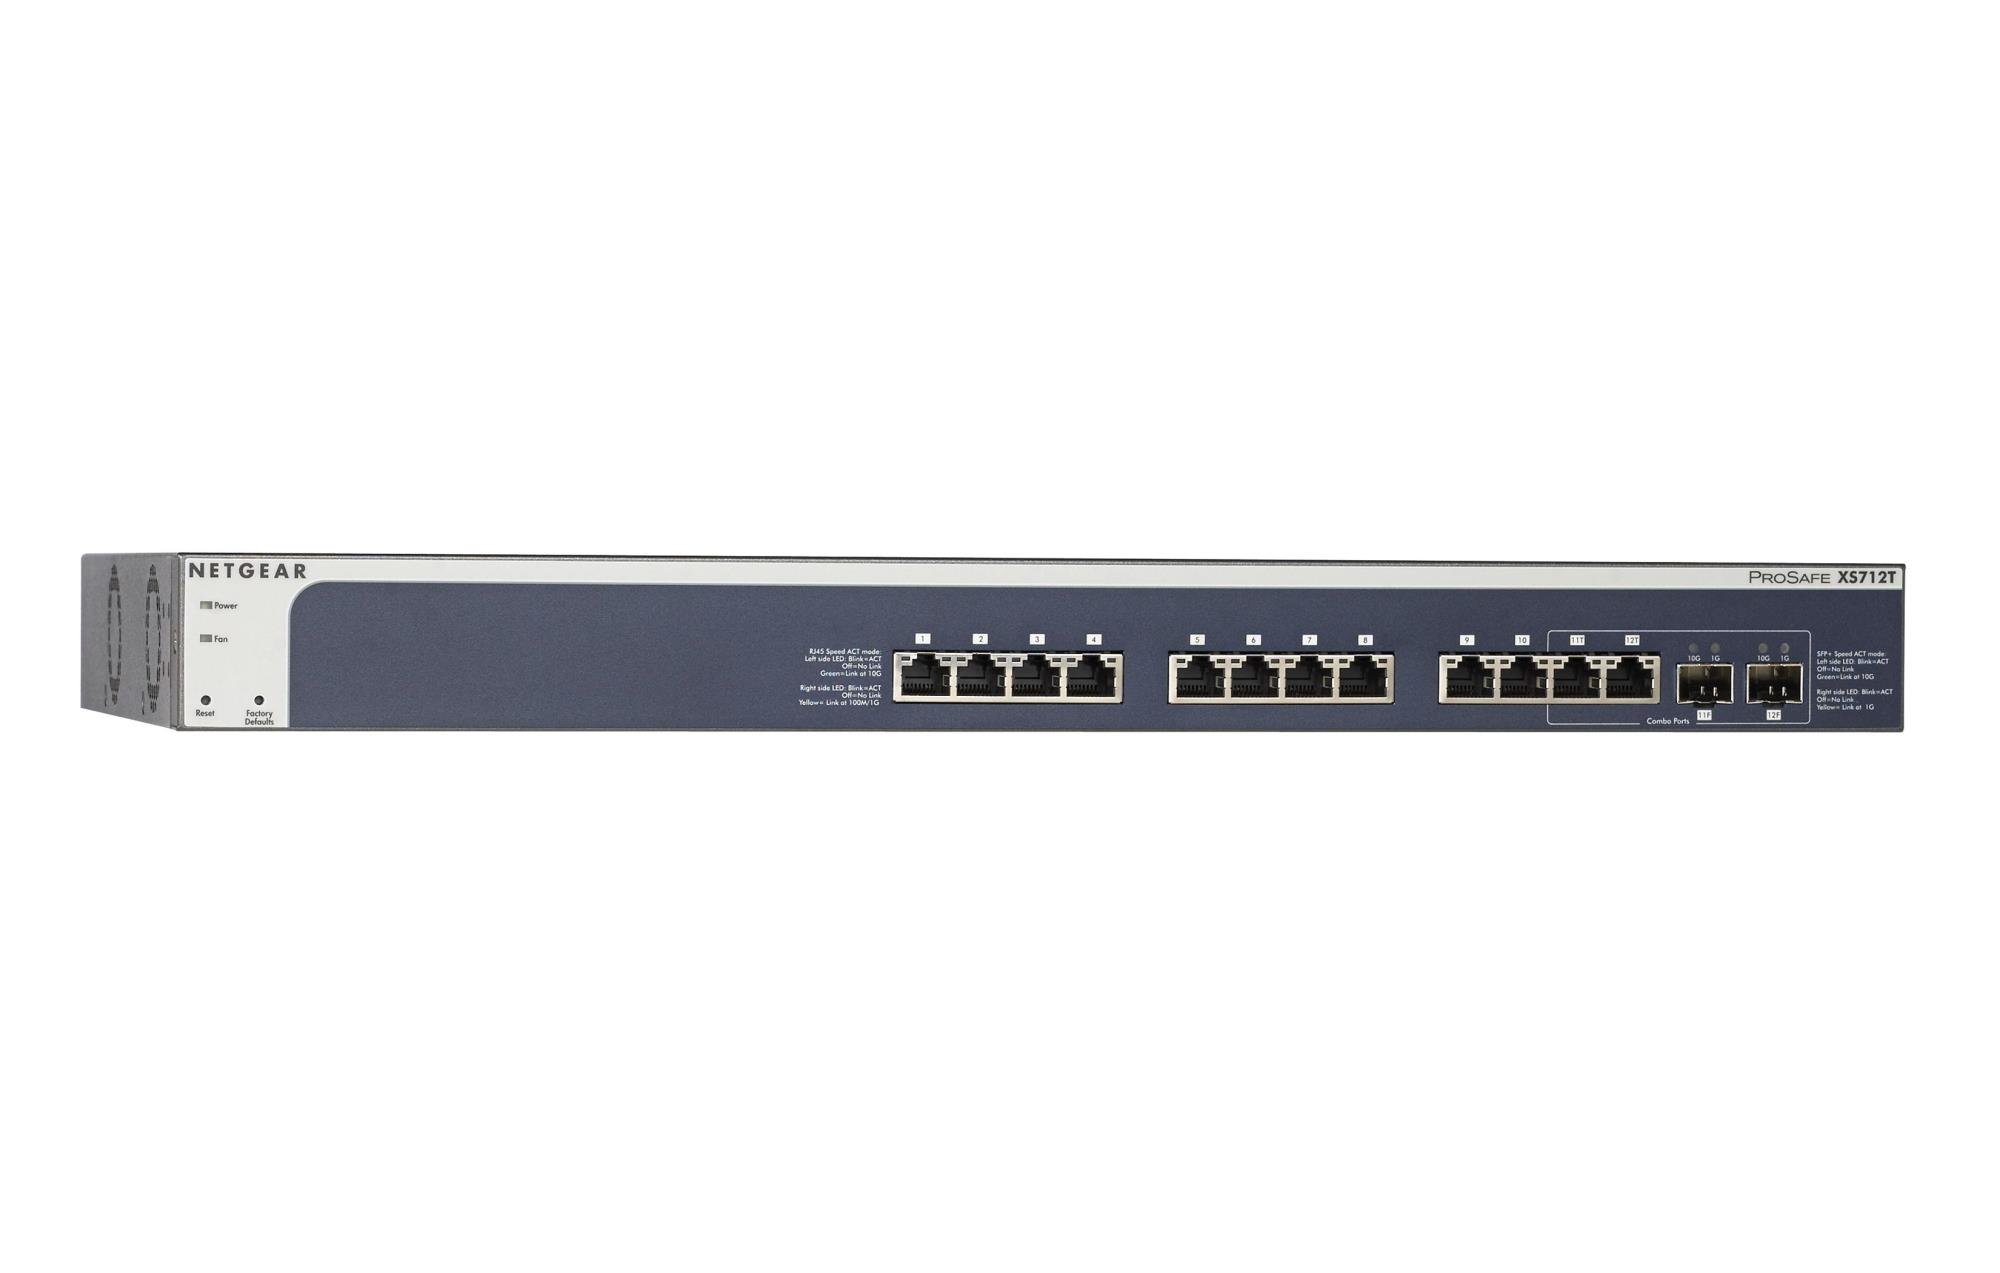
Figure 1: Front Panel of NETGEAR ProSAFE XS712T Switch
This image displays the front panel of the NETGEAR ProSAFE XS712T switch, showing the 12 10GBase-T ports, two combo SFP+ ports, and LED indicators for power, fan status, and port activity. The reset and factory defaults buttons are also visible on the left side.
Ön Panel Bileşenleri:
- Güç LED'i: Cihazın güç durumunu gösterir.
- Fan LED'i: Soğutma fanının çalışma durumunu gösterir.
- Sıfırlama Düğmesi: Used to restart the switch.
- Fabrika Ayarlarına Sıfırla düğmesi: Used to restore the switch to its factory default settings.
- RJ45 Bağlantı Noktaları (1-10): 10GBase-T Ethernet ports for high-speed network connections. Each port has associated Link/Act LEDs (Left side LED: Blink=ACT, Off=No Link, Green=Link at 100M/1G; Right side LED: Blink=ACT, Off=No Link, Yellow=Link at 10G).
- Combo Ports (11, 12): These ports can function as either 10GBase-T RJ45 ports or SFP+ fiber ports. Each combo port has associated SFP+ Speed/ACT LEDs (Left side LED: Blink=ACT, Off=No Link, Green=Link at 10G; Right side LED: Blink=ACT, Off=No Link, Yellow=Link at 1G).
5. Kurulum
5.1 Raf Montajı (İsteğe Bağlı)
If you intend to install the switch in a standard 19-inch equipment rack, use the provided rack-mount kit. Secure the mounting brackets to the sides of the switch using the screws provided. Then, attach the switch to the rack using appropriate rack screws.
5.2 Masaüstü Yerleşimi
For desktop use, ensure the switch is placed on a flat, stable surface. Allow adequate ventilation around the device to prevent overheating.
5.3 Güç Bağlantısı
- Connect one end of the provided power cord to the AC power inlet on the rear panel of the switch.
- Güç kablosunun diğer ucunu topraklı bir elektrik prizine takın.
- Ön paneldeki Güç LED'inin yandığını ve anahtarın güç aldığını doğrulayın.
5.4 Ağ Bağlantıları
- Connect your network devices (servers, workstations, other switches) to the RJ45 ports (1-10) using appropriate Ethernet cables (Cat6a or higher for 10G speeds).
- For fiber optic connections, insert compatible SFP+ transceivers into the combo SFP+ ports (11F, 12F) and connect fiber optic cables.
- Observe the Link/Act LEDs for each connected port. A solid green or yellow light indicates a successful link, and blinking indicates activity.
6. Kullanım Talimatları
6.1 Temel İşlemler
The NETGEAR ProSAFE XS712T is a plug-and-play device for basic connectivity. Once powered on and connected, it will automatically detect and configure connected devices for optimal performance.
6.2 Web-Tabanlı Yönetim
Gelişmiş yapılandırma ve yönetim için, anahtarın ayarlarına erişin. webtabanlı arayüz:
- Bilgisayarınızın anahtara bağlı olduğundan emin olun.
- Bir tane aç web browser and enter the default IP address of the switch (refer to the Quick Start Guide or NETGEAR support for the specific default IP).
- Log in using the default username and password (typically "admin" and "password" or similar, check documentation).
- Şuradan: web interface, you can configure VLANs, QoS settings, security features, and monitor network status.
7. Bakım
- Donanım Yazılımı Güncellemeleri: NETGEAR desteğini düzenli olarak kontrol edin. webEn iyi performansı ve güvenliği sağlamak için en son ürün yazılımı güncellemelerini bu siteden edinebilirsiniz.
- Temizlik: Anahtarı temiz ve tozdan arındırılmış halde tutun. Temizlik için yumuşak, kuru bir bez kullanın. Sıvı veya aerosol temizleyiciler kullanmayın.
- Havalandırma: Aşırı ısınmayı önlemek için havalandırma açıklıklarının kapalı olmadığından emin olun.
- Kablo yönetimi: Organize network cables to prevent strain on ports and improve airflow.
8. Sorun Giderme
- Güç Yok: If the Power LED is off, ensure the power cord is securely connected to both the switch and the electrical outlet. Try a different outlet or power cord.
- Limanda Bağlantı Yok: Ethernet kablosunun her iki ucundaki bağlantıyı kontrol edin. Farklı bir kablo veya bağlantı noktası deneyin. Bağlı cihazın açık ve düzgün çalıştığından emin olun.
- Yavaş Ağ Hızı: Verify that you are using appropriate cables (Cat6a or higher for 10G). Check for network congestion or misconfigurations in the switch's settings (e.g., QoS).
- Erişilemiyor Web Arayüz: Ensure your computer's IP address is in the same subnet as the switch's IP address. Verify the switch's IP address and login credentials. Try resetting the switch to factory defaults if necessary (this will erase all custom configurations).
- Fan Gürültüsü: The switch may generate fan noise during operation, especially under heavy load or in warmer environments. This is normal. Ensure proper ventilation.
9. Özellikler
| Özellik | Detay |
|---|---|
| Marka | AĞ DİŞLİLERİ |
| Model Numarası | XS712T-100NES |
| Port Sayısı | 12 (10GBase-T RJ45, 2 Combo SFP+) |
| Veri Aktarım Hızı | Saniyede 10000 Megabit (10 Gigabit) |
| Arayüz Türü | RJ45, SFP+ |
| Kasa Malzemesi | Plastik |
| Ürün Ağırlığı | 1.32 pound |
| Ürün Boyutları | 22.44 x 3.54 x 13.74 inç |
| Üst Sıcaklık Derecesi | 40 Derece Santigrat |
| Veri deposu | 2 MB |
| Dil | İngilizce |
10. Garanti ve Destek
For warranty information, technical support, and product registration, please visit the official NETGEAR support website or refer to the warranty card included in your product package. Keep your purchase receipt for warranty claims.
Çevrimiçi Kaynaklar:
Ask a question about this manual
Ask about setup, troubleshooting, compatibility, parts, safety, or missing instructions. Manuals+ will review the question and use this page’s manual context to help answer it.