TOORX PLX 4300 Pin Loaded Horizontal Leg Curl Instruction Manual
DESIGN ILLUSTRATION

SPECIFICATIONS
Unit Dimensions: 1580mm(L)×1000mm(W)×1530mm(H)
Weight Stack: 80kg (standard); 80~120kg (optional)
User Weight≤150kg

ASSEMBLY TOOLS

ASSEMBLY INSTRUCTIONS
- As the unit has a large size, please assemble it in a space which is big enough.
- Open the packing box, take out the parts and remove packing materials. Classify all parts and tidily put them on vacant floor.
- Ensure that it’s correctly assembled and the parts are complete according to assembly steps.
- It requires at least two persons.
I.Assemble Weight Cage
- Attach front shroud, decorative strip and upper cap to tower frame.
- Assemble weight plates. Insert two guide rods into the corresponding mounting holes on the lower part of weight cage; pass them through shock pads; pass them through weight plates successively.
- Assemble head plate. Now the weight plates are assembled.
- Assemble circlips on the upper parts of two guide rods; fix guide rods.
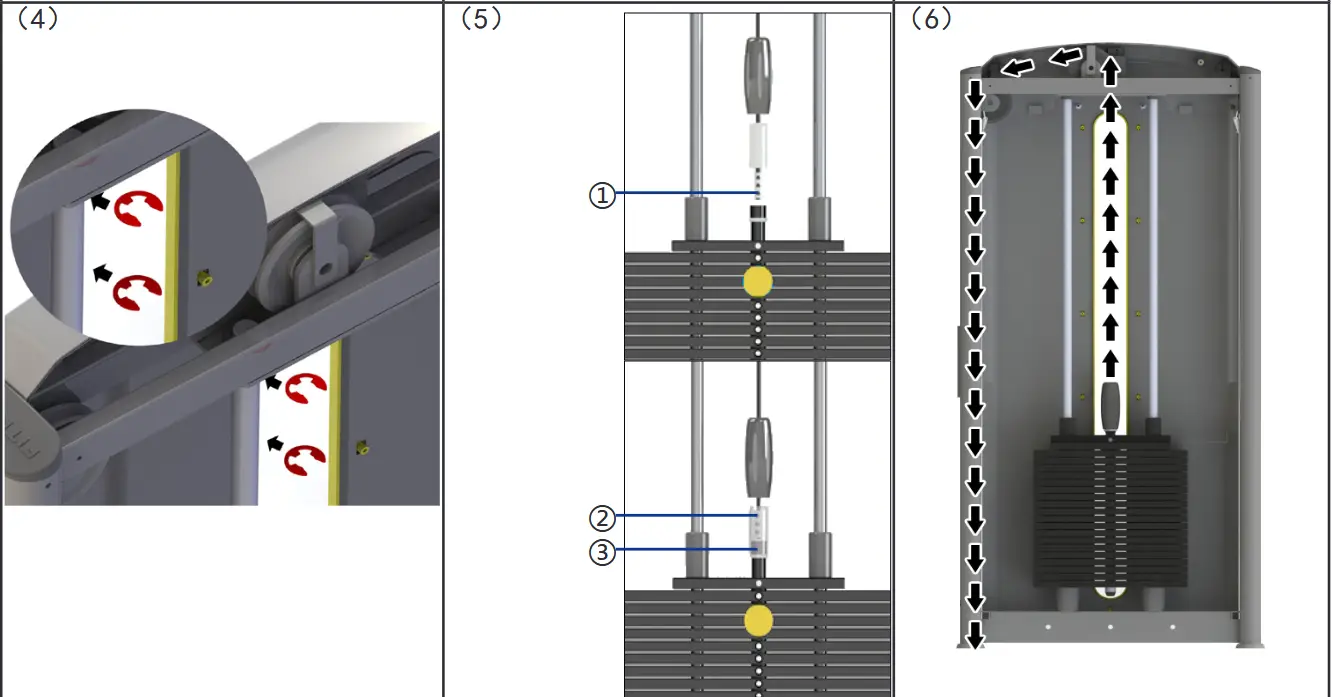
- Pass steel cable through cord lock; fasten steel cable with screws.
① Tighten the 3 screws as much as possible.
② The bolt must make at least 10 turns towards the selector bar.
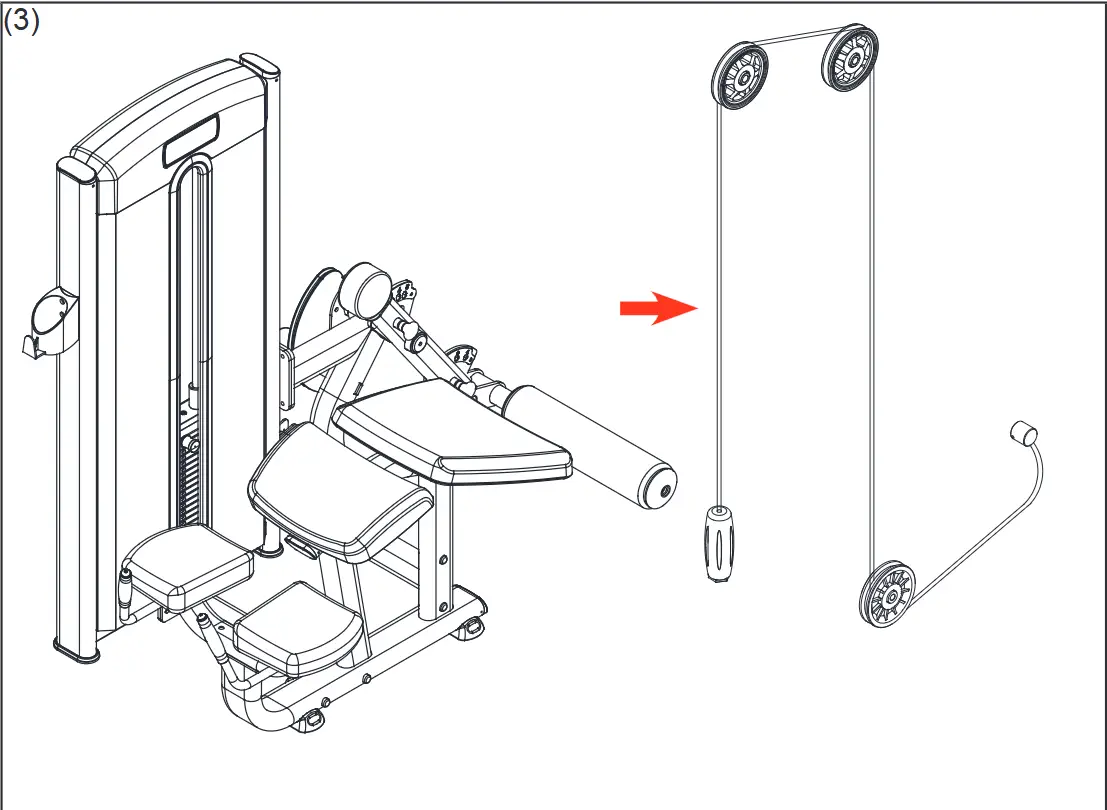
③ Tighten hexagon nut. - Assemble steel cable as the diagram shows; check whether all the pulleys move smoothly.
- Assemble rear shroud; fasten it to tower frame with designated screws.
- Assemble water bottle holder; fasten it to tower frame with designated screws.
- Now the weight cage is assembled.


II.Assemble User Frame
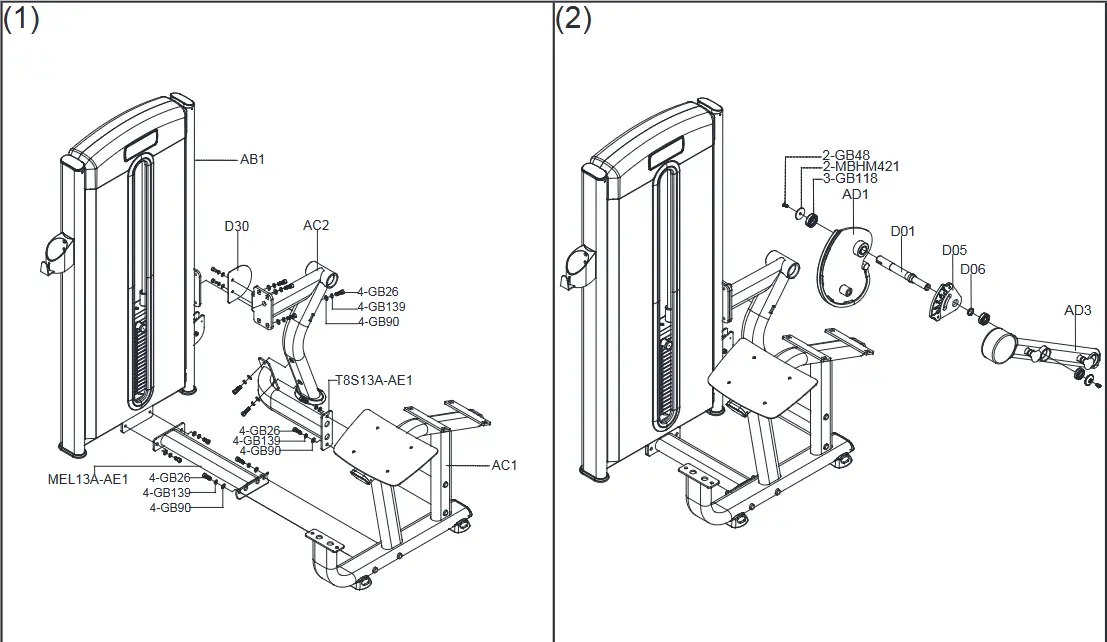
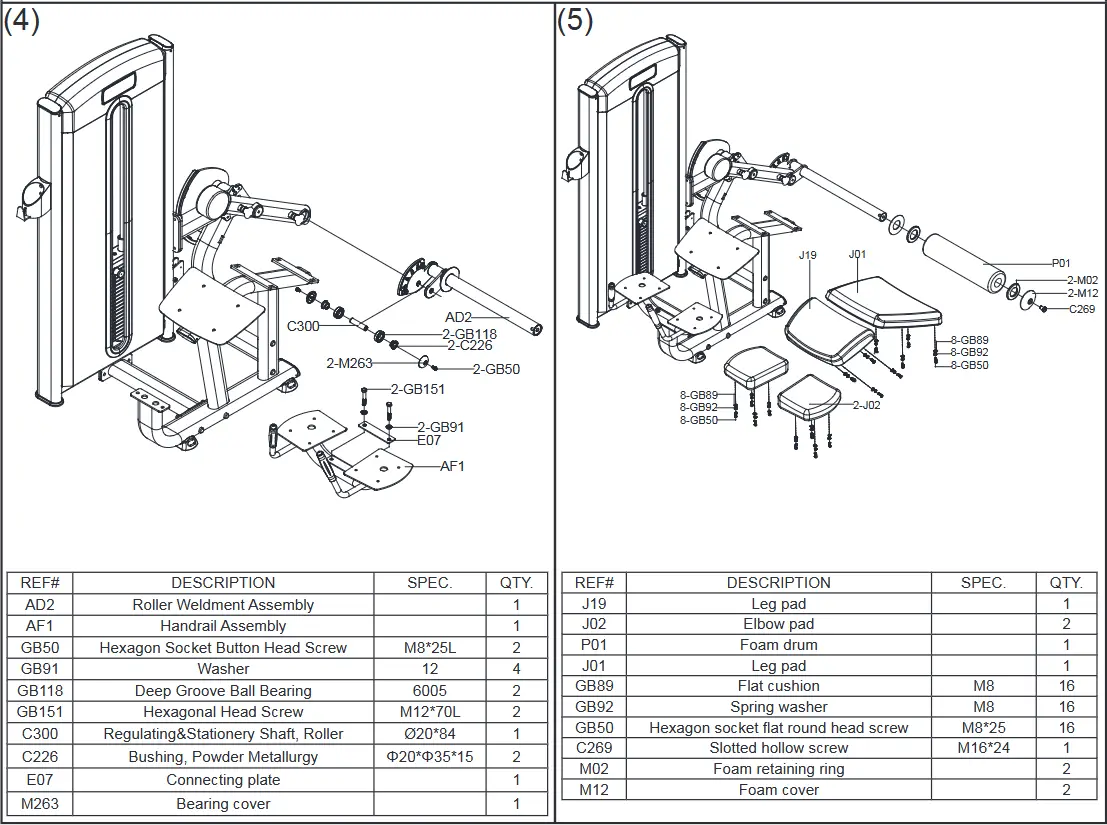
- Put the assembled Weight Cage in the area where the machine will be used. Make an inventory of the other parts according to the diagrams below; remove packing materials and place the parts tidily. Assemble the main frame; firmly attach the Connecting Assemblies (upper; lower) (AE1; AE2) to Weight Cage with set bolts as the diagram shows. (Diagram 1)
- Attach Cam Assembly (AD1) and Rotating Assembly (AD3) to the main frame. Tighten all the set bolts. (Diagram 2)
- Assemble steel cable as the diagram shows; make sure that it moves along the trajectory as the arrow shows. Fix and adjust it, ensuring that it moves smoothly without any twist or slack. (Diagram 3)
- Attach Roller Weldment Assembly (AD2) and Handrail Assembly (AF1) to the main frame. (Diagram 4)
- Assemble Cushions (M202), Elbow Rests (M194) and Roller Pad (M315). (Diagram 5)
- Recheck all links and tighten all loose screws in case of slack.
- Finally, before the machine is put into use, a trial must be taken by professional to assure that it’s correctly assembled.
USAGE GUIDANCE
Instructions
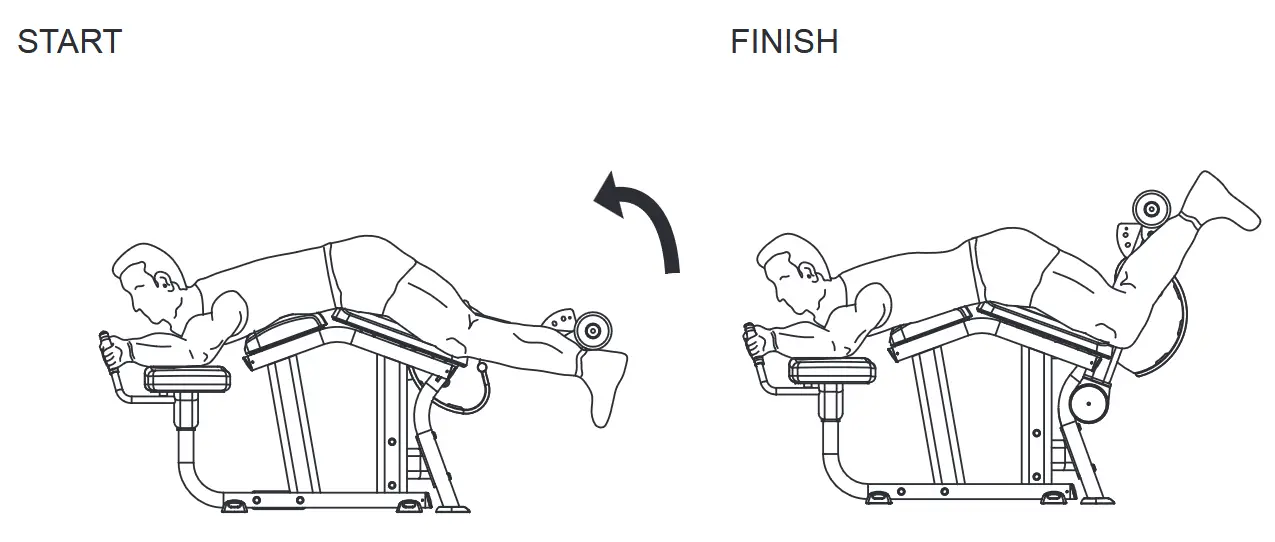
Inspect joints of steel cables for looseness. Select an appropriate weight resistance according to personal condition. Adjust roller pads height by pulling T-knob behind them, ensuring that they are firmly pressed against your thighs. Straighten both arms and grasp handgrips.
Exercise Movement
Grasp handgrips with both hands and pull them downward (Never get handgrips perpendicular to head!), return to the starting position slowly, ensuring that the moving weight plates do not touch the static ones. Repeat the movement. Please consult a coach if you experience any pain when you stop suddenly.
EXERCISE NOTICES
- 5~10 minutes of warm-up must be taken prior to having exercise on this machine. Record the time while having free exercise which aims to activate the joints in case of injury to them during training.
- Inspection must be carried out prior to using the machine. For any potential problem, please contact the coach or maintenance staff immediately. Do not use it before it’s assured that it can operate correctly.
- Do not use the machine if there’s a sign on it that tells it malfunctions.
- Please take high-protein foods, vegetables and fruits. Have a meal 40 min prior to the exercise and another meal no sooner than 30 min after it. A small amount of water can be taken during exercise.
- Inhale when you exert yourself; exhale when you relax. Adjust breath according to movements.
- The next workout for same muscle must be taken after at least 48 hours of rest.
Weight resistance should be selected according to personal condition. Excessive weight must not be taken in case of injury to muscles. The training must be proceeded in an orderly way and step by step. It is normal to feel slight pain in the muscles during the first workout.
MAINTENANCE AND TROUBLESHOOTING
- Inspect bolts at all mechanical parts frequently for tightness; rotating parts should rotate smoothly without producing any abnormal sound.
- When the machine is static, steel cable should be tightened while weight plates should not be suspended.
- The machine should be kept clean but not wiped with strong cleaning solvents.
- Bolts at all the adjustment parts should be tightened after adjustment in case of slack.
- If any loading part, e.g., steel cable, pulley, pulley case, weight plate, is abraded or damaged, it must be replaced immediately; the machine can only be put into use after repair.
Basic Troubleshooting

If the machine malfunction is not referred in the text above, please contact the customer service centre or call us, you’ll receive satisfactory service.
EXERCISE NOTICES
Daily Inspection
Clean and inspect machine frame every day; clean upholsteries; inspect steel cable and the terminals for abrasion.
Clean upholsteries and machine frame with neutral soapy water, remove dirt, oil stain and perspiration on the surfaces and air dry them completely. Inspect the frame for rupture, rustiness and other damage. Make sure that soldering points and fastening parts are correctly fixed.
Fastening parts may get loose during normal use; therefore, please inspect all the nuts, bolts, screws and other fastening parts, make sure they are well tightened and correctly assembled. The machine can only be put into use when no problem is found.
Regular inspections of steel cable, pulleys, fastening parts and other accessories must be carried out. Frequently used cable may be damaged and broken due to abrasion; sudden damage or rupture may cause severe injuries to users. Hence, daily inspection of cable and connections at the terminals must be implemented. Check whether there’s kink or abrasion, whether sheath and terminals are damaged. Special attention must be paid to the terminals and the parts of cable which are in contact with pulleys. Damaged cable must be replaced immediately in case of injury to users.
Characteristics of Obvious Steel Cable Damages (Picture 1)
- A tear or crack in the cable sheath that exposes the cable; or the part of sheath which pulley contacts is cracked.
- Z-type twist or a curled sheath.
- Kinks which indicate that internal of cable may be damaged.
- Necking-A stretched cable sheath.
- Cable sheath gets inflated.
In addition, the following inspections must be carried out.
- Make sure that steel cable is correctly adjusted and securely fastened to the top of weight plates. Make sure that cable is securely connected to pulleys and all assemblies are well fixed, all the seven cable strands pass through the selector bar and screws are well tightened.
- Wipe and clean all warning/instruction stickers. (Picture 2)
- After some time of use, steel cable may get loose due to stretches. It can be solved by adjusting the hexagon nut on the head plate in time; tighten hexagon nut in case of slack. If it fails, cut a small section of the cable and refasten it. (For adjustment and assembly of steel cable, please check Assemble Weight Cage, ASSEMBLY INSTRUCTIONS.)

Weekly Inspection
Clean upholsteries; clean and lubricate cable rod end; clean and lubricate guide rods; inspect cable, connecting parts, and cable tension; inspect cable accessories; inspect pulleys; inspect each weight plate and selector pin; inspect and lubricate bearings and bushings; inspect seat adjustment system; test the pop pin.
- Clean upholsteries with special detergent. Note: It must be neutral detergent. Never use detergent which contains solvent, ethanol, ammonia or petroleum.
- Inspect heim joint and assure that the shoulder screw is well tightened. If there’s noise inside the heim joint, lubricate it with silicone oil as shown in Picture 1 on Page 18. Wipe them with cloth to remove excessive oil.
- Inspect the exposed parts of guide rods; keep them clean; remove dirt and oil stain on the rods with soft cloth. (Note: You can only inspect, clean and lubricate guide rods after dismantling shrouds.)
- Spray silicone oil onto the exposed parts of guide rods or cloth, and then wipe guide rods with cloth. Never lubricate the rods when the machine is in use; the parts which are hidden in weight plates can only be lubricated after the weight plates are removed, otherwise, it will cause severe injuries.
Reminder: Do not use petroleum-based lubricant; it will lead to rapid accumulations of dirt and hair on weight plates and may get the weight plates stuck to each other. - Inspect and test steel cable and the links thoroughly every week; inspect cable tension.
- Inspect cable connection at weight plates. Make sure that the bolt makes at least 10 turns (15mm) towards the selector bar. Inspect the two thin nuts at both ends of the nut and ensure that they are securely tightened.
- Inspect steel cable; pay special attention to parts which are in contact with pulleys and cams. Inspect links at cams; inspect bolts which pass through parts on the top of cams and assure that set screws are tightened.
- Inspect steel cable; make sure all connections are firm and secure, tension is appropriate and steel cable is correctly fixed on the top of weight plate.
- Inspect pulleys: check if there’s abrasion, flaw, breach or deletion. Abrasion of pulley surface can lead to severe damage to steel cable. Therefore, abraded or damaged pulley must be replaced immediately. Make sure pulleys can revolve flexibly during usage and do not sway to left and right with big amplitude. Big amplitude indicates that set bolt or bearing is damaged; in this case, dismantle pulley and inspect it. If any damaged bearing, it must be replaced immediately.
- Inspect weight plates and selector pin: check if there’s burr or damage; wipe each weight plate and guide rod to remove dirt and dust. Make sure that selector pin can be fully inserted into each weight plate and stably retained there (Picture 2).
- Inspect bearings and lubricate shaft bushing: it’s recommended that a small amount of silicone oil should be used for lubricating shaft bushing which is used for supporting shaft. Spray the oil onto shaft and twist the shaft several laps inside shaft bushing; meanwhile, check whether the bushing is excessively abraded or damaged.

Monthly Inspection
- Inspect main frame and press arms: lubricate the pop pin; inspect and lubricate seat post; inspect all fastening parts.
- Inspect main frame and press arms: check if they are complete and work normally; check if there’s cracking, peeling paint or rustiness. Repair or replace the parts according to actual condition.
- Check if main frame is cracked. Pay special attention to solder joints. If any crack, suspend the machine immediately and contact maintenance staff to repair it.
- Check if there’s rust or peeling paint on frame; if yes, wipe it gently with wet grainy cloth, dry emery cloth, or steel wire (fine thread) ball and then repair paint chips.
- If the selector pin cannot be easily inserted into weight plate, check whether the selector bar swings leftward and rightward when it’s in vertical position. (Picture 1)
- Pull out the pop pin; spray a small amount of silicone oil onto it; wipe it and remove excessive oil. (Picture 2)

Annual Maintenance
- Dismantle shrouds and carry out necessary maintenance. It’s recommended that one should dismantle weight plates, clean and inspect them thoroughly. Carefully take steel cable and guide rods off weight plates; clean and inspect each weight plate; inspect guide rod bushing. If any damaged part, replace it immediately. Clean guide rods and the selector bar; reassemble weight plates and shrouds. We recommend that abraded or damaged cable get replaced during regular maintenance; and all cables should be replaced with new ones annually.
- Inspect and lubricate the pop pin.
![]()
contact@toorxprofessional.it
www.toorxprofessional.it
Documents / Resources
 | TOORX PLX 4300 Pin Loaded Horizontal Leg Curl [pdf] Instruction Manual PLX 4300 Pin Loaded Horizontal Leg Curl, PLX 4300, Pin Loaded Horizontal Leg Curl, Loaded Horizontal Leg Curl, Horizontal Leg Curl, Leg Curl |