1. บทนำ
Thank you for choosing the KEENSTAR 20Bar Espresso Machine. This manual provides essential information for the safe operation, maintenance, and troubleshooting of your new espresso machine. Please read it thoroughly before first use and keep it for future reference.
2. คำแนะนำด้านความปลอดภัยที่สำคัญ
- อ่านคำแนะนำทั้งหมดก่อนใช้เครื่องใช้ไฟฟ้า
- อย่าสัมผัสพื้นผิวที่ร้อน ใช้ที่จับหรือลูกบิด
- เพื่อป้องกันไฟไหม้ ไฟฟ้าช็อต และการบาดเจ็บต่อบุคคล ห้ามจุ่มสายไฟ ปลั๊ก หรือเครื่องใช้ไฟฟ้าในน้ำหรือของเหลวอื่นๆ
- จำเป็นต้องมีการดูแลอย่างใกล้ชิดเมื่อมีเด็กหรือใช้งานเครื่องใช้ไฟฟ้าใดๆ ใกล้เด็ก
- ถอดปลั๊กออกเมื่อไม่ได้ใช้งานและก่อนทำความสะอาด ปล่อยให้เย็นลงก่อนใส่หรือถอดชิ้นส่วน และก่อนทำความสะอาดเครื่องใช้ไฟฟ้า
- ห้ามใช้งานเครื่องใช้ไฟฟ้าที่มีสายไฟหรือปลั๊กชำรุด หรือหลังจากที่เครื่องใช้ไฟฟ้าทำงานผิดปกติ หรือได้รับความเสียหายในลักษณะใดๆ
- การใช้อุปกรณ์เสริมที่ไม่แนะนำโดยผู้ผลิตเครื่องใช้ไฟฟ้าอาจทำให้เกิดไฟไหม้ ไฟฟ้าช็อต หรือบาดเจ็บบุคคลได้
- ห้ามใช้กลางแจ้ง
- อย่าให้สายไฟห้อยออกจากขอบโต๊ะหรือเคาน์เตอร์ หรือสัมผัสพื้นผิวที่ร้อน
- ห้ามวางบนหรือใกล้เตาแก๊สหรือเตาไฟฟ้าที่ร้อน หรือในเตาอบที่อุ่น
- เสียบปลั๊กเข้ากับเครื่องใช้ไฟฟ้าก่อนเสมอ จากนั้นจึงเสียบสายไฟเข้ากับเต้ารับไฟฟ้าที่ผนัง หากต้องการตัดการเชื่อมต่อ ให้ปิดสวิตช์ควบคุมทั้งหมด จากนั้นถอดปลั๊กออกจากเต้ารับไฟฟ้าที่ผนัง
- ห้ามใช้เครื่องใช้ไฟฟ้าเพื่อวัตถุประสงค์อื่นนอกเหนือจากที่กำหนดไว้
- โปรดใช้ความระมัดระวังอย่างยิ่งเมื่อกำจัดไอน้ำร้อน
- เครื่องใช้ไฟฟ้าชิ้นนี้มีไว้สำหรับใช้ในครัวเรือนเท่านั้น
3. เนื้อหาบรรจุภัณฑ์
โปรดตรวจสอบสิ่งของภายในกล่องทันทีที่เปิด เพื่อให้แน่ใจว่าสินค้าทุกชิ้นครบถ้วนและไม่เสียหาย
ภาพ: All components included in the KEENSTAR 20Bar Espresso Machine package. This includes the main unit, portafilter with handle, single and double shot filters, coffee spoon with tamper, and a removable drip tray. The water tank and steam nozzle are also visible.
- KEENSTAR 20Bar Espresso Machine Main Unit
- ที่จับ Portafilter
- 1-Shot Filter Basket
- 2-Shot Filter Basket
- Coffee Spoon with Tamper
- ถาดรองน้ำหยดแบบถอดออกได้
- คู่มือการใช้งาน
4. สินค้าหมดview
Familiarize yourself with the various parts of your espresso machine.

ภาพ: ด้านหน้า view of the KEENSTAR 20Bar Espresso Machine, showcasing its sleek stainless steel design and key operational areas.
- ถังเก็บน้ำ: Detachable, 1.1 Liter capacity. Located at the back of the machine.
- แผงควบคุม: Intuitive touch screen for selecting brew options (Espresso, Americano, Espresso Cool, Steam, ON/OFF, 2X Espresso).
- พอร์ตฟิลเตอร์: ใช้สำหรับบรรจุผงกาแฟเพื่อชง
- แท่งไอน้ำ: For frothing milk for lattes and cappuccinos. Features a 360-degree rotation.
- ถาดรองน้ำหยด: ถอดทำความสะอาดง่าย
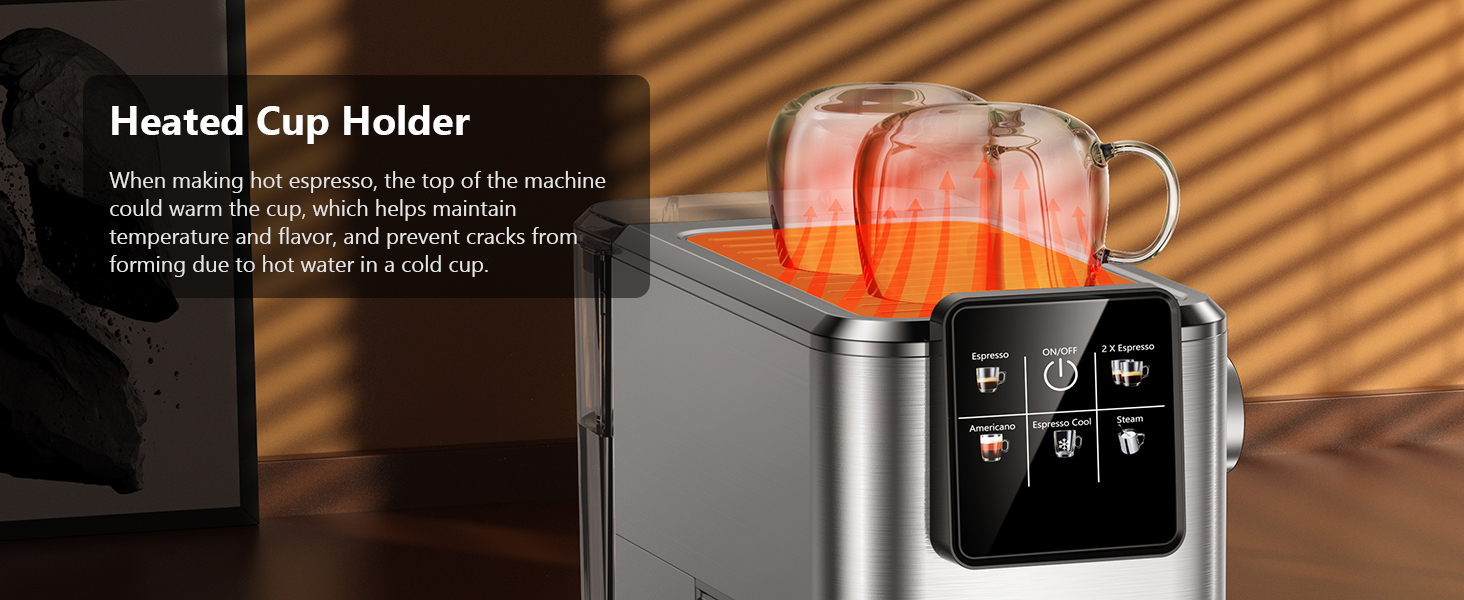
- Heated Cup Holder: Located on top of the machine to warm cups, maintaining coffee temperature.
5. การตั้งค่า
5.1 Initial Use and Priming
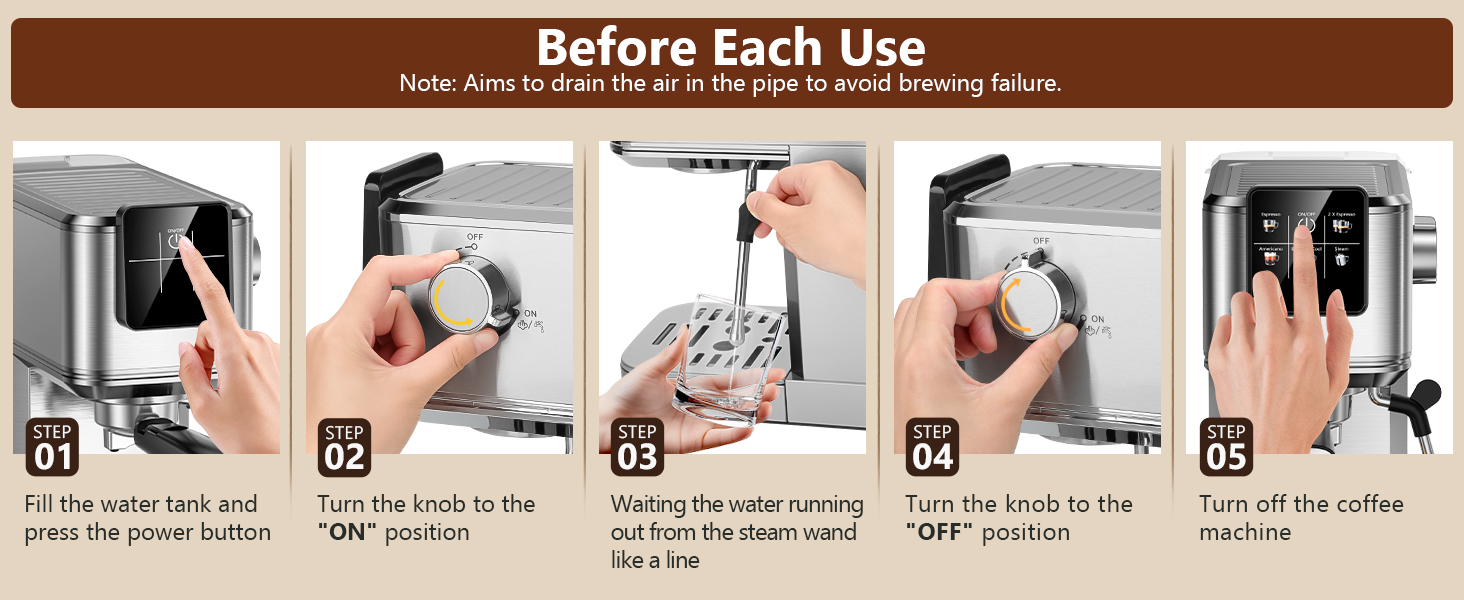
Before first use, or if the machine has not been used for a long time, it is essential to prime the system to ensure proper operation and remove any air from the pipes.
- Fill the water tank with fresh water and place it back into the machine. Ensure the tank cover is properly closed.
- Plug the machine into a power outlet. The ON/OFF button on the touch screen will illuminate.
- Press the ON/OFF button to turn on the machine. The indicator lights will blink as the machine preheats.
- Once the indicator lights are steady, the machine is ready.
- วางถ้วยเปล่าไว้ใต้แท่งไอน้ำ
- Turn the steam knob to the "ON" position. Water will run out from the steam wand like a line. Let it run for about 10-15 seconds to purge air.
- Turn the steam knob to the "OFF" position.
- Press the ON/OFF button to turn off the machine. The machine is now primed and ready for use.

ภาพ: Visual steps for priming the espresso machine before its first use or after a period of inactivity. This process drains air from the internal pipes.
5.2 ถังบรรจุน้ำ
The water tank has a maximum capacity of 1200ml. Do not exceed the maximum fill line to prevent overflow.
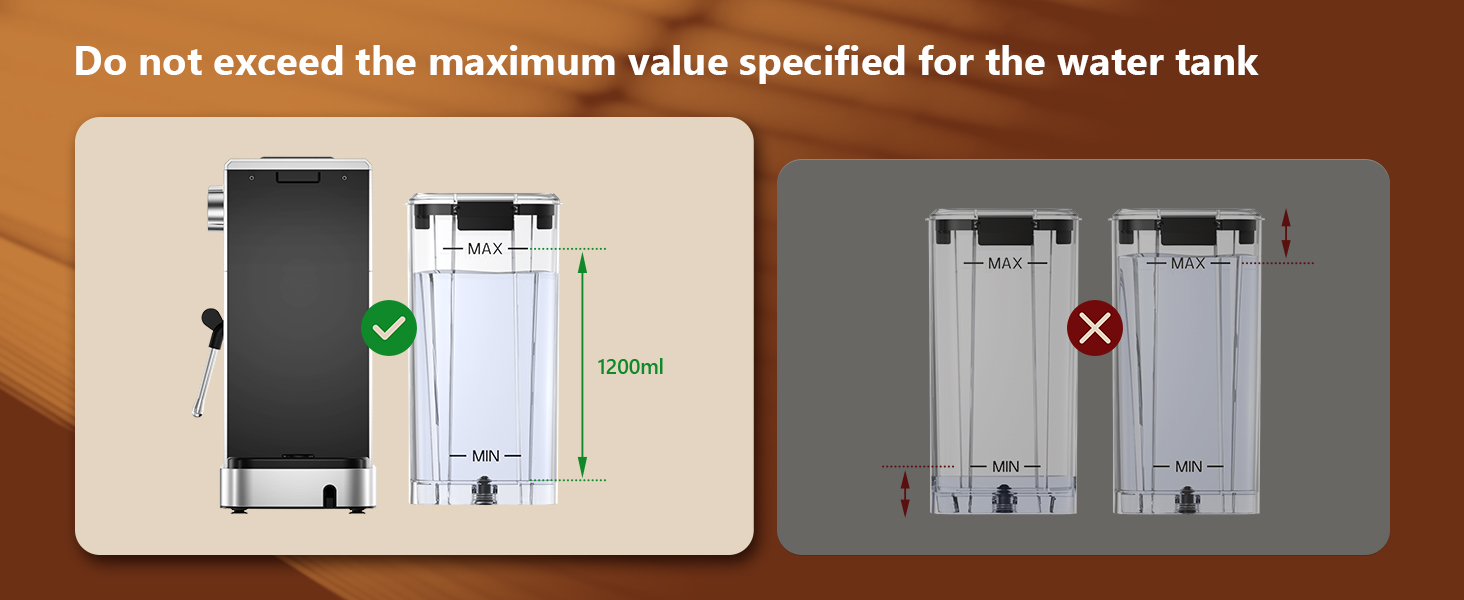
ภาพ: Guidance on filling the water tank, indicating the 1200ml maximum fill level to avoid overfilling.
6. คู่มือการใช้งาน
6.1 การชงเอสเพรสโซ
The machine features a 20-bar pressure system and pre-soak technology for rich espresso extraction.
- โปรดตรวจสอบให้แน่ใจว่าได้ตั้งปุ่มควบคุมไอน้ำไปที่ตำแหน่ง "ปิด" ก่อนชงกาแฟ
- Fill the water tank with fresh water and press the ON/OFF button to power on. Wait for the indicator to become steady, signifying preheating is complete.
- Select the appropriate filter basket (1-shot or 2-shot) and place it into the portafilter.
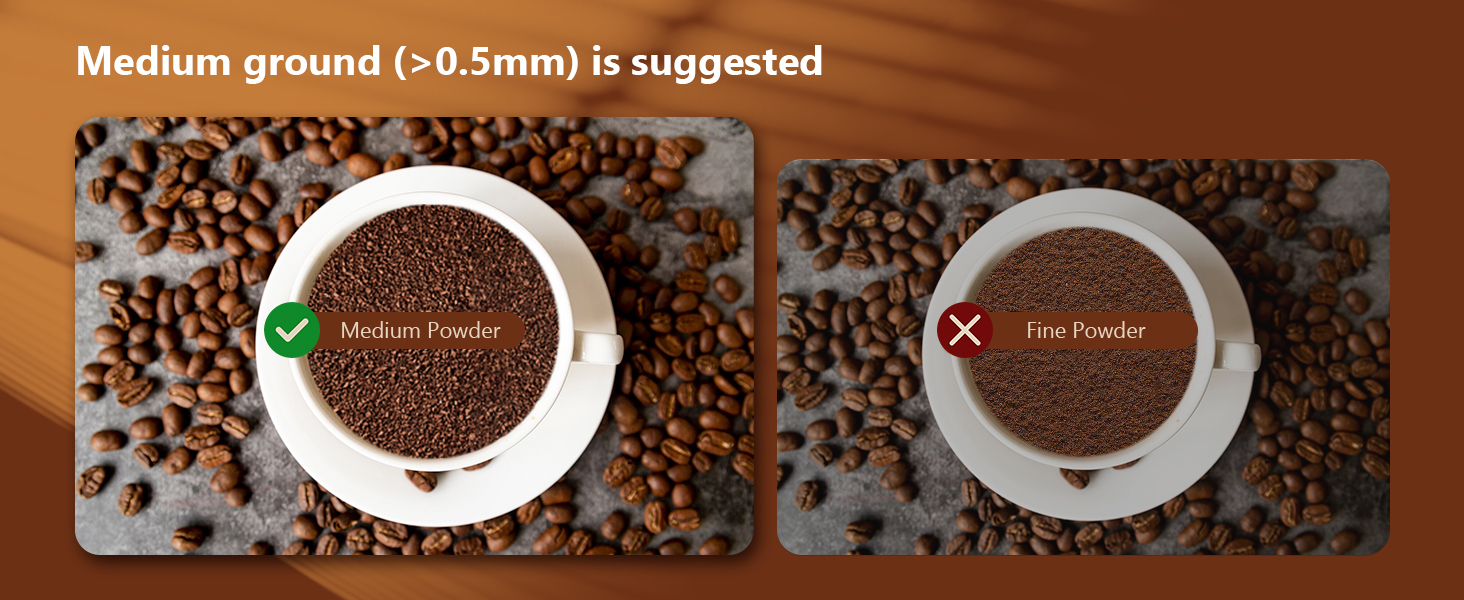
- Add ground coffee to the filter basket. Use medium ground coffee (greater than 0.5mm) for optimal results.
- Tamp the ground coffee firmly and evenly using the coffee tampเอ่อ.
- Attach the portafilter to the machine, ensuring it is fully locked into place.
- Place your cup(s) on the drip tray beneath the portafilter.
- Select "Espresso" for a single shot or "2 X Espresso" for a double shot on the touch screen. The machine will begin brewing.
- เมื่อการชงเสร็จสิ้น เครื่องจะหยุดโดยอัตโนมัติ

ภาพ: Step-by-step visual instructions for brewing espresso, from preparing the machine to the final extraction.
ภาพ: Illustration demonstrating the correct way to lock the portafilter before brewing to prevent leaks and ensure proper extraction.

ภาพ: Recommended coffee grind size (medium, >0.5mm) for optimal espresso extraction, contrasting it with fine ground coffee.
6.2 Making Cold Brew Espresso
This machine offers a rapid cold brew function, producing smooth cold brew in as little as 10 minutes.
- Ensure the water tank is filled with iced water for the cold brew function.
- Prepare the portafilter with ground coffee as described in Section 6.1.
- Attach the portafilter to the machine and place a cup underneath.
- Select "Espresso Cool" on the touch screen. The machine will begin the cold brew process.
- Enjoy your rapid cold brew espresso.

ภาพ: The espresso machine preparing cold brew, emphasizing the requirement for iced water in the tank.
6.3 การตีฟองนม
The powerful steam wand allows you to create creamy microfoam for lattes and cappuccinos.
- Fill the water tank with fresh water and press the ON/OFF button to power on.
- Press the "Steam" button on the touch screen to preheat the steam function. The indicator will blink during preheating and become steady when ready.
- After preheating, turn the steam knob to the "ON" position to release any remaining water in the pipe before frothing.
- Insert the steam nozzle approximately 1 inch into the surface of your milk.
- Gradually turn the steam knob to increase steam until the desired foam consistency is achieved.
- Once finished, turn the steam knob to the "OFF" position and clean the steam wand immediately.
ภาพ: Visual instructions for frothing milk, detailing the steps from preheating to creating microfoam.
7. การบำรุงรักษาและการทำความสะอาด
การทำความสะอาดอย่างสม่ำเสมอจะช่วยให้เครื่องชงกาแฟเอสเปรสโซของคุณมีอายุการใช้งานยาวนานและทำงานได้อย่างมีประสิทธิภาพสูงสุด
- การทำความสะอาดทั่วไป: เช็ดภายนอกเครื่องด้วยผ้าชุบน้ำหมาดๆamp ผ้า. ห้ามใช้น้ำยาทำความสะอาดหรือใยขัดที่มีฤทธิ์กัดกร่อน
- ถาดรองน้ำหยด: The removable drip tray should be emptied and cleaned regularly.
- พอร์ตาฟิลเตอร์และตะกร้ากรอง: หลังการใช้งานแต่ละครั้ง ให้ถอดด้ามชงกาแฟออกและทิ้งกากกาแฟที่ใช้แล้ว ล้างด้ามชงกาแฟและตะกร้ากรองด้วยน้ำไหลผ่าน
- แท่งไอน้ำ: ทันทีหลังจากตีฟองนม ให้เช็ดก้านพ่นไอน้ำด้วยผ้าamp cloth to prevent milk residue from drying. Purge steam briefly to clear any internal blockages.
- ถังเก็บน้ำ: ทำความสะอาดถังเก็บน้ำเป็นระยะด้วยผงซักฟอกอ่อนๆ แล้วล้างออกให้สะอาด
- การขจัดตะกรัน: Depending on water hardness, descale the machine every 2-3 months. Follow the instructions provided with a suitable descaling solution.

ภาพ: Important cleaning instruction: All accessories must be washed by hand and are not dishwasher safe.
8 การแก้ไขปัญหา
โปรดดูหัวข้อนี้เพื่อดูปัญหาทั่วไปและวิธีแก้ไข
| ปัญหา | สาเหตุที่เป็นไปได้ | สารละลาย |
|---|---|---|
| ไม่ต้องจ่ายกาแฟ / ไหลช้า |
|
|
| Water leaks from portafilter edge |
|
|
| หัวฉีดไอน้ำไม่ปล่อยไอน้ำ |
|
|
| กาแฟไม่ร้อนพอ |
|
|
9. ข้อมูลจำเพาะ
- ยี่ห้อ: คีนสตาร์
- ชื่อรุ่น : เจเอช-ซี5210
- ระบบแรงดัน: 20 บาร์
- พลัง: 1350วัตต์
- ความจุถังน้ำ: 1.1 ลิตร (37 ออนซ์)
- ขนาดสินค้า : ลึก 11.8 นิ้ว x กว้าง 12.6 นิ้ว x สูง 5.5 นิ้ว
- น้ำหนักสินค้า: 4.6 ปอนด์
- วัสดุ: สแตนเลส
- คุณสมบัติพิเศษ: Programmable, Touch Screen, Milk Frother, Hot & Rapid Cold Brew
- ประเภทอินพุตกาแฟ: กาแฟบด
- ประเภทตัวกรอง: สามารถนำกลับมาใช้ใหม่ได้
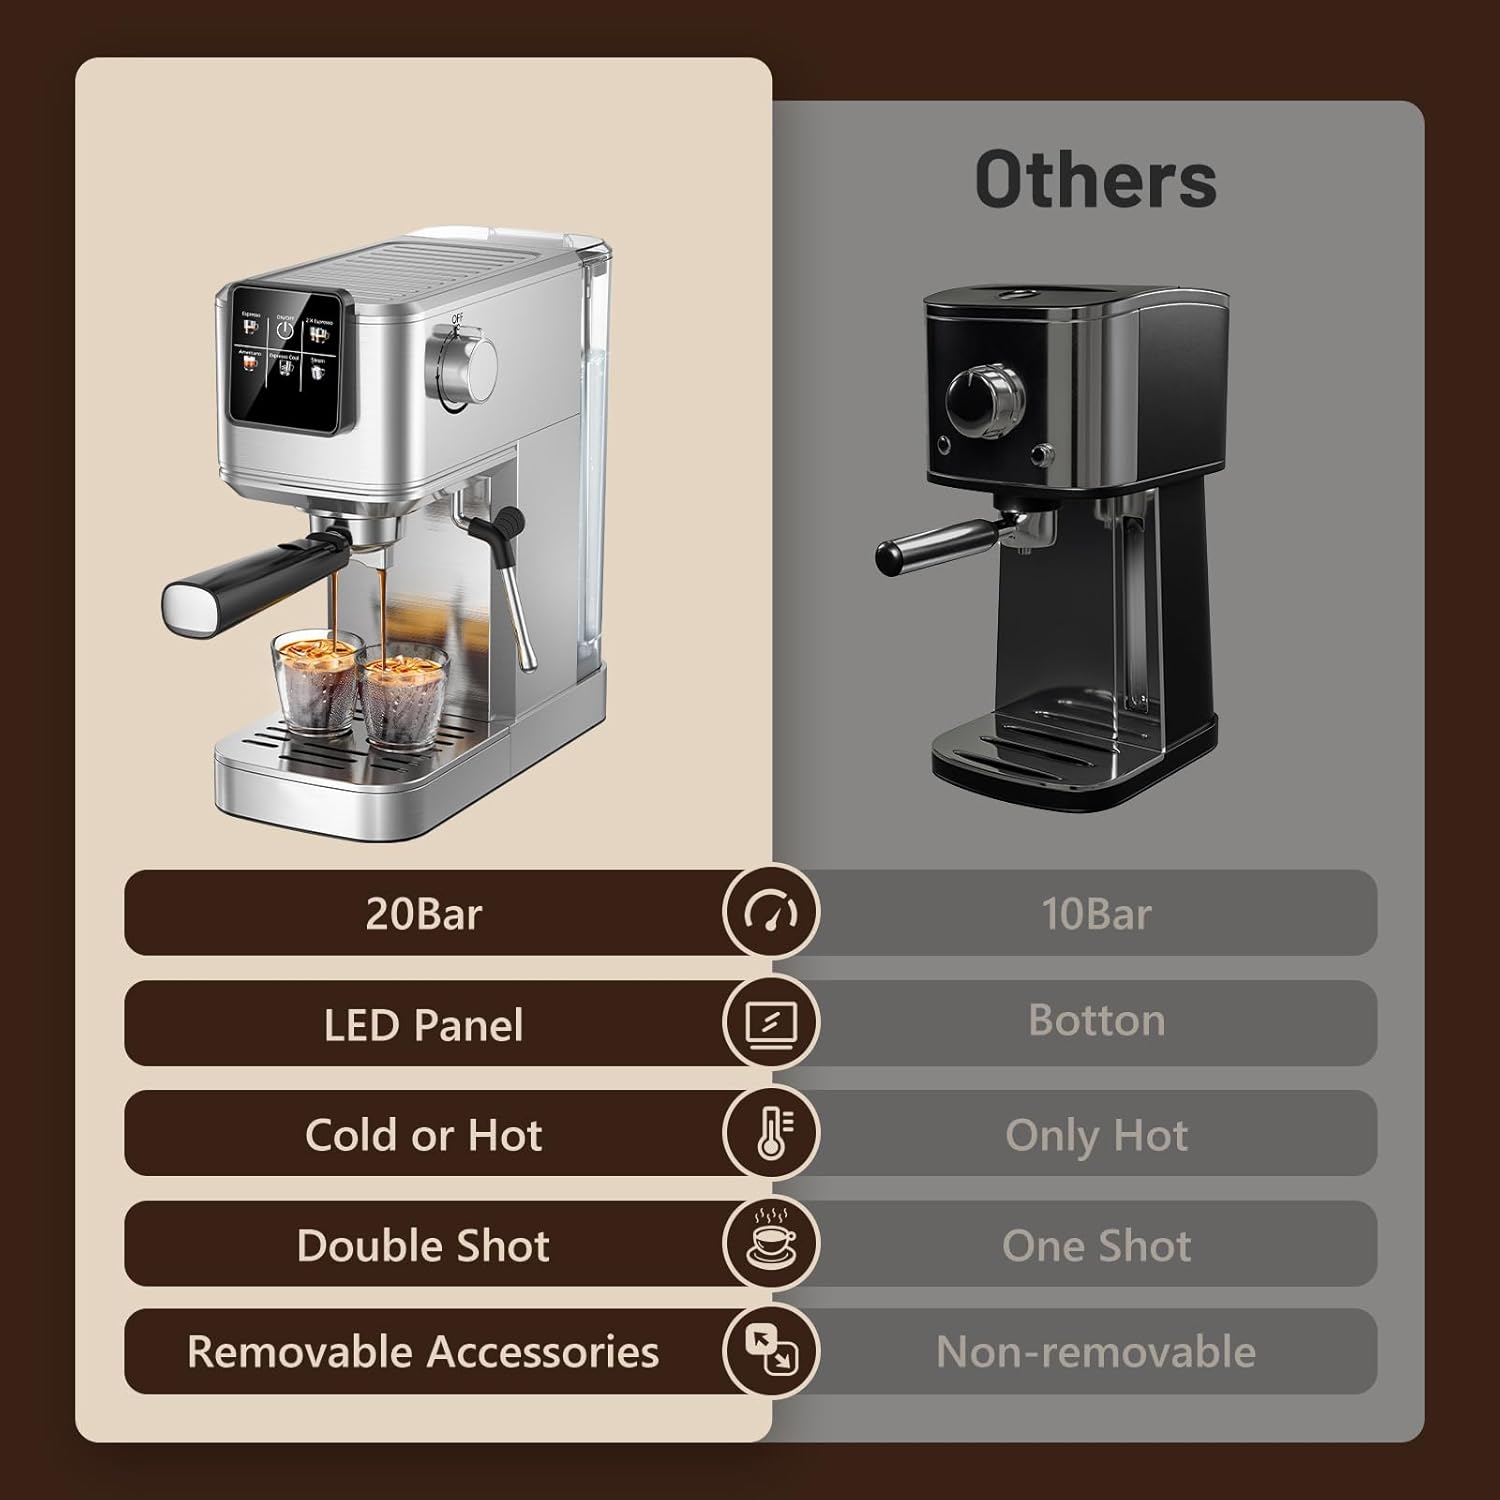
ภาพ: Feature comparison of the KEENSTAR machine, emphasizing its 20Bar pressure, LED panel, and versatility for hot and cold beverages.

ภาพ: Dimensions of the KEENSTAR espresso machine, indicating its compact size.
10. การรับประกันและการสนับสนุน
For warranty information or technical support, please refer to the contact details provided on the product packaging or visit the official KEENSTAR webไซต์ เก็บหลักฐานการซื้อของคุณไว้เพื่อใช้ในกรณีเรียกร้องการรับประกัน