1. บทนำ
The Audiolab 9000A is a high-performance integrated amplifier designed to be the central component of any advanced audio system. It combines a powerful amplifier, a high-resolution Digital-to-Analog Converter (DAC), and a dedicated phono preamplifier, offering extensive connectivity and advanced features for audiophiles.
This manual provides essential information for setting up, operating, and maintaining your Audiolab 9000A to ensure optimal performance and longevity.
2. ข้อมูลด้านความปลอดภัย
โปรดอ่านคำแนะนำด้านความปลอดภัยทั้งหมดอย่างละเอียดก่อนใช้งานเครื่อง เก็บคู่มือนี้ไว้เพื่อใช้อ้างอิงในอนาคต
- แหล่งจ่ายไฟ: Connect the unit only to a power supply of the type marked on the rear panel.
- การระบายอากาศ : ตรวจสอบให้แน่ใจว่ามีการระบายอากาศที่เพียงพอ อย่าปิดกั้นช่องระบายอากาศ
- น้ำและความชื้น: อย่าให้ตัวเครื่องโดนฝนหรือความชื้น อย่าวางสิ่งของที่บรรจุของเหลวไว้บนตัวเครื่อง
- ความร้อน: ห้ามวางเครื่องไว้ใกล้แหล่งความร้อน เช่น หม้อน้ำ เครื่องทำความร้อน เตา หรืออุปกรณ์อื่น ๆ ที่ผลิตความร้อน
- การทำความสะอาด: ทำความสะอาดด้วยผ้าแห้งเท่านั้น ห้ามใช้น้ำยาทำความสะอาดของเหลวหรือน้ำยาทำความสะอาดสเปรย์
- การบริการ: อย่าพยายามซ่อมบำรุงเครื่องนี้ด้วยตนเอง แนะนำให้ช่างผู้ชำนาญการเป็นผู้ซ่อมบำรุงทุกครั้ง
3. อะไรอยู่ในกล่อง
Carefully unpack the contents of the box. You should find the following items:
- Audiolab 9000A แบบบูรณาการ Ampชีวิต
- สายไฟ
- รีโมทคอนโทรล
- คู่มือการใช้งาน (เอกสารนี้)
- Antennas (for Bluetooth connectivity)
4. สินค้าหมดview
แผงด้านหน้า
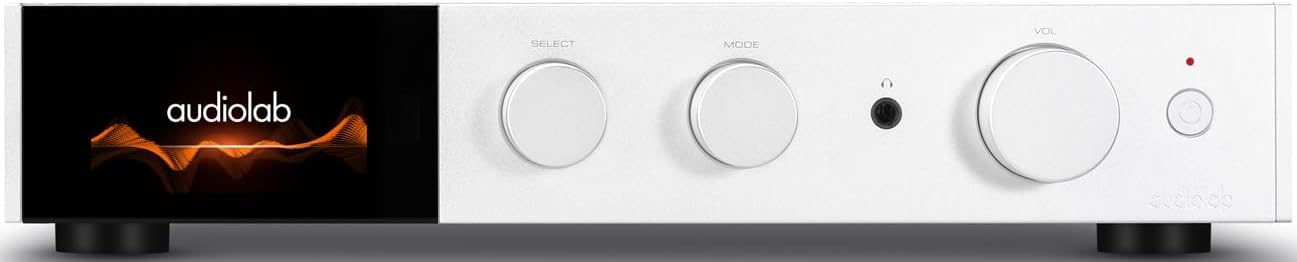
รูปที่ 4.1 : ด้านหน้า view of the Audiolab 9000A, displaying the Audiolab logo on its full-color IPS LCD screen. The front panel features three rotary controls for Select, Mode, and Volume, along with a headphone jack and power button.

รูปที่ 4.2 : ด้านหน้า view of the Audiolab 9000A, showcasing the full-color IPS LCD screen displaying VU meters. This visual option provides real-time audio level feedback.
The 9000A features a 4.3-inch (800 x 480mm) full-color IPS LCD screen, providing clear and informative playback, source, and file information. It also offers various display options, including two VU meter styles, allowing for visual feedback or a discreet appearance.
การเชื่อมต่อแผงด้านหลัง

Figure 4.3: Rear panel of the Audiolab 9000A, showing a comprehensive array of input and output connections. These include analog, XLR, phono (MM), power amplifier input, SPDIF (coaxial and optical), PC USB, Bluetooth antenna, pre-amplifier output, stereo speaker terminals, and 12V trigger connections.
The rear panel provides a wide range of connectivity options, including multiple analog and digital inputs, a dedicated phono input, balanced XLR input, and various outputs for speakers and external components. Bluetooth antennas are also located here for wireless streaming.
คุณสมบัติหลัก
- Ampการทำให้บริสุทธิ์: Discrete Class AB power amplifier delivering 100W per channel into 8 ohms (160W into 4 ohms). Features Audiolab's CFB (Complementary Feedback) topology for superior linearity.
- ตัวแปลงดิจิทัลเป็นแอนะล็อก (DAC): Equipped with the ESS 9038PRO flagship 32-bit DAC chip, supporting PCM up to 32-bit/768kHz and DSD up to DSD512.
- การถอดรหัส MQA: Full MQA decoding capability for high-resolution streaming.
- โฟโน สtage: Dedicated high-performance, low-noise Moving Magnet (MM) phono stage with JFET-based circuitry and precise RIAA equalization.
- หูฟัง Ampเครื่องฟอก: หูฟังกระแสตอบรับโดยเฉพาะ amplifier with wide bandwidth and high slew rate.
- การเชื่อมต่อ: Multiple analog inputs (3 x AUX, 1 x XLR), digital inputs (2 x Coaxial, 2 x Optical, 1 x PC USB), Bluetooth 5.1 with aptX HD/AAC/LDAC support.
- โหมดการทำงาน: Integrated, Pre-Power, and Pre Only modes for versatile system integration.
5. การตั้งค่า
5.1 การจัดวาง
Place the Audiolab 9000A on a stable, level surface away from direct sunlight, heat sources, and excessive moisture. Ensure there is adequate space around the unit for ventilation.
5.2 การเชื่อมต่อลำโพง
- Ensure the 9000A is powered off and unplugged from the mains.
- Connect your loudspeakers to the speaker terminals on the rear panel (refer to Figure 4.3). Ensure correct polarity: red (+) to red (+) and black (-) to black (-).
- Tighten the binding posts securely, but do not overtighten.
5.3 การเชื่อมต่อแหล่งเสียง
รุ่น 9000A มีตัวเลือกการป้อนข้อมูลที่หลากหลาย:
- Analog Inputs (AUX1, AUX2, AUX3): Use RCA cables to connect analog sources like CD players, tuners, or tape decks.
- อินพุต XLR ที่สมดุล: For high-quality analog sources with XLR outputs.
- อินพุตท่วงทำนอง (MM): Connect your turntable directly to this input. Ensure your turntable has a Moving Magnet (MM) cartridge.
- Digital Inputs (COAX1, COAX2, OPT1, OPT2): Connect digital sources such as CD transports, media streamers, or TVs using coaxial or optical cables.
- PC USB (USB B): Connect your computer for high-resolution audio playback.
- บลูทูธ: Attach the supplied antennas to the rear panel for optimal Bluetooth signal reception.
5.4 การเชื่อมต่อสายไฟ
Once all audio connections are made, connect the supplied power cord to the IEC inlet on the rear panel and then to a suitable mains power outlet.
6. คู่มือการใช้งาน
6.1 การเปิด/ปิดเครื่อง
Press the power button on the front panel or the remote control to switch the unit on or off. The display will illuminate upon power-on.
6.2 การเลือกแหล่งที่มา
Use the "SELECT" rotary control on the front panel or the source buttons on the remote control to cycle through the available input sources (AUX1, AUX2, AUX3, XLR, Phono, COAX1, COAX2, OPT1, OPT2, PC USB, Bluetooth).
6.3 การควบคุมระดับเสียง
Adjust the listening volume using the "VOL" rotary control on the front panel or the Volume Up/Down buttons on the remote control.
6.4 โหมดการทำงาน
The 9000A offers three distinct operating modes, selectable via the menu:
- Integrated Mode: This is the default mode, where the pre-amplifier และพลังงาน ampไลไฟเออร์ เอสtages are combined. Use this for connecting digital and analog sources directly to the 9000A and driving a pair of speakers.
- Pre-Power Mode: This mode disconnects the pre-amplifier และพลังงาน ampไลไฟเออร์ เอสtages. The 9000A can then be used solely as a power amplifier (e.g., connected to an AV processor) or to insert external signal processing between the pre-out and power-in connections.
- Pre Only Mode: In this mode, the 9000A functions solely as a pre-amplifier, outputting the processed signal via its pre-amplifier outputs to an external power ampชีวิต.
6.5 ตัวกรองดิจิตอล
For digital inputs, the 9000A provides user-selectable digital filters to optimize the response to suit the source file and partnering equipment. Access these options through the unit's menu system.
6.6 การเชื่อมต่อบลูทูธ
- Ensure the Bluetooth antennas are connected to the rear panel.
- Select "Bluetooth" as the input source on the 9000A.
- บนอุปกรณ์พกพาของคุณ (สมาร์ทโฟน แท็บเล็ต แล็ปท็อป) เปิดใช้งานบลูทูธและค้นหาอุปกรณ์ที่ใช้งานได้
- Select "Audiolab 9000A" from the list to pair. Once paired, audio from your device will stream wirelessly to the ampชีวิต.
- The 9000A supports aptX HD, AAC, and LDAC protocols for high-quality wireless audio.
6.7 เอาต์พุตหูฟัง
Connect your headphones to the 6.35mm (1/4 inch) headphone jack on the front panel. Connecting headphones will automatically mute the main speaker outputs.
7. การบำรุงรักษา
- การทำความสะอาด: Use a soft, dry, lint-free cloth to clean the unit. Do not use abrasive cleaners, waxes, or solvents.
- การระบายอากาศ : ตรวจสอบเป็นระยะว่าช่องระบายอากาศไม่มีฝุ่นและเศษสิ่งสกปรกอุดตัน
- การเชื่อมต่อ: Ensure all cables are securely connected. Loose connections can affect sound quality.
- พื้นที่จัดเก็บ: หากต้องเก็บรักษาเครื่องไว้เป็นเวลานาน ควรตัดการเชื่อมต่อจากแหล่งจ่ายไฟและเก็บไว้ในที่แห้งและเย็น
8 การแก้ไขปัญหา
| ปัญหา | สาเหตุที่เป็นไปได้ | สารละลาย |
|---|---|---|
| ไม่มีไฟฟ้า | ไม่ได้เสียบสายไฟ; ปลั๊กไฟชำรุด; เครื่องอยู่ในโหมดสแตนด์บาย | Check power cord connection; Try a different outlet; Press power button on unit or remote. |
| ไม่มีเสียงออกจากลำโพง | Incorrect input selected; Speaker cables loose or incorrectly connected; Volume too low; Mute function active; Headphone connected. | Select correct input; Check speaker connections and polarity; Increase volume; Deactivate mute; Disconnect headphones. |
| ไม่มีเสียงจากช่องหนึ่ง | Speaker cable loose or faulty; Source cable faulty; Speaker faulty. | Check speaker and source cable connections; Test with another speaker or source. |
| เสียงฮัมหรือเสียงหวีด | Ground loop; Nearby electrical interference; Faulty cable. | Ensure all components are properly grounded; Move unit away from other electronics; Try different cables. |
| ปัญหาการจับคู่บลูทูธ | Antennas not connected; Device too far; Device already paired with another unit. | Connect Bluetooth antennas; Move device closer; Disconnect from other devices and try pairing again. |
9. ข้อมูลจำเพาะ
| หมวดหมู่ | รายละเอียด |
|---|---|
| คำอธิบายทั่วไป | บูรณาการ Ampชีวิต |
| เอาท์พุทจัดอันดับพลังงาน | 2 x 100W (8 ohms, THD<1%); 2 x 160W (4 ohms, THD<1%) Class AB |
| ชิป DAC | ES9038Pro 32-bit DAC |
| แสดง | 4.3" (800 x 480mm) Full View จอ LCD ไอพีเอส |
| การถอดรหัส MQA | Built-in Certified MQA Full Decoder (PC USB, Coax/Optical) |
| บลูทูธ | Bluetooth 5.1 (aptX/aptX HD/AAC/LDAC) Support |
| โฟโน สtage | Dedicated High-performance, Low-noise MM Phono Stage |
| หูฟัง AMP | หูฟังตอบสนองกระแสไฟฟ้าโดยเฉพาะ AMP |
| โหมดการทำงาน | Integrated / PRE-POWER / PRE Only Modes |
| USB Upgrade Support | ใช่ |
| ข้อมูลอินพุต | 3 x Analogue, 1 x XLR, 1 x Phono (MM), 1 x Power Amplifier, 2 x SPDIF (Coax), 2 x SPDIF (Optical), 1 x PC USB (USB B), 1 x Bluetooth, 1 x 12V Trigger |
| เอาท์พุต | 1 x พรี Ampเครื่องขยายเสียง, ลำโพงสเตอริโอ 1 ตัว, หูฟัง 1 ตัว, ทริกเกอร์ 1V 12 ตัว |
| Sampling Frequency (Optical/Coaxial) | 44.1kHz-192kHz |
| Sampling Frequency (PC USB) | 44.1kHz-768kHz (PCM) / DSD64, DSD128, DSD256, DSD512 |
| พรีamplifier Gain (max.) | +6dB (Line), +53dB (Phono MM) |
| พรีamplifier THD | <0.0004% (1kHz @ 2V, Volume = 0dB) |
| DAC THD | <0.001% (1kHz @ 0dBFS) |
| พลัง Amplifier THD | <0.002% (1kHz @ 50W / 8 โอห์ม) |
| หูฟัง Amplifier THD | <0.01% (1kHz, 50mW) |
| น้ำหนักสุทธิ | 9.4กก. |
| ขนาด (กว้าง x สูง x ลึก) | 444 x 342 x 89 มม. |
| ตัวเลือกการเสร็จสิ้น | สีดำ / เงิน |
| ความต้องการด้านพลังงาน | 100-120V ~ 50/60Hz |
10. การรับประกันและการสนับสนุน
Audiolab products are manufactured to the highest standards and undergo rigorous quality control. This product is covered by a manufacturer's warranty, the terms of which may vary by region. Please refer to the warranty card included with your product or visit the official Audiolab webเว็บไซต์สำหรับข้อมูลการรับประกันโดยละเอียด
For technical support, service, or inquiries regarding your Audiolab 9000A, please contact your authorized Audiolab dealer or distributor. You can also find support resources, FAQs, and contact information on the official Audiolab webเว็บไซต์: www.audiolab.co.uk