1. คำแนะนำด้านความปลอดภัยที่สำคัญ
Please read and follow all safety instructions before using your Maypug P7 Projector to prevent injury or damage to the device.
- อย่าปิดกั้นช่องระบายอากาศ ตรวจสอบให้แน่ใจว่ามีอากาศถ่ายเทเพียงพอรอบๆ โปรเจ็กเตอร์
- อย่าวางโปรเจ็กเตอร์ไว้ในที่ที่มีฝนหรือความชื้น เพื่อลดความเสี่ยงจากไฟไหม้หรือไฟฟ้าช็อต
- หลีกเลี่ยงการมองเข้าไปในเลนส์โปรเจ็กเตอร์โดยตรงเมื่อเลนส์amp is on, as this may cause eye damage.
- ใช้เฉพาะอุปกรณ์เสริม/สิ่งที่แนบที่ผู้ผลิตกำหนดเท่านั้น
- ถอดปลั๊กโปรเจ็กเตอร์ในระหว่างที่มีพายุฝนฟ้าคะนองหรือเมื่อไม่ได้ใช้งานเป็นเวลานาน
- ส่งต่อการบริการทั้งหมดไปยังบุคลากรบริการที่มีคุณสมบัติเหมาะสม
2. เนื้อหาบรรจุภัณฑ์
ตรวจสอบว่ามีรายการทั้งหมดอยู่ในแพ็คเกจของคุณ:
- Maypug P7 Projector
- รีโมทคอนโทรล
- สายไฟ
- คู่มือการใช้งาน
3. สินค้าหมดview
Familiarize yourself with the components and ports of your Maypug P7 Projector.

รูปที่ 3.1 : ด้านหน้า view of the Maypug P7 Projector with remote control and projected interface.
3.1. พอร์ตและการเชื่อมต่อ
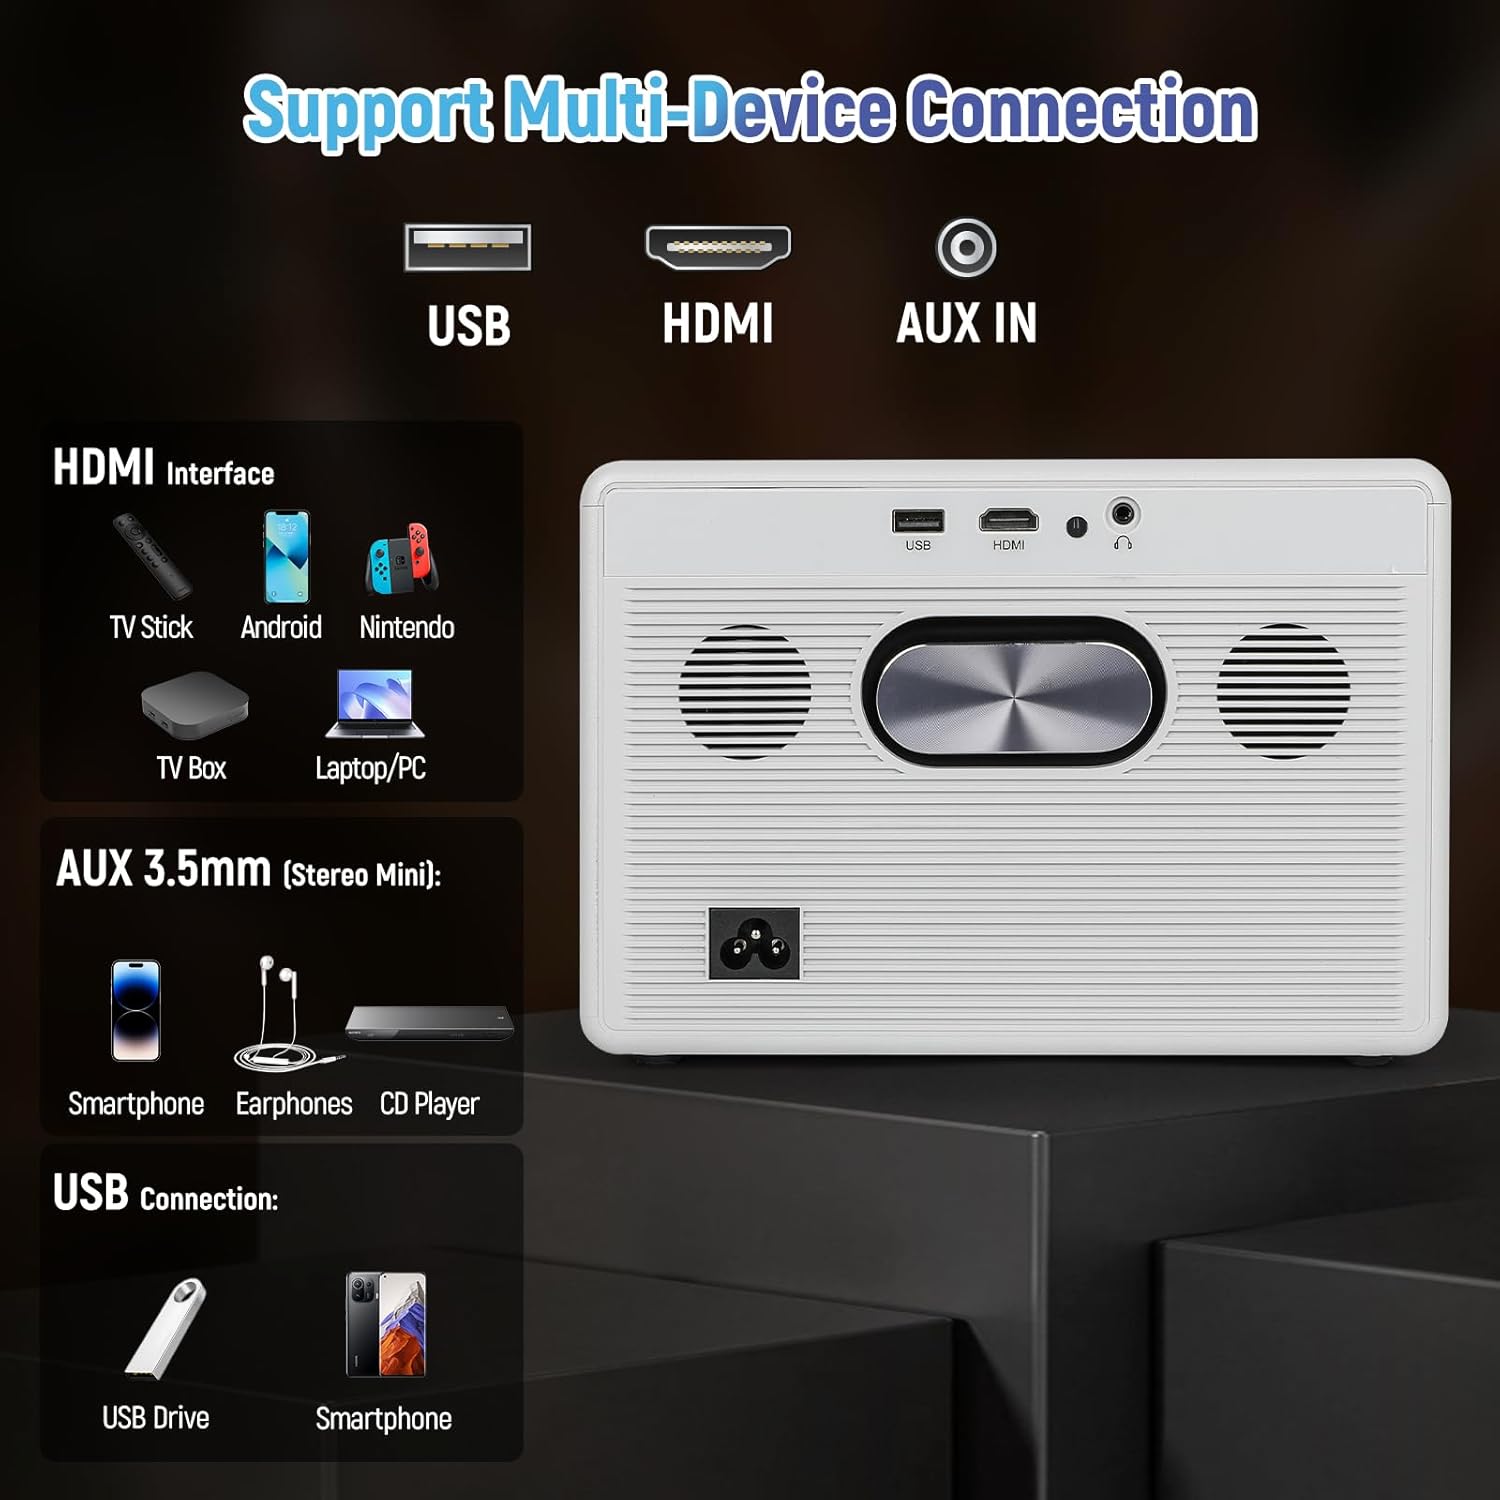
Figure 3.2: Rear panel connections including USB, HDMI, and AUX IN.
- พอร์ต USB: สำหรับเชื่อมต่ออุปกรณ์จัดเก็บข้อมูล USB
- พอร์ต HDMI: For connecting external video sources like TV sticks, gaming consoles, or laptops.
- AUX IN (3.5mm Audio Jack): สำหรับเชื่อมต่ออุปกรณ์เสียงภายนอกหรือหูฟัง
- กำลังไฟเข้า: สำหรับเชื่อมต่อสายไฟ
4. การตั้งค่า
4.1. การเชื่อมต่อไฟฟ้า
- ต่อสายไฟเข้ากับช่องเสียบไฟของโปรเจ็กเตอร์
- เสียบปลายสายไฟอีกด้านหนึ่งเข้ากับเต้ารับไฟฟ้าที่ผนัง
- กดปุ่มเปิด/ปิดบนโปรเจ็กเตอร์หรือรีโมทคอนโทรลเพื่อเปิดเครื่อง
4.2 การปรับโฟกัสและคีย์สโตน
The Maypug P7 features automatic vertical keystone correction and electric focus for a clear image from various angles.

Figure 4.1: Illustration of automatic keystone correction and electric focus features.
- Automatic Keystone: The projector will automatically adjust vertical distortion (±30°).
- แก้ไขภาพบิดเบี้ยวด้วยตนเอง: For further adjustments, navigate to the settings menu to manually correct keystone up to ±50°.
- โฟกัสไฟฟ้า: Use the remote control to fine-tune the image sharpness.
4.3. Network Connection (WiFi & Bluetooth)
Connect your projector to a wireless network and Bluetooth devices.
- การเชื่อมต่อ WiFi:
- Go to the "Settings" menu on the Lilac OS interface.
- Select "WiFi" and choose your desired network.
- Enter the password if prompted. The projector supports dual-band WiFi 6.
- การเชื่อมต่อบลูทู ธ :
- Go to the "Settings" menu.
- เลือก "บลูทูธ" แล้วเปิดใช้งาน
- Select your Bluetooth device (e.g., external speakers, headphones) from the list to pair. The projector supports Bluetooth 5.4.
5. คู่มือการใช้งาน
5.1. Navigating Lilac OS and Built-in Apps
The Maypug P7 runs on Lilac OS, providing a user-friendly interface with pre-installed streaming applications.

Figure 5.1: Lilac OS interface displaying pre-installed and downloadable applications.
- Use the Bluetooth remote control to navigate the interface.
- Access pre-installed apps like Netflix, Prime Video, and YouTube directly.
- Download additional applications from Google Play and the TV Store.
5.2. การฉายภาพแบบไร้สาย
Mirror content from your mobile devices wirelessly.
- มิราแคสต์ (แอนดรอยด์): For Android devices, select Miracast from the apps menu and follow the on-screen instructions to connect.
- AumiCast (Android/iOS): For both Android and iOS devices, select AumiCast and follow the pairing instructions.
5.3. การเชื่อมต่ออุปกรณ์ภายนอก
Connect devices via HDMI or USB for expanded content options.
- ช่องต่อ HDMI: Connect TV sticks, gaming consoles, Blu-ray players, or laptops to the HDMI port. The projector supports 4K inputs and 120Hz refresh rates for gaming.
- ยูเอสบี: เสียบไดรฟ์ USB เข้ากับพอร์ต USB เพื่อเล่นสื่อ fileโดยตรงเลย
5.4. การตั้งค่าเสียง
The projector includes built-in 5W stereo speakers. For external audio, use Bluetooth or the AUX IN port.

Figure 5.2: The projector's integrated 5W stereo speakers provide clear audio.
- ปรับระดับเสียงโดยใช้รีโมทคอนโทรล
- Connect Bluetooth speakers/headphones as described in Section 4.3.
- Connect wired headphones or external speakers via the 3.5mm AUX IN port.
5.5. ฟังก์ชั่นซูม
Adjust the projected image size without moving the projector.
- Use the remote control to access the zoom function.
- The projector supports 50-100% digital zoom.
6. การบำรุงรักษา
6.1. การทำความสะอาด
- เช็ดทำความสะอาดภายนอกของโปรเจคเตอร์ด้วยผ้าแห้งเนื้อนุ่ม
- For the lens, use a lens cleaning cloth and specialized lens cleaning solution. Do not use abrasive cleaners.
6.2. Dust-Proof Sealed Optical Engine
The Maypug P7 features a fully sealed optical engine designed to prevent dust ingress, ensuring consistent performance and extending the lifespan of internal components. This reduces the need for frequent internal cleaning.
6.3. การจัดเก็บ
- เก็บโปรเจคเตอร์ไว้ในที่แห้งและเย็น หลีกเลี่ยงแสงแดดโดยตรงและอุณหภูมิที่สูงหรือต่ำเกินไป
- If storing for an extended period, cover the projector to protect it from dust.
7 การแก้ไขปัญหา
| ปัญหา | สาเหตุที่เป็นไปได้ | สารละลาย |
|---|---|---|
| ไม่มีภาพแสดง | Power cable loose; Input source incorrect; Lens cap on. | Check power connection; Select correct input source (HDMI/USB); Remove lens cap. |
| ภาพเบลอ | ไม่ได้ปรับโฟกัส โปรเจ็กเตอร์อยู่ไกล/ใกล้หน้าจอมากเกินไป | Use electric focus via remote; Adjust projector distance. |
| ภาพบิดเบี้ยว (รูปทรงสี่เหลี่ยมคางหมู) | ไม่ได้ปรับคีย์สโตน | Allow auto keystone to correct; Adjust manual keystone in settings. |
| ไม่มีเสียง | Volume too low; External audio device not connected/paired; Mute enabled. | Increase volume; Check Bluetooth/AUX connection; Disable mute. |
| ปัญหาการเชื่อมต่อ WiFi/บลูทูธ | Out of range; Incorrect password; Interference. | Move closer to router/device; Re-enter password; Reduce interference. |
8. ข้อมูลจำเพาะ
| คุณสมบัติ | รายละเอียด |
|---|---|
| ยี่ห้อ | Maypug |
| หมายเลขรุ่น | เอ็ม-พี7 |
| ความละเอียดการแสดงผล | ความละเอียดดั้งเดิม 1920 x 1080 (1080P) รองรับ 4K |
| ความสว่าง | 2000 ANSI Lumens |
| อัตราส่วนคอนทราสต์ | 20,000:1 น. |
| อัตราการรีเฟรช | 60Hz (up to 120Hz for HDMI input) |
| ระบบปฏิบัติการ | Lilac OS with built-in apps (Netflix, Prime Video, YouTube) |
| การเชื่อมต่อแบบไร้สาย | Dual-Band WiFi 6, Bluetooth 5.4, Miracast, AumiCast |
| Keystone Correction | Automatic Vertical (±30°), Manual (±50°) |
| จุดสนใจ | โฟกัสไฟฟ้า |
| ฟังก์ชั่นซูม | 50-100% Digital Zoom |
| เสียง | Built-in 5W Stereo Speakers with Hi-Fi audio |
| เครื่องยนต์ออปติคอล | Fully Sealed, Dust-Proof |
| อายุการใช้งานของ LED | 50,000 ชั่วโมง |
| น้ำหนักสินค้า | 6.73 ปอนด์ |
| ขนาด | 10.5 x 9.15 x 9.15 นิ้ว (ขนาดบรรจุภัณฑ์) |
Note: Item weight and dimensions are approximate.
9. การรับประกันและการสนับสนุน
Your Maypug P7 Projector is backed by a รับประกัน 3 ปี. For technical assistance or warranty claims, please contact our 24/7 US-based support ทีม.
Contact information can typically be found on the official Maypug webเว็บไซต์หรือเอกสารการซื้อของคุณ