1. บทนำ
This instruction manual provides comprehensive guidance for the assembly, operation, and maintenance of your TRYX LUCA L70 E-ATX Mid-Tower PC Case. The LUCA L70 is designed to accommodate a wide range of components, supporting E-ATX, ATX, Micro-ATX, and Mini-ITX motherboards. It features a 270° panoramic tempered glass panel for an unobstructed view of your internal components, a modular design for flexible power supply placement, and extensive cooling capabilities. Please read this manual carefully before beginning assembly to ensure proper installation and safe use.
2. ข้อมูลด้านความปลอดภัย
โปรดปฏิบัติตามข้อควรระวังด้านความปลอดภัยต่อไปนี้เสมอ เพื่อป้องกันการบาดเจ็บและความเสียหายต่อชิ้นส่วนของคุณ:
- ไฟฟ้าสถิต: ควรต่อสายดินให้ตัวเองก่อนใช้งานส่วนประกอบภายในทุกครั้ง เพื่อป้องกันความเสียหายจากไฟฟ้าสถิต (ESD) ควรใช้สายรัดข้อมือป้องกันไฟฟ้าสถิตหากมี
- การตัดการเชื่อมต่อไฟฟ้า: Ensure all power is disconnected from the power supply unit (PSU) and the wall outlet before installing or removing any components.
- ขอบที่คมชัด: Be cautious of sharp edges inside the case during installation.
- น้ำหนัก: The PC case, especially when fully assembled with components, can be heavy. Lift with care and seek assistance if necessary.
- การระบายอากาศ : ตรวจสอบให้แน่ใจว่ามีการระบายอากาศที่เพียงพอรอบเคสเพื่อป้องกันความร้อนสูงเกินไป อย่าปิดกั้นช่องระบายอากาศ
- กระจกนิรภัย: Handle the tempered glass panels with extreme care. They are fragile and can shatter if dropped or subjected to impact. Avoid placing heavy objects on the glass.
3. สินค้าหมดview และคุณสมบัติ
The TRYX LUCA L70 PC case offers a blend of aesthetic design and functional features for high-performance PC builds.
3.1 คุณสมบัติหลัก
- 270° Panoramic Tempered Glass: Front and side panels feature reinforced tempered glass for an unobstructed view ของส่วนประกอบภายในของคุณ
- การออกแบบแบบโมดูลาร์: The power supply unit (PSU) can be positioned at the top or bottom, offering flexibility for various build configurations and improved cable management.
- Excellent Cooling Support: Supports up to nine fans and radiators up to 420mm, ensuring optimal thermal performance for demanding systems.
- ภายในกว้างขวาง: Accommodates E-ATX motherboards (up to 280mm width), graphics cards up to 460mm in length, and CPU coolers up to 170mm in height. Rear cable management space up to 65mm.
- ตัวเลือกการจัดเก็บ: Features nine 2.5-inch drive bays and two 3.5-inch drive bays for ampที่เก็บของ
- Advanced I/O Ports: Includes one USB 3.2 Gen2x2 Type-C port (20Gbps, 30W Power Delivery), two USB 3.0 Type-A ports, and one 3.5mm 4-pole TRRS audio jack.
- ตัวกรองฝุ่น: Equipped with dust filters on the top and bottom to maintain a clean interior.
- รองรับการติดตั้งการ์ดจอแนวตั้ง: Ready for vertical GPU mounting (riser cable sold separately).
3.2 ภาพรวมview

Figure 1: Stylish Design & Superior Performance. This image highlights the internal layout of the TRYX LUCA L70 PC case, showcasing its spacious interior, fan mounting options, and the 270-degree tempered glass panels. It also indicates a 19mm ultra-slim chassis, 4mm thick tempered glass, and an X-shaped floating foot construction that elevates the case by 40mm for improved airflow.
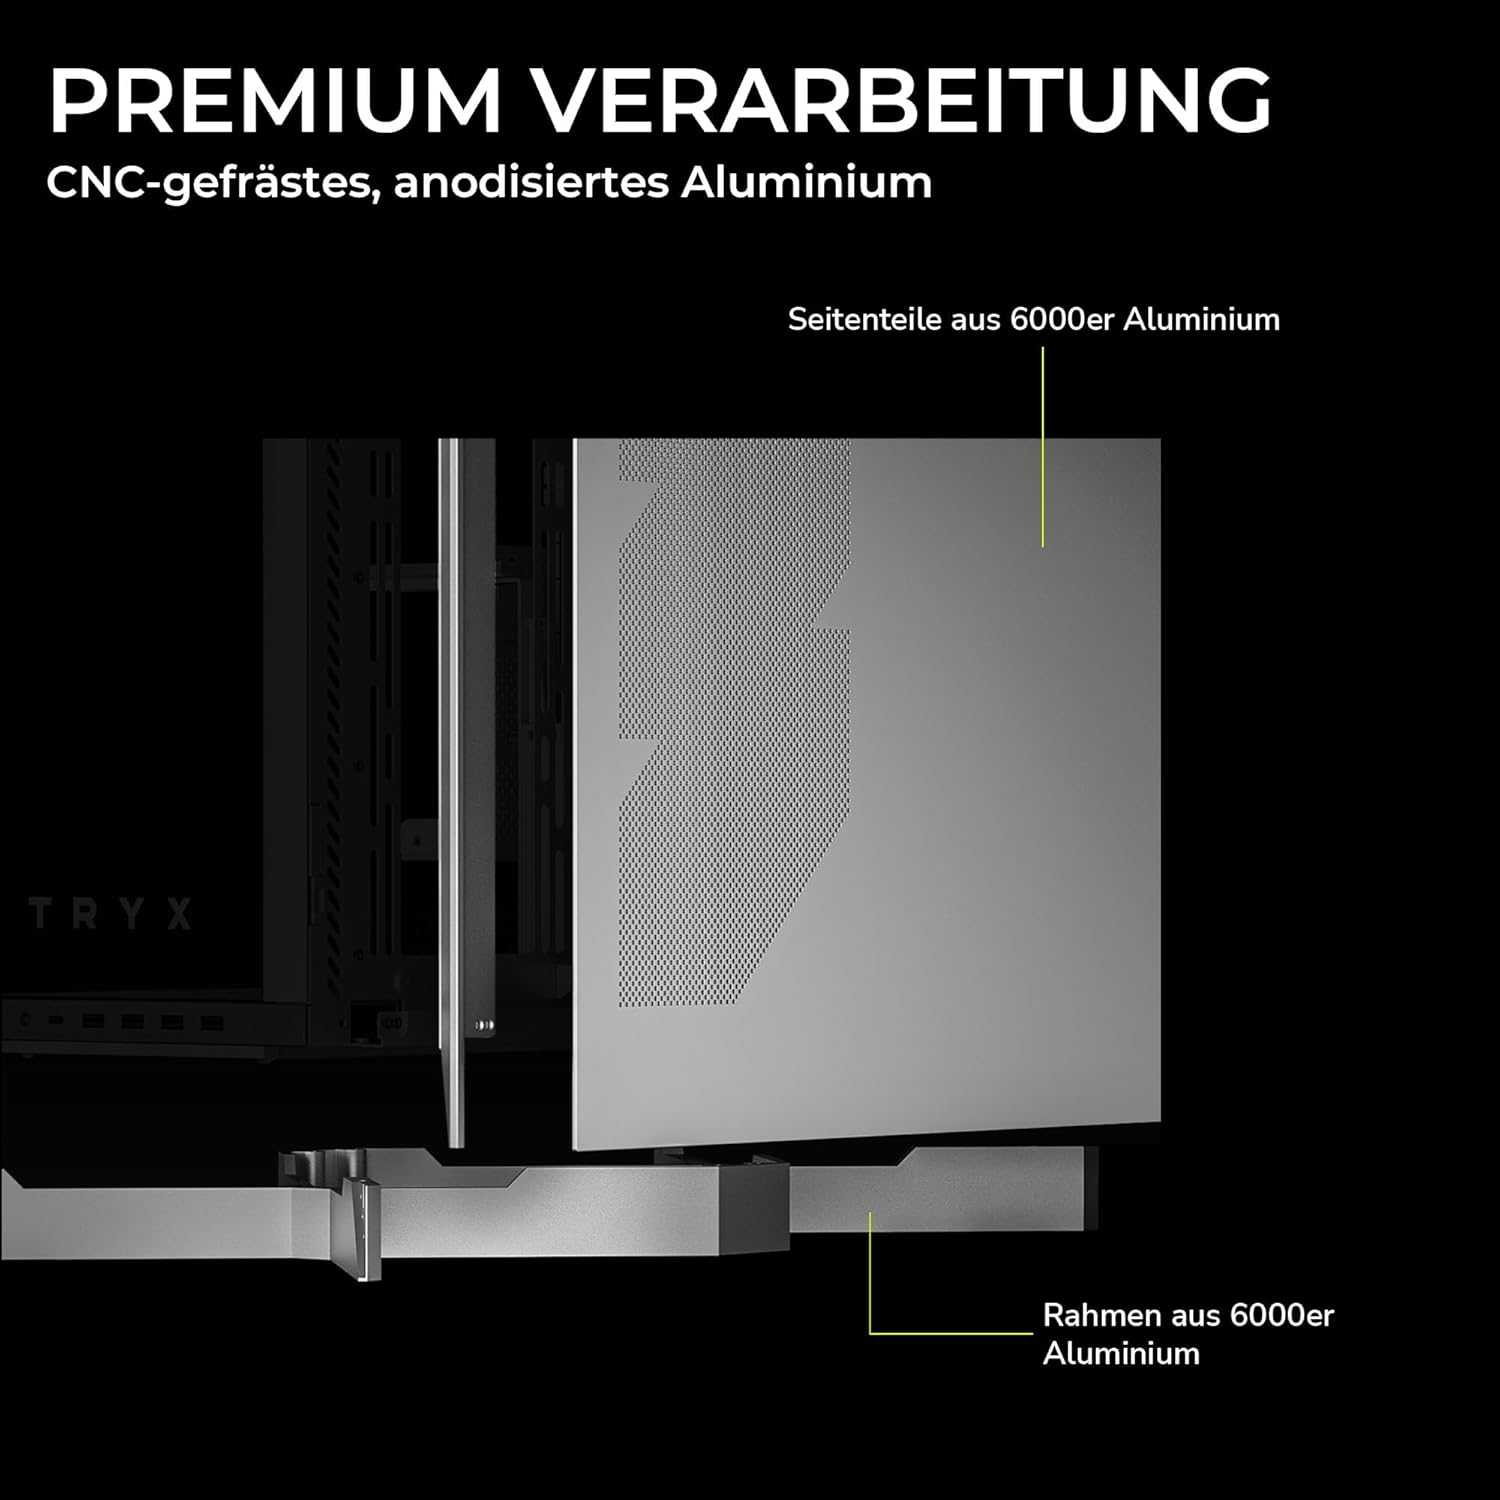
Figure 2: Premium Craftsmanship. This image details the construction materials, specifically highlighting the side panel made from 6000 series aluminum and the frame also constructed from 6000 series aluminum, emphasizing the case's durable and high-quality build.

Figure 3: Effortless Access with Swivel Front Panel. This image demonstrates the swing-out front panel feature, which allows for easy access to the front fan mounts and radiator space, simplifying installation and maintenance.

Figure 4: Modular Design. This illustration shows the flexible power supply unit (PSU) positioning (top or bottom) and the removable motherboard tray, which facilitates easier component installation and cable management. It also indicates various fan and radiator mounting points.

Figure 5: Extensive Connectivity Options. This image details the front I/O panel, including the microphone and speaker jacks, one USB-C 3.2 Gen 2x2 port (with 30W Power Delivery), and two USB-A 3.2 Gen 1 ports.

รูปที่ 6: ขนาดผลิตภัณฑ์ This image provides a visual representation of the case's approximate dimensions: 26cm (width), 57cm (height), and 54cm (depth). Note that precise dimensions are listed in the specifications section.
4. การตั้งค่าและการติดตั้ง
This section outlines the general steps for installing your PC components into the TRYX LUCA L70 case. Always refer to your individual component manuals for specific installation instructions.
4.1 การเตรียมคดี
- วางกล่องบนพื้นผิวเรียบและมั่นคง
- Carefully remove the tempered glass side panel by unscrewing the thumb screws and gently pulling it away. Set it aside on a soft, non-abrasive surface.
- Remove any other panels or covers as needed for easier access to the interior.
4.2 การติดตั้งเมนบอร์ด
- Install the CPU, CPU cooler (if air cooler), and RAM onto your motherboard before placing it in the case.
- Ensure the correct standoffs are installed for your motherboard form factor (E-ATX, ATX, Micro-ATX, Mini-ITX).
- Carefully align your motherboard with the standoffs and the I/O shield opening at the rear of the case.
- ยึดเมนบอร์ดด้วยสกรูที่ให้มา
4.3 การติดตั้งหน่วยจ่ายไฟ (PSU)
- Determine your preferred PSU mounting position (top or bottom) based on your modular design preference.
- เลื่อนพาวเวอร์ซัพพลาย (PSU) เข้าไปในช่องที่กำหนดจากด้านหลังของเคส
- ยึดพาวเวอร์ซัพพลายด้วยสกรูจากด้านหลังของเคส
- เชื่อมต่อสายไฟที่จำเป็นเข้ากับเมนบอร์ดและส่วนประกอบอื่นๆ ของคุณ
4.4 การติดตั้งไดรฟ์จัดเก็บข้อมูล
- ไดรฟ์ขนาด 2.5 นิ้ว: Locate the 2.5-inch drive mounts (up to 9 available). Secure SSDs or 2.5-inch HDDs using the provided screws or tool-less mechanisms.
- ไดรฟ์ขนาด 3.5 นิ้ว: Locate the 3.5-inch drive bays (up to 2 available). Install HDDs into the drive cages, typically using trays or screws.
4.5 การติดตั้งการ์ดจอ (GPU)
- ถอดฝาปิดช่องเสียบอุปกรณ์เสริมที่ด้านหลังเคสออกให้หมด
- ใส่ GPU ของคุณเข้าไปในช่อง PCIe ที่เหมาะสมบนเมนบอร์ด
- Secure the GPU with screws to the expansion slots.
- If using a vertical GPU mount (riser cable sold separately), follow the instructions provided with your vertical mount kit.
4.6 การติดตั้งพัดลมและหม้อน้ำ
The LUCA L70 supports extensive cooling configurations:
- สูงสุด: Up to 2x 120mm / 140mm fans or radiators up to 420mm.
- ด้านข้าง: Up to 3x 120mm / 140mm fans or radiators up to 420mm.
- ด้านล่าง: Up to 3x 120mm / 140mm fans or radiators up to 360mm.
- หลัง: พัดลมขนาด 120 มม. จำนวน 1 ตัว
Install fans and radiators using the appropriate screws, ensuring correct airflow direction.
4.7 การจัดการสายเคเบิล
การใช้ประโยชน์จาก ample cable routing cutouts and tie-down points behind the motherboard tray to manage cables neatly. This improves airflow and aesthetics. The case offers up to 65mm of space for cable management.
4.8 การเชื่อมต่อ I/O ด้านหน้า
Connect the front panel cables (USB, audio, power switch, reset switch, LED indicators) to the corresponding headers on your motherboard. Refer to your motherboard manual for header locations.
5. การใช้งานเคสพีซีของคุณ
Once all components are installed and cables are connected, replace all panels, including the tempered glass side panel. Connect your peripherals (monitor, keyboard, mouse) and power cable to the PSU.
- เปิดเครื่อง: Press the power button on the front I/O panel to turn on your PC.
- หมดแรง: Shut down your operating system normally. You can also press and hold the power button for a few seconds for a forced shutdown (use only when necessary).
- เริ่มต้นใหม่อีกครั้ง: Use the reset button on the front I/O panel if available, or restart through your operating system.
6. การบำรุงรักษา
การบำรุงรักษาตามปกติจะช่วยให้มั่นใจได้ถึงประสิทธิภาพสูงสุดและอายุการใช้งานที่ยาวนานของส่วนประกอบพีซีของคุณ
- ตัวกรองฝุ่น: The top and bottom dust filters should be regularly cleaned. Gently remove them and clean with compressed air or rinse with water (ensure they are completely dry before reinstallation).
- การทำความสะอาดภายนอก: เช็ดพื้นผิวภายนอกรวมทั้งแผงกระจกนิรภัยด้วยผ้านุ่มๆamp ผ้า หลีกเลี่ยงน้ำยาทำความสะอาดหรือตัวทำละลายที่มีฤทธิ์กัดกร่อน
- การทำความสะอาดภายใน: Periodically open the case and use compressed air to remove dust buildup from fans, heatsinks, and other components. Ensure the PC is powered off and unplugged before cleaning the interior.
7 การแก้ไขปัญหา
หากคุณพบปัญหา โปรดพิจารณาขั้นตอนการแก้ไขปัญหาทั่วไปต่อไปนี้:
- คอมพิวเตอร์เปิดไม่ติด:
- Check if the PSU is switched on at the back.
- Ensure all power cables (24-pin ATX, 8-pin CPU, GPU power) are securely connected.
- ตรวจสอบให้แน่ใจว่าสายเคเบิลของสวิตช์เปิดปิดแผงด้านหน้าเชื่อมต่อกับหัวต่อบนเมนบอร์ดอย่างถูกต้องแล้ว
- ไม่มีการแสดงผล:
- Ensure your monitor is connected to the graphics card (not the motherboard I/O, unless using integrated graphics).
- ติดตั้งการ์ดจอและโมดูล RAM ใหม่
- ความร้อนสูงเกินไป:
- Check fan connections and ensure they are spinning.
- ทำความสะอาดแผ่นกรองฝุ่นและชิ้นส่วนภายใน
- Verify proper airflow direction within the case.
- พอร์ต USB ไม่ทำงาน:
- ตรวจสอบให้แน่ใจว่าสาย USB แผงด้านหน้าเชื่อมต่อกับหัวเมนบอร์ดอย่างถูกต้อง
- Check your motherboard's BIOS/UEFI settings for USB port configuration.
For more complex issues, consult your motherboard or component manuals, or seek professional assistance.
8. ข้อมูลจำเพาะ
| คุณสมบัติ | ข้อมูลจำเพาะ |
|---|---|
| ยี่ห้อ | ไทรซ์ |
| ชื่อรุ่น | LUCA L70 |
| หมายเลขรุ่น | C-L700N-NN0H-G0W |
| ประเภทเคส | หอคอยกลาง |
| สี | สีขาว |
| ความเข้ากันได้ของเมนบอร์ด | E-ATX, ATX, ไมโคร ATX, มินิ-ITX |
| ขนาด (กว้าง x สูง x ลึก) | 261.8 มม. x 540.4 มม. x 571.85 มม. (ประมาณ 10.3 x 21.3 x 22.5 นิ้ว) |
| น้ำหนัก | ประมาณ 16.2 กก. (35.7 ปอนด์) |
| วัสดุ | Aluminum Alloy, SGCC Steel, Tempered Glass |
| ช่องเสียบขยาย | 7 |
| ความยาวสูงสุดของ GPU | 460มม. |
| ความสูงสูงสุดของตัวระบายความร้อนซีพียู | 170มม. |
| ความยาวสูงสุดของ PSU | 190mm (ATX) |
| ช่องไดรฟ์ | 9x 2.5-inch, 2x 3.5-inch |
| การสนับสนุนแฟนๆ (ด้านบน) | 2x120มม./140มม |
| ที่รองรับพัดลม (ด้านข้าง) | 3x120มม./140มม |
| ฐานรองพัดลม (ด้านล่าง) | 3x120มม./140มม |
| การรองรับพัดลม (ด้านหลัง) | 1x 120มม. |
| ตัวรองหม้อน้ำ (ด้านบน) | สูงถึง 420มม. |
| ขาตั้งหม้อน้ำ (ด้านข้าง) | สูงถึง 420มม. |
| Radiator Support (Bottom) | สูงถึง 360มม. |
| พอร์ต I / O ด้านหน้า | 1x USB 3.2 Gen2x2 Type-C (20Gbps, 30W PD), 2x USB 3.0 Type-A, 1x 3.5mm 4-pole TRRS Jack |
| แผ่นกรองฝุ่น | บน,ล่าง |
| คุณสมบัติพิเศษ | 270° Tempered Glass, Modular Design, Vertical GPU Mount Ready |
| GTIN | 06977029650209 |
9. การรับประกันและการสนับสนุน
9.1 ข้อมูลการรับประกัน
The TRYX LUCA L70 PC Case comes with a รับประกัน 2 ปี from the date of purchase. This warranty covers defects in materials and workmanship under normal use. It does not cover damage caused by misuse, accident, modification, unauthorized repair, or improper installation. Please retain your proof of purchase for warranty claims.
9.2 การสนับสนุนด้านเทคนิค
For technical assistance, troubleshooting, or warranty inquiries, please contact TRYX customer support. Refer to the official TRYX website or your retailer's support channels for the most up-to-date contact information. When contacting support, please have your product model (LUCA L70) and proof of purchase ready.