1. ข้อมูลด้านความปลอดภัย
โปรดอ่านคำแนะนำด้านความปลอดภัยทั้งหมดอย่างละเอียดก่อนใช้ผลิตภัณฑ์นี้ การไม่ปฏิบัติตามคำแนะนำเหล่านี้อาจทำให้เกิดไฟฟ้าช็อต ไฟไหม้ หรืออันตรายอื่นๆ
- อย่าให้โปรเจ็กเตอร์โดนฝนหรือความชื้นเพื่อป้องกันไฟไหม้หรือไฟฟ้าช็อต
- ห้ามเปิดโปรเจคเตอร์asinก. ไม่มีชิ้นส่วนใดที่ผู้ใช้สามารถซ่อมบำรุงเองได้ภายใน แนะนำให้ช่างผู้ชำนาญการซ่อมบำรุงนำชิ้นส่วนทั้งหมดไปซ่อม
- ตรวจสอบให้แน่ใจว่ามีการระบายอากาศที่เหมาะสม อย่าปิดกั้นช่องระบายอากาศ
- ใช้เฉพาะอะแดปเตอร์ไฟฟ้าที่มาพร้อมกับโปรเจ็กเตอร์เท่านั้น
- หลีกเลี่ยงการสัมผัสเลนส์โปรเจ็กเตอร์โดยตรงกับดวงตาเมื่อลamp อยู่บนแล้ว
- ควรวางโปรเจคเตอร์ให้ห่างจากแหล่งความร้อนและแสงแดดโดยตรง
2. เนื้อหาบรรจุภัณฑ์
ตรวจสอบว่ารายการทั้งหมดที่ระบุไว้ด้านล่างนี้รวมอยู่ในแพ็คเกจของคุณ:
- 1 x Jectse Mini LED Projector
- 1 x Remote Control (2 AAA batteries not included)
- 1 x AV Line (3-in-1 RCA cable)
- 1 x คู่มือการใช้งาน
- อะแดปเตอร์ไฟฟ้า 1 ตัว

Figure 2.1: Contents of the Jectse Mini LED Projector package.
3. สินค้าหมดview
The Jectse Mini LED Projector is a compact and portable device designed for various multimedia applications. It features a 1080P resolution, LED light source, and multiple connectivity options.

รูปที่ 3.1: ด้านหน้าและด้านบน view of the Jectse Mini LED Projector.
3.1 ส่วนประกอบของโปรเจ็กเตอร์

Figure 3.2: Top panel controls of the Jectse Mini LED Projector.
- เลนส์: ฉายภาพขึ้นบนจอภาพ
- ตะแกรงระบายอากาศ: ช่วยให้การไหลเวียนของอากาศเหมาะสมสำหรับการระบายความร้อน
- ปุ่มควบคุม: (Refer to Figure 3.2) For basic navigation and power control.
- โฟกัสล้อ: ปรับความคมชัดของภาพ
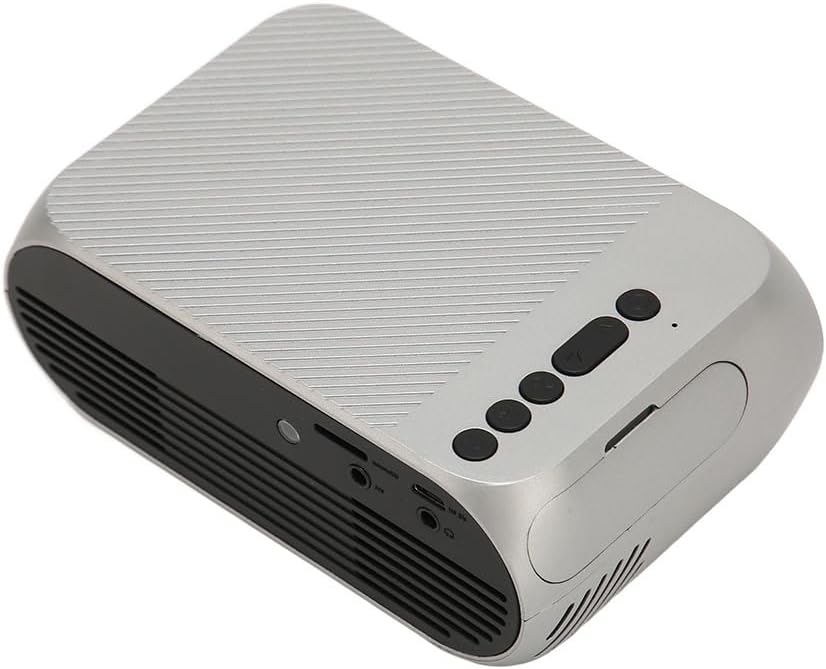
รูปที่ 3.3: ด้านหลังและด้านข้าง view พร้อมพอร์ตอินพุต/เอาต์พุต
3.2 พอร์ตอินพุต/เอาต์พุต
- HD Multimedia Interface (HDMI): For connecting devices like laptops, gaming consoles, and media players.
- พอร์ต AV: For connecting older devices using the included AV cable.
- พอร์ต USB: สำหรับเชื่อมต่อไดรฟ์ USB เพื่อเล่นสื่อ fileโดยตรงเลย
- กำลังไฟเข้า: สำหรับการเชื่อมต่ออะแดปเตอร์ไฟฟ้า
- ช่องต่อสัญญาณเสียงออก (แจ็ค 3.5 มม.): สำหรับเชื่อมต่อลำโพงภายนอกหรือหูฟัง
4. การตั้งค่า
4.1 การจัดวาง
Place the projector on a stable, flat surface. Ensure there is adequate space around the projector for ventilation. The ideal projection distance is between 1.5 to 2 meters for optimal image size and clarity.

Figure 4.1: Recommended projection distance and screen sizes.
4.2 การเชื่อมต่อสายไฟ
- ต่ออะแดปเตอร์แปลงไฟเข้ากับพอร์ตจ่ายไฟของโปรเจ็กเตอร์
- เสียบอะแดปเตอร์แปลงไฟเข้ากับเต้ารับไฟฟ้าที่เหมาะสม (100-240 โวลต์)
4.3 การเชื่อมต่อแหล่งอินพุต
The projector supports HD Multimedia Interface, AV, and USB inputs.

Figure 4.2: Projector compatibility with various devices.
- HD Multimedia Interface: Connect an HD Multimedia Interface cable from your source device (e.g., laptop, game console) to the projector's HD Multimedia Interface port.
- เอวี: Connect the included AV cable to the projector's AV port and the corresponding audio/video output ports on your source device.
- ยูเอสบี: Insert a USB flash drive into the projector's USB port.
4.4 การปรับโฟกัส
After powering on the projector, rotate the focus wheel (usually located near the lens) until the projected image appears clear and sharp.
5. คู่มือการใช้งาน
5.1 การเปิด/ปิดเครื่อง
- การเปิดเครื่อง: Press the Power Switch button on the projector or the power button on the remote control.
- วิธีปิดเครื่อง: Press the Power Switch button again. The projector will shut down.
5.2 การเลือกแหล่งที่มา
After powering on, use the "Signal Source Button" on the projector or the "Source" button on the remote control to cycle through available input sources (HD Multimedia Interface, AV, USB).
5.3 การนำทางเมนู
Use the Direction Buttons and Confirm Button on the projector or the arrow keys and OK button on the remote control to navigate through the projector's on-screen menu for settings adjustments (e.g., picture mode, aspect ratio, sound settings).
5.4 การใช้งานรีโมทคอนโทรล
Insert two AAA batteries (not included) into the remote control. Point the remote control towards the projector's IR receiver to operate functions such as power, source selection, volume, and menu navigation.
6. การบำรุงรักษา
6.1 การทำความสะอาดเลนส์
ใช้ผ้าเนื้อนุ่ม ปราศจากขน ที่ออกแบบมาสำหรับเลนส์โดยเฉพาะ เช็ดเลนส์โปรเจคเตอร์เบาๆ อย่าใช้สารทำความสะอาดที่มีฤทธิ์กัดกร่อนหรือออกแรงมากเกินไป เพราะอาจทำให้เลนส์เป็นรอยได้
6.2 การทำความสะอาดทั่วไป
Wipe the exterior of the projector with a soft, dry cloth. Do not use liquid cleaners or solvents. Ensure the ventilation grilles are free from dust and debris to maintain optimal cooling.
7 การแก้ไขปัญหา
| ปัญหา | สาเหตุที่เป็นไปได้ | สารละลาย |
|---|---|---|
| ไม่มีภาพที่ฉาย |
|
|
| ภาพเบลอ |
|
|
| ไม่มีเสียง |
|
|
| รีโมตคอนโทรลไม่ทำงาน |
|
|
8. ข้อมูลจำเพาะ
| คุณสมบัติ | รายละเอียด |
|---|---|
| ยี่ห้อ | เจคเซ่ |
| หมายเลขรุ่น | Jectse3giz17bkpy |
| ปณิธาน | 1920*1080p |
| แหล่งกำเนิดแสง | นำ |
| ไฟ LED ชีวิต | 3000 ชั่วโมง |
| ระยะฉายภาพ | 1.5-2ม. |
| อัตราส่วนการฉายภาพ | 1.6:1 น. |
| อัตราส่วนภาพ | 16:9 น. |
| กำลังไฟเข้า | 100-240โวลต์ |
| ขนาดสินค้า | 13 x 8.5 x 5 ซม. (ประมาณ 5.1 x 3.3 x 2 นิ้ว) |
| น้ำหนักสินค้า | 1.1 ปอนด์ |
| เทคโนโลยีการเชื่อมต่อ | HD Multimedia Interface, AV, USB |
| คุณสมบัติพิเศษ | Adjustable, Portable Design |
9. การรับประกันและการสนับสนุน
For warranty information or technical support, please refer to the contact details provided with your purchase or visit the official Jectse webไซต์นี้ โปรดเก็บหลักฐานการซื้อไว้เพื่อใช้ยืนยันการรับประกัน