1. บทนำ
This manual provides detailed instructions for the setup, operation, and maintenance of your DOACT Projection Alarm Clock. Please read this manual thoroughly before using the device to ensure proper function and to avoid damage.
2. ข้อมูลด้านความปลอดภัย
- อย่าให้เครื่องสัมผัสกับอุณหภูมิที่สูงหรือต่ำเกินไป แสงแดดโดยตรง หรือความชื้นสูง
- เก็บอุปกรณ์ให้ห่างจากน้ำและของเหลวอื่นๆ
- Use only the specified power supply (AAA*2 batteries or 5V USB).
- อย่าพยายามถอดประกอบหรือซ่อมแซมอุปกรณ์ด้วยตนเอง โปรดติดต่อช่างผู้ชำนาญการเพื่อขอรับบริการ
- เก็บแบตเตอรี่ให้พ้นจากมือเด็ก
3. เนื้อหาบรรจุภัณฑ์
ตรวจสอบว่ามีรายการทั้งหมดอยู่ในแพ็คเกจ:
- 1 x DOACT Projection Alarm Clock
- สาย USB 1 เส้น
- 1 x คู่มือผู้ใช้ (เอกสารนี้)
4. สินค้าหมดview
Familiarize yourself with the components of your projection alarm clock.

รูปที่ 4.1: ด้านหลัง View และการควบคุม
This image displays the back of the projection clock, highlighting key controls and ports. These include the Mode button, UP/DOWN buttons for time adjustment, MAX/MIN button for temperature/humidity display, SNZ (snooze) button, probe hole, AAA battery compartment, external power interface, and supporting base.
- หน้าจอแสดงผล: Shows time, temperature, humidity, and weather forecast icons.
- เลนส์ฉายภาพ: ฉายภาพเวลาลงบนพื้นผิว
- ปุ่มโหมด: Used to enter setup modes for time, alarm, etc.
- ปุ่มขึ้น/ลง: Adjust values during setup or switch display modes.
- ปุ่มสูงสุด/นาที: Toggles between current, maximum, and minimum temperature/humidity readings.
- SNZ (Snooze) Button: Activates snooze function for the alarm.
- ช่องใส่แบตเตอรี่: Holds 2 x AAA batteries (not included).
- พอร์ตจ่ายไฟ USB: For continuous power supply via USB cable.
5. การตั้งค่า
5.1 การเปิดเครื่องอุปกรณ์
- การติดตั้งแบตเตอรี่: Open the battery compartment on the back of the clock. Insert 2 x AAA batteries (not included), ensuring correct polarity (+/-). Note: When using only batteries, the display will not be continuously on to conserve power. The display will be black when off and difficult to see.
- พลังงาน USB: For continuous display and optimal functionality, connect the provided USB cable to the USB power port on the back of the clock and plug the other end into a 5V USB power adapter (not included) or a USB port. The display will remain continuously on when powered via USB.
5.2 การตั้งเวลาและวันที่เริ่มต้น
- กดปุ่มค้างไว้ โหมด button for approximately 3 seconds to enter time setting mode. The hour digits will flash.
- ใช้ UP or ลง ปุ่มเพื่อปรับชั่วโมง
- กด โหมด กดอีกครั้งเพื่อยืนยันชั่วโมง แล้วเปลี่ยนไปตั้งค่านาที ตัวเลขนาทีจะกะพริบ
- ใช้ UP or ลง ปุ่มปรับนาที
- กดต่อไป โหมด to cycle through and set other parameters such as year, month, and day, adjusting each with the UP or ลง ปุ่ม
- กด โหมด one last time or wait for 10 seconds without input to exit the setting mode.
6. คู่มือการใช้งาน
6.1 ฟังก์ชันการฉายภาพตามเวลา

Figure 6.1: Time Projection
This image shows the projection clock actively displaying the time onto a surface, illustrating its projection capability. The projection distance is approximately 1 to 5 meters.
- The clock can project the time onto a ceiling or wall. The optimal projection distance is 1-5 meters.
- To activate the projection, ensure the clock is powered via USB or press a button if using batteries (projection is not continuous on battery power).
- การปรับมุมการฉายภาพ: The projection lens can be rotated 180 degrees to direct the time display to your desired surface. Gently rotate the projection arm to adjust.
6.2 การแสดงอุณหภูมิและความชื้น
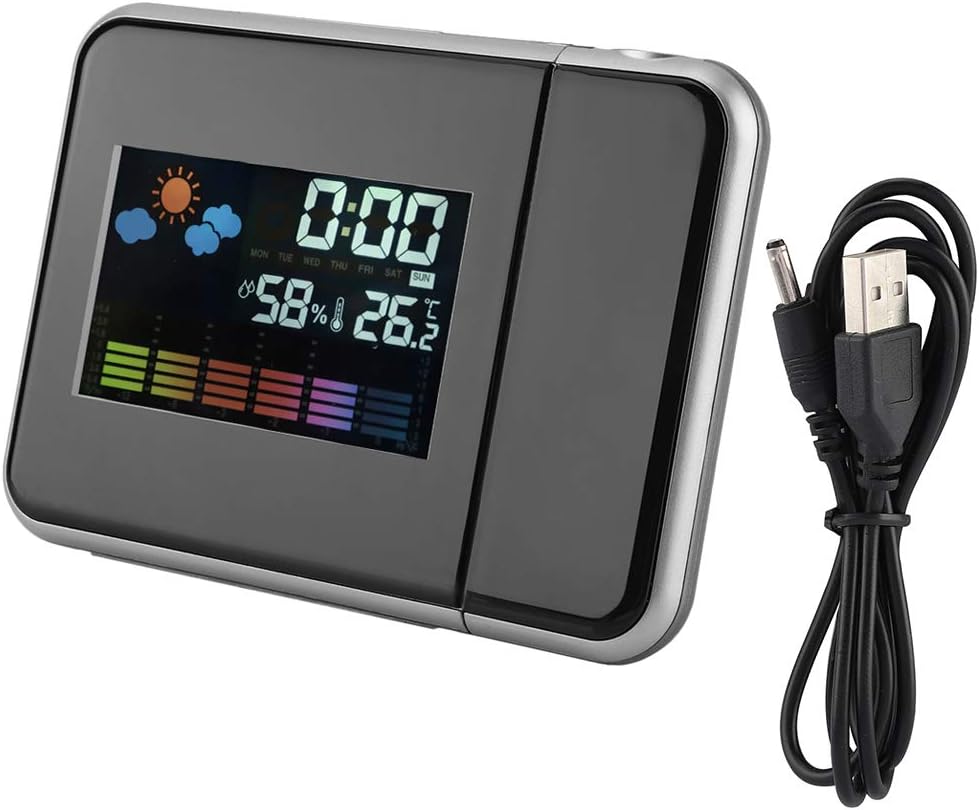
รูปที่ 6.2: จอแสดงผลหลัก
ความชัดเจน view of the clock's front display, showing the digital time, current temperature, humidity percentage, and weather forecast icons. This illustrates the multi-functional display capabilities.
- The main display shows the current indoor temperature and humidity.
- หน่วยอุณหภูมิ: หากต้องการสลับระหว่างองศาเซลเซียส (°C) และองศาฟาเรนไฮต์ (°F) ให้กดปุ่ม ลง ปุ่มสั้นๆ
- Maximum/Minimum Readings: กดปุ่ม สูงสุด/ต่ำสุด ปุ่มที่จะ view the maximum recorded temperature and humidity. Press again to view the minimum recorded temperature and humidity. Press a third time to return to current readings. The readings reset daily or when the device is reset.
6.3 Alarm Clock and Snooze Function
- การตั้งค่าสัญญาณเตือน:
- กดปุ่ม โหมด button once to enter alarm setting mode. The alarm time will flash.
- ใช้ UP or ลง ปุ่มเพื่อปรับชั่วโมงการปลุก
- กด โหมด again to confirm the hour and set the alarm minutes.
- ใช้ UP or ลง ปุ่มสำหรับปรับนาทีปลุก
- กด โหมด again or wait for 10 seconds to exit alarm setting.
- การเปิด/ปิดระบบเตือนภัย: ในโหมดแสดงเวลาปกติ ให้กดปุ่ม UP button briefly to toggle the alarm on or off. An alarm icon will appear on the display when activated.
- ฟังก์ชั่นเลื่อน: เมื่อเสียงปลุกดัง ให้กด SNZ button to activate the snooze function. The alarm will temporarily stop and sound again after a few minutes (default snooze time is typically 5-10 minutes, refer to specific model details if available). To turn off the alarm completely, press any other button.
7. การบำรุงรักษา
- ทำความสะอาดอุปกรณ์ด้วยผ้านุ่มและแห้ง ห้ามใช้น้ำยาทำความสะอาดหรือสารละลายที่มีฤทธิ์กัดกร่อน
- Ensure the projection lens is clean for clear time projection.
- หากไม่ได้ใช้อุปกรณ์เป็นเวลานาน ให้ถอดแบตเตอรี่ออกเพื่อป้องกันการรั่วซึม
8 การแก้ไขปัญหา
| ปัญหา | สาเหตุที่เป็นไปได้ | สารละลาย |
|---|---|---|
| Display is off or dim (on battery power) | Batteries are low or display is designed to turn off to save power. | Replace AAA batteries or connect the device to a USB power source for continuous display. |
| No time projection | Projection function not activated or device not powered via USB. | Ensure USB power is connected. If on battery, press a button to temporarily activate projection. Check if the projection lens is obstructed. |
| เวลา/วันที่ไม่ถูกต้อง | Time/date not set correctly or power interruption. | โปรดดูหัวข้อ 5.2 เพื่อตั้งค่าเวลาและวันที่ใหม่ |
| นาฬิกาปลุกไม่ส่งเสียง | สัญญาณเตือนภัยไม่ได้เปิดใช้งานหรือตั้งค่าไม่ถูกต้อง | Refer to Section 6.3 to ensure the alarm is set and activated (alarm icon visible). |
9. ข้อมูลจำเพาะ
| คุณสมบัติ | รายละเอียด |
|---|---|
| หมายเลขรุ่น | DOACTcuf6pq3yvr-01 |
| ประเภทจอภาพ | Digital, LED Color Screen |
| แหล่งพลังงาน | 2 x AAA Batteries (not included), USB 5V (cable included) |
| ช่วงแสดงอุณหภูมิ | -9.9°C ถึง +60°C (14.2°F ถึง 140°F) |
| ช่วงการแสดงความชื้น | 20% RH ถึง 90% RH |
| ระยะฉายภาพ | 1-5 เมตร |
| มุมการฉายภาพ | หมุนได้ 180° |
| ขนาดสินค้า | 15 cm (5.9 in) W x 11 cm (4.3 in) H x 2 cm (0.8 in) D |
| วัสดุ | พลาสติก |
| น้ำหนัก | ประมาณ 246g (8.7 ออนซ์) |
| คุณสมบัติพิเศษ | Alarm, Snooze, Temperature Display, Humidity Display, Weather Forecast, Digital Time Display, Max/Min Temperature/Humidity |

รูปที่ 9.1: ขนาดผลิตภัณฑ์
This image provides a visual representation of the clock's dimensions, indicating its width (15cm / 5.9in), height (11cm / 4.3in), and depth (2cm / 0.8in).
10. การรับประกันและการสนับสนุน
สำหรับข้อมูลการรับประกันหรือการสนับสนุนทางเทคนิค โปรดดูนโยบายของร้านค้าปลีกหรือติดต่อผู้ผลิตโดยตรง เก็บใบเสร็จรับเงินไว้เป็นหลักฐานการซื้อ