1. บทนำ
The Epson EcoTank L5290 is a versatile A4 Wi-Fi All-in-One Ink Tank Printer designed for efficiency and convenience. It integrates print, scan, copy, and fax functionalities, along with an Automatic Document Feeder (ADF) for enhanced productivity. This manual provides essential information for the proper use and care of your device.
คุณสมบัติหลัก
- A4 Wi-Fi All-in-One Ink Tank Printer with Wi-Fi & Wi-Fi Direct.
- Print, scan, copy, and fax capabilities with an Automatic Document Feeder (ADF).
- Print speeds of up to 15ppm (color draft) / 33ppm (black draft) and 5.0ppm (color ISO) / 10.0ppm (black ISO).
- ความละเอียดการพิมพ์สูงสุด: 5760 x 1440 dpi
- ความละเอียดในการสแกนด้วยแสง: 1200 x 2400 dpi
- Connectivity: 1 Hi-Speed USB 2.0, Wi-Fi IEEE 802.11b/g/n, Wi-Fi Direct.
- Compatible with Apple Airprint and Mopria Print Service.
- Uses Epson 003 series ink bottles for economical and spill-free refilling.

ภาพที่ 1.1: ด้านหน้า view ของเครื่องพิมพ์ Epson EcoTank L5290 ที่แสดงในภาพasinด้วยการออกแบบที่กะทัดรัดและแผงควบคุม
2. การตั้งค่า
2.1 การแกะกล่องเครื่องพิมพ์
- นำเครื่องพิมพ์ออกจากบรรจุภัณฑ์
- นำเทปกาวป้องกันและวัสดุบรรจุภัณฑ์ทั้งหมดออกจากภายนอกและภายในเครื่องพิมพ์
- วางเครื่องพิมพ์บนพื้นผิวที่มั่นคงและเรียบ ใกล้กับปลั๊กไฟ
2.2 การเติมหมึกเริ่มต้น
The EcoTank L5290 uses integrated ink tanks for a high-capacity, refillable ink system. Follow these steps for initial ink filling:
- เปิดฝาครอบชุดตลับหมึกที่ด้านข้างเครื่องพิมพ์
- เปิดฝาแท็งก์หมึกสีดำ
- Uncap the black ink bottle and align its nozzle with the ink tank's filling port. The bottles are designed for spill-free refilling, ensuring ink only flows into the correct tank.
- ปล่อยให้หมึกไหลลงแท็งก์จนหมด อย่าบีบขวด
- เมื่อเติมหมึกเต็มแล้ว ให้ถอดขวดหมึกออกและปิดฝาแท็งก์หมึกให้สนิท
- Repeat the process for the cyan, magenta, and yellow ink tanks using their respective color bottles.
- ปิดฝาครอบชุดตลับหมึก
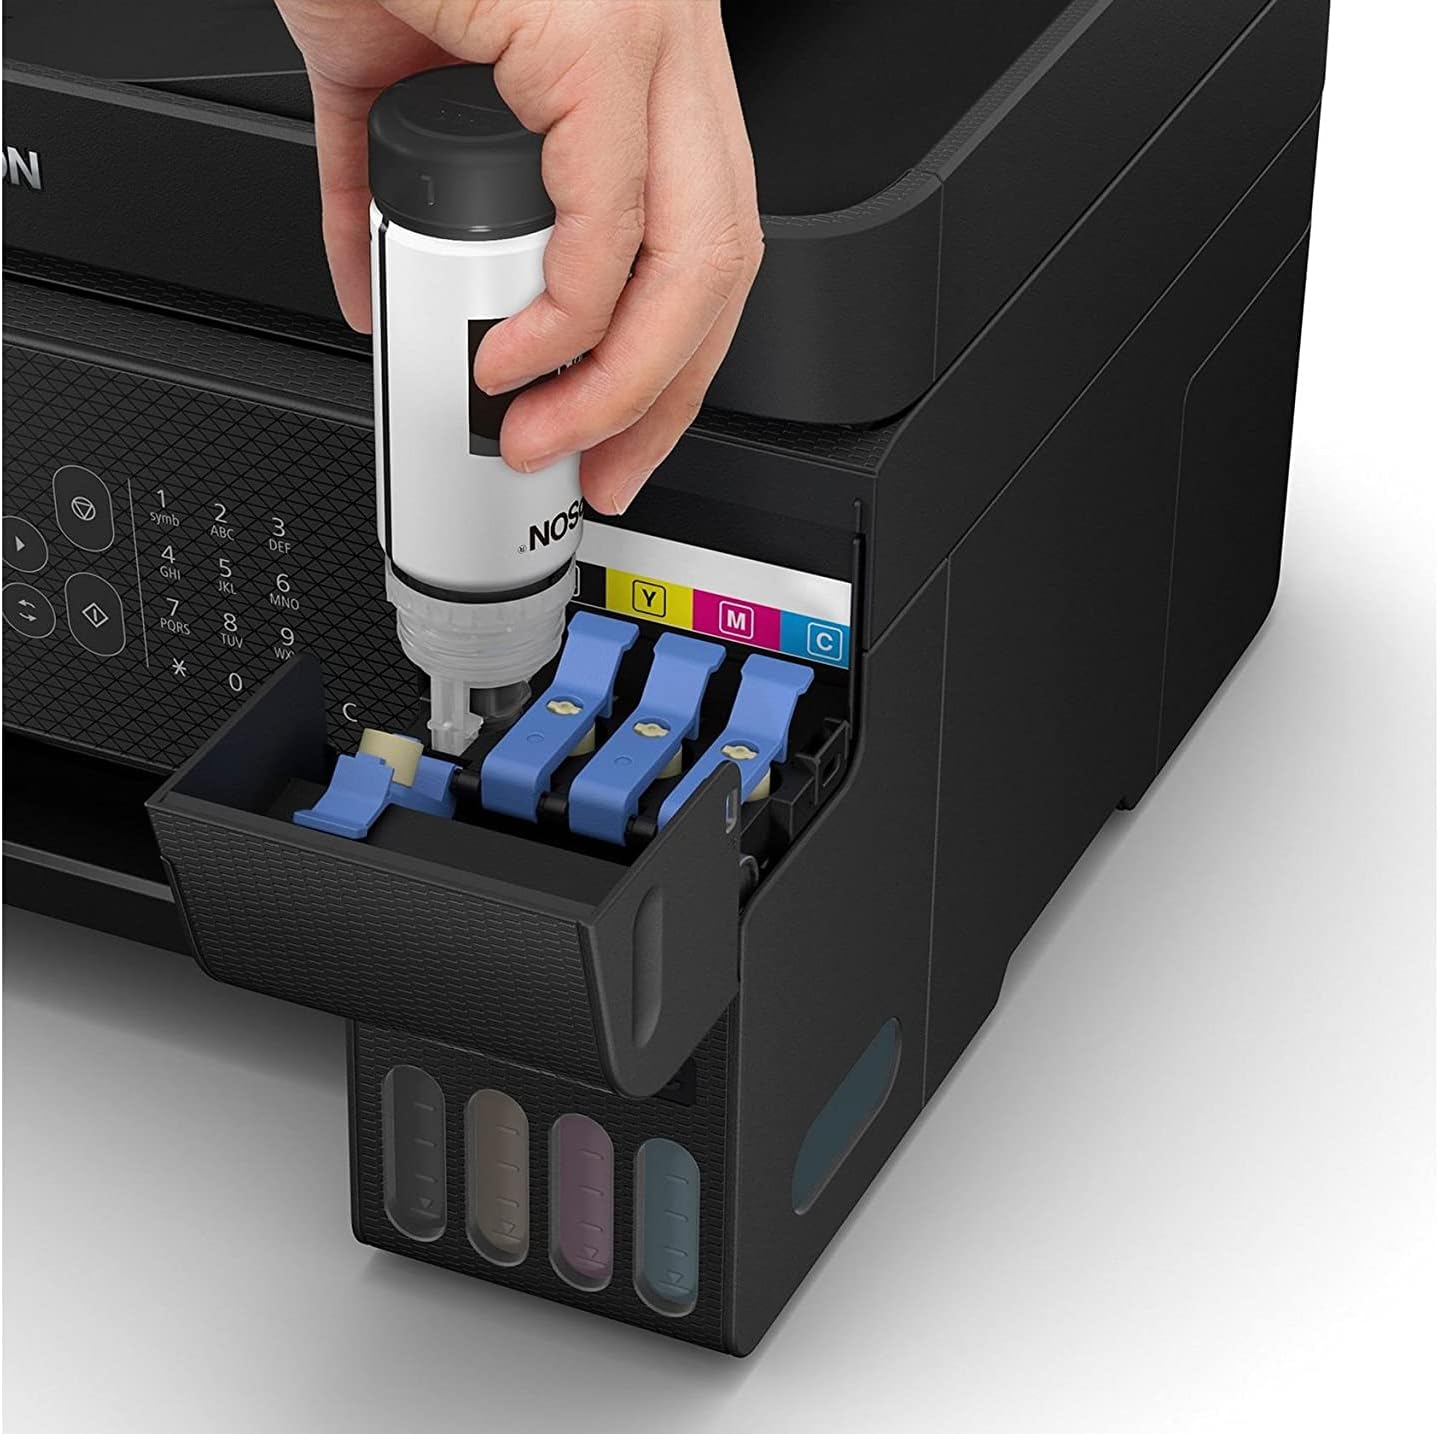
Image 2.1: A hand demonstrating the spill-free ink refilling process for the Epson EcoTank L5290.
2.3 Powering On the Printer
- เชื่อมต่อสายไฟเข้ากับเครื่องพิมพ์ แล้วจึงเสียบเข้ากับเต้ารับไฟฟ้า
- Press the power button on the printer's control panel.
- Follow the on-screen instructions on the printer's LCD panel to complete the initial setup, including language selection and ink initialization. Ink initialization may take several minutes.
2.4 การติดตั้งซอฟต์แวร์
To utilize all printer functions, install the necessary drivers and software on your computer or mobile device.
- สำหรับคอมพิวเตอร์: Insert the installation CD (if provided) or download the latest drivers and utilities from the official Epson support webไซต์ ทำตามคำแนะนำบนหน้าจอเพื่อการติดตั้ง
- สำหรับอุปกรณ์พกพา: Download the Epson Smart Panel app from your device's app store (Apple App Store or Google Play Store). This app facilitates printing, scanning, and printer management from your smartphone or tablet.
2.5 Network Connection (Wi-Fi / Wi-Fi Direct)
The L5290 supports both standard Wi-Fi and Wi-Fi Direct for flexible connectivity.
- การตั้งค่า Wi-Fi: On the printer's control panel, navigate to the Wi-Fi settings. Select your network from the list of available networks and enter the password.
- Wi-Fi Direct: This feature allows direct connection between your device and the printer without a router. Enable Wi-Fi Direct on the printer and then connect your mobile device or computer to the printer's direct Wi-Fi network.
3. คู่มือการใช้งาน
3.1 การพิมพ์เอกสาร
- Load paper into the paper tray. Ensure the paper guides are adjusted to fit the paper size.
- Open the document you wish to print on your computer or mobile device.
- เลือก 'พิมพ์' จากเมนูของแอปพลิเคชัน
- Choose the Epson EcoTank L5290 as your printer.
- Adjust print settings (e.g., paper size, print quality, color/grayscale) as needed.
- คลิก 'พิมพ์'
3.2 การสแกนเอกสาร
คุณสามารถสแกนเอกสารโดยใช้เครื่องสแกนแบบแท่นวางหรือเครื่องป้อนเอกสารอัตโนมัติ (ADF)
- การใช้รถบรรทุกพื้นเรียบ: วางเอกสารคว่ำหน้าลงบนกระจกสแกนเนอร์ โดยจัดให้ตรงกับเครื่องหมายที่มุม
- การใช้งาน ADF: ใส่เอกสารหลายหน้าโดยหงายหน้าขึ้นลงในถาดป้อนเอกสารอัตโนมัติ (ADF)
Initiate the scan from your computer using Epson Scan software or from the Epson Smart Panel app on your mobile device. Select scan settings such as resolution, color mode, and destination, then start the scan.
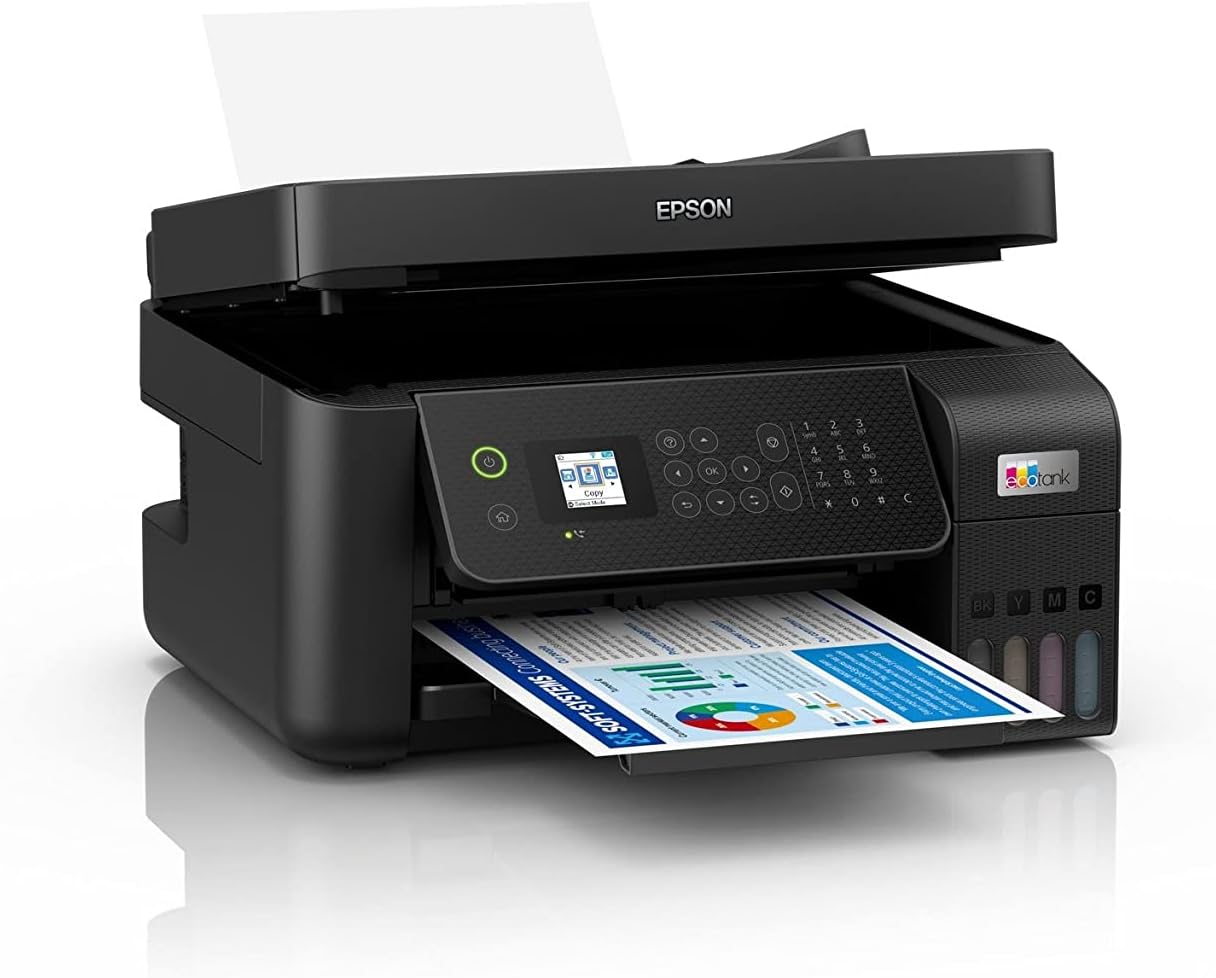
Image 3.1: The Epson EcoTank L5290 printer with paper loaded in the front tray and the ADF ready for use.
3.3 การคัดลอกเอกสาร
- Load the original document on the scanner glass or in the ADF.
- On the printer's control panel, select the 'Copy' function.
- ปรับการตั้งค่าต่างๆ เช่น จำนวนสำเนา สี/ขาวดำ และขนาดกระดาษ
- กดปุ่ม 'เริ่ม' เพื่อเริ่มการคัดลอก
3.4 การแฟกซ์เอกสาร
The L5290 includes fax functionality. Ensure the printer is connected to a phone line.
- Load the document(s) into the ADF or place a single page on the scanner glass.
- On the printer's control panel, select the 'Fax' function.
- ป้อนหมายเลขแฟกซ์ของผู้รับโดยใช้แป้นพิมพ์ตัวเลข
- Adjust any necessary fax settings (e.g., resolution, color/black & white).
- กดปุ่ม 'เริ่ม' เพื่อส่งแฟกซ์
4. การบำรุงรักษา
4.1 Ink Level Management and Refilling
Regularly check the ink levels through the transparent ink tanks or via the printer's control panel/software. When an ink tank is low, refill it using genuine Epson 003 series ink bottles, following the procedure outlined in Section 2.2.
4.2 การทำความสะอาดเครื่องพิมพ์
- ภายนอก: เช็ดทำความสะอาดภายนอกเครื่องพิมพ์ด้วยผ้าเนื้อนุ่มและแห้งampใช้ผ้าที่ไม่เป็นขุยเช็ด หลีกเลี่ยงการใช้สารทำความสะอาดที่มีฤทธิ์กัดกร่อนหรือตัวทำละลาย
- กระจกสแกนเนอร์: Gently clean the scanner glass with a soft, lint-free cloth moistened with a small amount of glass cleaner.
- การทำความสะอาดหัวพิมพ์: If print quality declines (e.g., missing lines, streaking), perform a print head cleaning cycle through the printer's maintenance menu or the printer driver software.
4.3 การแก้ไขปัญหากระดาษติด
If a paper jam occurs, the printer's LCD panel will display an error message. Follow these general steps:
- ปิดเครื่องพิมพ์และถอดปลั๊กไฟ
- Carefully open all covers (e.g., rear cover, top cover) to access the paper path.
- Gently pull out any jammed paper in the direction of the paper path. Avoid tearing the paper.
- ตรวจสอบให้แน่ใจว่าได้กำจัดเศษกระดาษออกหมดแล้ว
- ปิดฝาครอบทั้งหมด เสียบสายไฟ และเปิดเครื่องพิมพ์
5 การแก้ไขปัญหา
This section addresses common issues you might encounter. For detailed troubleshooting, refer to the comprehensive online manual or Epson support resources.
- เครื่องพิมพ์ไม่ตอบสนอง: Check power connections, USB/network cables, and ensure the printer is selected as the default printer on your computer. Restart both the printer and computer.
- คุณภาพการพิมพ์ไม่ดี: Perform a nozzle check and print head cleaning. Ensure genuine Epson ink is used and ink levels are sufficient. Check paper type settings in the print driver.
- ปัญหาการป้อนกระดาษ: Ensure paper is loaded correctly and not creased or damaged. Adjust paper guides. Clean the paper rollers if necessary.
- ปัญหาการเชื่อมต่อเครือข่าย: Verify Wi-Fi settings on both the printer and your router. Restart your router and printer. Ensure the printer is within range of your Wi-Fi network.
- ข้อความแสดงข้อผิดพลาด: Refer to the specific error code displayed on the printer's LCD panel and consult the online manual for detailed solutions.
6. ข้อมูลจำเพาะ
| คุณสมบัติ | รายละเอียด |
|---|---|
| ยี่ห้อ | เอปสัน |
| หมายเลขรุ่น | L5290 |
| หมายเลขชิ้นส่วนของผู้ผลิต | C11CJ65502 |
| ฟังก์ชั่น | Print, Scan, Copy, Fax with ADF |
| ความละเอียดในการพิมพ์ (สูงสุด) | 5760 x 1440 จุดต่อนิ้ว |
| ความละเอียดในการสแกน (แบบออปติคอล) | 1200 x 2400 จุดต่อนิ้ว |
| การเชื่อมต่อ | USB 2.0, Wi-Fi (IEEE 802.11b/g/n), Wi-Fi Direct |
| หมึกที่รองรับ | ขวดหมึก Epson 003 |
| สี | สีดำ |
| วันที่พร้อมใช้งานครั้งแรก | 21 มิถุนายน 2022 |
7. การรับประกันและการสนับสนุน
Your Epson EcoTank L5290 printer comes with a manufacturer's warranty. For specific warranty terms and conditions, please refer to the documentation included with your product or visit the official Epson support webเว็บไซต์สำหรับภูมิภาคของคุณ
หากต้องการความช่วยเหลือด้านเทคนิค การดาวน์โหลดไดรเวอร์ คำถามที่พบบ่อย และการสนับสนุนเพิ่มเติม โปรดไปที่เว็บไซต์ฝ่ายสนับสนุนของ Epson website or contact their customer service. Keep your printer's model number (L5290) and serial number ready when seeking support.


