1. บทนำ
This manual provides detailed instructions for the installation, operation, and maintenance of your Edge Audio Xtreme Series EDX5000.1FD-E0 Monoblock Amplifier. The EDX5000.1FD-E0 is a high-performance Class D full-bridge amplifier designed for powerful audio output. Please read this manual thoroughly before attempting installation or operation to ensure proper use and to prevent damage.
1.1 ข้อควรระวังเพื่อความปลอดภัย
- ควรตัดการเชื่อมต่อขั้วลบของแบตเตอรี่รถยนต์ทุกครั้งก่อนทำการเชื่อมต่อทางไฟฟ้าใดๆ
- ตรวจสอบให้แน่ใจว่าสายไฟทั้งหมดได้รับการเดินสายและยึดอย่างถูกต้องเพื่อป้องกันความเสียหายหรือไฟฟ้าลัดวงจร
- ใช้สายไฟที่มีขนาดเหมาะสมสำหรับการเชื่อมต่อไฟและสายดินตามที่ระบุไว้ในคู่มือนี้
- หลีกเลี่ยงการติดตั้ง amplifier in locations exposed to moisture or excessive heat.
- ปรึกษาผู้ติดตั้งมืออาชีพหากคุณไม่แน่ใจเกี่ยวกับส่วนใดส่วนหนึ่งของกระบวนการติดตั้ง
2. เนื้อหาบรรจุภัณฑ์
ตรวจสอบว่ามีรายการทั้งหมดอยู่ในบรรจุภัณฑ์ก่อนดำเนินการติดตั้ง
- Edge Audio EDX5000.1FD-E0 Monoblock Ampชีวิต
- ชุดควบคุมเสียงเบสระยะไกล
- Wiring for Remote Bass Control
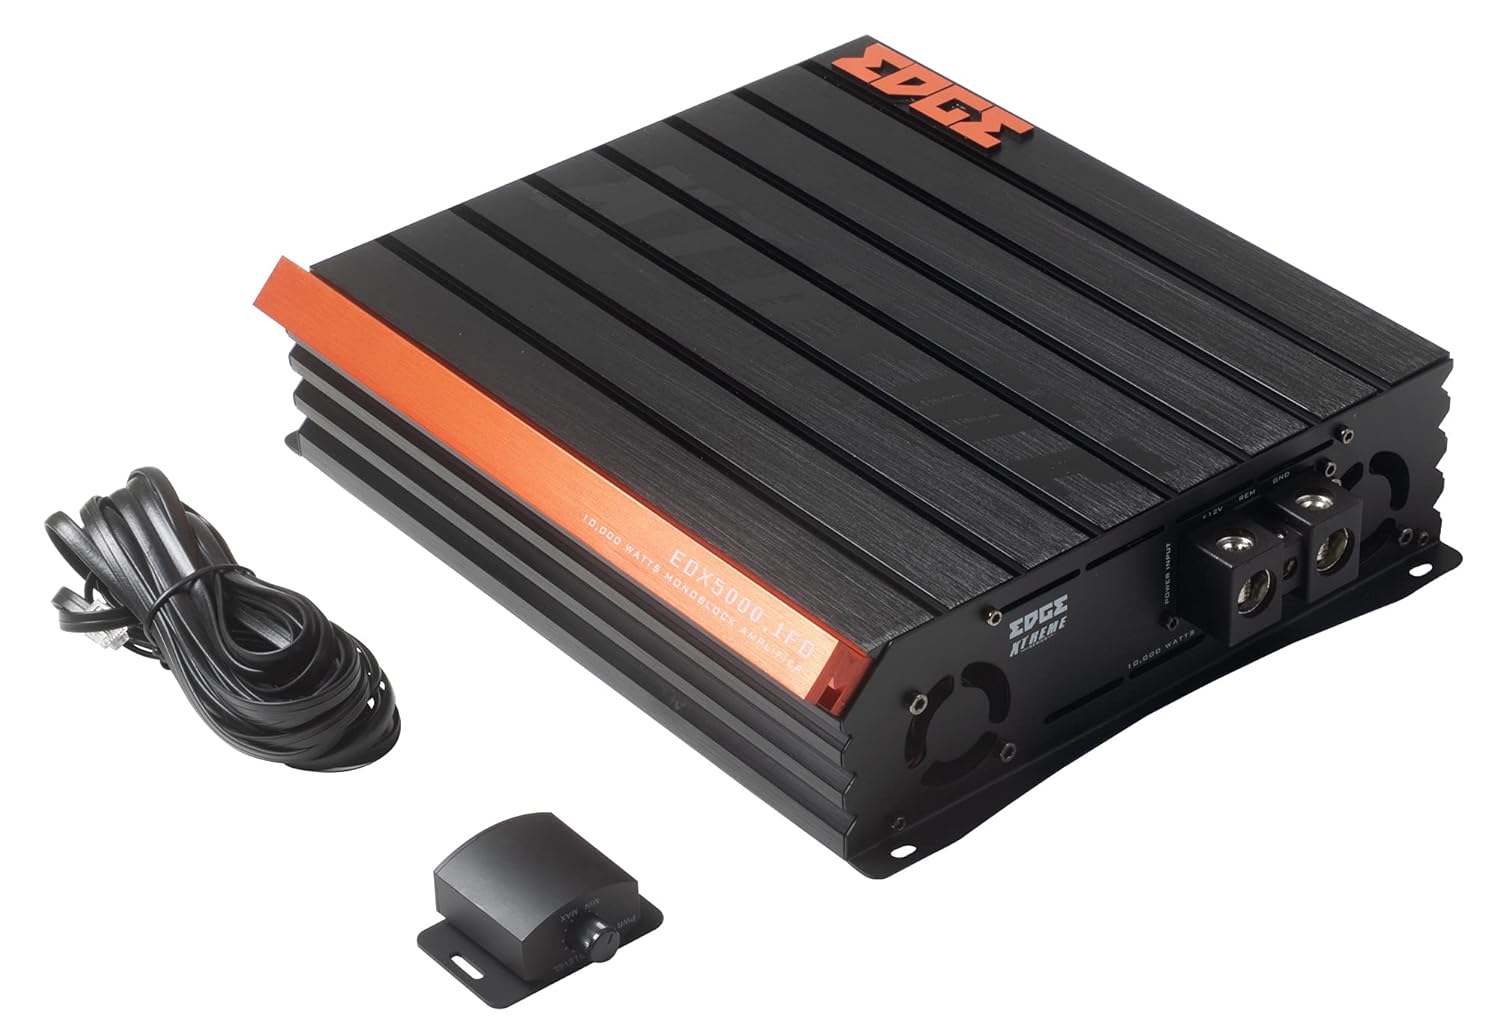
Image 2.1: Contents of the EDX5000.1FD-E0 package, including the amplifier, remote bass control, and connecting cable.

Image 2.2: The retail packaging for the Edge Audio EDX5000.1FD-E0 Monoblock Ampชีวิต.
3. คุณสมบัติ
The Edge Audio Xtreme Series EDX5000.1FD-E0 amplifier incorporates advanced features for optimal audio performance:
- Monoblock power amplifier design for dedicated subwoofer applications.
- Max Power: 10,000 watts.
- Built-in active crossovers (High-Pass Filter and Low-Pass Filter) for precise sound shaping.
- Adjustable Bass Boost circuit for enhanced low-frequency response.
- Ultra-efficient Class D topology for high power output with minimal heat generation.
- Wideband frequency response up to 20kHz.
- Full bridge technology for efficient power delivery.
- Compact footprint for versatile installation options.
- Dimensions (H x W x D): 2.5 x 10.4 x 9.1 inches (64 x 264 x 230mm).

ภาพที่ 3.1: ด้านบน view of the EDX5000.1FD-E0 ampเครื่องแสดงasing its compact design and heatsink fins.
4. การตั้งค่าและการติดตั้ง
การติดตั้งที่ถูกต้องเป็นสิ่งสำคัญต่อประสิทธิภาพและอายุการใช้งานยาวนานของคุณ amplifier. Follow these guidelines carefully.
4.1 ตำแหน่งการติดตั้ง
ติดตั้ง amplifier in a dry, well-ventilated area, away from direct sunlight or heat sources. Ensure sufficient airflow around the ampแผ่นระบายความร้อนของเครื่องขยายเสียง ampแอมพลิฟายเออร์นี้ออกแบบมาสำหรับการติดตั้งบนพื้นผิว
4.2 การเชื่อมต่อสายไฟ
All wiring should be securely connected and insulated to prevent short circuits. Use high-quality, appropriate gauge wiring.
4.2.1 การต่อสายไฟ
เชื่อมต่อ amplifier to the vehicle's electrical system as follows:
- +12V (ไฟเลี้ยง): Connect a heavy-gauge power cable (e.g., 4 AWG or larger for 10,000W max power) directly from the positive terminal of the vehicle's battery to the +12V terminal on the amplifier. Install an appropriate fuse (not supplied) within 18 inches of the battery.
- GND (กราวด์): เชื่อมต่อสายดินขนาดใหญ่ที่มีขนาดเท่ากับสายไฟเข้ากับขั้วต่อ GND บน amplifier to a clean, unpainted metal surface of the vehicle chassis. Ensure a solid electrical connection.
- REM (การเปิดใช้งานจากระยะไกล): ต่อสายไฟขนาดเล็กกว่า (เช่น 18 AWG) จากขั้วต่อ REM บน ampเชื่อมต่อสายสัญญาณนี้กับช่องต่อรีโมทเปิด-ปิดของชุดเครื่องเสียงในรถของคุณ สายนี้จะเปลี่ยน... ampเปิดและปิดเครื่องขยายเสียงพร้อมกับระบบเสียงของคุณ

Image 4.1: Power input terminals (+12V, REM, GND) on the EDX5000.1FD-E0 ampชีวิต.
4.2.2 การเชื่อมต่ออินพุตเสียง
Connect your head unit's RCA outputs to the 'LOW INPUT' RCA jacks on the ampชีวิต.
4.2.3 การเชื่อมต่อเอาต์พุตลำโพง
Connect your subwoofer(s) to the speaker output terminals on the amplifier. Ensure correct polarity (+ to + and - to -) for optimal performance. Refer to your subwoofer's specifications for impedance matching.

Image 4.2: Rear panel of the EDX5000.1FD-E0 amplifier, showing low-level inputs, crossover controls, gain, bass boost, and speaker output terminals.
5. คู่มือการใช้งาน
เมื่อติดตั้งเสร็จแล้ว ให้ปรับแต่ง ampตั้งค่าเครื่องขยายเสียงเพื่อคุณภาพเสียงที่ดีที่สุด
5.1 แผงควบคุมโอเวอร์view
Refer to Image 4.2 for the location of the following controls:
- ฟิลเตอร์กรองความถี่สูง (HPF) Adjusts the high-pass crossover frequency. For subwoofer applications, this should typically be set to its minimum or off, as a low-pass filter is usually preferred.
- ตัวกรองความถี่ต่ำ (LPF): Adjusts the low-pass crossover frequency (15Hz - 200Hz). This filters out frequencies above the set point, sending only low frequencies to the subwoofer. Set this according to your subwoofer and system requirements, typically between 60Hz and 100Hz.
- ได้รับ: ตรงกับ ampความไวในการรับสัญญาณของแอมพลิฟายเออร์ต่อระดับสัญญาณเอาต์พุตของชุดเครื่องเสียงของคุณ เริ่มจากปรับเกนไปที่ระดับต่ำสุด จากนั้นค่อยๆ เพิ่มขึ้นจนกว่าคุณจะได้ยินเสียงผิดเพี้ยน แล้วจึงลดลงเล็กน้อย อย่าใช้ปุ่มควบคุมเกนเป็นปุ่มปรับระดับเสียง
- เพิ่มเสียงเบส: Adjusts the level of bass enhancement (0dB - 12dB). Use sparingly to avoid distortion.
- FREQ (Bass Boost Frequency): Selects the center frequency for the bass boost (35Hz - 70Hz).
- ระยะไกล: Port for connecting the wired remote bass control unit.
5.2 Remote Bass Control
The included remote bass control allows for convenient adjustment of the subwoofer output level from the driver's seat. Connect it to the 'REMOTE' port on the ampชีวิต.
6. การบำรุงรักษา
การบำรุงรักษาอย่างสม่ำเสมอจะช่วยให้มั่นใจได้ถึงอายุการใช้งานและประสิทธิภาพการทำงานของอุปกรณ์ของคุณ ampชีวิต.
- การทำความสะอาด: ทำความสะอาด .เป็นระยะ amplifier's exterior with a soft, dry cloth. Do not use harsh chemicals or abrasive cleaners. Ensure ventilation fins are free of dust and debris.
- ตรวจสอบการเชื่อมต่อ: Annually inspect all power, ground, remote, and speaker connections for tightness and corrosion. Loose connections can cause performance issues or damage.
- สิ่งแวดล้อม: ให้แน่ใจว่า amplifier remains in a dry, stable environment, protected from extreme temperatures.
7 การแก้ไขปัญหา
หากคุณประสบปัญหาเกี่ยวกับ ampสำหรับเครื่องขยายเสียง โปรดดูปัญหาและวิธีแก้ไขทั่วไปต่อไปนี้ก่อนติดต่อฝ่ายสนับสนุน
- ไม่มีไฟฟ้า:
- ตรวจสอบฟิวส์แบบอินไลน์ที่อยู่ใกล้แบตเตอรี่
- Verify +12V, GND, and REM connections are secure and receiving power.
- Ensure the remote turn-on wire is connected to a switched 12V source.
- ไม่มีเสียง:
- Check all RCA input and speaker output connections.
- Verify head unit is powered on and outputting audio.
- Adjust the GAIN control.
- เสียงผิดเพี้ยน:
- Reduce the GAIN setting.
- ตรวจสอบสายไฟลำโพงว่ามีการลัดวงจรหรือต่อขั้วผิดหรือไม่
- ตรวจสอบให้แน่ใจว่าค่าความต้านทานของลำโพงตรงกัน ampข้อมูลจำเพาะของไลเออร์
- Reduce BASS BOOST if active.
- Ampเครื่องทำความร้อนเกิน:
- จัดให้มีการระบายอากาศโดยรอบอย่างเพียงพอ ampชีวิต.
- Check speaker impedance; running too low an impedance can cause overheating.
- Verify power and ground wire gauge is sufficient.
8. ข้อมูลจำเพาะ
Technical specifications for the Edge Audio Xtreme Series EDX5000.1FD-E0 Monoblock Ampเครื่องฟอก:
| คุณสมบัติ | ข้อมูลจำเพาะ |
|---|---|
| หมายเลขรุ่น | EDX5000.1FD-E0 |
| ยี่ห้อ | ขอบ |
| Amplifier ประเภท | Monoblock, Class D, Full Bridge |
| พลังสูงสุด | 10,000 วัตต์ |
| การตอบสนองความถี่ | สูงสุด 20kHz |
| Built-in Crossovers | Active (HPF, LPF) |
| เพิ่มเสียงเบส | Adjustable (0-12dB) |
| Bass Boost ความถี่ | ปรับได้ (35Hz-70Hz) |
| เล่มที่tage | 230 โวลต์ (แรงดันใช้งานtage Range typically 12-14.4V DC for car audio) |
| ประเภทการติดตั้ง | การติดตั้งบนพื้นผิว |
| ขนาดสินค้า (สูง x กว้าง x ลึก) | 2.5 x 10.4 x 9.1 นิ้ว (64 x 264 x 230 มม.) |
| น้ำหนักผลิตภัณฑ์ | 6.61 ปอนด์ |
9. การรับประกันและการสนับสนุน
For warranty information or technical support, please refer to the documentation provided at the time of purchase or contact your authorized Edge Audio dealer. Keep your proof of purchase for warranty claims.