1. บทนำ
Thank you for choosing the Inscabin P2 Portable DAB/DAB+FM Digital Radio and Bluetooth Speaker. This device combines multiple audio functionalities, including DAB/DAB+ digital radio, FM radio, Bluetooth connectivity, and playback from USB drives and TF cards. It also features a dual alarm clock, sleep timer, and snooze function. This manual provides detailed instructions to help you set up, operate, and maintain your device.
โปรดอ่านคู่มือนี้อย่างละเอียดก่อนใช้ผลิตภัณฑ์และเก็บคู่มือนี้ไว้เพื่อใช้อ้างอิงในอนาคต
2. ข้อมูลด้านความปลอดภัย
- แหล่งพลังงาน: Use only the specified power adapter or USB charging cable. Ensure the voltage สามารถใช้งานร่วมกับภูมิภาคของคุณได้
- น้ำและความชื้น: Do not expose the device to rain, moisture, or immerse it in water. Avoid placing liquid-filled objects on the device.
- ความร้อน: ควรวางอุปกรณ์ให้ห่างจากแหล่งความร้อน เช่น เครื่องทำความร้อน ช่องระบายความร้อน เตา หรือเครื่องใช้ไฟฟ้าอื่นๆ ที่ให้ความร้อน
- การระบายอากาศ : ตรวจสอบให้แน่ใจว่ามีการระบายอากาศที่เหมาะสม อย่าปิดกั้นช่องระบายอากาศใดๆ
- การทำความสะอาด: ถอดปลั๊กไฟก่อนทำความสะอาด ใช้ผ้าแห้งนุ่มๆ เช็ดทำความสะอาด ห้ามใช้น้ำยาทำความสะอาดหรือสเปรย์ทำความสะอาด
- การบริการ: อย่าพยายามให้บริการผลิตภัณฑ์นี้ด้วยตนเอง ส่งต่อการบริการทั้งหมดไปยังช่างบริการที่ผ่านการรับรอง
- แบตเตอรี่: The device contains a built-in rechargeable battery. Do not expose it to excessive heat or direct sunlight. Dispose of batteries responsibly according to local regulations.
3. สินค้าหมดview
Familiarize yourself with the various parts and controls of your Inscabin P2 radio.
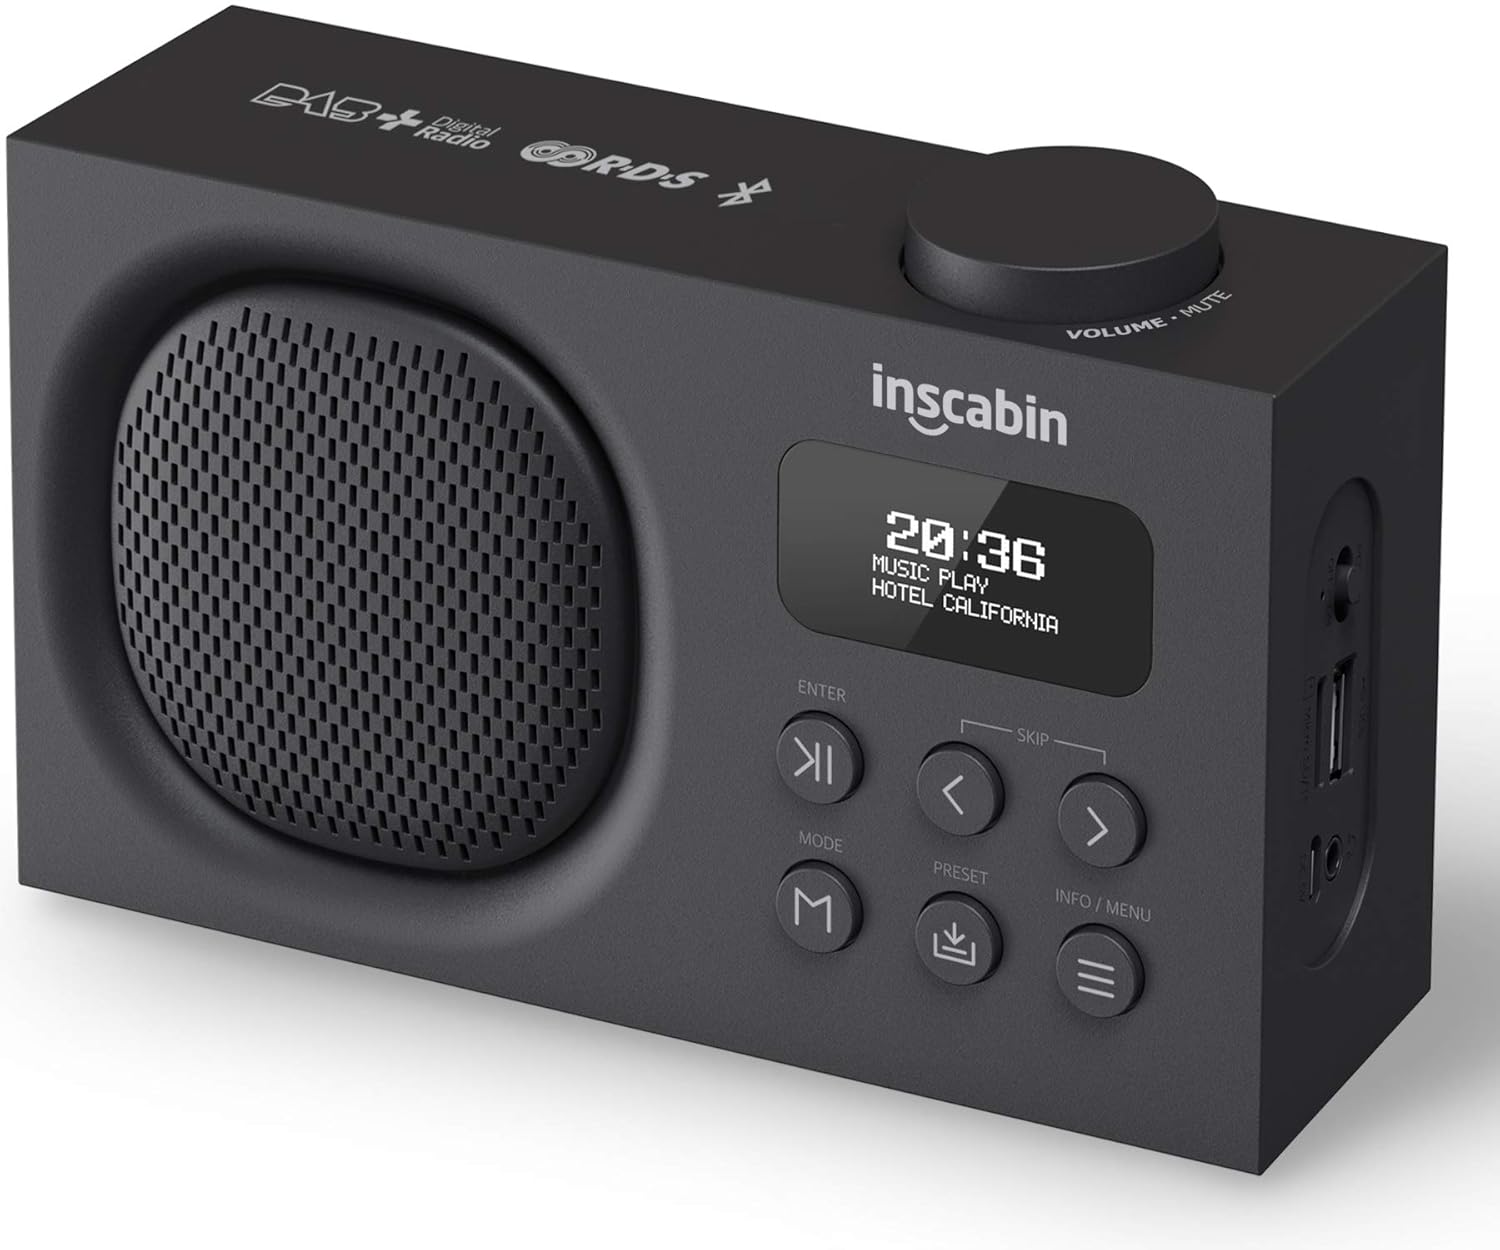
This image displays the front of the Inscabin P2 radio, highlighting its speaker grille, LCD display, control buttons, and the volume knob on top. It provides a clear view of the device's compact design.

This detailed side view of the Inscabin P2 radio clearly labels its various ports: Power Switch, Micro SD/TF card slot, USB input port, Headphone insert slot, and Micro USB charging slot. This helps users identify connection points.
การควบคุมและพอร์ต:
- ปุ่มปรับระดับเสียง/ปิดเสียง: หมุนเพื่อปรับระดับเสียง กดเพื่อปิดเสียง/เปิดเสียง
- จอแสดงผล LCD: Shows time, station information, mode, and menu options.
- ปุ่ม ENTER: ยืนยันการเลือก
- SKIP Buttons (< / >): Navigate menus, skip tracks, or tune stations.
- ปุ่มโหมด: Switches between DAB, FM, Bluetooth, USB, and TF card modes.
- ปุ่มตั้งค่าล่วงหน้า: Accesses or saves preset stations.
- ปุ่มข้อมูล/เมนู: Displays information or accesses the system menu.
- สวิตช์ไฟ: เปิดหรือปิดอุปกรณ์
- Micro SD/TF Card Slot: สำหรับการเล่นเสียง fileจากบัตร TF
- พอร์ตอินพุต USB: สำหรับการเล่นเสียง fileจากไดรฟ์ USB
- Headphone Insert Slot: สำหรับการฟังส่วนตัว
- ช่องชาร์จ Micro USB: สำหรับชาร์จแบตเตอรี่ภายใน
4. การตั้งค่า
4.1 การชาร์จแบตเตอรี่
- Connect the provided Micro USB cable to the Micro USB charging slot on the side of the radio.
- Connect the other end of the USB cable to a USB power adapter (not included) or a powered USB port.
- The charging indicator on the display will show the charging status. A full charge typically takes several hours.
- Once fully charged, disconnect the charging cable. The built-in 1800mAh battery provides over 10 hours of playback.
4.2 การเปิดเครื่องครั้งแรก
- Ensure the radio is charged or connected to power.
- Slide the Power Switch to the 'ON' position.
- The display will light up, and the device will typically start in DAB mode or the last used mode.
4.3 การจัดวางตำแหน่งเสาอากาศ
For optimal reception in DAB and FM modes, extend the telescopic antenna fully and adjust its position. Experiment with different angles to find the best signal strength.
5. คู่มือการใช้งาน
5.1 เปิด/ปิดเครื่อง
- To turn on, slide the Power Switch to 'ON'.
- To turn off, slide the Power Switch to 'OFF'.
การเลือกโหมด 5.2
กดปุ่ม โหมด button repeatedly to cycle through the available modes: DAB, FM, Bluetooth, USB, and TF Card.
5.3 โหมดวิทยุ DAB/DAB+
- Switch to DAB mode using the โหมด ปุ่ม.
- Upon first use or if no stations are found, the radio will automatically perform a full scan for available DAB/DAB+ stations. This may take a few minutes.
- เมื่อการสแกนเสร็จสิ้น สถานีแรกที่ว่างจะเริ่มเล่นเพลง
- ใช้ SKIP (< / >) buttons to navigate through the list of available stations. Press เข้า เพื่อเลือกสถานี
- การบันทึกค่าที่ตั้งล่วงหน้า: หากต้องการบันทึกสถานี ให้ปรับไปยังสถานีที่ต้องการ จากนั้นกดปุ่มค้างไว้ พรีเซ็ต ปุ่ม ใช้ปุ่ม SKIP (< / >) buttons to select a preset number (1-10), then press เข้า เพื่อยืนยัน.
- การเรียกคืนค่าที่ตั้งไว้ล่วงหน้า: กดปุ่มสั้นๆ พรีเซ็ต ปุ่ม จากนั้นใช้ปุ่ม SKIP (< / >) buttons to select your desired preset, and press เข้า.
- DAB Information: กดปุ่ม ข้อมูล/เมนู button to cycle through various information displays such as program type, signal strength, bit rate, and date/time.
โหมดวิทยุ FM 5.4
- สลับไปที่โหมด FM โดยใช้ โหมด ปุ่ม.
- สแกนอัตโนมัติ: To automatically scan and save FM stations, press and hold the ข้อมูล/เมนู button. The radio will scan and store stations with strong signals.
- การปรับด้วยตนเอง: กดปุ่มสั้นๆ SKIP (< / >) buttons to fine-tune the frequency in small increments. Press and hold the SKIP (< / >) ปุ่มสำหรับสแกนหาสถานีที่ว่างอยู่ถัดไปโดยอัตโนมัติ
- การบันทึกค่าที่ตั้งล่วงหน้า: Similar to DAB mode, tune to the desired FM station, then press and hold the พรีเซ็ต ปุ่ม ใช้ปุ่ม SKIP (< / >) กดปุ่มเพื่อเลือกหมายเลขที่ตั้งไว้ล่วงหน้า จากนั้นกด เข้า.
- การเรียกคืนค่าที่ตั้งไว้ล่วงหน้า: กดปุ่มสั้นๆ พรีเซ็ต ปุ่ม จากนั้นใช้ปุ่ม SKIP (< / >) buttons to select your desired preset, and press เข้า.
5.5 โหมดบลูทู ธ
- เปลี่ยนไปใช้โหมดบลูทูธโดยใช้ โหมด button. The display will show "Bluetooth Pairing" or similar, indicating it's ready to connect.
- บนอุปกรณ์ที่รองรับบลูทูธ (สมาร์ทโฟน แท็บเล็ต) ให้เปิดใช้งานบลูทูธและค้นหาอุปกรณ์ที่ใช้งานได้
- Select "Inscabin P2" from the list of devices.
- Once paired, the radio will confirm the connection, and you can now stream audio from your device to the Inscabin P2.
- Use your connected device or the radio's SKIP (< / >) buttons to control playback (play/pause, next/previous track).
5.6 USB/TF Card Playback Mode
- Insert a USB drive into the USB input port or a TF card into the Micro SD/TF card slot.
- Switch to USB or TF Card mode using the โหมด button. The radio will automatically detect and begin playing compatible audio files.
- ใช้ SKIP (< / >) buttons to navigate between tracks. Press เข้า เพื่อเล่น/หยุดชั่วคราว
5.7 Alarm Clock, Sleep Timer, and Snooze
The Inscabin P2 features two independent alarms, a sleep timer, and a snooze function.
- การตั้งค่าการเตือน: Access the alarm settings via the ข้อมูล/เมนู button. You can set two separate alarms with options for alarm source (DAB, FM, or Buzzer) and volume.
- เวลานอน: Set a duration after which the radio will automatically turn off. This is typically found in the system settings menu.
- ฟังก์ชั่นเลื่อน: เมื่อสัญญาณเตือนดังขึ้น ให้กดปุ่ม เข้า button (or another designated button) to activate snooze, which will temporarily silence the alarm for a short period before it sounds again.
5.8 การตั้งค่าระบบ
กดปุ่มค้างไว้ ข้อมูล/เมนู button to access the system settings. Here you can adjust:
- เวลา/วันที่: Manually set or synchronize with DAB/FM broadcast.
- ภาษา: Select from nine supported languages.
- แสงไฟด้านหลัง: Adjust brightness and timeout.
- รีเซ็ตเป็นค่าเริ่มต้นจากโรงงาน: รีเซ็ตการตั้งค่าทั้งหมดเป็นค่าเริ่มต้น
6. การบำรุงรักษา
6.1 การทำความสะอาด
- ถอดสายไฟออกทุกครั้งก่อนทำความสะอาด
- Use a soft, dry, lint-free cloth to wipe the exterior surfaces of the radio.
- ห้ามใช้สารทำความสะอาดที่มีฤทธิ์กัดกร่อน ขี้ผึ้ง หรือตัวทำละลาย เพราะอาจทำให้พื้นผิวเสียหายได้
6.2 การดูแลแบตเตอรี่
- เพื่อยืดอายุการใช้งานแบตเตอรี่ ควรหลีกเลี่ยงการปล่อยแบตเตอรี่จนหมดบ่อยครั้ง
- หากเก็บรักษาอุปกรณ์ไว้เป็นเวลานาน ควรชาร์จแบตเตอรี่ให้ได้ประมาณ 50% และชาร์จใหม่ทุกๆ สองสามเดือน
- อย่าให้แบตเตอรี่สัมผัสกับอุณหภูมิที่สูงเกินไป
6.3 พื้นที่จัดเก็บ
When not in use, store the radio in a cool, dry place, away from direct sunlight and excessive dust.
7 การแก้ไขปัญหา
If you encounter issues with your Inscabin P2 radio, please refer to the following common problems and solutions:
| ปัญหา | สาเหตุที่เป็นไปได้ | สารละลาย |
|---|---|---|
| ไม่มีไฟ/อุปกรณ์ไม่เปิดใช้งาน | Battery is depleted; Power switch is off; Faulty charging cable/adapter. | Charge the battery; Ensure power switch is 'ON'; Try a different charging cable/adapter. |
| การรับสัญญาณวิทยุ DAB/FM ไม่ดี | เสาอากาศไม่ได้ยืดออก; บริเวณที่มีสัญญาณอ่อน; มีสัญญาณรบกวน | Fully extend and adjust the telescopic antenna; Move the radio to a location with better signal; Avoid placing near other electronic devices. |
| Bluetooth won't connect | Radio not in Bluetooth mode; Device not discoverable; Already connected to another device. | Ensure radio is in Bluetooth mode; Make sure your device's Bluetooth is on and searching; Disconnect from other devices; Try restarting both devices. |
| No sound from USB/TF card | โหมดไม่ถูกต้อง; ไม่เข้ากัน file รูปแบบ; สื่อเสียหาย. | Ensure radio is in USB/TF mode; Check if audio files are in a supported format (e.g., MP3); Try a different USB drive/TF card. |
| นาฬิกาปลุกไม่ส่งเสียง | Alarm not set correctly; Alarm volume too low; Device powered off. | Verify alarm settings (time, source, volume); Ensure the device is on or in standby mode. |
8. ข้อมูลจำเพาะ
Detailed technical specifications for the Inscabin P2 Portable DAB/DAB+FM Digital Radio and Bluetooth Speaker.
| คุณสมบัติ | ข้อมูลจำเพาะ |
|---|---|
| ยี่ห้อ | Inscabin |
| หมายเลขรุ่น | 054114293711 |
| ขนาดสินค้า | 16 x 9 x 5 ซม. |
| น้ำหนักสินค้า | 540 กรัม |
| เทคโนโลยีจูนเนอร์ | DAB Plus, FM |
| ความถี่ตบเบาๆ/ตบเบาๆ+ | แบนด์ III 174.928-239.20MHz |
| คลื่นความถี่เอฟเอ็ม | Band II 87.5-108MHz |
| เวอร์ชันบลูทูธ | บลูทูธ 5.0 |
| เทคโนโลยีการเชื่อมต่อ | อุปกรณ์เสริม, บลูทูธ, USB |
| ประเภทจอภาพ | จอแอลซีดี |
| กำลังขับของลำโพง | 7 วัตต์ RMS |
| แหล่งพลังงาน | ใช้พลังงานจากแบตเตอรี่ |
| ประเภทแบตเตอรี่ | ลิเธียมโพลีเมอร์ 1 อัน (รวมอยู่ด้วย) |
| ความจุของแบตเตอรี่ | 1800mAh (approx. 10+ hours playback) |
| คุณสมบัติพิเศษ | Lightweight, Portable, Rechargeable, Dual Alarm Clock, Sleep/Snooze Function, USB/TF Card Playback |
| ภาษาที่รองรับ | Nine languages for system operation |
9. การรับประกันและการสนับสนุน
The Inscabin P2 Portable DAB/DAB+FM Digital Radio and Bluetooth Speaker comes with a standard manufacturer's warranty. Please refer to the warranty card included in your product packaging for specific terms and conditions, including warranty duration and coverage details.
For technical support, troubleshooting assistance, or warranty claims, please contact Inscabin customer service through the contact information provided on your purchase receipt or the official Inscabin website. When contacting support, please have your model number (P2) and purchase date ready.