1. บทนำ
Thank you for choosing the Walfront LCD Digital Programmable Weekly Timer Switch. This device is designed for automatic control of various electrical appliances based on user-defined schedules. Please read this manual carefully before installation and operation to ensure proper use and to prevent damage.
2. ข้อมูลด้านความปลอดภัย
คำเตือน: การติดตั้งระบบไฟฟ้าควรดำเนินการโดยบุคลากรที่มีคุณสมบัติเหมาะสมเท่านั้น ควรตัดกระแสไฟฟ้าก่อนการติดตั้งหรือการบำรุงรักษา เพื่อป้องกันไฟฟ้าช็อต
- ตรวจสอบให้แน่ใจปริมาณอินพุตtage matches the timer's specifications (24V for this model).
- Do not exceed the maximum load capacity of 16A 250VAC (resistive load).
- ควรเก็บอุปกรณ์ให้ห่างจากน้ำและความชื้นสูง
- ห้ามถอดประกอบหรือซ่อมแซมเครื่องด้วยตนเอง หากพบปัญหา โปรดติดต่อฝ่ายสนับสนุน
3. สินค้าหมดview
The Walfront LCD Digital Programmable Weekly Timer Switch is a high-precision device built with durable, moisture-resistant, and corrosion-protected materials. It features a clear LCD display and supports up to 16 ON/OFF programs daily and weekly.
3.1 คุณสมบัติหลัก
- High-quality construction for long lifespan.
- Automatic ON/OFF control for various electrical devices.
- Built-in 1.2V/40mA rechargeable battery for memory retention.
- Industrial-grade chip for high precision and strong anti-interference.
- Up to 16 ON and 16 OFF programming settings per day/week.
- LCD display showing real-time, hour, minute, and ON/AUTO/OFF status.
- DIN rail mounting design.
3.2 ส่วนประกอบ

ภาพที่ 1: ด้านหน้า view of the Walfront LCD Digital Programmable Weekly Timer Switch. Shows the LCD display and control buttons.

ภาพที่ 2: กลับ view of the timer switch, illustrating the wiring terminals and basic electrical specifications printed on the unit.
4. การตั้งค่าและการติดตั้ง
This timer is designed for DIN rail mounting. Ensure the DIN rail is securely installed before attaching the timer.
4.1 แผนผังการเดินสายไฟ

ภาพที่ 3: Wiring diagrams showing direct connection (left) and connection with an AC contactor (right). The direct connection illustrates neutral and live wire inputs and load output. The AC contactor diagram shows 220V power input and output to the load device.
Direct Wiring: Connect the neutral and live wires to the designated input terminals (L and N). Connect the load to the output terminals (typically 3 and 4 for normally open, or 3 and 5 for normally closed, as indicated on the device). Refer to the diagram on the device for exact terminal numbering.
Wiring with AC Contactor: For higher loads, connect the timer to control an AC contactor. The timer's output will switch the coil of the contactor, which in turn controls the main power to the load. This setup is shown on the right side of Image 3.
4.2 การเปิดเครื่องครั้งแรกและการชาร์จแบตเตอรี่
Upon first use, connect the timer to power. The internal 1.2V/40mA rechargeable battery will begin charging. If the display is blank or shows incorrect time, allow it to charge for a few minutes. Press the "รีเซ็ต" button (often labeled with a small 'R' or 'C' and requires a pointed object) to clear all settings and start fresh.
5. คู่มือการใช้งาน
5.1 การตั้งเวลาปัจจุบัน
- กดปุ่ม "CLOCK" button (often labeled with a clock icon) and hold it.
- ขณะถืออยู่ "CLOCK", กดปุ่ม "D+" ปุ่มเพื่อตั้งค่าวันปัจจุบันของสัปดาห์
- ขณะถืออยู่ "CLOCK", กดปุ่ม "H+" ปุ่มตั้งค่าชั่วโมงปัจจุบัน
- ขณะถืออยู่ "CLOCK", กดปุ่ม "M+" ปุ่มสำหรับตั้งค่าเวลาปัจจุบัน
- ปล่อยตัว "CLOCK" ปุ่ม. ตั้งเวลาเรียบร้อยแล้ว
5.2 Setting 12/24 Hour Mode
By default, the timer operates in 24-hour mode. To switch between 12-hour (AM/PM) and 24-hour modes, press and hold the "CLOCK" button for approximately 5 seconds. The display will show "AM" for 12-hour mode or switch back to 24-hour format.
5.3 การตั้งโปรแกรมตารางเวลาเปิด/ปิด
The timer supports up to 16 ON and 16 OFF programs. Each program consists of an ON time and an OFF time.
- กดปุ่ม "PROG" กดปุ่มหนึ่งครั้ง หน้าจอจะแสดง "1 ON"
- กด "D+" to select the day(s) for this ON program (e.g., Mon-Fri, Sat-Sun, or specific days).
- กด "H+" เพื่อตั้งเวลาเปิดใช้งานที่ต้องการ
- กด "M+" เพื่อตั้งค่านาทีที่ต้องการเปิดใช้งาน
- กด "PROG" อีกครั้ง หน้าจอจะแสดง "1 OFF"
- ทำซ้ำขั้นตอนที่ 2-4 เพื่อตั้งเวลาปิดสำหรับโปรแกรมแรก
- กดต่อไป "PROG" to cycle through "2 ON", "2 OFF", up to "16 ON", "16 OFF", setting each as needed.
- หลังจากตั้งค่าโปรแกรมที่ต้องการทั้งหมดแล้ว ให้กดปุ่ม "CLOCK" button to exit programming mode and return to real-time display.
บันทึก: If you need to cancel a program, press the "PROG" button to select the program, then press the "คู่มือ" button until "----" appears on the display for that program's time slot.
5.4 Manual Override (ON/AUTO/OFF)
กดปุ่ม "คู่มือ" ปุ่มสำหรับสลับโหมดการทำงาน:
- บน: เอาต์พุตจะเปิดอยู่ตลอดเวลา โดยไม่สนใจโปรแกรมใดๆ
- อัตโนมัติ: The timer operates according to the programmed ON/OFF schedules.
- ปิด: เอาต์พุตจะปิดอยู่ตลอดเวลา โดยไม่สนใจโปรแกรมใดๆ
ตรวจสอบให้แน่ใจว่าตัวจับเวลาเปิดใช้งานอยู่ "AUTO" mode for programmed operation.
5.5 ฟังก์ชั่นล็อคกุญแจ
To prevent accidental changes to settings, the timer features a key lock function.

ภาพที่ 4: The timer display showing the key lock symbol, indicating that the buttons are locked.
- To lock the keys: Press and hold the "C/R" (Cancel/Reset) button for approximately 4 seconds until a lock symbol appears on the LCD.
- To unlock the keys: Press and hold the "C/R" button again for approximately 4 seconds until the lock symbol disappears.
6. ข้อมูลจำเพาะ
| พารามิเตอร์ | ค่า |
|---|---|
| อินพุต Voltage | AC/DC 24V (This model) |
| Contact Rated Voltage | AC 180V~264V (50/60Hz) |
| ความจุในการรับน้ำหนัก | 16A 250VAC (Resistive Load) |
| เปิด/ปิดการทำงาน | 16 ON / 16 OFF (Manual/Auto) |
| แสดง | จอแอลซีดี |
| การใช้พลังงาน | 4.5VA (Max) |
| ข้อผิดพลาด | ≤2 seconds/day (at 25℃) |
| วิธีการติดตั้ง | DIN Rail (sold separately) |
| ช่วงเวลา | 1 นาทีถึง 168 ชั่วโมง |
| ระยะเวลาขั้นต่ำ | 1 นาที |
| อุณหภูมิในการทำงาน | -10℃ ถึง 55℃ |
| ความชื้นในการทำงาน | ความชื้นสัมพัทธ์ 35-85% |
| ขนาด (กว้าง x ยาว x สูง) | 86 x 36 x 65มม. |
| แบตเตอรี่ภายใน | 1.2V/40mA rechargeable, >15 days backup |
| จำนวนวงจร | Changeover switch (SPDT) |
| อายุการใช้งาน | Mechanical: 107, Electrical: 105 |
| น้ำหนัก | 125กรัม |
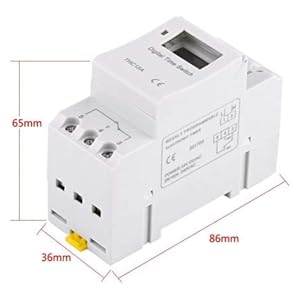
ภาพที่ 5: Diagram illustrating the dimensions of the timer switch: 86mm length, 36mm width, and 65mm height.
7. การบำรุงรักษา
- Keep the timer clean and free from dust. Use a dry, soft cloth for cleaning.
- ห้ามใช้น้ำยาทำความสะอาดที่มีฤทธิ์กัดกร่อนหรือตัวทำละลาย
- ตรวจสอบการเชื่อมต่อสายไฟเป็นระยะเพื่อให้แน่ใจว่ามีความปลอดภัย
- The internal battery is designed for long life and typically does not require replacement. If the timer loses settings frequently after power outages, the battery may need servicing by a qualified technician.
8 การแก้ไขปัญหา
| ปัญหา | สาเหตุที่เป็นไปได้ | สารละลาย |
|---|---|---|
| จอแสดงผลว่างเปล่า | No power supply or internal battery discharged. | Check power connections. Allow the timer to charge for a few minutes after connecting to power. |
| ตัวตั้งเวลาไม่เปิด/ปิดตามที่ตั้งโปรแกรมไว้ | Timer is not in "AUTO" mode, programs are incorrect, or key lock is active. | Press "MANUAL" until "AUTO" is displayed. Review and correct programs. Unlock keys if necessary. |
| ปุ่มต่างๆ ไม่ตอบสนอง | ฟังก์ชันล็อคกุญแจทำงานอยู่ | Press and hold "C/R" for 4 seconds to unlock the keys. |
| เวลาไม่ถูกต้อง | Minor drift (within specifications) or internal battery issue. | Reset and re-set the time. If inaccuracy persists or settings are lost frequently, contact support. |
9. การรับประกันและการสนับสนุน
Walfront strives to provide high-quality products. If you encounter any issues with your product, please contact us for prompt assistance. We offer return and refund services for product defects.
For support, please refer to the contact information provided with your purchase or visit the Walfront store on Amazon: Walfront Amazon Store.