SatLink WS 6909
SatLink WS-6909 DVB-S/DVB-T Combo Satellite Signal Finder Meter User Manual
1. บทนำ
The SatLink WS-6909 is a versatile digital meter designed for aligning both DVB-S (satellite) and DVB-T (terrestrial) signals. Featuring a 3.5-inch high-definition TFT LCD screen, it allows users to view actual channels directly on the device, ensuring quick and accurate signal alignment. The meter includes a unique calibration system for optimal performance and supports various satellite and terrestrial signal parameters.
บันทึก: DVB-T functionality may not be supported in all regions, including America.
2. เนื้อหาบรรจุภัณฑ์
โปรดตรวจสอบว่ารายการทั้งหมดที่ระบุไว้ด้านล่างมีอยู่ในแพ็คเกจของคุณหรือไม่:
- 1 x SatLink WS-6909 Satellite Meter
- อะแดปเตอร์ไฟฟ้า 1 ตัว
- สาย 1 x AV
- 1 x สายชาร์จไฟรถยนต์
- 1 x เคสซิลิโคน
3. สินค้าหมดview
Familiarize yourself with the components and ports of your SatLink WS-6909 meter.

รูปที่ 3.1: ด้านหน้า view of the SatLink WS-6909 meter, showing the 3.5-inch LCD screen, control buttons, and numeric keypad, alongside its protective orange silicone case.

รูปที่ 3.2: ด้านล่าง view of the device, featuring the main power switch, DC power input port, and a USB port for software upgrades.

รูปที่ 3.3: ด้านข้าง view of the meter, illustrating the AV IN and AV OUT ports for connecting external video sources or displays.
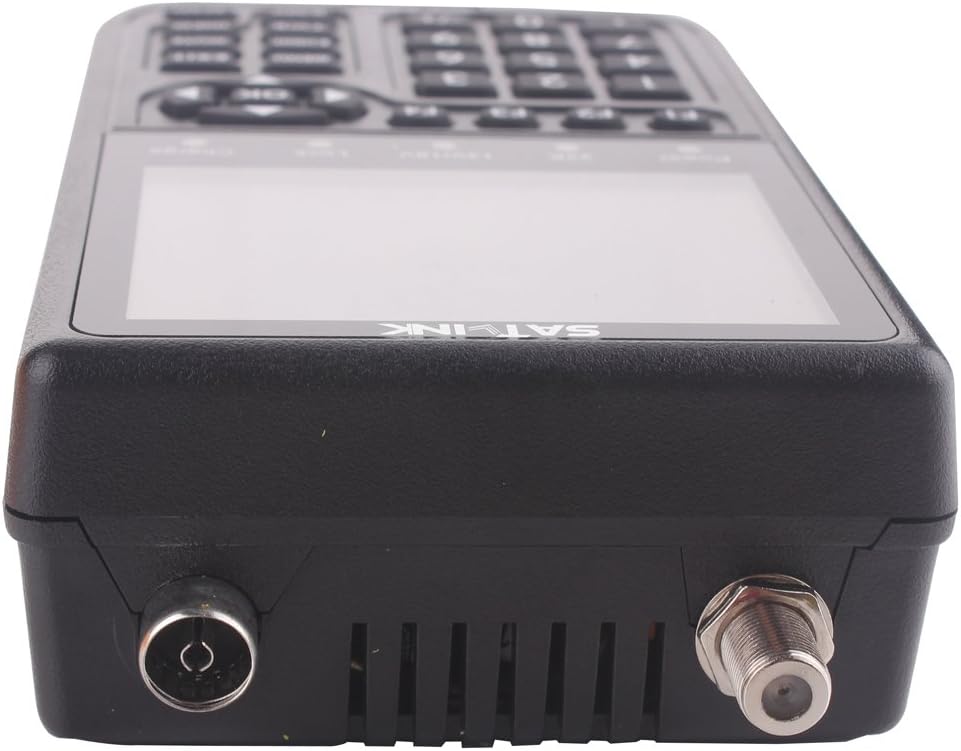
รูปที่ 3.4: สูงสุด view of the device, displaying the F-connector for satellite input and the standard antenna input for terrestrial signals.
4. การตั้งค่า
4.1 การชาร์จอุปกรณ์
- Connect the provided Power Adaptor to the DC input port on the bottom of the meter.
- Plug the Power Adaptor into a standard electrical outlet. The 'Charge' indicator light on the device will illuminate.
- Allow the device to charge fully before initial use. A full charge provides approximately 4 hours of operating time.
- Alternatively, use the Car Charger Cable to charge the device in a vehicle.
4.2 การเปิดเครื่องครั้งแรก
- ตรวจสอบให้แน่ใจว่าอุปกรณ์มีแบตเตอรี่เพียงพอ
- Flip the main power switch located on the bottom of the meter to the 'ON' position.
- The device will power on and perform an automatic calibration for optimal performance.
4.3 Connecting Antennas/LNBs
- For satellite signal reception (DVB-S), connect the LNB cable from your satellite dish to the F-connector input on the top of the meter.
- For terrestrial signal reception (DVB-T), connect your terrestrial antenna cable to the standard antenna input on the top of the meter.
5. คู่มือการใช้งาน
5.1 การนำทางพื้นฐาน
- ใช้ เมนู ปุ่มเพื่อเข้าสู่เมนูหลัก
- Navigate through menu options using the directional arrow buttons (ขึ้นลงซ้ายขวา).
- กดปุ่ม OK button to confirm selections or enter sub-menus.
- ใช้ EXIT ปุ่มสำหรับกลับไปยังหน้าจอก่อนหน้าหรือออกจากเมนู
- The numeric keypad can be used for direct input of values such as frequencies or channel numbers.
5.2 DVB-S (Satellite) Signal Finding
- From the main menu, select the DVB-S measurement mode.
- Configure parameters such as satellite, transponder frequency, symbol rate, and polarity. These settings can be modified by the user.
- The meter supports DISEQC 1.0, 1.1, 1.2, and 22kHz Tone. Adjust these settings as required for your LNB configuration.
- The meter provides LNB power supply options of 18V/13V (maximum 400mA).
- Align your satellite dish while observing the signal strength, quality, BER (Bit Error Rate), S/N (Signal-to-Noise ratio), and PWR (Power) on the 3.5-inch LCD screen.
- The device will provide a sound and light alarm when a signal is locked.
- The meter can automatically calculate Azimuth (AZ) and Elevation (EL) angles to assist with dish alignment.
- Search modes include Auto, Blind, and Manual.
5.3 DVB-T (Terrestrial) Signal Finding
- From the main menu, select the DVB-T measurement mode.
- Configure the desired frequency range.
- The meter supports ANT power supply options of 5V/12V/24V for active antennas.
- Align your terrestrial antenna while observing the signal strength, quality, MER (Modulation Error Ratio), S/N (Signal-to-Noise ratio), and PWR (Power) on the LCD screen.
- The meter supports multichannel checks and demodulation types including QPSK, 16QAM, and 64QAM.
- Search modes include Auto and Manual.
5.4 Software Upgrades
The USB port on the bottom of the device is used for software upgrades. Refer to the manufacturer's webเว็บไซต์สำหรับซอฟต์แวร์และคำแนะนำล่าสุด
6. การบำรุงรักษา
6.1 การทำความสะอาด
- เช็ดทำความสะอาดภายนอกอุปกรณ์ด้วยผ้าแห้งเนื้อนุ่ม
- ห้ามใช้น้ำยาทำความสะอาดหรือตัวทำละลายที่เป็นของเหลว เนื่องจากอาจทำให้เครื่องเสียหายได้
6.2 การดูแลแบตเตอรี่
- เพื่อยืดอายุการใช้งานแบตเตอรี่ ควรหลีกเลี่ยงการวางอุปกรณ์ไว้ในที่ที่มีอุณหภูมิสูงหรือต่ำเกินไป
- ควรชาร์จแบตเตอรี่เป็นประจำ แม้ว่าจะไม่ได้ใช้งานอุปกรณ์บ่อยก็ตาม
6.3 การอัปเดตซอฟต์แวร์
ตรวจสอบข้อมูลจากผู้ผลิตอย่างเป็นทางการเป็นระยะ website for available software updates. Updating the firmware can improve performance and add new features.
7 การแก้ไขปัญหา
| ปัญหา | สาเหตุที่เป็นไปได้ | สารละลาย |
|---|---|---|
| อุปกรณ์ไม่เปิดเครื่อง | Low battery; Power switch off; Faulty power adapter | Charge the battery; Ensure power switch is ON; Try a different power source |
| No signal detected (DVB-S) | Incorrect satellite/transponder settings; LNB not powered; Dish misalignment; Cable issue | Verify satellite and transponder settings; Check LNB power (13/18V); Adjust dish alignment; Inspect cable connections |
| No signal detected (DVB-T) | Incorrect frequency; Antenna not powered (if active); Antenna misalignment; Regional DVB-T incompatibility | Verify frequency settings; Check ANT power (5/12/24V); Adjust antenna alignment; Confirm DVB-T support in your region |
| คุณภาพสัญญาณไม่ดี | Fine-tuning needed; Obstructions; Damaged LNB/antenna | Make small adjustments to alignment; Clear line of sight; Replace faulty components if necessary |
| หน้าจอค้างหรือไม่ตอบสนอง | ข้อผิดพลาดของซอฟต์แวร์ | Perform a hard reset by turning the power switch OFF and then ON again. If persistent, consider a software upgrade. |
8. ข้อมูลจำเพาะ
- แสดง: หน้าจอ TFT LCD ความละเอียดสูง 3.5 นิ้ว
- แบตเตอรี่: 8.4V/3000mAh Li-ion, Max Operating Time: 4 hours
- DVB-S Input Frequency: 950-2150เมกะเฮิรตซ์
- DVB-S Input Level: -65 ถึง -25dBm
- DVB-S Input Impedance: 75Ω
- DISEQC Support: 1.0, 1.1, 1.2 and 22kHz Tone
- LNB Power Supply: 18V/13V (IMax 400mA)
- DVB-T Frequency Range: 46MHz-862MHz
- DVB-T Level Range: 40dBµV-110dBµV
- DVB-T Input Impedance: 75Ω
- DVB-T Demodulation: คิวพีเอสเค, 16คิวเอเอ็ม, 64คิวเอเอ็ม
- ANT Power Supply: 5โวลต์/12โวลต์/24โวลต์
- ประเภทการวัด: Signal strength, quality, BER, S/N, PWR (DVB-S); Signal strength, quality, MER, S/N, PWR (DVB-T)
- โหมดการค้นหา: Auto, Blind, Manual
- ขนาดสินค้า : 3.54 x 1.77 x 6.46 นิ้ว
- น้ำหนักสินค้า: 1.76 ปอนด์
- หมายเลขรุ่น: WS 6909
9. การรับประกันและการสนับสนุน
For technical assistance, warranty information, or customer support, please contact your original retailer or refer to the manufacturer's official website for contact details. Please have your product model number (WS 6909) and purchase information ready when seeking support.
Ask a question about this manual
Ask about setup, troubleshooting, compatibility, parts, safety, or missing instructions. Manuals+ will review the question and use this page’s manual context to help answer it.