TCL TM43N Digital Signage
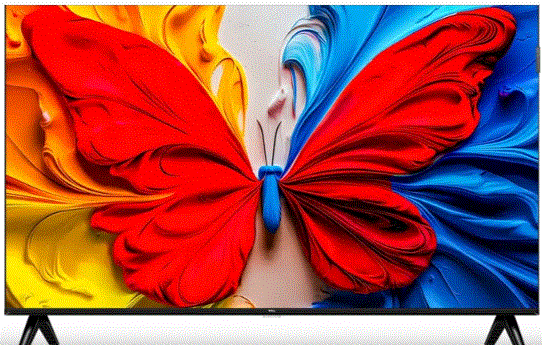
Technical Specifications
- Product Name: Digital Signage
- Models: TMN (TM43N, TM55N, TM65N, TM75N) / TBN (TB43N, TB55N, TB65N, TB75N)
- Display Sizes: 43″, 55″, 65″, 75″
- Functions: Multimedia playback, Network download
SAFETY WARNINGS
Please read and understand the following precautions carefully before using this product, and keep the Manual properly for future inquiry.
- The device shall be kept in a well-ventilated environment.
- No vent holes shall be covered with items such as newspapers, tablecloths and curtains that may impede ventilation device.
- The device shall not be exposed to drops or splashes, and no li
- To prevent tipping hazards, make sure that all edges of the device within the bracket, and do not place the device on any unstable or non-weight bearing carts, racks or tables.
- The device must be securely secured to the wall by professionals.
- Devices of Class I construction (typically with a three-core power cord that needs to be grounded) should be connected to the grid power output socket with protective ground.
- When the multimedia system having the device of Class I construction (typically with a three-core power cord that needs to be grounded) and the device of Class II construction (typically with a two-core power cable without the need to be grounded specially) is connected to the power supply, reliable connection of the protective ground of the device of Class I construction shall be ensured. Devices that need to be connected to the communication network and those that need to be connected to the wired network in the multimedia system must meet the requirements for isolation from the communication network and the wired network. The power plug or appliance coupler serves as the disconnecting device of the device and shall remain readily accessible.
- Terminals marked with
 are live and dangerous, and shall be connected to external wires by trained personnel or to ready-made leads or cords. After the device is moved from a low temperature area to a warm area, the temperature difference may cause water beads in the device. The device shall be powered on only after water beads there in are fully evaporated and disappeared. Batteries (packs
local recycling method for environment protection. - The symbol
 indicates the use of fuses on the neutral line of single-phase equipment that is permanently connected or equipped with non reversible plugs. After the fuse is activated, components that are still live in the equipment may pose a danger during maintenance.
 - Attention
If the battery is not replaced properly, there is a risk of explosion and can only be replaced with batteries of the same or equivalent type. - Warning
To prevent injury, the device must be securely fixed to the wall according to the installation instructions. - The wired network antenna connected to this device must be isolated from the protective grounding, otherwise it may cause fire and other hazards!
DEVICE STABILITY
- The device may tip over, causing serious personal injury or death.
- Never put the device in an unstable position. The device may tip over, causing serious personal injury or death.
Many injuries, particularly to children, can be avoided by taking simple preventive measures such as the following:
- Use cabinets or supports recommended by the device manufacturer.
- Only furniture that can safely support the device can be used.
- Ensure that the device does not protrude over the edge of the supporting furniture.
- Do not place the device on high furniture (such as cabinets or bookshelves) without securing both the furniture and the device to appropriate supports.
- Do not place the device on fabrics or other materials laid between the device and furniture.
- Educate children about the danger of climbing on furniture to reach for the device or its controls.
If an existing device needs to be retained and relocated, the aforementioned precautions should also be taken into consideration.
SAFETY SIGNS
Attention should be paid to the following safety signs on the device:
- It is only suitable for safe use in areas below an altitude of 5000m.
- It is only suitable for safe use in non tropical climate conditions.
CAUTION
- When moving the device, make sure the plug is removed from the power socket and disconnect the audio/video cables are needed for moving the device. The device can be moved upright only.
- Do not touch the power cord or other connected wires and cables in case of thunder or lightning strikes.
- Turn off the device immediately and remove the power plug from the socket if the device the service technicians for inspection and maintenance.
- Do not repair, modify or dis assemble the device without permission.
- In case of any faults, contact the service technicians for inspection and maintenance.

- Turn off the device immediately and remove the power plug from the socket when the device breaks down Contact the service technicians after have disappeared.
- Unplug the power cord before cleaning the device. The device cannot be cleaned by gasoline, thinner or solvents that may deform be stains when rubber or vinyl products come into contact with the device for a long time.If the casing becomes dirty, wipe it with a soft dry cloth. When cleaning the LCD, gently wipe the LCD surface with the soft dry cloth.
Note: Do not wipe the display and casing with a wet cloth. - When the device is not in use for a long period of time (e.g., on vacation or travel), unplug the power cord from the power socket. The device is not fully disconnected from the power supply even when in standby mode, and will still draw a small amount of current.
- Do not stand on or climb on the device.

ENVIRONMENTAL PRECAUTIONS AND INSTRUCTIONS
- Everyone has the responsibility and obligation to protect the environment. You should pay attention to the following when using the product.
- Energy saving: Energy saving is not only essential for environment protection, but also can reduce cost of electricity.
- When the device is not in use, turn off the power switch (cut off the power) to save energy.
- The device also consumes electric energy in standby state. If it is not in use for a long time, turn off the power switch AS MUCH as possible, and do not leave the device in standby state for a long time.
- Power consumption during use can be reduced by reducing the luminance of the display. It is advised to select the operating mode as required. For devices with a backlight luminance adjustment function, the power consumption of the display can be reduced by reducing the backlight luminance of the display.
ACCESSORIES
Check whether the following accessories can be found in the packing box, if not, contact your local dealer.
- Monitor Unit x1
- Remote Control x1
- Batteries x2
- Power Cables (Includes EU and US power cables.) x2
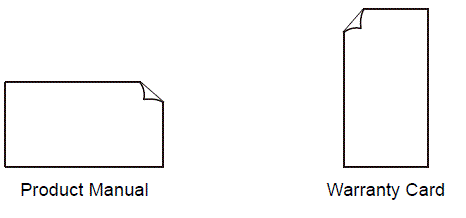
- Product Manual x1
- Warranty Card x1
Note: The accessories in kind shall prevail and are subject to change without notice.
LIST OF OPTIONAL ACCESSORIES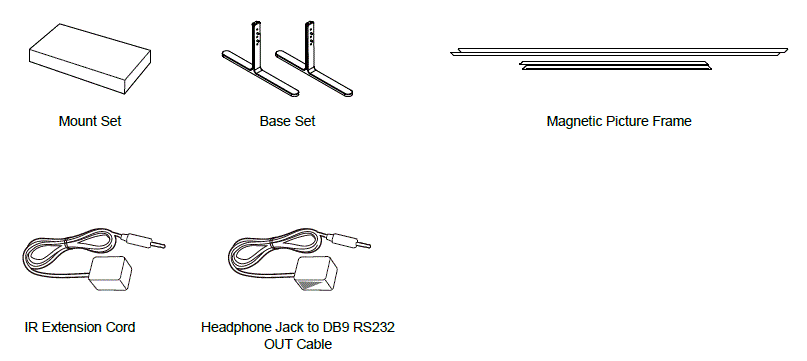
Note: The above accessory illustrations are for reference only, and the actual product may vary.
FUNCTIONS AND FEATURES
Functions
- Commercial-grade quality standard, 7 *24-hour continuous operation, IP5X dustproof certification, a wide range of applications;
- True standby technology and built-in RTC clock module facilitate ultra-low power consumption and scheduled power on/off functions to promote energy conservation and environmental sustainability. Anti-burn-in screen settings significantly enhance the screen’s durability and lifespan;
- Wired network and Wi-Fi (including enterprise Wi-Fi) connections, along with domain name user authentication login, ensure efficient wireless cooperation;
- Multiple interfaces: 2-channel USB (disabled by software), 2-channel HDMI IN, I-channel Audio OUT, I-channel RS232 IN, I-channel RS232 OUT, I-channel
- RJ45, I-channel IR IN and I-channel DP (only for TM series)
- High hardware configuration, Android 13, 3+16G (TB series)/4+32G (TM series), ultra-large memory, smooth operation without jamming, support R232 interface, convenient for users to realize centralized control function;
Multiple mainstream media formats:
- Picture decoding: JPG, JPEG, BMP and PNG
- Audio decoding: MP2/MP31WAV/OGG/FLAC/Ape/AAC/M4A/AlF/AlFF/ALAW/alaclWMA
- Video decoding: DAT,MPG, TS,MPEG, TP, VOB,AVI, MP4, MOV, 3G2, MKV, M2TS, MTS, M4V, FLV, F4V,
Features
Ultra-slim and minimalist body design, uniformly narrow bezels, and stylish appearance;
- The central VESA holes support horizontal/vertical installation and can be matched with an ultra-thin mount to realize seamless wall installation- Additionally, the accompanying magnetic picture frame delivers the ultimate artistic experience of the product;
- Ultra-HD 4K resolution, commercial AG25% anti-glare screen, NTSC 72% (TB series)/DCl-P3 93% (TM series), high color gamut, rich and delicate picture details, restoring real colors;
- High brightness 400nit (TB series)/500nit (TM series), clearer and brighter picture than TV, more suitable for commercial scenarios than traditional TV;
- Automatic white balance and image quality tuning technology, no color difference for multi-screen display;
- Pure Android system ensures immersive experience;
- Built-in TCL EShow multimedia information release system realizes remote information release and remote management of the device;
- Support import of videos, audio, and pictures via USB drive, local stand-alone playback, and automatic playback upon startup;
- Open API interface ensures compatibility with customer software and customer applications can be automatically activated upon startup-
Note: The performance of this product is continuously being improved. All product specifications (including appearance and color) are subject to the actual product and may be updated without prior notice-
WALL MOUNTING
- Remove the screws from the mounting holes of the rear cover mount.
Note: Some models may come with two screws, four screws, or no screws at all. - Use VESA screws to lock the mount to the complete device (top VESA holes). Two M6×16 screws, packed with mount.

- The mount installation is completed.
- Hang the device on the wall according to the mount instructions.

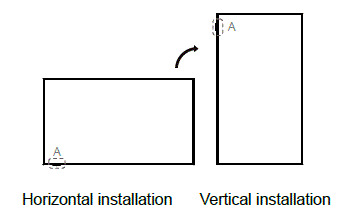
Notes: 1. The steps are for illustration only, and the product appearance shall be subject to the physical object; 2. The complete device does not include a mount as a standard accessory. If needed, please purchase it separately and refer to the corresponding mount instructions for proper setup.
WALL MOUNTING SPECIFICATIONS
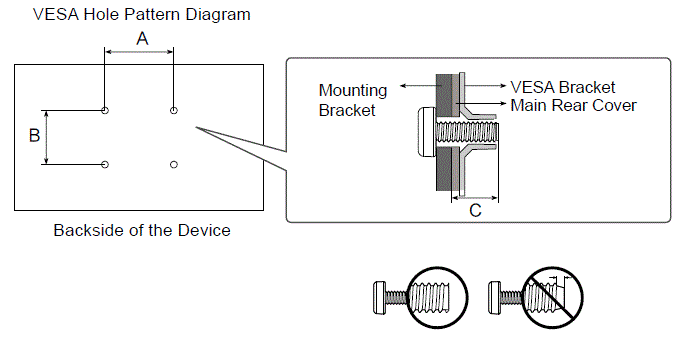
| Model Name | VESA screw hole specs (A * B) in millimeters | C(mm) | Standard Screw | Quantity |
| TM43N/TB43N | 300 x 300 | 14.5 | M6 | 2 |
| TM55N/TB55N | 200 x 400 | |||
| TM65N/TB65N | 300 x 400 | |||
| TM75N/TB75N | 300 x 600 |
REMOTE CONTROL KEYS AND INSTRUCTIONS
Schematic Diagram of Remote Control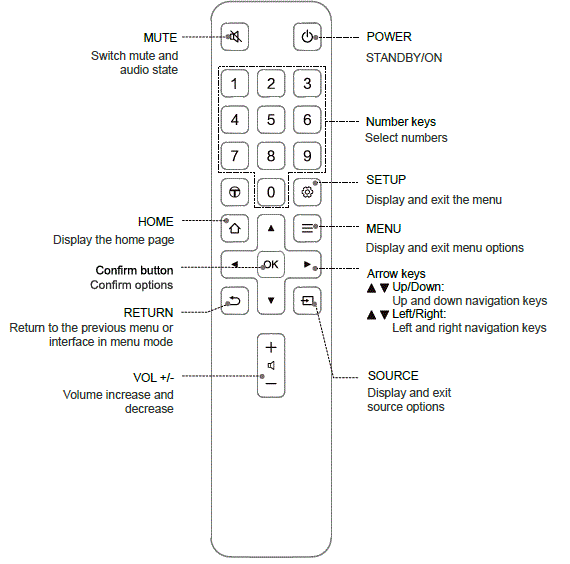
Installation Diagram of Remote Control
Batteries
- Push aside the battery compartment cover;
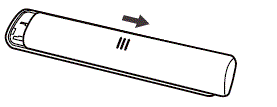
- Place two AAA batteries accordingly to the polarity marked in the battery compartment;

- Push to close the battery compartment cover.
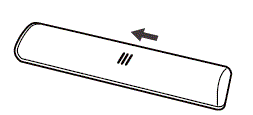
Note: For reference only, which may vary for different models.
Precautions for use of remote control:
- When operating the main unit with the remote control, aim at the screen’s reception area. If the remote control is unresponsive, you can pull down the key box and direct the box for remote operation. If there is an obstacle between the main unit and the remote control, it may result in malfunction.
- To ensure optimal performance of the remote control, please replace the battery immediately if abnormal operation is found after long-time use of the battery.
- Do not mix new and old batteries or batteries of different types.
- When the battery power is low, it may leak electrolytes, which can damage the remote control. Please replace the battery immediately once it is found that the power is low or the remote control does not work.
- If the remote control is not used for a long time, please take out the battery to prevent electrolyte leakage from the battery.
- When the remote control is not in use, please store it in a cool and dry place. Avoid direct sunlight, exposure to heat, and storing it in damp areas.
- The system can activate the remote control lock, which will prevent infrared remote control from operating the device. To unlock, please try the following operations:
- Press the “1003” button followed by the “OK” button. After seeing the prompt to unlock the remote control, attempt to operate it.
- Press the “Up/Down/Left/Right” button followed by the “OK”button. After seeing the prompt to unlock the remote control, attempt to operate it.
CONNECTION
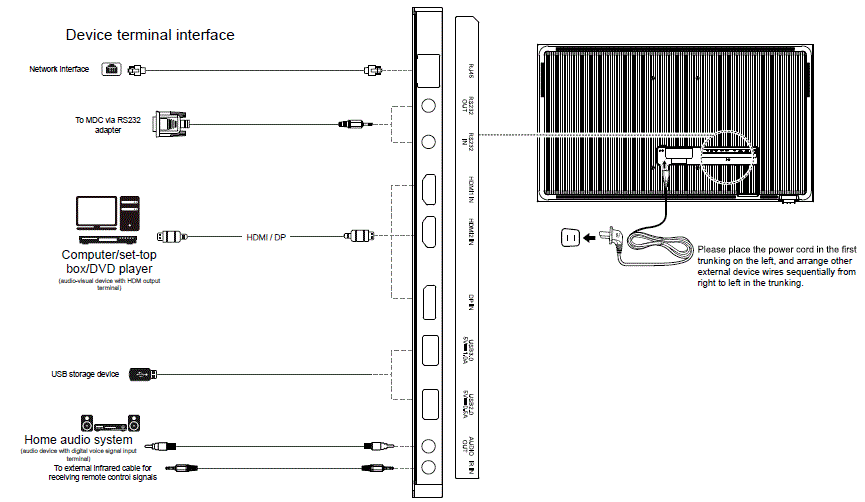
Tips:
- The HDMI port supports the HDM12.1 standard, HDM11/2 supports 4K@60Hz. However, there may be issues with external HDMI devices if their version is too low, which could result in malfunction.
- The DP interface is only supported in the TM series, with a capability of 4K@60Hz. Actual performance may vary depending on the specific product.
Schematic Diagram of Wired Network Connection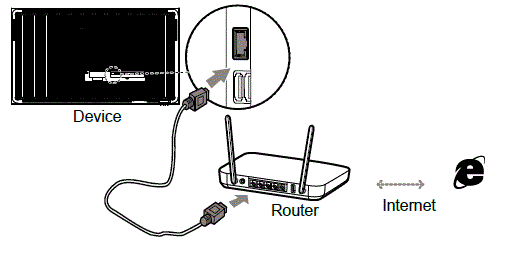
Schematic Diagram of Wireless Network Connection
Tips:
When the device experiences intermittent blurred-screen display issues during use, it is recommended to reposition the router at a distance of approximately 30 cm from the device to determine if the issue resolves, thereby eliminating potential interference from the router.
Network connection and settings
This device offers two connection options for users to choose from.
- Wired network connection and settings
If the user’s network can dynamically obtain an IP address, select “Automatically Obtain IP Address” for network connection. If a static IP address needs to be input, select “Manually Set IP Address”. After entering the manual IP address input interface, press the OK button to call out the soft keyboard, press the Up/Down/Left/ Right button to select numbers, and then press the OK button to the input. After entering each set of numbers, proceed to the next input remote control to exit the soft keyboard, then select “Connect” to initiate the automatic network connection. - Wireless network settings
When utilizing Wi-Fi to connect to a wireless network, the network connection can be established by adjusting the settings within this menu. Select “Settings —> All Settings —> Network —> Wireless Network —> Wi-Fi Switch”.
DEVICE APPEARANCE
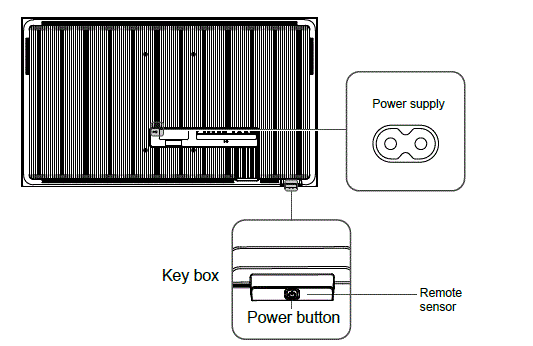
| Remote sensor |
|
 Pull out the key box and use the remote control for remote operation. Pull out the key box and use the remote control for remote operation. | |
| Key box |  No matter whether the key box extends from the bottom of the product, it does not No matter whether the key box extends from the bottom of the product, it does not |
| Power button |
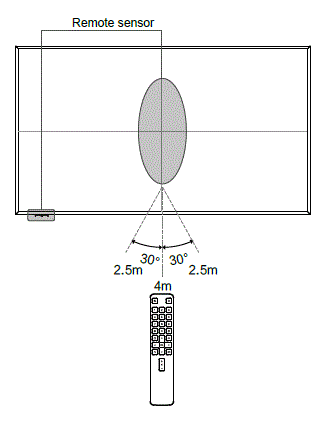
- Remote sensor on the screen: Within a distance of 2.5 m to 4 m from the sensor on the product, operate the remote control at an angle of up to 30° to the left and right.
- Remote sensor on the bottom: Within a distance of 7 m to 10 m from the sensor on the product, operate the remote control at an angle of up to 30° to the left and right.
BASIC FUNCTIONS OF DEVICE
Startup
Connect the AC power supply, and the device will start up automatically When the device is on standby, press the ![]() button on the remote control or device to start up the device-
button on the remote control or device to start up the device-
Shutdown
When the device is turned on, short press the ![]() button on the remote control to enter the standby state; short press the Standby button on the device to enter the standby state.
button on the remote control to enter the standby state; short press the Standby button on the device to enter the standby state.
Note: In case of power failure or out-of-service for a long time, please unplug the power cord from the socket in time-
Function entry
Enter the home page of the device, and press the Left/Right button on the remote control to select different function entries, When the focus of the remote control moves to these function entries, relevant applications will be disp)ayed on the interface.
DISCLAIMER
- Please keep the Warranty Bill properly. This Warranty Bill and the purchase invoice together serve as the warranty certificate for free maintenance service within the warranty period.
- Valid certificate of warranty:
- In case of product failure within the warranty period, consumers shall enpy free maintenance service by the purchase invoice and the Warranty Bill. To enjoy the free maintenance service, the serial number of the product to be repaired must be consistent with that of the product on the Warranty Bill.
In absence of a purchase invoice, the date of manufacture indicated by the serial number is postponed by 30 days as the start of the warranty period. Without the purchase invoice and the Warranty Bill, consumers cannot enjoy free maintenance service but are charged for service. - Installation and debugging records cannot serve as the warranty certificate alone, but must be accompanied by valid invoices.
- In case of product failure within the warranty period, consumers shall enpy free maintenance service by the purchase invoice and the Warranty Bill. To enjoy the free maintenance service, the serial number of the product to be repaired must be consistent with that of the product on the Warranty Bill.
- To the maximum extent permitted by law, this warranty does not cover, and a warranty claim cannot be in respect of, any los, damage, failure or defect relating to or arising from any one or more of the following:
- improper set up, installation or positioning of the product, or improper adjustment of settings or controls associated with the product;
- Normal wear and tear of the product;
- The product not being used or maintained in accordance with the manufacturer’s instructions, specifications or recommendations;
- Dismantling, repairing, servicing or other work calmed out on or in relation to the product by any person other than an authorized repairer or authorized service provider,
- Use of defective or incompatible parts or accessories in relation to the product;
- Accident, theft, vandalism, misuse, abuse, negligence, collision with another object, operation of a computer virus, fire, flood, liquid spillage or ingression, earthquake, thunderstorm activity, acts of God or any other event or circumstance occurring in relation to the product which is beyond the reasonable control of TCL;
- Defective pixés in the product where the visible number of those defective pixels in less than or equal to the acceptable number of defective pixels state in the manufacturer’s specifications (or where there are no such specifications relating to defective pixels for the product, there are less than 12 defective pixels), it Iain acknowledged that a normal limitation of the technology for LCD and plasma panels (and the associated processes) is for the screen to exhibit some bright dark or partially lit pixels;
- Exposure of the product to excessive heat or moisture or other environmental conditions, including dust, rodents, insect, rust, corrosion, salt build-up or inadequate ventilation;
- Viewing of an image or images on the display screen of the product for an extended period of time, ii being acknowledged that permanent damage can occur to a product if still or repetitive images are left or used on the screen for an extended period of time;
- Electrical issues, including power surges, spikes or dips, or incorrect or fluctuations in voltage or current;
- Externally or other interference resulting from or caused by or to other products and/or sources;
- Incompatibility with or configuration of equipment connected to the product;
- Inability of the product to read or output damaged or copied media;
- Any error or failure in software applications, content and/or service provided by a person or entity (other than TCL) which are accessed through the product;
- Use of any other equipment, systems, utilities, services, applications, parts or other items not supplied or authorized by TCL;
- Cosmetic, structural or mounting items associated with the product, including brackets, wall mounts, shelves or doors; and
- Consumable (for example, bulbs, globes, batteries and cables) or lost parts or accessories associated with the product.
- Without limiting the other provisions of this warranty and to the maximum extent permitted by law, this warranty will not apply, and TCL will not be liable under any warranty claim, in relation to the product if any one or more of the following apply:
- The product was not purchased by you as a brand-new item from TCL or a retailer who at the time of purchase was authorized by TCL to sell the product to you;
- The serial number on the product has been damaged, modified or removed;
- Any internal hardware or software associated with the product has been accessed or tampered without TCL’s prior authority; or
- You breach any provision of this warranty.
- Products beyond the warranty period or the scope of responsibility of warranty will be charged for corresponding services in accordance with the prescribed charge standard.
TECHNICAL SPECIFICATIONS OF THE COMPLETE DEVICE
| Model | Audio output power | Rated Power | Visual image diagonal size | Dimensions (mmxmmxmm) | Weight (kg) |
| TM43N / TB43N | 10W+10W(±15%) | 130W | 43 inches | About 963.4×552.3×27.9 | About 10.3 |
| TM55N / TB55N | 10W+10W(±15%) | 165W | 55 inches | About 1231.8×703.3×27.9 | About 16.7 |
| TM65N / TB65N | 10W+10W(±15%) | 200W | 65 inches | About 1452.3×827.3×27.9 | About 24.9 |
| TM75N / TB75N | 10W+10W(±15%) | 195W | 75 inches | About 1675.0×953.1×29.8 | About 33.0 |
- Supply voltage range: 100-240V ~ 50/60Hz(subject to the warning sign on the back)
- Operating environment :
- Operating temperature: 0℃ – 45℃ Operating humidity: 20%RH-80%RH
- Storage temperature: -20℃ – 60℃ Storage humidity: 10%RH-90%RH
- Altitude: ≤5000m (if the device is marked with an applicable altitude range, the specifications indicated on the device shall take precedence)
- Status display mode: screen display
- Adjustment status indicator : screen window menu
- Network interface : R45/10/100m. BASE
- USB 2.0: 5.0V =500mA
- USB 3.0: 5.0V= 1A(limited to models with USB 3.0)

- TCL KING ELECTRICAL APPLIANCES (HUIZHOU) CO., LTD
- ZHONGKAI NEW HIGH-TECH INDUSTRIES,DEVELOPMENT ZONE SECTION 78,
- HUIZHOU,GUANGDONG,CHINA
FAULT ANALYSIS AND TROUBLESHOOTING HDMI
HDMI Failure
- Check whether the connection cable from the device to the device is plugged in place or re-plug the HDMI cable
- Check whether the resolution of the external device meets the requirements of the device.
No Picture No Sound
- The power outlet switch is not turned on.
- Poor connect of power line.
- Check the signal source.
The Image Has Messy Ripples
Usually cause by local interference. Such as cars, fluorescent lamps, hair dryers, etc.
- No Color
A black screen in computer mode (that is, when it is used as a computer monitor) may be due to the unrecognizable resolution set by the computer. It is recommended to change to the optimal resolution or other Windows system standard resolutions. - Normal Picture, No Sound
Maybe the volume is not turned on, press the volume + key: if there is no physical volume key, adjust the volume in the system settings. - With Sound But No Picture
Adjust the brightness analog amount. - Spark Interference
Black dots, horizontal stripes or„images appear to sway and flap. These phenomena are often cause by the ignition system, neon lights, the interference of electric drill or other electronic device.
FAQ
What should I pay attention to in sow.'are upgrade?
Do not power off during the upgrade process; (2) Do not use the remote control for any operation during the upgrade process; The upgrade process may take a long time (generally about 5 minutes), but the process of downloading the upgrade APK through the network is affected by the network, so it cannot be accurately estimated, so you need to wait patient-ly.
Why is there no obvious change after the software upgrade?
Sometimes the software upgrade is to add new functions, and sometimes it is to improve the performance of the device. Therefore, the content of each upgrade is different. After the upgrade, new functions may be added and there are obvious changes in the interface. Or there may be no changes in the interface and no added functions, but only improved performance.
What if I accidentally touch the power supply during the upgrade process and terminate the upgrade?
Specific treatment methods: if there is a USB disk inserted in the device, please do not remove it, with the USB disk restart, should be able to upgrade; If you didn't start the upgrade with the USB disk, you also need to turn off the device and restart it to see whether it is normal; If you still can't upgrade again, please contact the customer service center.
Documents / Resources
 | TCL TM43N Digital Signage [pdf] Instruction Manual TM43N, TM55N, TM65N, TM75N, TB43N, TB55N, TB65N, TB75N, TM43N Digital Signage, TM43N, Digital Signage, Signage |
