tado WST02 Wireless Receiver

Specifications
- Supports combi boilers with relay (On/Off)
- Compatible with S-Plan & Y-Plan heating systems
- Communicates with boilers using OpenTherm
- Power supply: 230V AC/50 Hz
Product Usage Instructions
Mount the Wireless Receiver X
- Mount the Wireless Receiver to the wall using the included screws.
Wire the Wireless Receiver X
Combi boiler
1. Turn OFF the power before wiring.
2. Use the included strain reliefs on the cable’s outer insulation layer.
3. Mount the Wireless Receiver X to the wall before wiring.
S-/Y-Plan
1. Turn OFF the power before wiring.
2. Use the included strain reliefs on the cable’s outer insulation layer.
3. Mount the Wireless Receiver X to the wall before wiring.
Power the Wireless Receiver X
A. Put the terminal cover on the device and tighten the screw to secure it.
B. Turn the power back ON.
Configuration
A. Check the current configuration by pressing the Select System button once.
B. Press the Select System button again to change the configuration.
C. After selecting, wait for the LED to start blinking and turn solid for confirmation.
Test the system
A. Press Boost Heating or Boost Hot Water button on the Wireless Receiver X to turn it on.
B. Wait for 3 minutes and check if heating or hot water is ON.
C. Press the button again to stop testing and turn heating or hot water OFF.
Close the Wireless Receiver X
Close the main cover of the Wireless Receiver X.
Replacing room thermostat
Replacing an existing room thermostat
![]() Caution!
Caution!
- Turn OFF the power before wiring!
The Wireless Receiver X must be the only device controlling the heating system. To decommission an existing wired room thermostat in the zone intended to be controlled by the Wireless Receiver X, bridge the control wires and insulate the other wires with the 2-terminal connector blocks provided, as illustrated in the images.

For Neutral and Earth, insert only one wire per block, even though the block has more than one opening.
Product Usage Instructions
Mount the Wireless Receiver X
Mount the Wireless Receiver to the wall using the included screws.

Wire the Wireless Receiver X
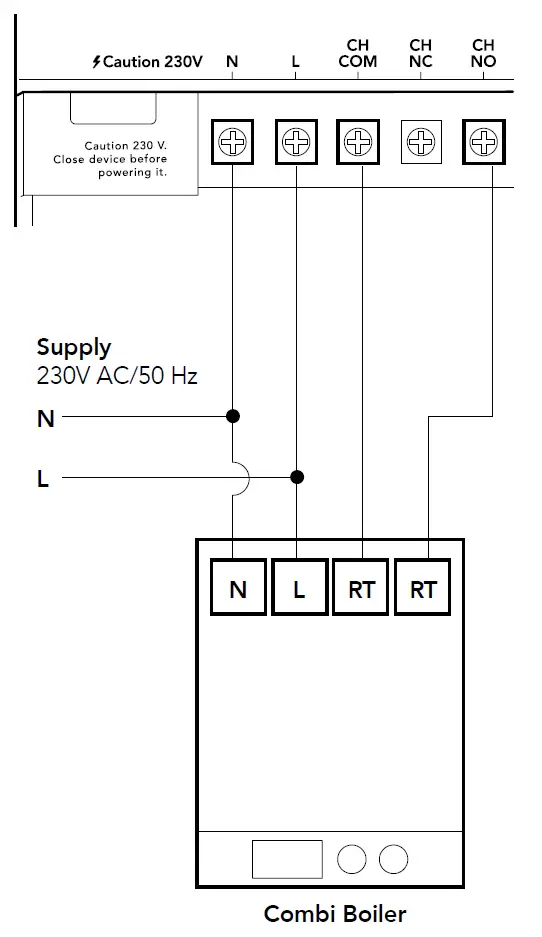
Combi boiler
The default configuration of Wireless Receiver X supports combi boilers with relay (On/Off).
![]() Caution!
Caution!
- Turn OFF the power before wiring!
Always use the included strain reliefs and position them on the outer insulation layer of the cable.
Check the boiler manual before wiring. Identify the control interface and check if it is supported by tado°.
Mount the Wireless Receiver X to the wall before wiring!
Potential Free

Switched Live

![]() Included bridging wires (purple)
Included bridging wires (purple)
S-/Y-Plan
When you connect the Wireless Receiver X to a fully-pumped heating system, you must change the configuration to relay (S-Plan & Y-Plan) to activate hot water control, as described in Step 4.
![]() Caution!
Caution!
- Turn OFF the power before wiring!
Always use the included strain reliefs and position them on the outer insulation layer of the cable.
Check the boiler manual before wiring. Identify the control interface and check if it is supported by tado°.
Mount the Wireless Receiver X to the wall before wiring!
S-Plan

Y-Plan

OpenTherm
The Wireless Receiver X will automatically detect successful digital wiring and communicate with the boiler using OpenTherm.


Power the Wireless Receiver X
A: Put the terminal cover on the device. Tighten the screw to secure it.
B: Turn the power back ON.

Configuration
Configuration is only required if you wire the device to an S- / Y-plan heating system or a gravity-fed system, and hot water control should be activated.
- A: Check the current configuration by pressing the Select System button once.
- B: Press the Select System button again to change the configuration.
- C: After selecting, wait for the LED to start blinking and turn solid to confirmation.

Test the system
- A: If not already active, press the Boost Heating or Boost Hot Water button on the Wireless Receiver X to turn it on. The corresponding LED will light up.
- B: Wait 3 min and check if the heating or hot water is ON.
- C: Press the button on the Wireless Receiver X again to stop testing and turn the heating or hot water OFF.

Please note that the hot water button will be inactive if the configuration is set to Combi boiler (Relay On/Off) or Opentherm.
Close the Wireless Receiver X
Close the main cover of the Wireless Receiver X.


Handover to the customers
Provide customers with the “Get started” card that includes instructions for setting up the device in the tado° app.
More Info
- +44 20 3893 2159


FAQ
- Q: Can I use this product with a gravity-fed system?
- A: Yes, you can use it with a gravity-fed system, but configuration is required for hot water control activation.
- Q: What happens if I don’t turn OFF the power before wiring?
- A: Not turning OFF the power before wiring can result in electrical hazards and damage to the device>
Documents / Resources
 | tado WST02 Wireless Receiver [pdf] Instruction Manual WST02 Wireless Receiver, WST02, Wireless Receiver, Receiver |