E-ACE DMMRUTXB
E-ACE 4.3-Inch Dual Lens Car DVR Rearview Mirror Dash Cam Användarmanual
Model: DMMRUTXB
1. Produkt överview
The E-ACE 4.3-inch Dual Lens Car DVR Rearview Mirror Dash Cam is designed to enhance driving safety by providing comprehensive video recording of your journeys. This device integrates a front-facing camera and supports an optional rear-facing camera, offering a wide field of view and continuous recording capabilities. Its sleek design replaces your existing rearview mirror, providing a discreet and integrated solution for vehicle surveillance.
Key features include a 4.3-inch high-definition display, dual-lens recording, night vision, loop recording, and a G-sensor for automatic incident detection.

Image: The E-ACE rearview mirror dash cam displaying both front and rear camera feeds on its integrated screen.
2. Paketets innehåll
Kontrollera paketet för följande artiklar:
- E-ACE Rearview Mirror Dash Cam Unit
- Billaddare
- Fixed Bandages (for mounting)
- Användarmanual
- Kortläsare
- Tillval: Bak View Camera + Cable (6M or 10M, depending on variant)
- Optional: Buck Line (for parking monitoring power)
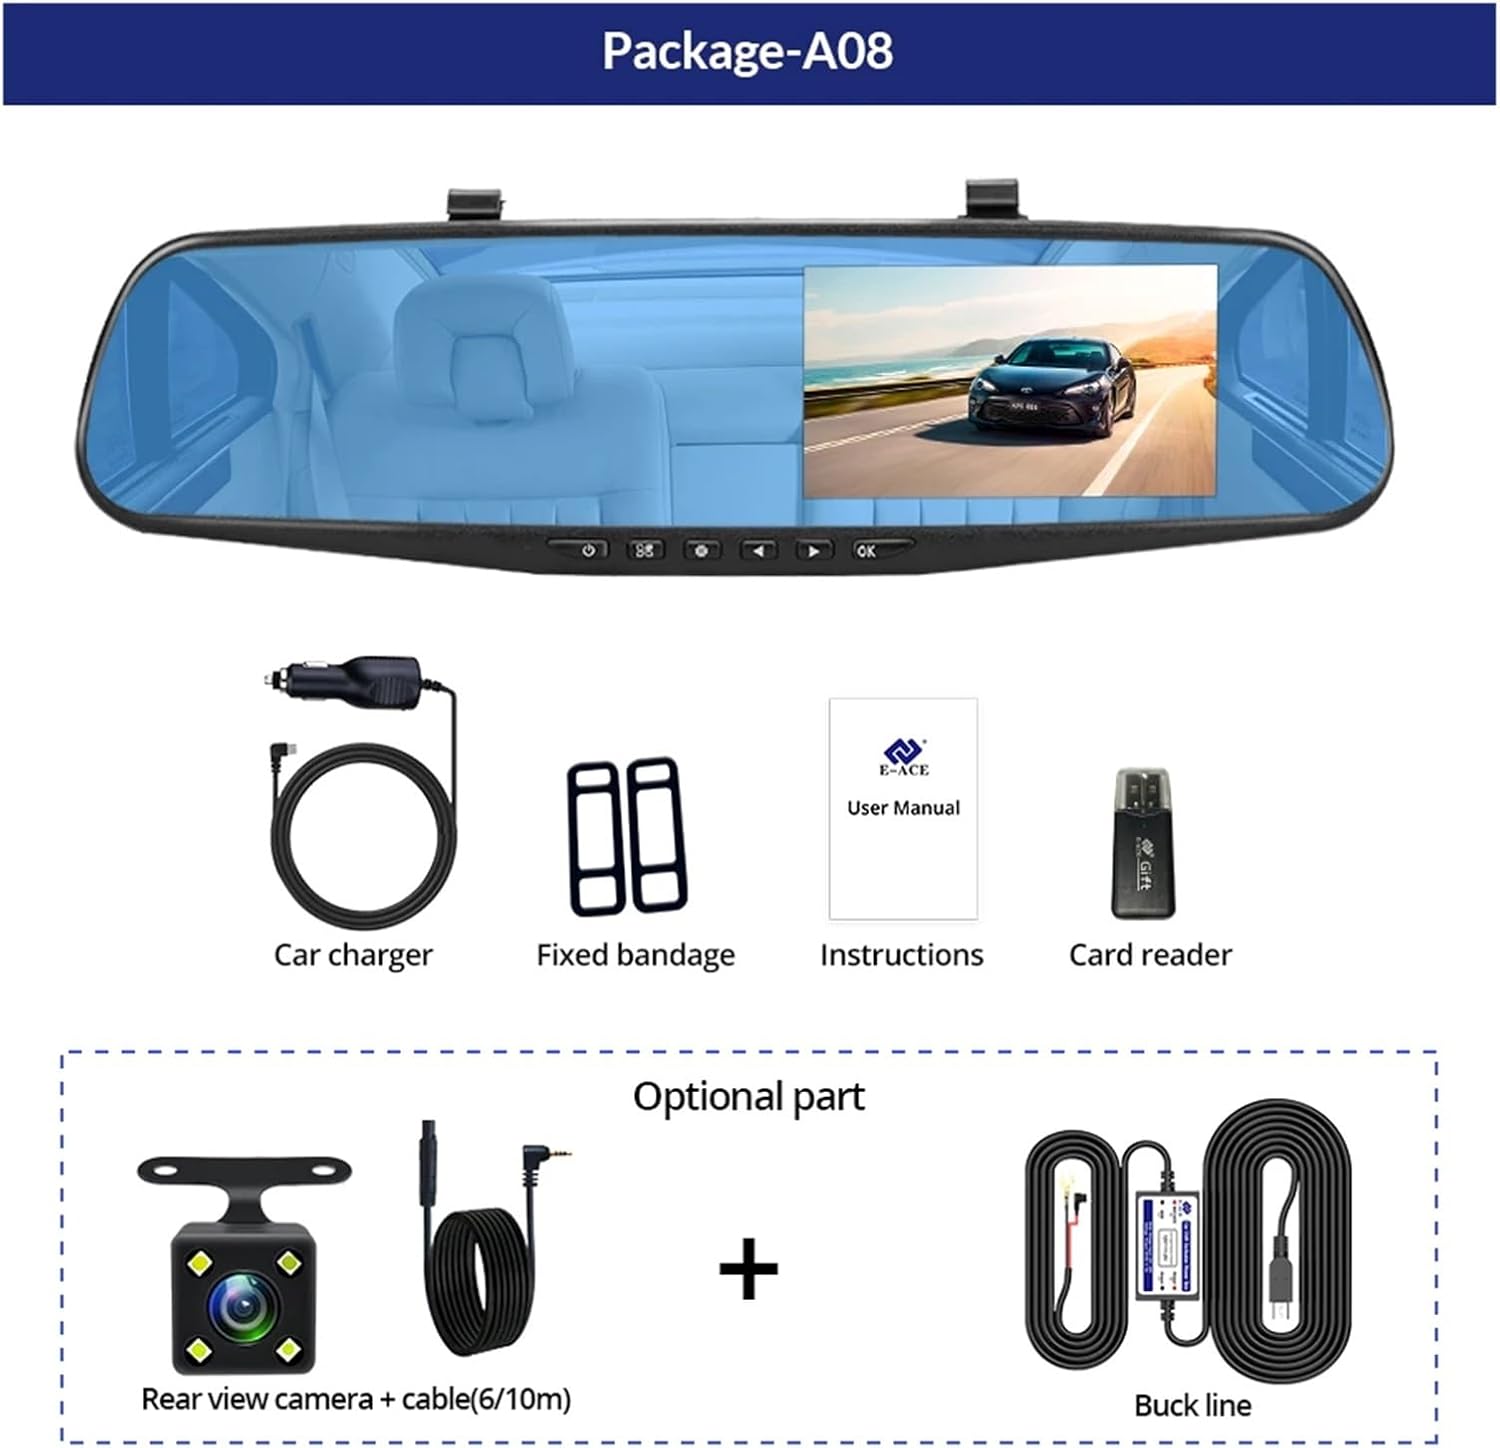
Image: A visual representation of the items included in the E-ACE dash cam package, showing the main unit and accessories.
3. Produktfunktioner
- 4.3-inch High-Definition Display: Provides clear visibility for real-time monitoring and playback.
- Dubbel linsdesign: Captures both front and rear footage simultaneously for comprehensive coverage.
- Built-in Night Vision Technology: Ensures clear recordings in low-light conditions.
- Användarvänlig installation: Sleek rearview mirror design integrates seamlessly into your vehicle.
- Slinginspelning: Skriver automatiskt över den äldsta matentage när minneskortet är fullt, vilket säkerställer kontinuerlig inspelning.
- G-Sensor Feature: Detects sudden movements or impacts and automatically locks the current video file för att förhindra att den skrivs över.
- Parkeringsövervakning: Records video when motion or impact is detected while the vehicle is parked (requires buck line connection).
- 170-graders vidvinkel: Ger ett brett view av vägen framåt.
- Omvänd bild: Visar den bakre kameran view med parkeringsriktlinjerna vid backning.

Image: An illustration highlighting the various functional features of the E-ACE dash cam.
4. Komponentidentifiering
Familiarize yourself with the various parts and controls of your E-ACE dash cam:

Image: A detailed diagram identifying the buttons, ports, and features on the E-ACE dash cam unit.
- PÅ/AV-knapp: Slår på eller av enheten.
- Menyknapp: Åtkomst till inställningar och alternativ.
- Lägesknapp: Switches between video recording, photo, and playback modes.
- UPP -knapp: Navigerar uppåt i menyer eller justerar inställningar.
- Ner-knapp: Navigerar nedåt i menyer eller justerar inställningar.
- OK -knapp: Bekräftar val eller startar/stoppar inspelning.
- TF-kortplats: Insert your MicroSD (TF) card here.
- AV-IN Port: Connects the rear camera.
- USB-port: För strömförsörjning och dataöverföring.
- Återställningsknapp: Resets the device to factory settings (use a thin pin).
- Mikrofon: Spelar in ljud inuti fordonet.
5. Installation och installation
5.1 Sätta i minneskortet
Before installation, insert a high-speed MicroSD (TF) card (Class 10 or higher, up to 64GB recommended) into the TF Card Slot (7) with the contacts facing the screen. Ensure the card is inserted correctly until it clicks into place.
5.2 Montering av dashcam
- Attach the fixed bandages to the back of the dash cam unit.
- Securely strap the dash cam over your vehicle's existing rearview mirror using the fixed bandages. Ensure it is centered and stable.
5.3 Ansluta strömförsörjningen
- Connect the car charger to the USB Port (9) on the dash cam.
- Anslut den andra änden av billaddaren till bilens cigarettändaruttag.
- Route the power cable neatly along the windshield trim to avoid obstructing your view.
5.4 Montera backkameran (valfritt)
- Connect the rear camera cable to the AV-IN Port (8) on the dash cam.
- Route the rear camera cable from the dash cam to the rear of your vehicle. This typically involves tucking the cable under the headliner and along the side pillars.
- Mount the rear camera on the rear windshield or near the license plate using its adhesive or screws. Ensure it has a clear view av vägen bakom.
- If using the reverse image function, connect the red wire from the rear camera cable to your vehicle's reverse light power supply.
6. Bruksanvisning
6.1 Ström på/av
- Automatisk: The dash cam will automatically power on and start recording when your vehicle's ignition is turned on (if connected to a switched power source).
- Manuell: Press and hold the ON/OFF Button (1) to manually power the device on or off.
6.2 Grundläggande användning
- Växla lägen: Press the Mode Button (3) to cycle between Video Recording, Photo, and Playback modes.
- Åtkomstmeny: In any mode, press the Menu Button (2) to enter the settings menu. Use the UP (4) and Down (5) buttons to navigate, and OK (6) to select.
- Starta/stoppa inspelning: In Video Recording mode, press the OK Button (6) to manually start or stop recording.
6.3 Visningslägen
While recording, you can typically switch between different display views by pressing the UP or Down buttons:
- Front Camera Only
- Rear Camera Only
- Picture-in-Picture (Front main, Rear sub-window)
- Picture-in-Picture (Rear main, Front sub-window)
6.4 Slinginspelning
Set the loop recording duration (e.g., 1, 3, or 5 minutes) in the settings menu. When the memory card is full, the oldest unlocked files kommer att skrivas över av nya inspelningar.
6.5 G-sensor
The G-sensor automatically detects collisions or sudden braking. When triggered, it locks the current video file, preventing it from being overwritten by loop recording. Adjust sensitivity in the settings.
6.6 Parking Monitoring (Optional)
If the buck line is installed, the dash cam can monitor your vehicle while parked. When motion or impact is detected, it will automatically record a short video. Enable this feature in the settings.
6.7 Inställning av datum och tid
It is important to set the correct date and time in the system settings for accurate timestamps på dina inspelningar.
7. Underhåll
- Rengöring: Use a soft, dry cloth to clean the lens and screen. Avoid abrasive cleaners or solvents.
- Minneskort: Format the MicroSD card regularly (e.g., once a month) within the dash cam's settings to maintain optimal performance and prevent data corruption. Back up important files innan formatering.
- Temperatur: Avoid exposing the device to extreme temperatures, as this can affect battery life and component integrity.
- Firmware -uppdateringar: Kontrollera tillverkarens website periodically for firmware updates that may improve performance or add features.
8. Felsökning
| Problem | Möjlig orsak | Lösning |
|---|---|---|
| Dashcam slås inte på. | No power supply; faulty charger; loose connection. | Check car charger connection and vehicle's cigarette lighter. Try a different USB cable/charger. |
| Inspelningen stoppas automatiskt. | Memory card full; slow memory card; G-sensor sensitivity too high. | Format the memory card. Use a Class 10 or higher MicroSD card. Lower G-sensor sensitivity in settings. |
| Video footage är suddigt. | Skyddsfilm på objektivet; smutsigt objektiv; felaktig fokusering. | Remove any protective film. Clean the lens with a soft cloth. |
| Backkameran visar inte. | Lös anslutning; felaktig kabel/kamera. | Check the AV-IN connection. Ensure the rear camera is properly installed. |
| Enheten fryser eller kraschar. | Programvaruproblem; minneskortsfel. | Press the Reset Button (10) with a thin pin. Format the memory card. |
9. Specifikationer
- Modellnamn: DMMRUTXB
- Visa: 4.3 tum
- Kamera: Dual Lens (Front & Rear support)
- Videoupplösning: FHD 1920x1080P (Front)
- Drag: Loop Recording, G-Sensor, Night Vision, Parking Monitoring, 170-degree wide angle
- Lagring: Supports MicroSD (TF) card, Class 10 or higher (up to 64GB)
- Anslutning: USB, AV-IN (for rear camera)
- Artikelvikt: Cirka 1.76 ounces (50 gram)
- Paketets mått: Cirka 0.39 x 0.39 x 0.39 tum
- Tillverkare: DMMRUTXB
10. Garanti och support
For warranty information and technical support, please refer to the documentation provided with your purchase or contact the retailer/manufacturer directly. Keep your purchase receipt as proof of purchase.
Ask a question about this manual
Ask about setup, troubleshooting, compatibility, parts, safety, or missing instructions. Manuals+ will review the question and use this page’s manual context to help answer it.