Sunco Lighting RC-100 Remote Control for Bi-Level Microwave Motion Sensors
Specifications
- Power supply: 2 x AAA 1.5V battery, Alkaline preferred
- Carrying case: RC-100 in carrying case
- Upload range: Up to 15 m (50 ft. )
- Op. temperature 0°C-50°C (32°F-122°F)
- Dimensions: (not provided in the text)
WARNING
Remove the batteries from compartment if the remote will not be used in 30 days.
OVERVIEW
- The remote control Wireless IR Configuration Tool is a handheld tool for remote configuration of IA-enabled fixture integrated sensors. The tool enables device to modify via pushbutton without ladders or tools, and stores up to four sensor parameter modes to speed configuration of multiple sensors.
- The remote control send sensor setting at mounting height up to 50 feet. The device can display previously established sensor parameters, copy parameters and send new parameters or store parameter profiles. For projects where identical settings may be desired across a large number of areas or spaces, this capability provides a streamlined method of configuration. Settings can be copied throughout a site, or in different sites.
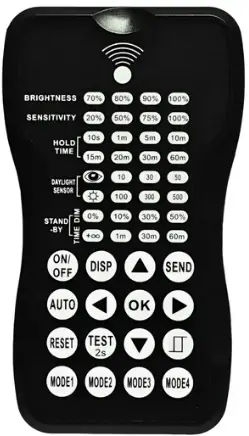
LED INDICATORS


SETTING
The SETTING Content contains all available settings and parameters for remote sensors. It allows you to change the available control, parameters, and operation of the sensor from factory default or current parameters.
Change multiple settings of sensor(s)
- Press
 button, the remote control leds will show the latest parameters you set.
NOTE: if you push button before, you must push
 button to unlock the sensor.
 - Press
 enter in the setting condition, the parameter leds of remote control will flash to be selected, navigate to the desired setting by pressing
 to select the new parameters.
 - Press ok to confirm all setting and saving.
- Aim at the target sensor and press to upload the new parameter, the led light that the sensor connects will on/off as confirm.
NOTE: the setting works key step is by Push, enter in the setting condition.
NOTE: the led light which the sensor connects will on/off after getting the new parameter as confirm.
NOTE: If you pressbutton, the remote led indicators will show the latest parameters that were sent.
Change multiple setting of sensors with smart photo cell sensor Open
- Press , the remote led indicators will show the latest parameters.
- Press enter in the setting condition, the parameter Led indicators of remote control will flash to be selected.
- Press
 ,2 led indicators will flash in daylight sensor settings ,select daylight
  as setpoint to light on automatically, select daylight
  as setpoint to light off automatically.
 - Press
 to confirm all setting and saving.
 - Aim at the target sensor and press
 to upload the new parameter. The led light which the sensor connects will on/off.
NOTE: is disabled by default. - Open or close the smart daylight sensor by push when remote control is in setting condition.
- When the smart daylight sensor open, 2 Led indicators are flash in daylight sensor setting. select daylight as setpoint to light on Automatically , select daylight as setpoint to light off automatically.When smart daylight sensor close, 1 Led indicator is flash in the daylight sensor setting for choose daylight sensor threshold.
- When the smart daylight sensor open, the standby time is only

- Smart daylight sensor takes place of normal photocell senor and works independently.
- See Daylight Sensor Function.
Corridor Function
This function inside the motion sensor to achieve tri-level control. for some areas which require a light change notice before switch-off. The sensor offers 3 levels of light: 100%–>dimmed light (natural light is insufficient)–>off; and 2 periods of selectable waiting time: motion hold-time and stand-by period; Selectable daylight threshold and freedom of detection area.

Daylight Sensor Function
Open the daylight sensor by push![]() when remote control is in setting condition.
when remote control is in setting condition.


Corridor Function VS Daylight Sensor Function.
- ln corridor function, turn on the light MUST by natural light level lower daylight sensor setting and Occupancy . In smart daylight sensor function, turn on the light by natural light level lower daylight setpoint to light on even if vacancy.
- ln corridor function, turn off light by stand-by time finish if vacancy. In smart daylight sensor function, turn off the light by natural light level higher than daylight setpoint to light off even if occupancy.
- ln smart daylight sensor function, natural light level lighter/lower than daylight setpoint to light off/on MUST keep at least 1 mintue,that will turn off/on the light automatically.
About RESET and MODE(1,2,3,4)
The remote control comes with 4 Scene MODES which are not default. You may make desired parameters and save as the new MODE(1,2,3,4) to configure the installed sensors.
- RESET: all settings go back to settings of DIP Switch in sensor.
- SCENE MODES(1 2 3 4)

Change the MODES:
- press
 button,the remote control Led indicators show existing parameters.
 - press
 to select the new parameters.
 - Press
 to confirm all parameters and saving in the mode.
UPLOAD
The upload function allows you to configure the sensor with all parameters in one operation. You may select CURRENT SETTING parameters or the MODE for uploading. Current setting parameters or the MODE are displayed in Remote control .
Upload the current parameters to sensor(s),and duplicate the sensor parameters form one to anther
- Press button or press, all parameters are displayed in Remote control.
Note: check if all parameters are correct , if not, change them. - Aim at the sensor and press button , the light that sensor connects will be on/off as confirm.
Note: if other sensor need same parameters, just aim at the sensor and press button.
Frequently Asked Questions
- Q: How do I know if the sensor is disabled?
A: Pressing the button will disable the sensor, and the light will be in permanent on or off mode. - Q: What happens if I don’t use the remote for 30 days?
A: It is recommended to remove the batteries from the compartment if the remote will not be used for 30 days to prevent damage.
Documents / Resources
 | Sunco Lighting RC-100 Remote Control for Bi-Level Microwave Motion Sensors [pdf] Instruction Manual RC-100 Remote Control for Bi-Level Microwave Motion Sensors, RC-100, Remote Control for Bi-Level Microwave Motion Sensors, Bi-Level Microwave Motion Sensors, Microwave Motion Sensors, Motion Sensors |