![]()
 TEMPERATURE DATA LOGGER (DL2B)
USER MANUAL
Features
- Data logger simultaneously displays minimum, maximum and current temperatures
- The unit will provide a visual and audio alert when temperature rises above or falls below the high and low set points.
- The min/max feature is designed to monitor and store the highest and lowest readings until the memory is cleared, or removal of battery.
- The temperature sensor is enclosed in a glycol-filled bottle, protecting it from rapid temperature changes when refrigerator/freezer door is opened.
- Low battery alert function ( battery symbol flashes)
- User can select oC or oF temperature display
- Measuring temperature range -45 ~ 120 oC ( or -49 ~ 248 oF)
- Operating conditions: -10 ~ 60 oC ( or -50 ~ 140 oF) and 20% to 90% non-condensing (relative humidity)
- Accuracy : ± 0.5 oC (-10 ~ 10 oC or 14 ~ 50 oF), in other range ± 1 oC ( or ± 2 oF)
- User defined logging interval 6.5 ft (2 meters) NTC probe-connecting cable
- Rechargeable Li-ion battery to record data up to 8 hours during a power-failure event
- Powered by a 12VDC power adapter
- Compatible with a USB 3.0 Extension Cable for durability and easy data transfer
- Large LED lit LCD screen
- Dimensions:137mm(L)×76mm(W)×40mm(D)
- Mounting hole dimension: 71.5mm(W) x 133mm(L)
SAVE THIS MANUAL FOR FUTURE REFERENCE
READ ALL INSTRUCTIONS BEFORE USE
Package Contents
- Data logger
- Temperature sensor (NTC) in a glycol-filled bottle
- Instructions manual
- Rechargeable x2 AA batteries (1.5Volts)
- 4 GB Memory stick [FAT 32]
- Power adapter
- Antistatic bag
- NIST-traceable calibration certificate
Installing the Data logger
- Install the backup battery
Unscrew the battery compartment cover located on the back of the unit and install the battery. Follow polarity (+/-) diagram below. Replace the battery cover. The unit will beep and all segments of the LCD will be activated.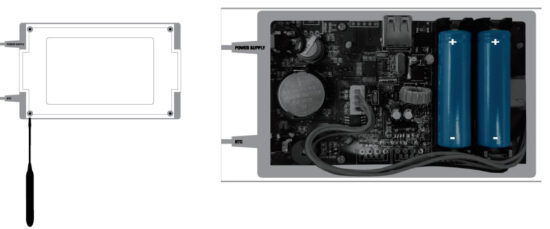
- Connect the temperature sensor and power adapter plugs
Do not use force to connect the probe or the power adapter plugs. The power adapter plug is different from the probe plug.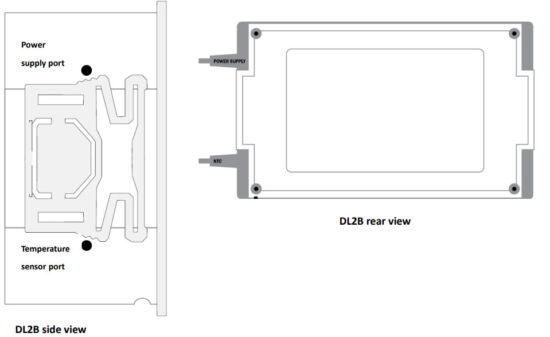
To Use
NOTE: Before use, remove and discard the clear plastic protective film from the screen (LCD).
- Place the temperature sensor (in glycol bottle) in the location to be monitored, such as inside a refrigerator or freezer. The data logger may be placed on top of unit with LCD display easily visible and the alarm audible. Data Logger displays internal temperature of unit being monitored, as well as maximum and minimum temperatures reached. The Data Logger’s maximum and minimum readings reflect the highest and lowest temperatures since the unit was powered or since the MIN/MAX history was cleared.
- If the temperature measurement rises above or falls below the set temperature range, the alarm will sound. To silence the alarm, press any key ONCE.
- Clear MIN/MAX history once the unit is stable.
Parts and Controls/Features

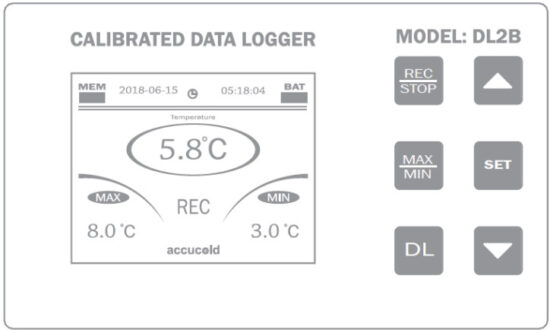
LCD Display Description

| Icon | Description | |
| 1 | MEM is memory capacity. When MEM reaches the 10th grid, MEM is full. MEM can hold data for one year. | |
| 2 | BAT is battery capacity. | |
| 3 | Current temperature value is displayed | |
| 4 | When “REC” is displayed, it means the logger is logging temperature; When “STOP” is displayed, it means the logger is not logging. | |
| 5 | Maximum temperature value during a data logging session is displayed | |
| 6 | Minimum temperature value during a data logging session is displayed | |
| 7 | High temperature alarm status | |
| 8 | Low temperature alarm status | |
| 9 | °C: Celsius temperature units; °F: Fahrenheit temperature units | |
| 10 | Time icon: HH:MM:SS (24-hour clock) | |
| 11 | Date icon: YYYY-MM-DD |
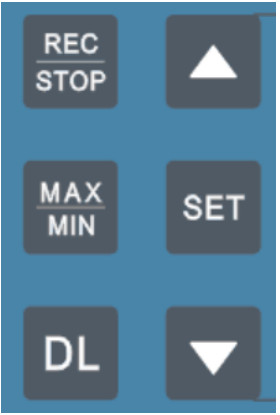
| REC/STOP | Press REC/STOP to STOP or RECORD data. |
| MAX/MIN | Press for 3 seconds to ERASE the MIN and MAX temperature history. |
| DL | Copy the recorded data (CSV file) to USB |
| SET | Hold the SET button to cycle through configuration settings. |
| Up/Down keys to change settings. Press and hold either key to advance the values rapidly. |
Default Data Logger Settings
| Code | Function | Range | Default Setting |
| *Please enter the correct temperature units °F 1°C | |||
| Cl | High temp. alarm | C2 – 100°C /212°F | 8.0 °C |
| C2 | Low temp. alarm | -45°C 1-49 °F – C 1 | 2.0 °C |
| C3 | Alarm hysteresis | 0.1-20.0°C 0.2-36 °F | 1.0 °C /2.0°F |
| C4 | Alarm delay | 00-90 min | 0 min |
| C5 | Start delay | 00-90 min | 0 min |
| CF | Temperature Unit | °C =Celsius °F =Fahrenheit | °C |
| E5 | Offset temperature | -20-20°C -36–36 °F | 0.0 °C/°F |
| Ll | Logging interval | 00-240 min | 05 min |
| PAS | Password | 00 –99 | 50 |
Programming the Data Logger
| Password Input | From the main display screen: Hold the SET key for 3 seconds. Use the up and down arrows to adjust the password to the correct password. By default the correct password is 50. Press SET key ONCE to confirm the settings. |
| High Alarm Temperature Setting | By default, the high and low alarm settings are 8 oC and 2 oC respectively. To reset high alarm and low alarm temperature settings, follow instructions below. From the main display screen: Hold the SET key for 3 seconds. Enter the correct password then press the SET key NCE to enter the HI Temp Alarm setting mode. Use the up and down arrows to adjust the temperature accordingly. Press SET key ONCE to confirm the settings. |
| Low Alarm | From the main display screen: |
| Temperature Setting | Hold the SET key for 3 seconds. Enter the correct password then press the SET key 2x to enter the LO Temp Alarm setting mode. Use the up and down arrows to adjust the temperature accordingly. Press SET key ONCE to confirm the settings. |
| Alarm Hysteresis | Hysteresis is the tolerance band to prevent alarm chattering. For instance, if the high alarm temperature is set at 8 o C with a hysteresis of 1o C, once the alarm is activated, it will not return to normal until the temperature goes below 7 oC. By default, the alarm hysteresis is set at 1 oC. To reset, follow instructions below. |
| When the temperature is higher than (Low Alarm Temperature setting + Alarm Hysteresis) it will exit low temperature alarm. |  |
| When the temperature is lower than (High Alarm Temperature setting – Alarm Hysteresis), it will exit high temperature alarm. | 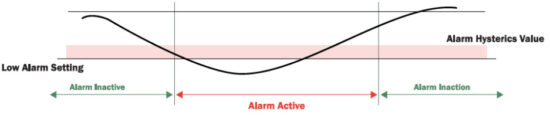 From the main display screen: |
| Alarm Delay | The alarm delay is used to avoid unnecessary alarms when the temperature exceeds the set high and low alarm limits. This feature will delay alarm activation by the amount of time entered. By default, the alarm delay is set at 0 minutes. To reset, follow instructions below. From the main display screen: Hold the SET key for 3 seconds. Enter the correct password then press the SET key 4x to enter the Alarm Delay setting mode. Use the up and down arrows to adjust the time accordingly. Press SET key ONCE to confirm the settings. |
| Start Delay | From the main display screen: Hold the SET key for 3 seconds. Enter the correct password then press the SET key 5x to enter the Start Delay setting mode. Use the up and down arrows to adjust the time accordingly. Press SET key ONCE to confirm the settings. |
| Temperature Unit | From the main display screen: Hold the SET key for 3 seconds. Enter the correct password then press the SET key 6x to enter the Temperature unit setting mode. Use the up and down arrows to adjust the temperature units accordingly. Press SET key ONCE to confirm the settings. |
| Offset temperature | The offset temperature feature is useful for customers who require a positive or negative temperature offset to be applied to the temperature sensor reading. By default, the offset temperature is preset to 0 oC. To change the setting, follow instructions below: From the main display screen: Hold the SET key for 3 seconds. Enter the correct password then press the SET key 7x to enter the Offset temperature setting mode. Use the up and down arrows to adjust the temperature accordingly. Press SET key ONCE to confirm the settings. |
| Logging/Record Interval | This setting tells the logger how frequently to take and store readings. The unit has a logging interval of 10 s to 240 minutes. By default, the logging interval is preset to 5 minutes. To change the setting, follow instructions below: From the main display screen: Hold the SET key for 3 seconds. Enter the correct password then press the SET key 8x to enter the Record Interval setting mode. Use the up and down arrows to adjust the time accordingly. Press SET key ONCE to confirm the settings. |
Date and Time Setting
Press MIN/MAX and SET keys simultaneously and hold for 3 seconds to enter the date and time setting mode. Use the up and down arrows to adjust the year accordingly. Press SET to confirm and move to the month setting mode.
Repeat the same steps to set MONTH/DAY/HOUR /MINUTE & SECOND
Other Functions
| CLEAR the high and low alarm temperature indicators. | Press |
| Delete all data history record | Press REC/STOP and DL keys simultaneously for 3 seconds to delete all data history. DLT will display on the screen when the data is deleted successfully, and MEM capacity display will be empty. |
| Delete max and min temperature history | Press MIN/MAX key for 3 seconds to clear max and min temperature historyClear will display on the screen if the data is deleted successfully. |
| Copy the recorded data in CSV to USB | First step: Insert the USB Flash Drive. USB will display on the screen when the logger detects the flash drive. Second step: Press DL button for 3 seconds to download the data. CPL will display on the screen when the data is successfully transferred to the flash drive. Third Step: When CPL displays on the screen, the flash drive can be removed. *Always clear the MEM/Data logger’s internal memory before taking new readings. Otherwise, it will take a long time to transfer large sets of data. * |
| Using USB 3.0 Extension Cable | Connect the male end of the cable to the USB port then connect the flash drive to the female end of the cable. |
Please note:
- When the MEM is full, the unit overwrites old data
- If the temperature sensor is loose or not inserted, “NP” will be displayed and the NP alarm will be activated.
- When PAS is 0 there is no password. User can enter parameter setup directly.
- When the logging interval (LI) =0, the record interval is 10 seconds.
- To modify the factory settings: Press the SET key for 3 seconds to enter parameter setup state. After adjusting parameters, press SET key button again for 3 seconds. “COP” will be displayed.
- The modified and stored set temperature and parameters will be new default settings.
- To resume original factory settings, press DL and SET keys simultaneously for 3 seconds, “888” will display when the parameters are reset to factory settings.
- To resume customer‟s default settings, press ▲ and ▼ keys simultaneously for 3 seconds, “888” will display when the parameters are reset to customer‟s default settings.
CSV File
- To download data, USB drive is ejected safely and connected to a computer. Open file(s) in Microsoft Excel or any .CSV compatible program.
- Data results will be displayed in tabular form as shown below:-
| Date | Time | Temp | Hi Alarm | Lo Alarm | Hi Alarm Setting | Lo Alarm Setting |
| 6/12/2018 | 16:33:27 | 24.9C | 0 | 0 | 30.0C | -10.0C |
| 6/12/2018 | 16:32:27 | 24.9C | 0 | 0 | 30.0C | -10.0C |
| 6/12/2018 | 16:31:27 | 24.9C | 0 | 0 | 30.0C | -10.0C |
| 6/12/2018 | 16:30:27 | 24.9C | 0 | 0 | 30.0C | -10.0C |
| 6/12/2018 | 16:29:27 | 24.9C | 0 | 0 | 30.0C | -10.0C |
| 6/12/2018 | 16:28:27 | 24.9C | 0 | 0 | 30.0C | -10.0C |
| 6/12/2018 | 16:27:19 | 24.9C | 0 | 0 | 30.0C | -10.0C |
| Date | Time | (24 hour clock) | Temperature (oC) | High Alarm & Low Alarm temperature status | 0 = No alarm event 1= Alarm event | Low Alarm & High Alarm Temperature Setting in Degrees Celsius |
Troubleshooting
| Displays ‘NP’ | ✓ The temperature sensor is not installed correctly. |
| Display screen not working | ✓ Make sure the AC adapter and batteries are installed correctly. |
| “Low battery” indicator flashing | ✓ Battery may need to be recharged. |
| Logger is not logging | ✓ Press the ✓ The logger will stop logging if AC power is removed and rechargeable battery is not connected or not charged. |
| Logger is taking too long to copy data to a flash drive | ✓ The logger internal memory should be cleared |
| The date sequence of the logged data is NOT accurate | ✓ Reset the date and time on the logger |
| Recorded data is corrupted | ✓ Make sure the unit is not installed in an area with strong electromagnetic interference. |
| The logger does not record data when the AC power is OFF | ✓ Is the rechargeable battery inserted correctly? Please note the negative and positive poles of the battery during replacing a new battery. ✓ The rechargeable battery has not been charged prior to the power failure. ✓ The battery needs to be charged for a minimum of 2 days. |
Recalibration
It is recommended that Felix Storch, Inc., temperature monitoring products be calibrated every two years to ensure
proper function and accurate measurements; however, your quality system or regulatory body may require more
frequent calibrations. To schedule your recalibration, please contact our ISO/IEC 17025:2005 calibration laboratory
accredited by Perry Johnson Laboratory Accreditation, Inc., at calibration@summitappliance.com
Care & Maintenance
- Do not disassemble the product, as product damage may result.
- Store the product where it will not be exposed to direct sunlight, dust or high humidity.
- Do not wash or expose the product to water or other liquids.
- Clean the product by wiping with a soft, dry cloth.
- Never use volatile or abrasive liquids or cleaners to clean the product.
- Do not drop the product or subject it to sudden shock or impact.
- The sensor cable leads must be kept away from main voltage wires in order to avoid high frequency noise. Separate the power supply of the loads from the power supply of the Logger.
- When installing the sensor, place it with the head upward and the wire downward.
- The logger must not be installed in an area where water drops may be present.
- The logger must not be installed in an area where corrosive materials or a strong electromagnetic interference may be present.
Battery Handling and Usage:
![]() WARNING
WARNING
To reduce the risk of serious personal injury:
- Keep batteries away from children. Only adults should handle batteries.
- Follow the battery manufacturer’s safety and usage instructions.
- Never throw batteries into a fire.
- Dispose of or recycle spent/discharged batteries in compliance with all applicable laws.
![]() CAUTION
CAUTION
To reduce the risk of personal injury:
- Always use the size and type of battery indicated.
- Insert the battery observing the proper polarity (+/−) as indicated.
Limited Warranty
ACCUCOLD products have a limited warranty period of 1 year against defects in materials and workmanship from the date of purchase. Accessory items and sensors have a limited warranty of 3 months. Repair services have a limited warranty period of 3 months against defects in materials and workmanship. ACCUCOLD shall, at its option either repair or replace hardware products that prove to be defective, if a notice to that effect is received within the warranty period. ACCUCOLD makes no other warranties or representations of any k ind whatsoever, expressed or implied, except that of title, and all implied warranties including any warranty of merchantability and fitness for a particular purpose are hereby disclaimed.![]() WARNING: This product can expose you to chemicals including Nickel (Metallic) which is known to the State of California to cause cancer. For more information go to www.P65Warnings.ca.gov
WARNING: This product can expose you to chemicals including Nickel (Metallic) which is known to the State of California to cause cancer. For more information go to www.P65Warnings.ca.gov
Note: Nickel is a component in all stainless steel and some other metal components. ![]()
Documents / Resources
 | Summit Appliance DL2B USB LED Digital Data Logger [pdf] User Manual DL2B USB LED Digital Data Logger, DL2B, USB LED Digital Data Logger, LED Digital Data Logger, Digital Data Logger, Data Logger, Logger |