1. Bubuka
This manual provides detailed instructions for the installation, configuration, and operation of your ASRock H81 PRO BTC Motherboard. Designed for reliable performance, this ATX motherboard supports Intel LGA 1150 processors and DDR3 memory, featuring multiple PCI Express slots suitable for various computing applications, including multi-GPU setups. Please read this manual thoroughly before beginning the installation process to ensure proper setup and to maximize the stability and longevity of your system.
2. Eusi Paket
Pastikeun yén sadaya item anu didaptarkeun di handap aya dina pakét motherboard anjeun. Upami aya barang anu leungit atanapi rusak, hubungi pangecér anjeun.
- ASRock H81 PRO BTC Motherboard
- Guide Instalasi Gancang
- Support CD (Drivers and Utilities)
- Abdi / O Perisai
- 2 x Kabel Data SATA
3. Setup Sistim
3.1. Pamasangan CPU
The ASRock H81 PRO BTC motherboard uses an LGA 1150 socket. Handle the CPU and socket with extreme care to avoid damaging the pins.
- Locate the CPU socket on the motherboard. Lift the load lever and open the metal load plate.
- Carefully align the CPU with the socket, ensuring the gold triangle on the CPU matches the triangle on the socket. Gently place the CPU into the socket without forcing it.
- Close the load plate and press down the load lever until it locks into place.
- Larapkeun témpél termal kana CPU sareng pasang cooler CPU numutkeun parentah produsénna.
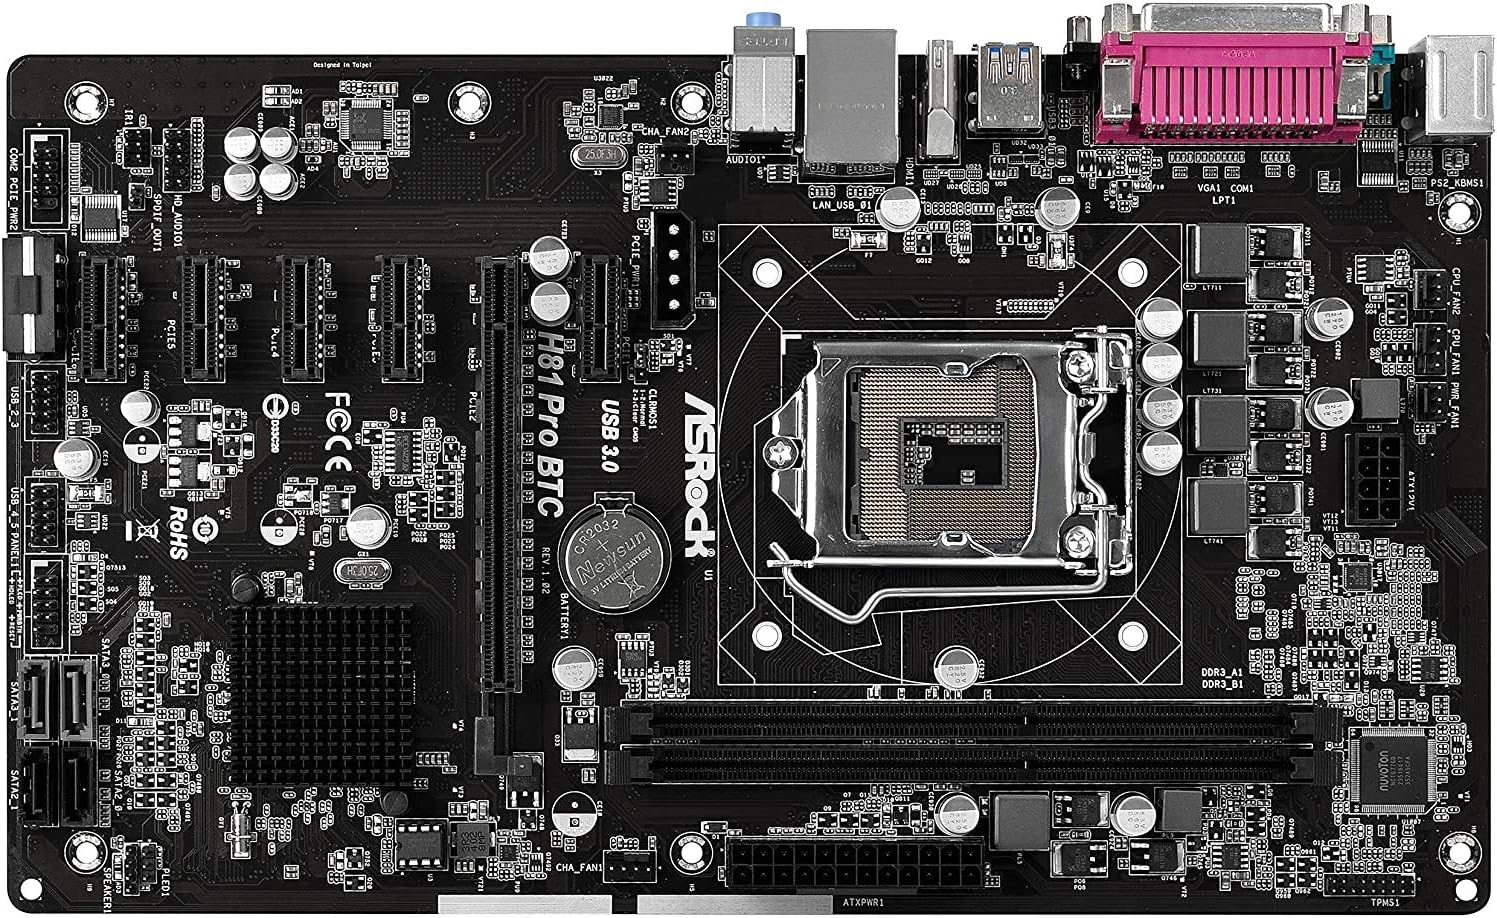
Gambar 1: Top-handap view of the ASRock H81 PRO BTC Motherboard. This image displays the LGA 1150 CPU socket at the center, flanked by two DDR3 DIMM slots on the right and multiple PCI Express slots below.
3.2. Pamasangan Mémori
This motherboard supports DDR3 DIMM modules. Ensure the memory modules are compatible with the motherboard's specifications (DDR3-1600/1333/1066).
- Buka klip dina kadua tungtung slot DIMM.
- Align kiyeu dina modul memori DDR3 jeung konci dina slot DIMM.
- Selapkeun modul memori pageuh kana slot nepi ka jepitan snap kana tempat. Pastikeun duanana klip ditutup pinuh.
3.3. Pamasangan Motherboard kana Chassis
Install the motherboard into a compatible ATX chassis.
- Install the I/O shield into the rear opening of your chassis.
- Align the motherboard with the standoffs in the chassis.
- Ngamankeun motherboard kalawan screws, mastikeun eta pageuh seated.
3.4. Nyambungkeun Periferal jeung Power
Connect all necessary components and power cables to the motherboard.
- Panyambung Daya: Connect the 24-pin ATX power connector and the 8-pin EPS power connector from your power supply to the motherboard. For multi-GPU configurations, connect the two additional Molex power connectors for PCIe stability.
- Alat SATA: Connect your storage drives (HDDs/SSDs) to the SATA3 (6Gb/s) or SATA2 (3Gb/s) ports.
- Panyambung Panel hareup: Connect the chassis's front panel cables (power button, reset button, USB ports, audio jacks, LED indicators) to the corresponding headers on the motherboard. Refer to the motherboard diagram for exact locations.
- Alat USB: Connect USB 2.0 and USB 3.0 devices to the rear I/O ports or internal headers.
- PCI Express Cards: Install graphics cards or other expansion cards into the PCI Express 2.0 x16 slot or the five PCI Express 2.0 x1 slots.
- Kaluaran tampilan: Connect your monitor to the VGA or HDMI port on the rear I/O panel if using integrated graphics, or to your dedicated graphics card.

Gambar 2: Angled view of the ASRock H81 PRO BTC Motherboard. This image highlights the various internal connectors such as SATA ports, USB headers, and the arrangement of PCI Express slots.

Figure 3: Side-angled view of the ASRock H81 PRO BTC Motherboard. This perspective shows the main 24-pin ATX power connector, the 8-pin EPS power connector, and the two Molex power connectors designed to provide stable power to multiple PCI Express devices.

Figure 4: Close-up of the ASRock H81 PRO BTC Motherboard's rear I/O panel. This detailed view displays the PS/2 keyboard and mouse ports, a serial port, VGA and HDMI display outputs, two USB 3.0 ports, four USB 2.0 ports, an RJ45 LAN port, and audio input/output jacks.
4. Parentah Operasi
4.1. Boot Mimiti sareng Setelan BIOS/UEFI
Saatos assembling sistem Anjeun, hurungkeun eta. Pencét éta Del or F2 key during startup to enter the BIOS/UEFI setup utility. Here you can configure system settings such as boot order, date/time, and advanced hardware parameters.
- Urutan boot: Set your preferred boot device (e.g., USB drive for OS installation, SSD/HDD).
- Émbaran Sistim: Verify CPU, memory, and storage device detection.
- Setélan canggih: Adjust settings for integrated peripherals, power management, and CPU features as needed.
- Simpen sareng Kaluar: Save your changes and exit the BIOS/UEFI to proceed with operating system installation.
4.2. Pamasangan supir
After installing your operating system, install the necessary drivers from the provided support CD or download the latest versions from the ASRock official website. This includes chipset drivers, LAN drivers, audio drivers, and any other specific device drivers.
5. Spésifikasi
| Chipset | Intel H81 |
| CPU Socket | LGA 1150 |
| Prosesor cocog | Intel Core i3/i5/i7 (4th and 5th Gen) |
| Mémori | 2x DDR3 DIMM Slots, Dual Channel, Non-ECC, Buffered, Max 16GB, DDR3-1600/1333/1066 MHz |
| slot ékspansi | 1x PCI-Express 2.0 x16, 5x PCI-Express 2.0 x1 |
| Panyimpenan | 2x SATA3 (6Gb/s) Ports, 2x SATA2 (3Gb/s) Ports |
| LAN | Realtek RTL8111GR Gigabit Ethernet Controller |
| palabuhan USB | 2x USB 3.0 (rear), 6x USB 2.0 (2 rear, 4 via headers) |
| pungkur I / O Ports | 1x PS/2 Keyboard, 1x PS/2 Mouse, 1x VGA, 1x HDMI, 1x Serial Port, 1x RJ45 LAN, Audio I/O Jacks |
| Panyambung internal | 1x Parallel Port Header, 1x Serial Port Header, 2x SLI/Xfire Molex Power Connectors |
| Faktor Bentuk | ATX |
| Diménsi | 13.2 x 3 x 10 inci (kira-kira) |
| Rojongan System Operasi | Microsoft Windows 10/8.1/8/7 (32-bit/64-bit) |
6. Cara ngungkulan
Upami anjeun mendakan masalah, tingal léngkah-léngkah ngungkulan umum ieu:
- Henteu aya kakuatan: Ensure all power cables (24-pin ATX, 8-pin EPS, Molex for PCIe) are securely connected. Check the power supply unit (PSU) and wall outlet.
- Henteu aya tampilan: Verify that the monitor is connected to the correct display output (integrated graphics or dedicated GPU). Reseat the graphics card and memory modules.
- System Fails to POST (Power-On Self-Test): Listen for beep codes (if a speaker is connected) which can indicate specific hardware issues. Reseat CPU, memory, and expansion cards. Clear CMOS by removing the CMOS battery for a few minutes or using the clear CMOS jumper.
- Sistem Operasi Teu Booting: Check boot order in BIOS/UEFI. Ensure the storage drive with the OS is properly connected and detected.
- Periferal Teu Dideteksi: Ensure the device is properly connected to the correct port/slot. Install or update relevant drivers.
For more advanced troubleshooting, consult the ASRock official websitus atanapi ngahubungan rojongan teknis maranéhna.
7. Pangropéa
pangropéa rutin mantuan mastikeun umur panjang sarta kinerja optimal motherboard Anjeun.
- Ngaleungitkeun lebu: Périodik ngabersihan lebu tina motherboard sareng komponenana nganggo hawa anu dikomprés. Pastikeun sistem dipareuman sareng dicabut colokan sateuacan beberesih.
- Pembaruan BIOS/UEFI: Pariksa ASRock websitus kanggo apdet BIOS/UEFI. Apdet tiasa ningkatkeun kompatibilitas, stabilitas, sareng kinerja. Turutan pitunjuk apdet kalayan saksama.
- Pembaruan supir: Keep your system drivers updated to ensure compatibility and optimal performance with your operating system and peripherals.
8. Garansi jeung Rojongan
This ASRock H81 PRO BTC Motherboard is covered by the manufacturer's warranty. For specific warranty terms and conditions, please refer to the warranty card included in your package or visit the official ASRock websitus.
For technical assistance, driver downloads, or further support, please visit the ASRock official support page:


