SONICWALL SonicOS 8 Cloud Secure Edge User Guide

Cloud Secure Edge Overview
SonicWall Cloud Secure Edge (CSE) (formerly Banyan Security) is a leading provider of zero-trust security solutions for the modern workforce. Our device-centric Security Service Edge (SSE) product delivers a comprehensive range of integrated security capabilities – including Zero Trust Network Access (ZTNA), VPN as a Service (VPNaaS), Cloud Access Security Broker (CASB), and Secure Web Gateway (SWG) – all in a unified product that is simple to implement and boosts employee productivity.
Unlike traditional security products focused on the network perimeter, CSE’s device-centric SSE platform brings the user and device to the forefront of protection, enabling intelligent, risk-based connectivity and threat detection. Working in concert with the CSE Cloud, our platform permits consistent policy enforcement without routing all enterprise traffic through vendor data centers or expensive on-premise appliances. This promotes lowering costs and improving user experience.
Topics:
- Cloud Secure Edge Integration with SonicOS
- Benefits of Using Cloud Secure Edge
- Connector Concepts
- Supported SonicWall Product Versions
Cloud Secure Edge Integration with SonicOS
Cloud Secure Edge (CSE) offers two edge deployment models to access your organization’s private resources: Self-hosted Private Edge and Global Edge Network. SonicOS 8 and later supports the Global Edge Network deployment type. With this new capability, any organization can deploy SonicOS 8 as a Cloud Secure Edge Connector. The Connector is a dial-out connector that establishes a secure tunnel with CSE’s Global Edge Network. It can be deployed in any location with connectivity to your internal services. There will be no change to the control plane. The Cloud Command Center always delivered as a cloud Software-As-A-Service (SaaS) offering. For more information on Cloud Secure Edge, refer to the CSE documentation.

To use the CSE feature, the user must do the following:
- Provision a trial or purchased CSE product in MySonicWall (creates an organization). Refer to the section Activating Cloud Secure Edge in MySonicWall.
- Enable the CSE Connector on a firewall running SonicOS 8 or higher. Refer to the section Configuring Cloud Secure Edge.
- Configure Private Access: SonicOS needs to publish the networks, IP Addresses, and Private Domains (optional) for the CSE clients. Refer to the section Configuring Cloud Secure Edge in SonicWall Firewall.
- Configure access control rules in the CSE (not on the SonicWall firewall). Refer to the section Configuring Access Control Rules on the CSE Console.
- Enable the Connector. Refer to the section Configuring the Connector.
- Manage Connectivity: To show the status of TSR, Packet Capture, and Logs. Refer to the section Viewing Cloud Secure Edge Connector Log events.
Benefits of Using Cloud Secure Edge
The following are the user benefits of using the Cloud Secure Edge with SonicWall firewall.
- Leverages the SonicWall firewall to enable ZTNA and CSE service.
- Empowers partners to provide robust security.
- Meets the evolving needs of customers.
- Adapts to the demands of various environments.
The Cloud Secure Edge “Connector” technology into our next-generation firewalls provides unparalleled security benefits:
- Trust no One, Always Verify: With a zero-trust approach, organizations can reduce the attack surface and prevent unauthorized access attempts, even if a device breaches the network perimeter.
- Simplified Remote Access: Cloud Secure Edge Connector (CSE) integration in SonicOS 8 allows employees to securely access authorized applications from anywhere, on any device, without having to deal with repetitive and complex VPN and Access Policy configurations. With CSE, all user and device- level access policies are defined in the cloud command center.
- A Better User Experience: Enabling ZTNA has never been easier. Secure access can now be enabled with a few clicks and a simple private resource definition on your SonicWall firewall.
Connector Concepts
The Connector is a dial-out connector that establishes a secure tunnel with the Global Edge Network. It deploys in any location that has connectivity to your internal services. Each Connector only connects outbound and does not need any inbound open ports to operate correctly.
The CSE Connector for SonicWall firewall allows secure remote access to private resources behind the firewall. CSE infrastructure enforces access control, not by the SonicWall firewall. Traffic ingresses SonicOS via WireGuard tunnels from CSE POPs. Only inbound access (WAN to protected zones from a firewall perspective) is allowed. SonicOS Group Address Object is created automatically (per Connector). The firewall admin configures the allowed private IPv4 addresses (Group address object) and private domains, if any, that SonicWall firewall needs to resolve for the CSE clients. The Connector establishes a WireGuard tunnel to CSE POPs.
Supported SonicWall Product Versions
The following are the CSE supported SonicWall product versions:

Activating Cloud Secure Edge in MySonicWall
This section explains how to deploy the SonicWall Cloud Secure Edge (CSE) in MySonicWall by activating a CSE trial. Alternatively, you can activate or subscribe to CSE directly by making a purchase.
To activate your Cloud Secure Edge in the MySonicWall account:
- Navigate to MySonicWall and click Sign Up. When you sign up for the MySonicWall account a new MySonicWall account can be created. For more information on creating your MySonicWall account, refer to the KB article How do I create a MySonicWall.com account.
- Navigate to Product Management > Free Trails. Hover over the SonicWall Cloud Secure Edge product and click Try Now.

- To start a trial for the CSE.
a. Choose a Friendly Name.
b. Choose Tenant Name and click Try Now.
c. To provide the Cloud Secure Edge tenant details, choose your data center from the Choose Data Center drop-down.
d. Enter your Cloud Secure Edge Name and click Try Now NOTE: We recommend you use something like ‘acme” or “acme-inc” if your organization name is ‘Acme Inc.”. The CSE Name is shown in the CSE console, is included in the SAML redirect URL and is the default invite code for banyan clients registering to this tenant. Only lowercase letters a-z, numbers 0-9, and hyphen *-* are allowed. Must start with a letter (we plan to allow starting with a number soon). Org name has at least 4 characters and at most 50 characters.
Now, you have a 25-user count trail for 30 days for both Secure Private Access and Secure Internet Access. - To view your license details:
a. Navigate to MyWorkSpace > Products and select your tenant from the Tenants drop-down.
b. Refresh the page and click on the serial number of the Cloud Secure Edge product type.
c. Click the Licenses tab to view your licensing information.
- Once provisioning is complete, you receive a provisioning complete email for the Cloud Secure Edge product. NOTE: Provisioning completion may take a few minutes.
- To use Connector on the SonicWall firewall, the firewall must be registered in the same MSW tenant as the CSE, refer to the KB article How can I register a product in MySonicWall account. NOTE: The firewall does not need a license to use the Connector. A licensed CSE product in the same MySonicWall tenant is sufficient.
a. Navigate to My Workspace > Register Products.
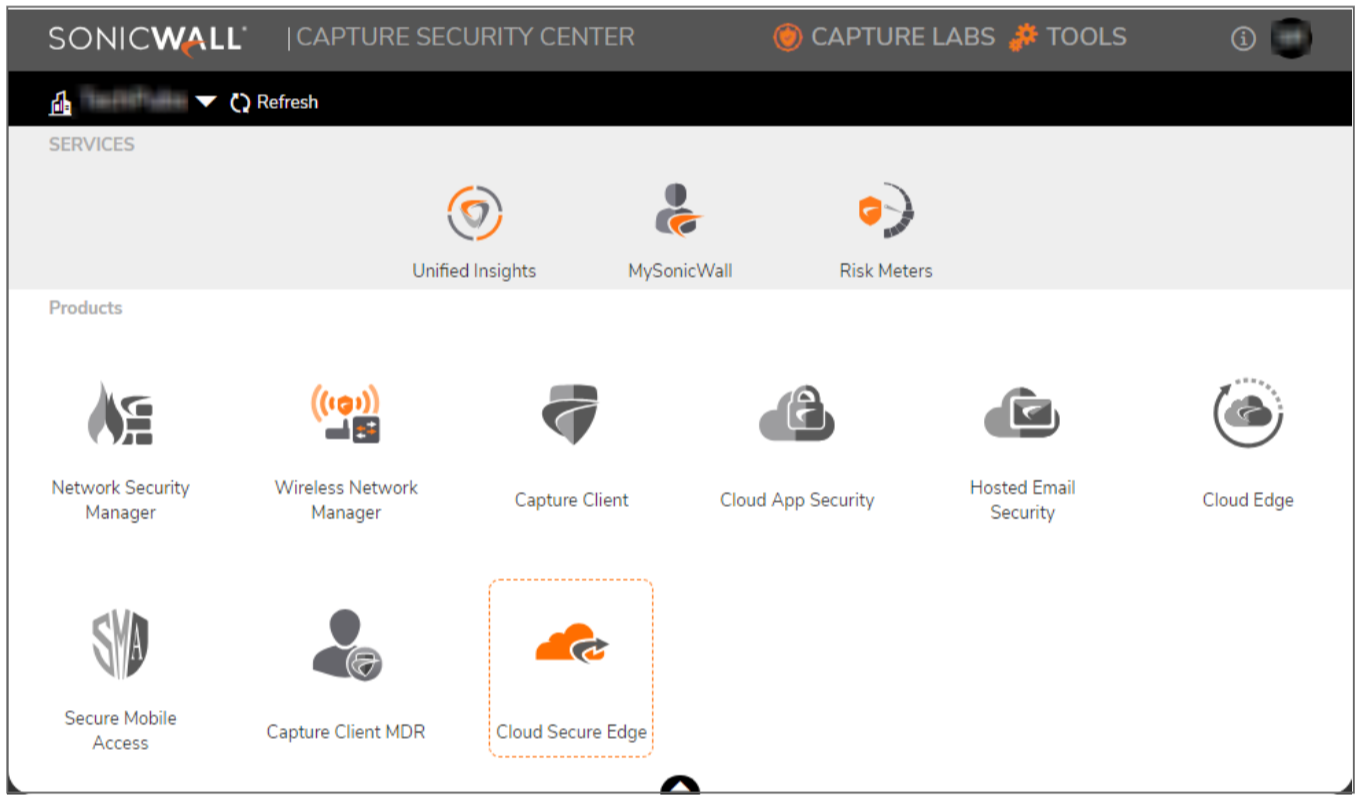
b. Register your SonicWall firewall in the tenant you started the CSE trial in. - Once you receive the provisioning complete email, navigate to Services >Available Services. Then, hover over the Capture Security Center and click Launch.

- Select your tenant in the Capture Security Center. If your tenant or product is unavailable, click refresh and check the availability.
- Click the Cloud Secure Edge icon to use your single sign-on (SSO) credentials to log into the product console, also known as the CSE Command Center.
Configuring Cloud Secure Edge in SonicWall Firewall
This section explains how to configure Cloud Secure Edge in the SonicWall firewall.
Topics:
- Configuring Cloud Secure Edge
- Configuring the Connector
- Viewing Connector Status
Configuring Cloud Secure Edge
This section explains how to configure Cloud Secure Edge in the SonicWall firewall.
Prerequisite:
- Register your SonicWall firewall in the same tenant where you started the trial or have the CSE license within your MySonicWall account. Refer to the KB article How can I register a firewall in my MySonicWall account for more information.
- An active Cloud Secure Edge registered in the same tenant.
To configure the CSE on the firewall:
- Sign in to your SonicWall firewall and navigate to Device > Settings > Firmware and Settings.
- Click the Create Backup to create a backup and click the Export Configuration to export the configuration file backup.
- Upgrade your SonicWall firewall to the latest firmware version. To get more information on upgrading SonicOS firmware, refer to the SonicOS Upgrade Guides. NOTE: Cloud Secure Edge is supported from the SonicOS 8 firmware version onwards. Once the SonicWall firewall is updated to version 8, a new feature, Cloud Secure Edge appears under the path: Network > Cloud Secure Edge.
- Navigate to Network > Cloud Secure Edge > Access Settings and enable the option Enable Cloud Secure Edge Connectivity.

To view the connectivity status:
● If all tunnel connections are error-free, the checkbox status shows as green.
● If there are partial tunnel connections, the checkbox status shows an orange icon.
● In case of errors, the checkbox status appears as a red icon, indicating issues with all tunnel connections along with error details.
● The Connector status tooltip provides more details when hovered over.
● The checkbox icon for tunnel connection status (up and down) are similar to those used in interfaces. - Click Accept.
Configuring the Connector
This section explains how to configure the Connector in the SonicWall firewall.
To configure the Connector on firewall:
- Navigate to Network > Cloud Secure Edge > Access Settings page and click the Connectors tab. You can see the Connector Synchronized with the SonicWall firewall and the enabled Connector status. If the Connector is not enabled by default, toggle the Enable option to enable it.

- Select the Connector and click the Configure icon to edit the Private Classless Inter-Domain Routing (CIDRs) accessible over the solution.
The Connector shows the list of entries added to the CSE. There are two tabs for configuration: Private CIDRs and Domains.
a. You can add/remove/edit the CIDR entries. You are publishing the private applications/resources/networks that you want your end users to access.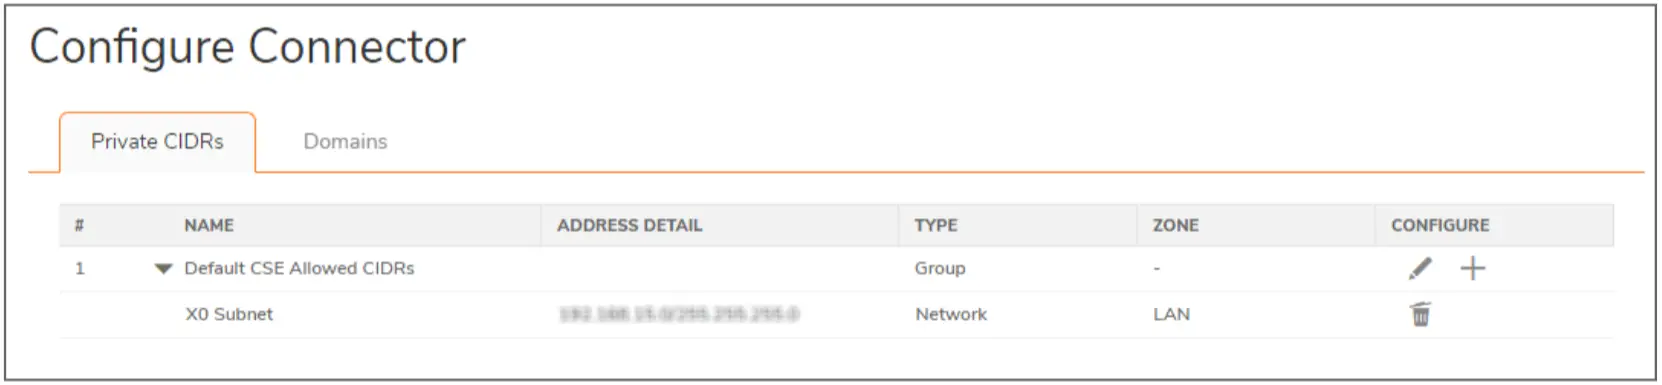
b. You can also add/remove/edit the domains (optional).
Domains represent the private domains that are resolvable by this firewall using the Split DNS Feature. This list publish as domains resolvable by this firewall in the CSE Connector settings automatically. NOTE: CSE connector includes support for wildcard entries. This feature ensures that all subdomains are properly accessible in terms of resource access.
● To enable DNS resolution for domains with all prefixes, configure the connector with a wildcard domain in the “Domain” section (e.g., *.sonicwall.local or *.sonicwall.com ).
● For resolving only specific domains, use non-wildcard domain entries in the “Domain” section of the connector configuration (e.g., a.sonicwall.local , b.sonicwall.com, or sonicwall.com).
- Click the Configure icon to edit the Private CIDRs: NOTE: The maximum number of allowed private CIDRs is 32.
Add the Network resource in the Group under the Default CSE Allowed CIDRs and click Save.
- Add the Network resource in the Group under the Default CSE Allowed CIDRs, and click Save.
Optional: Navigate to Object > Match Objects > Addresses > Address Objects. Click +Add to add the network resource in the Address Object Settings as below.
- Optional: Navigate to Object > Match Objects > Addresses > Address Groups. There is only an edit group operation, and when clicked, it shows an Address Object group configuration. Search for Default CSE Allowed CIDRs” address group.
● User can edit Address Object group to add or delete address objects.
● User cannot delete an Address Object group.
● When expanded, this displays the member Address Objects. - In the Network > Cloud Secure Edge > Access Settings > Domains tab, click +Add option to add the Domains, it opens the Add Split DNS, and user can configure the split entries. NOTE: The maximum number of published DNS domains is 4.

● Lists all domain entries filtered for the WireGuard interface only.
● Allows adding or deleting domain entries.
● Search and refresh capabilities.
Viewing Connector Status
Navigate to the Network > Cloud Secure Edge > Status page to view the status of the Connector’s connectivity with the Global Edge Network/POP. Obtain the Connector’s name from the configuration in CSE (the Connector name is generated automatically).

![]() NOTE: The Connector name can be up to 127 characters.
NOTE: The Connector name can be up to 127 characters.
Configuring Access Control Rules on the CSE Console
This section explains configuring networks, private access, and directories in the Cloud Secure Edge console.
To configure networks, private access, and directories in the Cloud Secure Edge console:
- Navigate to Services >Available Services. Hover over to the Capture Security Center, and click Launch.

- Select your tenant in the Capture Security Center. If your tenant or product is unavailable, click Refresh and check the availability.
- Click the Cloud Secure Edge icon to use your single sign-on (SSO) credentials to log into the product console.
- In the CSE console, navigate to Network > Connectors, and ensure that the configured SonicWall firewall shows up. Connector appears with the MySonicWall Friendly Name and Serial Number as the Name. NOTE: Do not delete the Connector in the CSE console.

- Navigate to Private Access > Service Tunnel tab, and click + Add Service Tunnel.

a. Enter your service tunnel name in the general information section.
b. Click + Add Network and select your SonicWall firewall Connectors in the Network Settings section. NOTE: The number of Connectors is limited to 1 and the maximum number of POPs (Service Tunnels) supports is 16.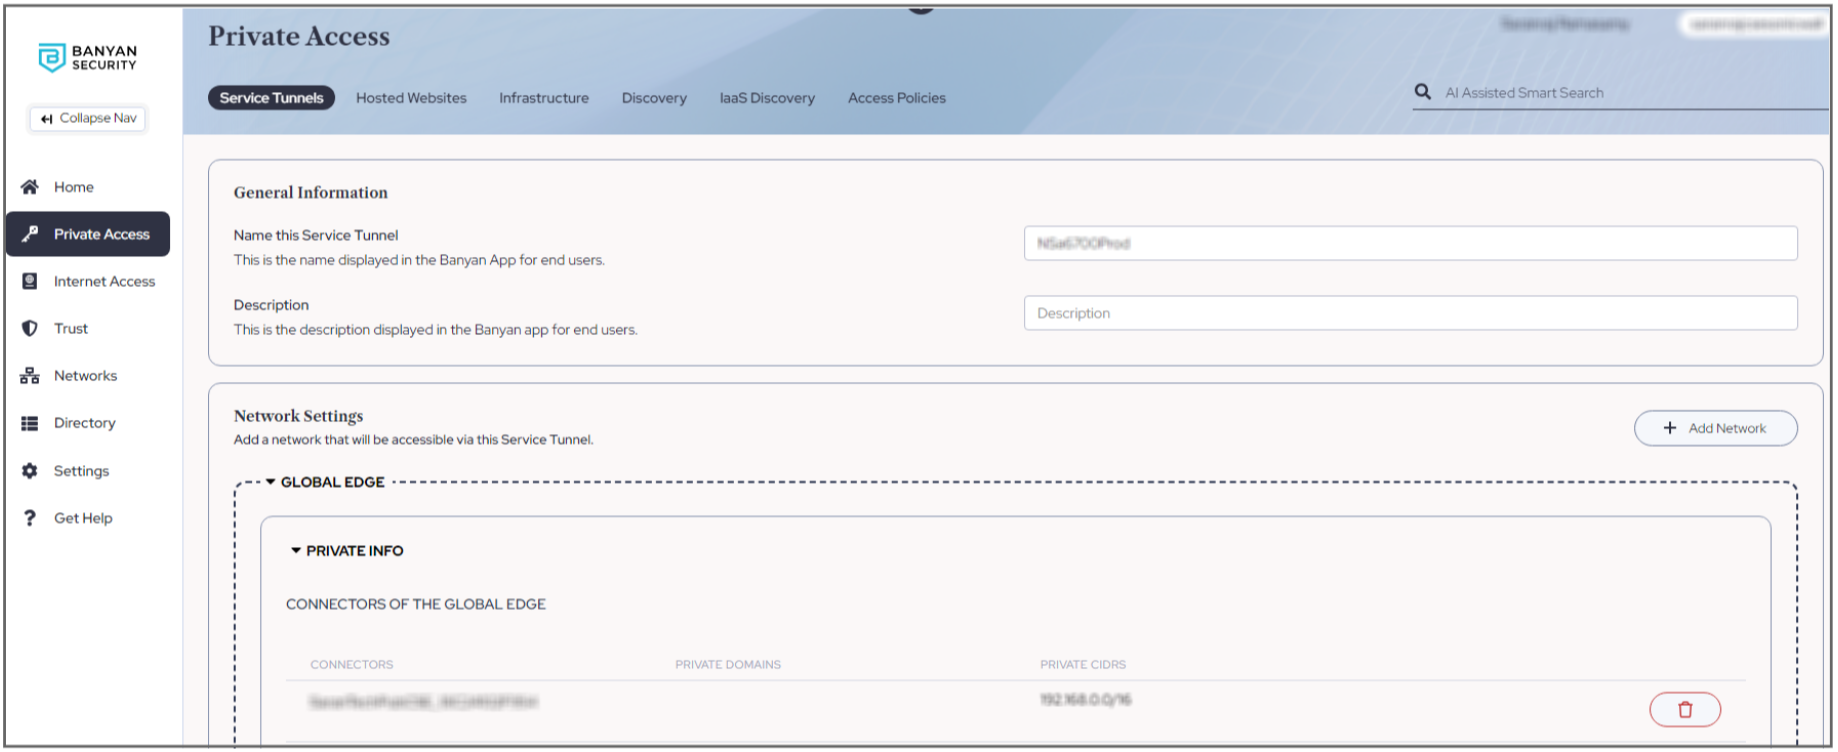
c. Click Attach a Policy, and select your policy from the Attach a Policy search option in the Assignment Settings section. For more information on the access policy, refer to the Access Policies.
d. Click Save.
- Navigate to Directory > Users.
a. Click Add User and enter your name and corporate email ID.
b. Click Save.
c. You receive an email from CSE with the account details.
d. Complete your sign-up with the information, set your new CSE password to activate your account in the CSE App or Client and log in with your new password.
Deploying CSE App or Client and Testing Connectivity
To deploy the CSE App or Client:
- Navigate to Settings > CSE Client, and download the CSE Client and Install it.

- Install the CSE App or Client on your machine.
Copy the invite code when prompted to register with the correct organization. You can find the invite code in the email received email from CSE when you add a user under the Directory > Users section. - Install a CSE App or Client on your machine. CSE App or Client represents a remote user trying to connect to a secure resource via the CSE/CSE ZTNA solution.
To test the CSE App or Client connectivity:
- If the CSE App or Client is in connected status.
In this case, we have allowed ping to an internal resource, and you can see that ping over the CSE ZTNA solution is working.
- If the CSE App or Client is in disconnected status.
In this case, we have allowed ping to an internal resource, and you can see that ping timing out.
Viewing Cloud Secure Edge Connector Log events
This chapter provides viewing the log events for CSE Connector.
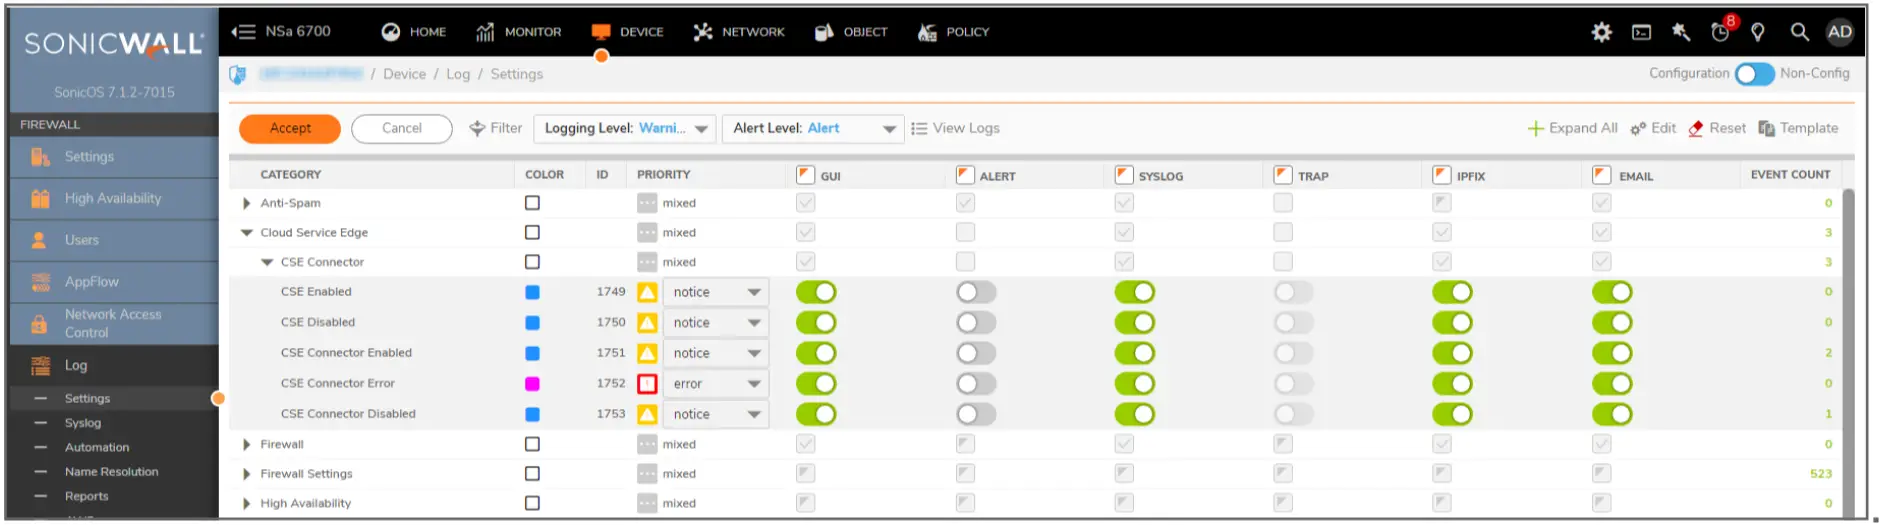
On the SonicWall firewall, navigate to Device > Log > Settings.
Users can view a new log category “Cloud Secure Edge”, and the implementation of New CSE Events such as CSE Connector, CSE Enabled, CSE disabled, CSE Connector Error, CSE Connector Enabled, CSE Connector Disabled.
The CSE Enabled/Disabled event have the date/time, and nominal string fields to indicate status.
CSE Connector Enabled/Disabled have the date/time, and the Connector name in the string field.
CSE error event is logged after exhausting retries to communicate with LM or CSE Command Center or on receiving an error indication from LM (For example: Organization is not created).
The WireGuard module implements WireGuard tunnel log events, and it has sufficient logs to report events on WireGuard packet handling.
SonicOS’s existing support for sending configured log events to an external server should already cover the sending of log events to NSM.
Summarized Connector status can be set in Heartbeats. (0 = all tunnels up, 1 = some tunnels up, 2 = all tunnels down).

Use Case
This section provides the use case information for the Cloud Secure Edge.
Topics:
- Firewall is RMA
- Firewall is a Secure Upgrade
- SonicWall Active/Standby HA Pair Scenarios
- Temporarily Turning off the Connector
- Synchronize Status of the Connector
Firewall is RMA
The old unit continues working for two weeks as per RMA expectations. The user receive a replacement unit and then register to start using the new unit. SonicOS running in the new unit will request LM for a new Connector. LM follow the same process as requesting a new Connector for a firewall.
Firewall is a Secure Upgrade
Users may need to create a new service tunnel and access control policies on the CSE command center.
SonicWall Active/Standby HA Pair Scenarios
Only the primary in an HA pair environment have a Connector created in CSE. The secondary expects to use the same configuration when it becomes the ‘active’ in the active/standby pair and connects with the same variables via WireGuard to the POPs.
Temporarily Turning Off the Connector
Once the user enables the toggle for the Cloud Secure Edge Connector, a new option enables by default. The Enable Cloud Secure Edge connectivity option can be toggled OFF to disconnect the Connector on the firewall. Toggle back enable the Connector again. In this scenario, the Connector remains connected in the CSE console. Do not delete the Connector in the CSE console.
Synchronize Status of the Connector
Request this option in the CSE Status tab, and click it to get the Connector details, including the Connector status from LM. This will help to synchronize the Connector status with LM.
SonicWall Support
Technical support is available to customers who have purchased SonicWall products with a valid maintenance contract.
The Support Portal provides self-help tools you can use to solve problems quickly and independently, 24 hours a day, 365 days a year.
The Support Portal enables you to:
- View Knowledge Base articles and Technical Documentation
- View and participate in the Community Forum discussions
- View Video Tutorials
- Access MySonicWall
- Learn about SonicWall Professional Services
- Review SonicWall Support services and warranty information
- Register at SonicWall University for training and certification
About This Document
SonicOS Cloud Secure Edge Feature Guide
Updated – November 2024
Software Version – 8
232-006213-00 Rev A
Copyright © 2024 SonicWall Inc. All rights reserved.
The information in this document is provided in connection with SonicWall and/or its affiliates’ products. No license, express or implied, by estoppel or otherwise, to any intellectual property right is granted by this document or in connection with the sale of products. EXCEPT AS SET FORTH IN THE TERMS AND CONDITIONS AS SPECIFIED IN THE LICENSE AGREEMENT FOR THIS PRODUCT, SONICWALL AND/OR ITS AFFILIATES ASSUME NO LIABILITY WHATSOEVER AND DISCLAIMS ANY EXPRESS, IMPLIED OR STATUTORY WARRANTY RELATING TO ITS PRODUCTS INCLUDING, BUT NOT LIMITED TO, THE IMPLIED WARRANTY OF MERCHANTABILITY, FITNESS FOR A PARTICULAR PURPOSE, OR NON-INFRINGEMENT. IN NO EVENT SHALL SONICWALL AND/OR ITS AFFILIATES BE LIABLE FOR ANY DIRECT, INDIRECT, CONSEQUENTIAL, PUNITIVE, SPECIAL OR INCIDENTAL DAMAGES (INCLUDING, WITHOUT LIMITATION, DAMAGES FOR LOSS OF PROFITS, BUSINESS INTERRUPTION OR LOSS OF INFORMATION) ARISING OUT OF THE USE OR INABILITY TO USE THIS DOCUMENT, EVEN IF SONICWALL AND/OR ITS AFFILIATES HAVE BEEN ADVISED OF THE POSSIBILITY OF SUCH DAMAGES. SonicWall and/or its affiliates make no representations or warranties with respect to the accuracy or completeness of the contents of this document and reserves the right to make changes to specifications and product descriptions at any time without notice. and/or its affiliates do not make any commitment to update the information contained in this document.
For more information, visit https://www.sonicwall.com/legal.
End User Product Agreement
To view the SonicWall End User Product Agreement, go to: https://www.sonicwall.com/legal/end-user-product-agreements/.
Open Source Code
SonicWall Inc. is able to provide a machine-readable copy of open source code with restrictive licenses such as GPL, LGPL, AGPL when applicable per license requirements. To obtain a complete machine-readable copy, send your written requests, along with certified check or money order in the amount of USD 25.00 payable to “SonicWall Inc.”, to:
General Public License Source Code Request
Attn: Jennifer Anderson
1033 McCarthy Blvd
Milpitas, CA 95035
Documents / Resources
 | SONICWALL SonicOS 8 Cloud Secure Edge [pdf] User Guide SonicOS 8 Cloud Secure Edge, Cloud Secure Edge, Secure Edge, Edge |