![]()
![]() SENSOR ACTIVATED
SENSOR ACTIVATED
User manual
Information & safety
Congratulations on your new bathroom mirror!
We hope you will enjoy it very much. Before you begin to install the mirror, please carefully read and follow the instructions.
- The mirror should be placed according to the requirements for bathroom and in the correct zone according to IP21.
- Do not use the mirror outdoors.
- Make sure the power source comlies with the product specifications.
- Do not let children play with the mirror.
- The mirror comes with an uncharged battery and it takes about 5 hours to fully charge.
Kelvin:

Lumen:
| FK487EP, FK488EP, FK487H | FK491EP | FK492EP |
| 58 Light | 68,25 | 65,36 |
The light in your mirror!
LED light ring and a built-in sensor that lights up automatically when moving close to the mirror. The LED light ring has an estimated life span of 50 000 h.
Sensor activated LED

The sensor is activated at a distance of 15 cm, it will turn off automatically after 12 seconds without use.
 | Premium LED/wall mount |
 | Premium LED/freestanding |
 | Sensor activated |
 | USB cord enclosed |
 | Rechargeable battery included |
 | Main switch ON/OFF |
 | 7X magnification |
 | Screw or glue. Glue is not included. |
 | Hardwired installation |
FK487EP/FK488EP/FK491EP/FK492EP
 | Power indicator |
Indication light info
| No light ar normal use | Please charge when red light flashes | ||
 | One blue flash when turning on | Pulses red light when charging | |
| One red flash when turning off | Blue light when fully charged |
Caution!
 | Avoid sunlight |
Important!
Tighten screws and retighten later if needed.

Care instructions!
Wipe with a slightly damp cloth.
 Mounting instructions, screw fitting
FK487EP
Dismantel the bracket using the allen key.
Drill two holes Ø5 mm and fix the brackets to the wall using the plugs and screws.
Check that the bracket is tightly fixed. Before drilling, make sure you have measured the distance between the wholes carefully.
Fasten the hexagonal screw with the allen key. Switch on.
Tighten screws and retighten later if needed.

 Mounting instructions, glue fitting
FK487EP
Dismantel the bracket using the allen key.

 Carefully follow the instructions for assembly and safety provided by the glue manufacturer.
Fasten the hexagonal screw with the allen key.
Switch on.
Tighten screws and retighten later if needed.

How to charge the battery
FK487EP/ FK488EP
Rechargeable battery, charge with USB.
 Mounting instructions, hardwired
FK487H Important!
Electrical installations must be performed by an authorized electrician.
Dismantel the bracket using the allen key.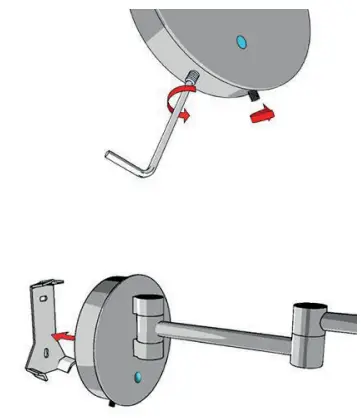
Drill a hole of Ø50 mm and 15 mm dept to the wall.
Drill two holes Ø5 mm and fix the brackets to the wall using the plugs and screws. Check that the bracket is tightly fixed. Before drilling, make sure you have measured the distance between the wholes carefully.

Fix the brackets to the wall using the screws and make sure the bracket is tightly fixed.

Fasten the hexagonal screw with the allen key. Plug into the main socket and switch on.
Tighten screws and retighten later if needed.

 Mounting instructions, screw fitting
FK491EP/ FK492EP

Dismantel the bracket using the allen key.

Drill two holes Ø5 mm and fix the brackets to the wall using the plugs and screws. Check that the bracket is tightly fixed. Before drilling, make sure you have measured the distance between the wholes carefully.

Fasten the hexagonal screw with the allen key. Plug into the main socket and switch on.

 How to charge the battery
FK491EP/ FK492EP
Rechargeable battery, charge with USB.
 Test and certification
Tested and approved by TÜV SYD (FK487EP, FK488EP), TÜV Rheinland (FK487H, FK491EP, FK492EP).
Warranty Made in colid brass with a genuine construction and classic design
 Smedbo bathroom products comes with a 10-Year consumer warranty
Recycling![]() Please recycle the outer package as card board, inner package as plastic and the mirror as electronics. Leave batteries in the propper container at your nearest recycling yard.
Please recycle the outer package as card board, inner package as plastic and the mirror as electronics. Leave batteries in the propper container at your nearest recycling yard.

![]()
| SMEDBO AB HEAD OFFICE BOX 13063 250 13 HELSINGBORG SWEDEN TEL +46 42 25 15 00 FM: +46 42 25 15 15 E-MAIL: INFOOSMEDBO.SE WWW.SMEDBO.NET | DAN MARK SMEDBO TEL 45 83 58 08 E-MAIL: INFO@SMEDBO.DK |
| UNITED KINGDOM SMEDBO PHONE: 0114 276 0707 FAX: 0114 272 0499 E-MAIL: UK.SALES@SMEDBO.COM WWW.SMEDBO.CO.UK | NORGE SMEDBO NORGE NS TEL 69 36 18 20 E-MAIL: INFO@SMEDBO.NO |
| DEUTSCHLAND SMEDBO GMBH AN DER STRUSBEK 68 D-22926 AHRENSBURG TEL: 04102-2208-0 FM: 04102-2208-22 E-MAIL: INFO@SMEDBO.DE | FINLAND SMEDBO PUH: 0207 129 570 E-MAIL: INFO@SMEDBO.FI |
X1710
E60548700REVG
Documents / Resources
 | SMEDBO Outline Sensor Activated LED [pdf] User Manual Outline, Sensor Activated LED, Activated LED, Sensor LED, LED |


