ROXIYED DC-C Series Ceiling Fan with Light and Remote

Specifications
- Models: DC-C48-W, DC-C48L-W, DC-C48-B, DC-C48L-B, DC-C48-T, DC-C48L-T
- Customer Support Email: Support@ROXIYED.COM
Product Information
This Roxiyed DC ceiling fan is equipped with intelligent energy-saving DC technology. The model comes with LED lighting options for added convenience and efficiency.
Installation Instructions
Before Installation
- Unpack the fan and identify all parts as shown in Fig 1a and Fig 1b.
- Check for any damage to the fan prior to installation.
- Ensure the power is off before installation.
- Verify that the outlet box can support the fan’s weight.
Quick Blade Installation
- Insert the blades into the blade holding slots on the motor housing and slide downward until they click into position.
- Secure the blade screws into place.
Hanging the Fan
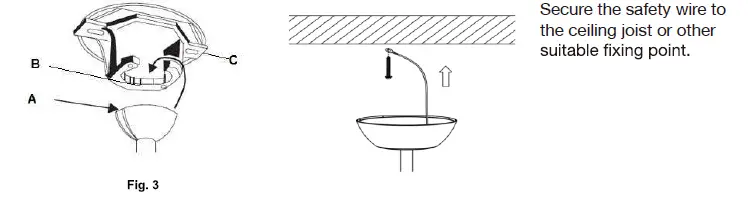
Lift the fan assembly onto the mounting bracket. Align the hanger ball with the tab of the mounting bracket to prevent rotation during operation. Secure the safety wire to the ceiling joist.
FAQ
- Q: Can I install the fan myself?
- A: The fan must be installed by a licensed electrician to ensure safety and proper installation.
- Q: What should I do if I notice physical damage to the fan?
- A: Physical damage like marks and scratches are not covered by the warranty. Contact Roxiyed for replacement parts discussion.

 Intelligent energy saving DC technology
Images are for reference only and may vary slightly from actual product.
Ceiling Fan Installation Manual Rev 1.1
MODELS
- DC-C48-W, DC-C48L-W, DC-C48-B, DC-C48L-B, DC-C48-T, DC-C48L-T
- DC-C52-W, DC-C52L-W, DC-C52-B, DC-C52L-B, DC-C52-T, DC-C52L-T
- DC-C60-W, DC-C60L-W, DC-C60-B, DC-C60L-B, DC-C60-T, DC-C60L-T
Customer Support Email: Support@ROXIYED.COM
Thank you for purchasing this quality Roxiyed DC ceiling fan. To ensure correct function and safety, please read all instructions before using the product and keep all instructions for future reference.
CAUTION
Read Instructions Carefully For Safe Installation and Fan Operation
 MUST BE INSTALLED BY
A LICENSED ELECTRICIAN
SAFETY PRECAUTIONS
WARNING:FOR SAFE USE OF THIS FAN. AN ALL-POLE DISCONNECTION MUST BE INCORPORATED INTO THE FIXED WIRING INACCORDANCE WITH THE WIRING RULES.
The installation is to be in accordance with the National Electrical Code, ANSI/NFPA 70 and local codes.As outlined in clause ANSI/NFPA70 for meeting the minimum electrical safety of this standard.
Please note warranty will be void if installation is without an all-pole disconnection incorporated in the fixed wiring in accordance with the wiring rules.Example: If a fan is connected to a circuit that can be isolated via an all-pole safety switch at the switchboard, then this is considered to be an all-pole disconnection to the ceiling fan electrical circuit, meeting the requirements of clause ANSI/NFPA70
A single-pole switch on the active of the receiver input of remote control must also be included in the wiring, and located in the same room as the ceiling fan. (see wiring diagram)
- The appliance is not intended for use by persons (including children) with reduced physical, sensory or mental capabilities, or lack of experience and knowledge, unless they have been given supervision or instruction concerning the use of the appliance by a person responsible for their safety.
- Children should be supervised to ensure that they do not play with the appliance.
- The structure to which the fan is to be mounted must be capable of supporting a weight of 20kg.
- The fixing point on the ceiling, requires a solid bracing structure such as Timber noggins or joists. The bracing should be butted up firmly and securely to the back of any non structural roofing panel such as plaster or Gyprock to ensure safety and optimum performance of the fan.
- CAUTION: To Reduce The Risk Of Injury To Persons, Install Fan So That The Blade Is At Least 3.05 Meters (10 Feet) Above The Floor.
- Only a licensed electrician should complete the installation.
- WARNING: If unusual wobbling or oscillating movement is observed, immediately stop using the ceiling fan and contact the manufacturer, its service agent or suitably qualified persons.
- WARNING: Light and fan must be connected to the same phase. Before servicing, ensure both light and fan circuits are disconnected. Do not dispose of electrical appliances as unsorted municipal waste, use separate collection facilities. Contact you local government for information regarding the collection systems available. If electrical appliances are disposed of in landfills or dumps, hazardous substances can leak into the ground water and get into the food chain, damaging your health and well-being.
![]() Do not dispose of electrical appliances as unsorted municipal waste, use separate collection facilities. Contact you local government for information regarding the collection systems available. If electrical can leak into the ground water and get into the food chain, damaging your health and well-being.
Do not dispose of electrical appliances as unsorted municipal waste, use separate collection facilities. Contact you local government for information regarding the collection systems available. If electrical can leak into the ground water and get into the food chain, damaging your health and well-being.
BEFORE INSTALLATION
Unpack the fan carefully and identify all parts. Please refer to Fig 1a and Fig 1b
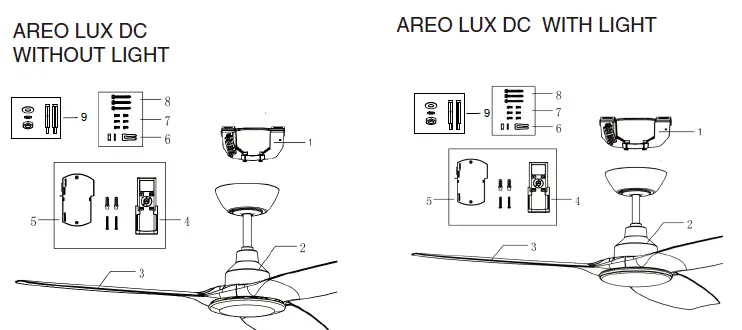
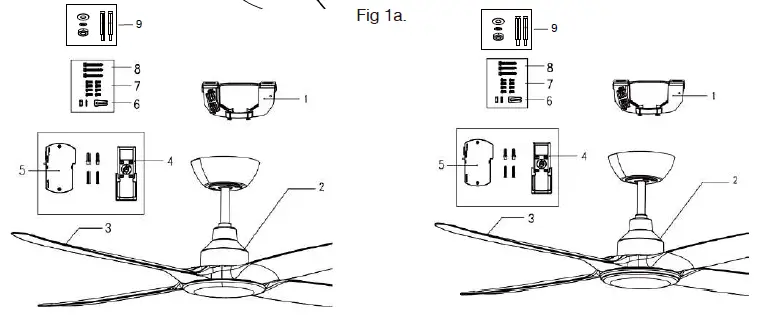
Fig 1b.
- Mounting bracket x 1
- Pre-assembled fan motor, down rod, canopy and bottom cover x 1
- Blades x 3 (or 4)
- Remote Control x 1 (Wood screws 3.5*20mm )
- Receiver x 1
- Balancing Kit x 1
- Blade screws x 6 (or 8) (5 x 16mm)
- Wood screws for mounting bracket x 2 (6 x 50mm)
Wood screw for safety wire x 1 (6 x 50mm) - Concrete Screw Anchors set x 1 (6 x 54mm)
Fig 1b.
- Mounting bracket x 1
- Pre-assembled fan motor, down rod, canopy and LED light x 1
- Blades x 3 (or 4)
- Remote Control x 1 (Wood screws 3.5x 20mm).
- Receiver x 1
- Balancing Kit x 1
- Blade screws x 6 (or 8) (5 x 16mm)
- Wood screws for mounting bracket x 2 (6 x 50mm)
Wood screw for safety wire x 1 (6 x 50mm) - Concrete Screw Anchors set x 1(6 x 54mm)
Please note: Check for any damage to the fan prior to installation. Physical damage such as marks and scratches is not covered by the in home warranty. In this case, please contact Roxiyed to discuss replacement parts.
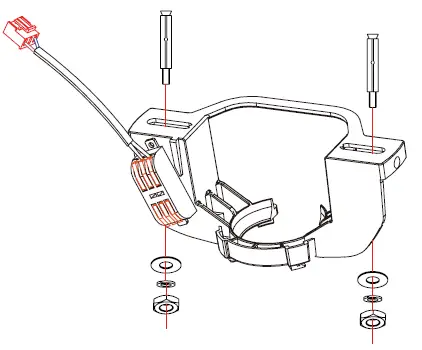
FIX THE CEILING HANGER BRACKETWARNING: The fixing must be done securely in the structure of the ceiling by a qualified person.
Depending on the structure of your ceiling, use suitable screws and washers. Do not fix the ceiling support in a structure thinner than 2 inch or in hollow elements, in order to avoid any risk of falling. Make sure that the fixing is very solid and capable of carrying a load of a least 20kg. We decline all responsibility in the event of a fall of the ceiling fan. Make sure power is off before installation.You can install the hanger bracket on an inclined ceiling of 15° maximum. If your ceiling is inclined, the lugs of the hanger bracket must be on the highest side of your ceiling. Do not put it on the lowest side of your ceiling.
Check that the outlet box is securely installed in place such that it is able to support at least the fan weight.
WOOD CEILING
Position the support in the desired location and fix it using the screws provided.
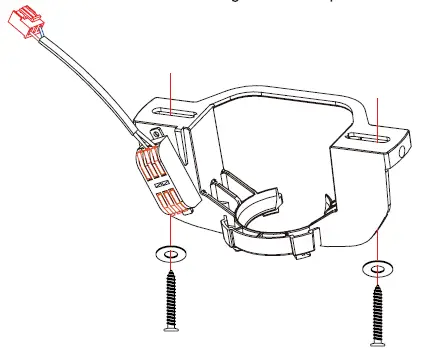
CONCRETE CEILING
Position the support in the desired location and mark the holes to be made. Remove the support and drill the concrete structure by making 2 holes corresponding to the diameter of your anchor studs. Remove dust and introduce the anchor studs using a hammer (leave the threaded rod sticking out). Remove nuts and washers, replace the support and replace the washers and nuts. Tighten the nuts securely using a suitable wrench.
QUICK ‘CLICK’ BLADE INSTALLATION
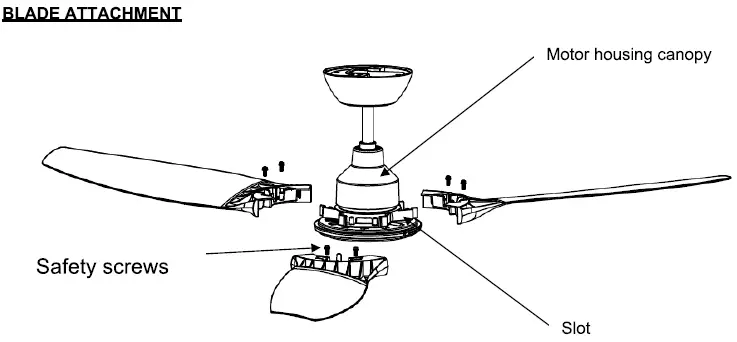
- Insert the blades (AREO LUX DC x 3) into the blade holding slots on the motor housing, slide downward and click into position‘.
- Insert the 2 safety screws ,being caws, being careful not to over-tighten
- Move motor housing canopy download until covering the motor
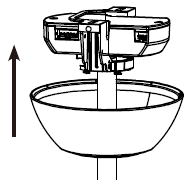
HANGING THE FAN
Lift the fan assembly onto the mounting bracket. Ensure that slot (A) of the hanger ball is fully aligned/engaged with the Tab (B) of the mounting bracket (C) to prevent the fan from rotating when in operation. Fig. 3)
 Angle Ceiling Installation
This fan hanging system supports a maximum 15-degree angled installation. (Fig 4)
Please note: the Tab (B) on the hanging bracket that sits in the groove (A) on the hanging ball should be positioned at the highest point to ensure correct operation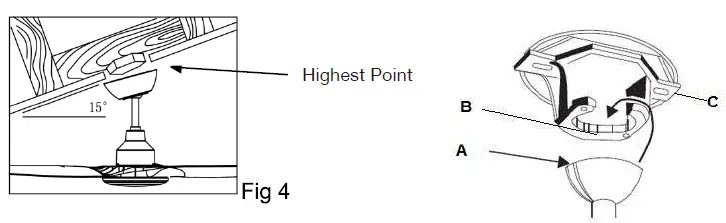
Finish Installation
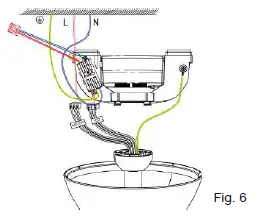
- Complete the electrical connection at the mounting bracket terminal block.
- Fix the EARTH cable from motor to the mounting bracket.
NOTE: AREO LUX DC is a Class I electrical product. (Refer to Fig 6.).
FINISHING THE INSTALLATION
- Connect fan to the receiver (can be done before or after sliding receiver into place).
A. For fan models without light, plug cable marked ‘motor’ into remote control box. See Fig 7.2
B. For fan models with light, plug cable marked ‘motor’ and ‘LED’ into remote control box. See Fig 7.1 - Slide receiver into position in the hanging bracket making sure the AC input connecter on the receiver is aligned with the AC port on the receiver. Refer Fig 7.1 on page 7
- CAUTION: To Reduce The Risk Of Electric Shock, Disconnect The Electrical Supply Circuit To The Fan Before Installing Light Kit.

- After making the wire connections, the wires should be spread apart with the grounded conductor and the equipment grounding conductor on one side of the outlet box and the ungrounded conductor on the other side of the outlet box. The splices after being made should be turned upward and pushed carefully up into the outlet box
- Slide the canopy upwards into position over the mounting bracket then turn counter clockwise to twist lock into position. Ensure all 4 tabs on the mount bracket are located correctly into the slots on the canopy. Canopy should be sitting approx. -1/8 inch off the ceiling.
- Ensure all wires are tucked neatly into canopy taking care not to cause damage
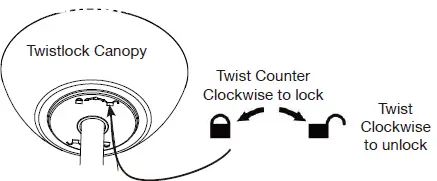
Fig. 8
ELECTRICAL WIRING DIAGRAM
WARNING: FOR YOUR SAFETY ALL ELECTRICAL CONNECTIONS MUST BE UNDERTAKEN BY
A LICENSED ELECTRICIAN IN ACCORDANCE WITH ANSI/NFPA 70 WIRING RULES.
- Connect “LIVE” supply to the “L” of the terminal block on the mounting bracket.
- Connect “EARTH” supply wire to
 of the terminal block on the mounting bracket.
 - Connect “NEUTRAL” supply to “N” of the terminal block on the mounting bracket.
- Screw “EARTH” cable from motor to cavityon the mounting bracket. Please refer to Fig 6

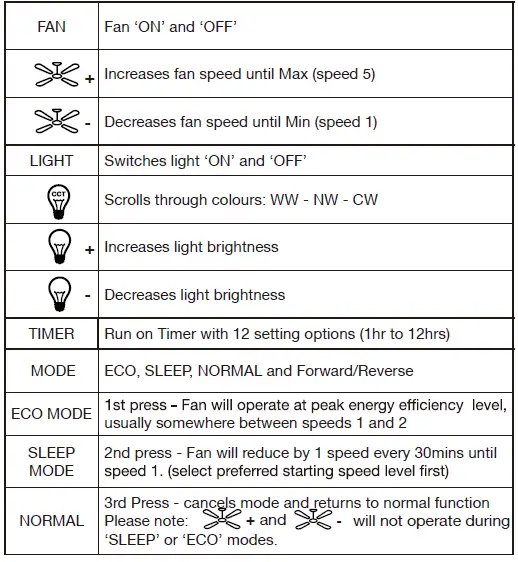
REMOTE CONTROL OPERATION
Fan Models Without Light
| FAN | Fan ‘ON’ and ‘OFF’ |
 | Increases fan speed until Max (speed 5) |
| Decreases fan speed until Min (speed 1) | |
| TIMER | Run on Timer with 12 setting options (1hr to 12hrs) |
| MODE | ECO, SLEEP and NORMAL |
| ECO MODE | level, usually somewhere between speeds 1 and 2 |
| SLEEP MODE | 2nd press – Fan will reduce by 1 speed every 30mins
|
| NORMAL | 3rd Press – cancels mode and returns to normal function Please note: |
Note: Light will reactivate at previous brightness and colour (CCT) settings when using handset only. Once wall (isolation) switch has been turned ‘OFF’ Light will default back to 100% brightness (NW) Natural white light.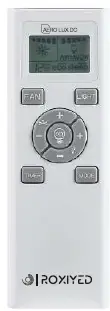
Fan Models With Light
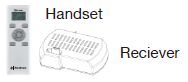
REMOTE CONTROL OPERATION
- A remote control consists of two parts.
- Handset (transmitter) controller.
- Receiver. Receives messages from the handset and is located in upper canopy of the fan.
- The AREO LUX DC remote control comes pre-paired at the factory and is ready to use.
Pairing will only be required in situations mentioned below.
Using 1 remote handset to control 2 or more AREO LUX DC Ceiling fans
- Choose the fan you wish to pair with your handset.
- Turn isolation switch ‘ON’ and within 20 seconds press and hold
 on the remote for 8 seconds. The fan will emit a ‘beep beep’ sound to indicate the pairing process is activated.
 - Press operation and successful pairing. press and hold FAN on the FAN and change the speed of the ceiling fan via the remote to check the operation and successful pairing.
- Press and change the speed of the ceiling fan via the remote to check the operation and successful pairing.
TECHNICAL INFORMATION
| Ceiling Fan Model | Rated Voltage | Rated Power (Motor) | Rated Power (Lamp) | Fan Weight (Kg) |
| DC-C36-W | 120AC/60HZ | 32W | N/A | 3.82 |
| DC-C36L-W | 120AC/60HZ | 32W | 20W, LED, 3000K, 4000K, 5000K | 4.16 |
| DC-C36-B | 120VAC/60HZ | 32W | N/A | 3.82 |
| DC-C36L-B | 120VAC/60HZ | 32W | 20W, LED, 3000K, 4000K, 5000K | 4.16 |
| DC-C48-W | 120VAC/60HZ | 31W | N/A | 4.00 |
| DC-C48L-W | 120VAC/60HZ | 31W | 20W, LED, 3000K, 4000K, 5000K | 4.43 |
| DC-C48-B | 120VAC/60HZ | 31W | N/A | 4.00 |
| DC-C48L-B | 120VAC/60HZ | 31W | 20W, LED, 3000K, 4000K, 5000K | 4.43 |
| DC-C52-W | 120VAC/60HZ | 31W | N/A | 4.05 |
| DC-C52L-W | 120VAC/60HZ | 31W | 20W, LED, 3000K, 4000K, 5000K | 4.39 |
| DC-C52-B | 120VAC/60HZ | 31W | N/A | 4.05 |
| DC-C52L-B | 120VAC/60HZ | 31W | 20W, LED, 3000K, 4000K, 5000K | 4.39 |
| DC-C52-T | 120VAC/60HZ | 31W | N/A | 4.05 |
| DC-C52L-T | 120VAC/60HZ | 31W | 20W, LED, 3000K, 4000K, 5000K | 4.39 |
| DC-C60-W | 120VAC/60HZ | 43W | N/A | 4.50 |
| DC-C60L-W | 120VAC/60HZ | 43W | 20W, LED, 3000K, 4000K, 5000K | 4.70 |
| DC-C60-B | 120VAC/60HZ | 43W | N/A | 4.50 |
| DC-C60L-B | 120VAC/60HZ | 43W | 20W, LED, 3000K, 4000K, 5000K | 4.70 |
| DC-C60-T | 120VAC/60HZ | 43W | N/A | 4.50 |
| DC-C60L-T | 120VAC/60HZ | 43W | 20W, LED, 3000K, 4000K, 5000K | 4.70 |
| Ceiling Fan Model | Rated Voltage | Rated Power (Motor) | Rated Power (Lamp) | Fan Weight (Kg) |
| DC-C364-W | 120VAC/60HZ | 30W | N/A | 4.11 |
| DC-C364L-W | 120VAC/60HZ | 30W | 20W, LED, 3000K, 4000K, 5000K | 4.45 |
| DC-C484-B | 120VAC/60HZ | 30W | N/A | 4.11 |
| DC-C484L-B | 120VAC/60HZ | 30W | 20W, LED, 3000K, 4000K, 5000K | 4.45 |
| DC-C564-W | 120VAC/60HZ | 38W | N/A | 4.31 |
| DC-C564L-W | 120VAC/60HZ | 38W | 20W, LED, 3000K, 4000K, 5000K | 4.65 |
| DC-C564-B | 120VAC/60HZ | 38W | N/A | 4.31 |
| DC-C564L-B | 120VAC/60HZ | 38W | 20W, LED, 3000K, 4000K, 5000K | 4.65 |
| DC-C48-T | 120VAC/60HZ | 31W | N/A | 4.00 |
| DC-C48L-T | 120VAC/60HZ | 31W | 20W, LED, 3000K, 4000K, 5000K | 4.43 |
WARRANTY INFORMATION
- If you suspect faults relating to installation, contact your installer to rectify.
- If you suspect there to be manufacturing defect,You can contact us without any hesitation at any time of the day, and we will reply to you within 12 hours.
(It would be appreciated if you could provide us with a video or pictures, if available)
It would be appreciated if you could provide us with:
Photos or videos to illustrate the issue with your ceiling fan. Model number and serial number (on motor housing).
The date and place of purchase of the unit.
We will send you brand new items for free or give you a full refund if any quality problems occur within 1 years from the date of purchase.
CONTACT INFORMATION
You can contact us by sending an email to: support@ROXIYED.com
Documents / Resources
 | ROXIYED DC-C Series Ceiling Fan with Light and Remote [pdf] Instruction Manual DC-C48-W, DC-C48L-W, DC-C48-B, DC-C48L-B, DC-C48-T, DC-C48L-T, DC-C52-W, DC-C52L-W, DC-C52-B, DC-C52L-B, DC-C52-T, DC-C52L-T, DC-C60-W, DC-C60L-W, DC-C60-B, DC-C60L-B, DC-C60-T, DC-C60L-T, DC-C Series Ceiling Fan with Light and Remote, DC-C Series, Ceiling Fan with Light and Remote, Fan with Light and Remote, Light and Remote, Remote |


