 Temperature Measurement Module
DVP04PT-H2
Instruction Manual
DVP04PT-H2 Temperature Measurement Module
DVP04PT-H2 is able to receive 4 points of resistance temperature detectors (PT100, PT1000, NI100, and NI1000) and convert them into 16-bit digital signals. Besides, through the user of FROM/TO instructions in DVP-EH2 MPU program, the data in DVP04PT-H2 can be read or written. There are 49 16-bit control registers (CR) in it. DVP04PT-H2 displays temperatures in Celsius (resolution: 0.1°C) and Fahrenheit (resolution: 0.18°F).
![]() This sheet only provides instructions that include electrical and other specifications as well as wiring. For more details of program design and instructions, please refer to “DVP-PLC Application Manual: Programming”. For any further information of peripherals, refer to “DVP-PLC Application Manual Special Modules”
This sheet only provides instructions that include electrical and other specifications as well as wiring. For more details of program design and instructions, please refer to “DVP-PLC Application Manual: Programming”. For any further information of peripherals, refer to “DVP-PLC Application Manual Special Modules”![]() DVP04PT-H2 is an OPEN-TYPE device. It should be installed in a control cabinet free of airborne dust, humidity, electric shock and vibration. To prevent non-maintenance staff from operating DVP04PT-H2, or to prevent an accident from damaging DVP04PT-H2, the control cabinet in which DVP04PT-H2 is installed should be equipped with a safeguard. For example, the control cabinet in which DVP04PT-H2 is installed can be unlocked with a special tool or key.
DVP04PT-H2 is an OPEN-TYPE device. It should be installed in a control cabinet free of airborne dust, humidity, electric shock and vibration. To prevent non-maintenance staff from operating DVP04PT-H2, or to prevent an accident from damaging DVP04PT-H2, the control cabinet in which DVP04PT-H2 is installed should be equipped with a safeguard. For example, the control cabinet in which DVP04PT-H2 is installed can be unlocked with a special tool or key.![]() DO NOT connect AC power to any of I/O terminals, otherwise serious damage may occur. Please check all wiring again before DVP04PT-H2 is powered up.
DO NOT connect AC power to any of I/O terminals, otherwise serious damage may occur. Please check all wiring again before DVP04PT-H2 is powered up.
After DVP04PT-H2 is disconnected, Do NOT touch any terminals in a minute. Make sure that the ground terminal![]() on DVP04PT-H2 is correctly grounded in order to prevent electromagnetic interference.
on DVP04PT-H2 is correctly grounded in order to prevent electromagnetic interference.![]() Please keep the wire as short as possible when wiring a platinum resistance thermometer (RTD) to the controller and please route power wires as far as possible from load wires to prevent interference and induced noise.
Please keep the wire as short as possible when wiring a platinum resistance thermometer (RTD) to the controller and please route power wires as far as possible from load wires to prevent interference and induced noise.![]() Make sure settings of resistance temperature detectors in CR#1 are correct, or serious error may occur in measurements.
Make sure settings of resistance temperature detectors in CR#1 are correct, or serious error may occur in measurements.
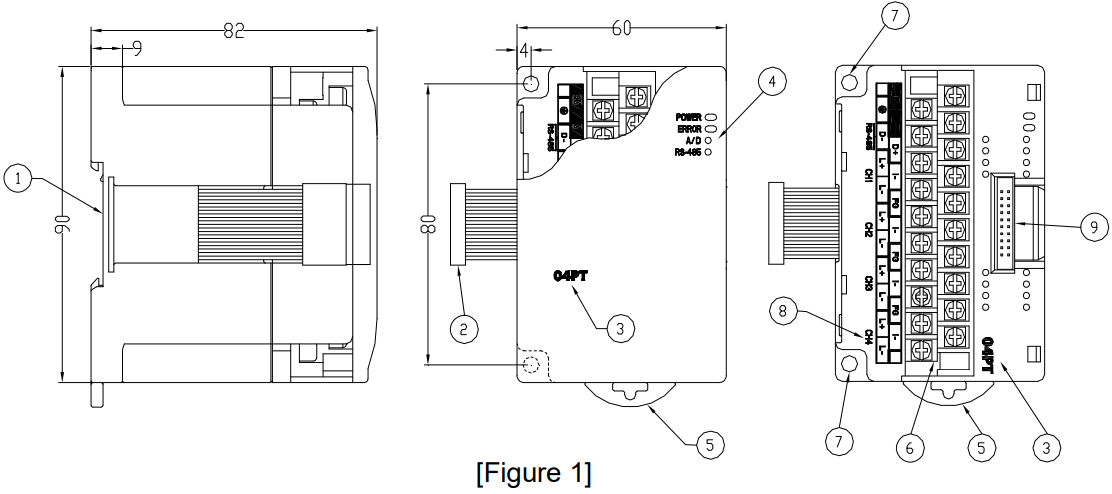
Product Profile & Dimensions
 Unit: mm
- DIN rail (35mm)
- Connection port for extension module
- Model name
- POWER, ERROR, A/D indicator
- DIN rail clip
- Terminals
- Mounting hole
- I/O terminals
- Mounting port for extension module
I/O Terminal Layout

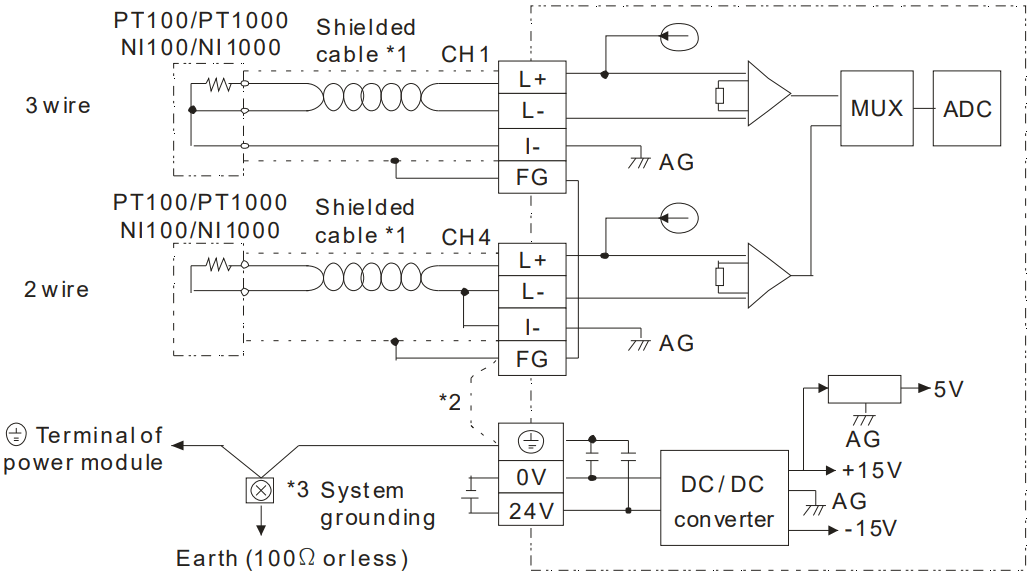
External Wiring

*1: Wiring for analog inputs should use cables of resistive temperature sensors or double shielding cables and should be separated from other power cables that may cause interferences. To prevent the measuring results from being affected by the line resistance, use 3-wire temperature sensor. The terminals should be screwed at torque 1.95 kg-cm (1.7 in-lbs).
*2: Terminal FG is the ground location for noise suppression.
*3: Connect![]() terminal on both the power supply module and DVP04PT-H2 to the system earth point and ground the system contact or connect it to the cover of power distribution cabinet.
terminal on both the power supply module and DVP04PT-H2 to the system earth point and ground the system contact or connect it to the cover of power distribution cabinet.
Note: DO NOT wire empty terminals. Use 60/75°C copper conductors only.
Electrical Specifications
| Power supply voltage | 24 VDC (20.4 to 28.8 VDC) (-15 to +20%) |
| Analog output channel | 4 channels/module |
| Applicable sensors | 3-WIRE PT100 / NI100 / PT1000 / NI1000 3850 PPM/°C (DIN 43760 JIS C1604-1989) |
| Current excitation | 1.53 mA/200 μA |
| Range of input temp. | See the table in “Temperature/Digital Value Curve” section. |
| Range of digital conversion | See the table in “Temperature/Digital Value Curve” section. |
| Resolution | 0.1°C/0.18°F*1 |
| Output impedance | 0.5Ω or less |
| Overall accuracy | ±0.6% when in full scale within the range of 0 to 55°C, 32 to 131°F |
| Response time | 400 ms × number of channels |
| Isolation | Isolation between digital circuits and analog circuits. 500 VDC between digital circuits and ground 500 VDC between analog circuits and ground 500 VDC between analog circuits and digital circuits 500 VDC between 24 VDC and ground |
| Format of digital data | 15 significant bits out of 16 bits are available; in 2’s complement |
| Average function | Provided; available for setup in CR#2 to CR#5; Range: K1 to K100 |
| Self-diagnosis | Upper and lower bound detection/channel |
| Communication mode (RS-485) | Supported, including ASCII/RTU mode. Default communication format: 9600, 7, E, 1, ASCII; refer to CR#32 for details on the communication format. Note1: RS-485 cannot be used when connected to PLC CPUs. Note2: Use extension module wizard in ISPSoft to search or modify the control register (CR) in the modules. |
| Serial connection with DVP-PLC MPU | The modules are numbered from “0 to 7” automatically by their distance from MPU. 0 is the closest to MPU and 7 is the furthest. Maximum 8 modules are allowed to connect to the PLC and will not occupy any digital I/O points. |
*1: The unit of temperature would be displayed as 0.1°C/0.1°F. If the temperature unit is set to be Fahrenheit, the second decimal place would not be shown.
Other Specifications
| Power supply | |
| Max. rated power consumption | 24 VDC (20.4 to 28.8 VDC) (-15 to +20%), 2.5 W supplied by external power. |
| Environment | |
| Operation/storage | 1. Operation: 0 to 55°C (temperature), 5 to 95% (humidity), pollution degree 2 2. Storage: -25 to 70°C (temperature), 5 to 95% (humidity) |
| Vibration/shock immunity | Standard: IEC61131-2, IEC 68-2-6 (TEST Fc)/IEC61131-2 & IEC 68-2-27 (TEST Ea) |
Control Register
| CR# | Attrib. | Content | Explanation | |
| #0 | O | R | Model name | Set up by the system. DVP04PT-H2 = H’6402. You can read the model name from the program and see if the module exists. |
| #1 | O | R/W | Modes of CH1 ~ CH4 | CH1 mode: b0 ~ b3 CH2 mode: b4 ~ b7 CH3 mode: b8 ~ b11 CH4 mode: b12 ~ b15 Take setting up (b3, b2, b1, b0) of CH1 for example (Default = H’0000): 1. (0, 0, 0, 0): PT100 2. (0, 0, 0, 1): NI100 3. (0, 0, 1, 0): PT1000 4. (0, 0, 1, 1): NI1000 5. (0, 1, 0, 0): 0 to 300Ω 6. (0, 1, 0, 1): 0 to 3,000Ω 7. (1, 1, 1, 1): Disabled |
| #2 | O | R/W | CH1 average time | Range of settings in CH1 to CH4: K1 to K100. Default =K10. Please note that the average times set in CR#2 to CR#5 can only be written in once. |
| #3 | O | R/W | CH2 average time | |
| #4 | O | R/W | CH3 average time | |
| #5 | O | R/W | CH4 average time | |
| #6 | X | R | Average °C temp. measured at CH1 | Average Celsius temperature measured at CH1 ~ CH4. Unit: 0.1°C |
| #7 | X | R | Average °C temp. measured at CH2 | |
| #8 | X | R | Average °C temp. measured at CH3 | |
| #9 | X | R | Average °C temp. measured at CH4 | |
| CR#6 to CR#9 are the average Celsius temperatures measured at CH1 to CH4 obtained from the average time settings in CR#2 ~ CR#5. | ||||
| #12 | X | R | Average °F temp. measured at CH1 | Average Fahrenheit temperature measured at CH1 ~ CH4. Unit: 0.1°F |
| #13 | X | R | Average °F temp. measured at CH2 | |
| #14 | X | R | Average °F temp. measured at CH3 | |
| #15 | X | R | Average °F temp. measured at CH4 | |
| CR#12 to CR#15 are the average Fahrenheit temperatures measured at CH1 to CH4 obtained from the average time settings in CR#2 to CR#5. | ||||
| CR# | Attrib. | Content | Explanation | |
| #18 | X | R | Present °C temp. measured at CH1 | Present Celsius temperature measured at CH1 ~ CH4. Unit: 0.1°C |
| #19 | X | R | Present °C temp. measured at CH2 | |
| #20 | X | R | Present °C temp. measured at CH3 | |
| #21 | X | R | Present °C temp. measured at CH4 | |
| #24 | X | R | Present °F temp. measured at CH1 | Present Fahrenheit temperature measured at CH1 ~ CH4. Unit: 0.1°F |
| #25 | X | R | Present °F temp. measured at CH2 | |
| #26 | X | R | Present °F temp. measured at CH3 | |
| #27 | X | R | Present °F temp. measured at CH4 | |
| #30 | X | R | Error status | Register for storing all error statuses. See the table of error status for more information. |
| #31 | O | R/W | Communication address | The RS-485 communication addresses. Range: 01 to 254, Default = K1. |
| #32 | O | R/W | Communication format | 6 communication speeds: 4,800 bps /9,600 bps /19,200 bps / 38,400 bps /57,600 bps /115,200 bps. Data formats include: ASCII: 7, E, 1/ 7,O,1 / 8,E,1 / 8,O,1 / 8,N,1 / 7,E,2 /7,O,2 / 7,N,2 / 8,E,2 / 8,O,2 / 8,N,2 RTU: 8, E, 1 / 8,O,1 / 8,N,1 / 8,E,2 / 8,O,2 / 8,N,2 Default: ASCII,9600,7,E,1(CR#32=H‘0002) Please refer to✽CR#32 at the bottom of the page for more details. |
| #33 | O | R/W | Returning to default setting | Take the setting of CH1 for example: b0: Reserved, b1: Reserved When b2 is set to 1, all settings will return to default ones. Definitions of ERR LED: (Default of b12 to b15 = 1111) 1. When b12 = 1 and CH1 wired to empty external contact, ERR LED will flash. 2. When b13 = 1 and CH2 wired to empty external contact, ERR LED will flash. 3. When b14 = 1 and CH3 wired to empty external contact, ERR LED will flash. 4. When b15 = 1 and CH2 wired to empty external contact, ERR LED will flash. |
| #34 | O | R | Firmware version | Displaying the current firmware version in hex; e.g. version 1.0A is indicated as H’010A |
| #35 ~ #48 | For system use | |||
| Symbols: O: Latched, X: Non-latched R: Able to read data by using FROM instruction or RS-485 communication. W: Able to write data by using TO instruction or RS-485 communication. | ||||
✽Reset Module (Firmware V4.06 or above): Having connected the external power 24V, write the reset code H’4352 for CR#0, then disconnect and reboot to complete the setup.
✽CR#32 Communication Format Setting:
– Firmware V4.04 (and lower): Data format (b11~b8) is not available, ASCII format is 7, E, 1 (code H’00xx), RTU format is 8, E, 1 (code H’C0xx/H’80xx).
– Firmware V4.05 (and higher): Refer to the following table for setup. For new communication format, please take note that modules in the original code H’C0xx/H’80xx is changed to 8E1 for RTU.
| b15 ~ b12 | b11 ~ b8 | b7 ~ b0 | |||||
| ASCII/RTU & High/Low Bit Exchange of CRC | Data Format | Communication Speed | |||||
| Description | |||||||
| H’0 | ASCII | H’0 | 7,E,1*1 | H’6 | 7,E,2*1 | H’01 | 4800 bps |
| H’8 | RTU, No High/Low Bit Exchange of CRC | H’1 | 8,E,1 | H’7 | 8,E,2 | H’02 | 9600 bps |
| H’2 | – | H’8 | 7,N,2*1 | H’04 | 19200 bps | ||
| H’C | RTU, High/Low Bit Exchange of CRC | H’3 | 8,N,1 | H’9 | 8,N,2 | H’08 | 38400 bps |
| H’4 | 7,O,1*1 | H’A | 7,O,2*1 | H’10 | 57600 bps | ||
| H’5 | 8.O,1 | H’B | 8,O,2 | H’20 | 115200 bps | ||
ex: To setup 8N1 for RTU (High/Low Bit Exchange of CRC), communication speed is 57600 bps, write H’C310 in CR #32.
Note *1. Supports ASCII mode ONLY.
▲ CR#0 ~ CR#34: The corresponding parameter addresses H’4064 ~ H’4086 are for users to read/write data by RS-485 communication. When using RS-485, you have to first separate the module from the PLC MPU.
- Function: H’03 (read register data); H’06 (write 1 word datum into register); H’10 (write many word data into register).
- The latched CR should be written by RS-485 communication to stay latched. The CR will not be latched if written by MPU through TO/DTO instruction; however, when using TO/DTO instruction to modify the PID control registers, all latched CR will stay latched.
CR#30: Error status
| Error status | Value | b15 ~ b12 | b11 | b10 | b9 | b8 | b7 | b6 | b5 | b4 | b3 | b2 | b1 | b0 |
| Abnormal power supply | K1 (H’1) | Reserved | 0 | 0 | 0 | 0 | 0 | 0 | 0 | 0 | 0 | 0 | 0 | 1 |
| Wired to empty external contact | K2 (H’2) | 0 | 0 | 0 | 0 | 0 | 0 | 0 | 0 | 0 | 0 | 1 | 0 | |
| Incorrect mode setting | K4 (H’4) | 0 | 0 | 0 | 0 | 0 | 0 | 0 | 0 | 0 | 1 | 0 | 0 | |
| OFFSET/GAIN error | K8 (H’8) | 0 | 0 | 0 | 0 | 0 | 0 | 0 | 0 | 1 | 0 | 0 | 0 | |
| Memory self-test fail | K16 (H’10) | 0 | 0 | 0 | 0 | 0 | 0 | 0 | 1 | 0 | 0 | 0 | 0 | |
| Abnormal digital range | K32 (H’20) | 0 | 0 | 0 | 0 | 0 | 0 | 1 | 0 | 0 | 0 | 0 | 0 | |
| Incorrect average times setting | K64 (H’40) | 0 | 0 | 0 | 0 | 0 | 1 | 0 | 0 | 0 | 0 | 0 | 0 | |
| Instruction error | K128 (H’80) | 0 | 0 | 0 | 0 | 1 | 0 | 0 | 0 | 0 | 0 | 0 | 0 | |
| CH1 wired to empty external contact | K256 (H’100) | 0 | 0 | 0 | 1 | 0 | 0 | 0 | 0 | 0 | 0 | 0 | 0 | |
| CH2 wired to empty external contact | K512 (H’200) | 0 | 0 | 1 | 0 | 0 | 0 | 0 | 0 | 0 | 0 | 0 | 0 | |
| CH3 wired to empty external contact | K1024 (H’400) | 0 | 1 | 0 | 0 | 0 | 0 | 0 | 0 | 0 | 0 | 0 | 0 | |
| CH4 wired to empty external contact | K2048 (H’800) | 1 | 0 | 0 | 0 | 0 | 0 | 0 | 0 | 0 | 0 | 0 | 0 | |
| Note: Each error status is determined by the corresponding bit (b0 ~ b11) and there may be more than 2 errors occurring at the same time. 0 = normal; 1 = error. | ||||||||||||||
PID Control Registers
| CR# | Latched | Content | Explanation | ||||
| CH1 | CH2 | CH3 | CH4 | ||||
| #51 | #71 | #91 | #111 | O | R/W | Temperature SV | Default = K0. |
| #52 | #72 | #92 | #112 | O | R/W | Sampling time | Range: K1 to K30, Unit: s Default = K2. |
| #53 | #73 | #93 | #113 | O | R/W | KP | Default = K121 |
| #54 | #74 | #94 | #114 | O | R/W | KI | Integral constant, Default = K2,098. |
| #55 | #75 | #95 | #115 | O | R/W | KD | Derivative constant, Default = K-29. |
| #56 | #76 | #96 | #116 | O | R/W | Upper limit of I value | Range: K-32,760 to K32,760 Default = K0. |
| #57 | #77 | #97 | #117 | O | R/W | Lower limit of I value | Range: K-32,760 to K32,760 Default = K0. |
| #58 | #78 | #98 | #118 | X | R | I value | Current accumulated offset value. Default = K0. |
| #59 | #79 | #99 | #119 | O | R/W | Heating/cooling control | 0: Heater, 1: Cooler. Default = K0. |
| #60 | #80 | #100 | #120 | O | R/W | Upper limit of output | Range: K-32,760 to K32,760 Default = K4,000. |
| #61 | #81 | #101 | #121 | O | R/W | Lower limit of output | Range: K-32,760 to K32,760 Default = K0. . |
| #62 | #82 | #102 | #122 | X | R | Output percentage | Range: K0 to K1,000, Unit: 0.1%. Default = K0. |
| #63 | #83 | #103 | #123 | X | R | Output width | Width of control output, Unit: ms. Default = K0. |
| #64 | #84 | #104 | #124 | X | R | Output cycle | Cycle of control output, Unit: ms. Default = K0. |
| #65 | #85 | #105 | #125 | X | R | Output volume | Default = K0 |
| #66 | #86 | #106 | #126 | X | R/W | PID_Run/Stop | 0: Stop, 1: Run. Default = K0. |
| #67 | #87 | #107 | #127 | X | R/W | Auto Tune | 0: Disabled, 1: Auto-tuning Default = K0. |
✽ The CR#51 ~ CR#127 listed above do not support RS-485 read/write.
✽ When using TO/DTO instruction to modify PID control registers, latched CR and PID control registers will stay latched.
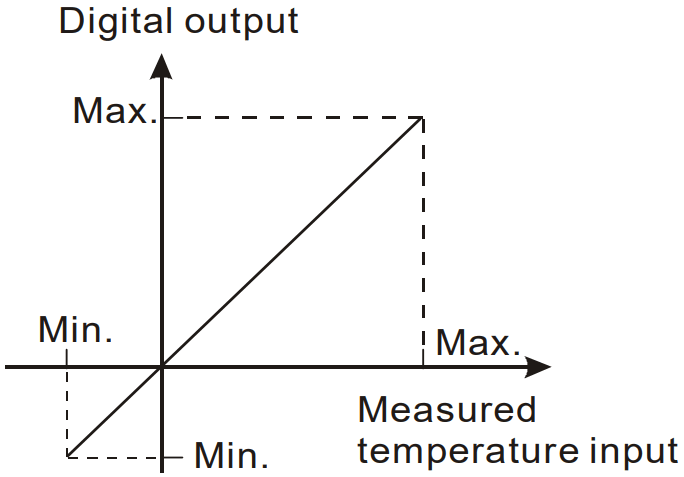
Temperature / Digital Value Curve
Temperature Measurement Mode (°C/°F):

| Thermo couple | Range of input temperature | Range of digital conversion | ||
| °C (Min. / Max.) | °F (Min. / Max.) | °C (Min. / Max.) | °F (Min. / Max.) | |
| PT100 | -180 to 800°C | -292 to 1,472°F | K-1,800 to K8,000 | K-2,920 to K14,720 |
| NI100 | -80 to 170°C | -112 to 338°F | K-800 to K1,700 | K-1,120 to K3,380 |
| PT1000 | -180 to 800°C | -292 to 1,472°F | K-1,800 to K8,000 | K-2,920 to K14,720 |
| NI1000 | -80 to 170°C | -112 to 338°F | K-800 to K1,700 | K-1,120 to K3,380 |
| 300 Ω | 0 to 300 Ω | K0 to K30,000 | ||
| 3k Ω | 0 to 3,000 Ω | K0 to K30,000 | ||
 DVP-0070530-02
20220112
Documents / Resources
 | DELTA DVP04PT-H2 Temperature Measurement Module [pdf] Instruction Manual DVP04PT-H2 Temperature Measurement Module, DVP04PT-H2, Temperature Measurement Module, Measurement Module, Module |


