AYANEO 3 AB07 Portable Gaming Computer
Specifications
- Dimensions: 278x109mm
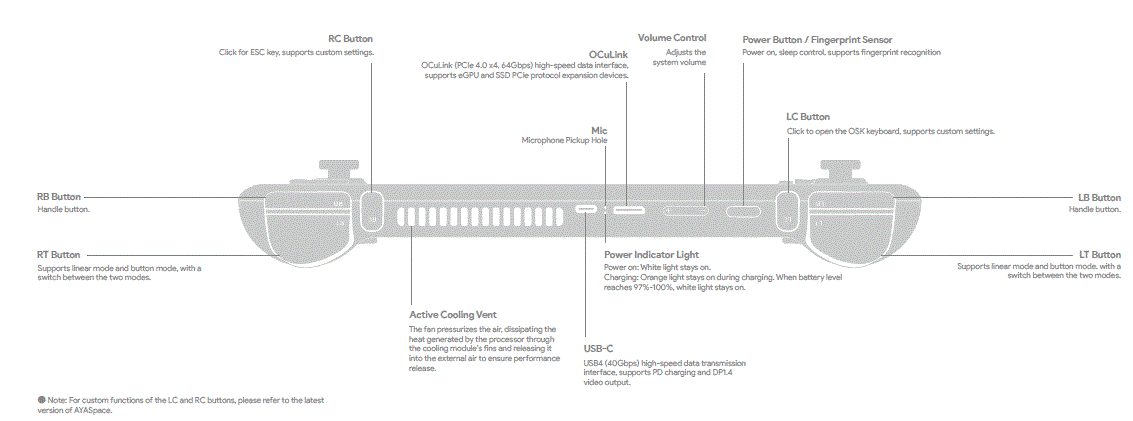
- RC Button: Click for ESC key, supports custom settings.
- OCuLink: PCIe 4.0 x4, 64Gbps high-speed data interface, supports eGPU and SSD PCIe protocol expansion devices.
- Volume Control: Adjusts the system volume.
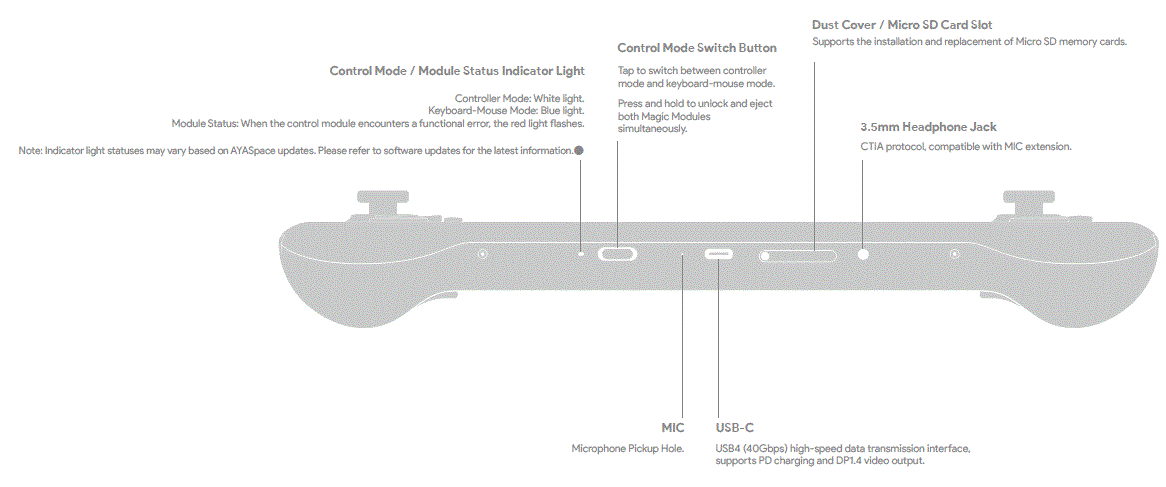
- Mic: Microphone Pickup Hole
- Power Button / Fingerprint Sensor: Power on, sleep control, supports fingerprint recognition.
- LC Button: Click to open the OSK keyboard, supports customsettings.
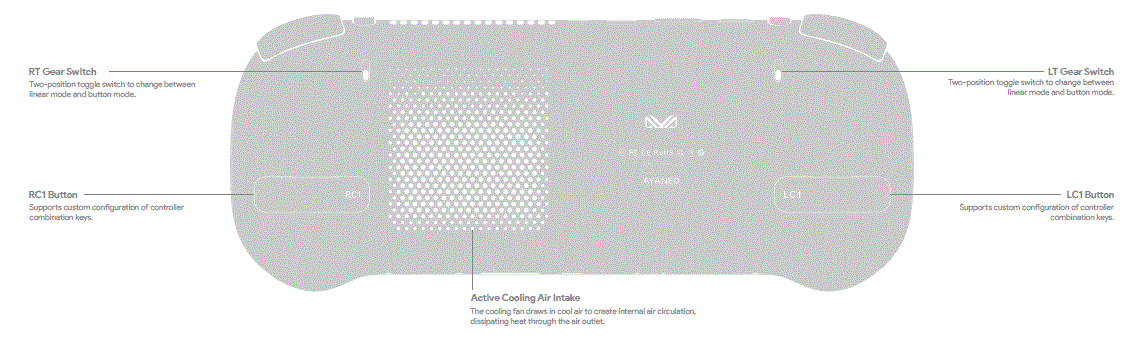
- RB Button: Handle button.
- RT Button: Supports linear mode and button mode, with a switch between the two modes.
- Active Cooling Vent: Ensures performance release by dissipating heat generated by the processor.
- Power Indicator Light: White light for power on, orange light for charging, white light for battery level reaching 97%-100%.
- USB-C: USB4 (40Gbps) high-speed data transmission interface, supports PD charging and DP1.4 video output.
- LB Button: Handle button.
- LT Button: Supports linear mode and button mode, with a switch between the two modes.
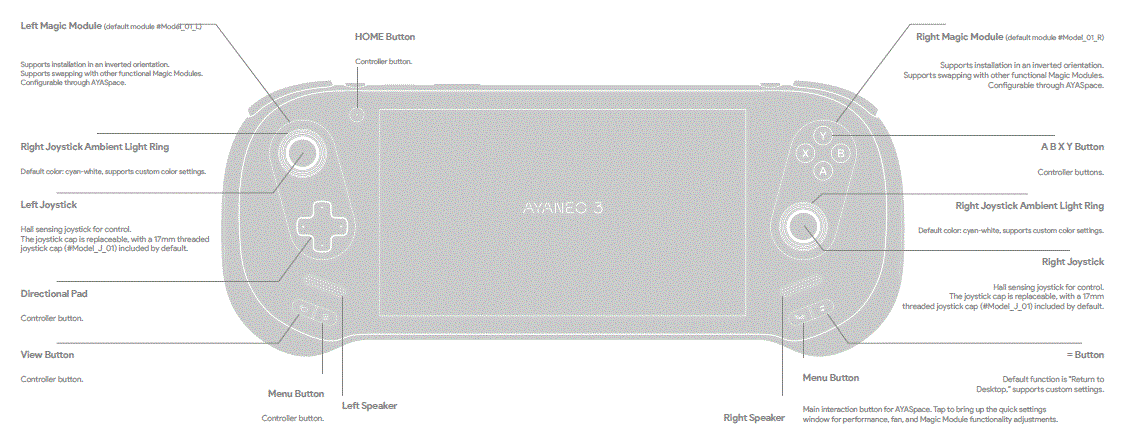
- Left Magic Module: Supports installation in an inverted orientation, configurable through AYASpace.
- HOME Button: Controller button.
- Right Magic Module: Supports installation in an inverted orientation, configurable through AYASpace.
- A B X Y Button: Controller buttons.
- Control Mode / Module Status Indicator Light: Controller Mode -White light, Keyboard-Mouse Mode – Blue light, Module Status – Red light flashes in case of error.
- Control Mode Switch Button: Tap to switch between controller mode and keyboard-mouse mode. Press and hold to unlock and eject both Magic Modules simultaneously.
- Dust Cover / Micro SD Card Slot: Supports installation and replacement of Micro SD memory cards.
- 3.5mm Headphone Jack: CTIA protocol, compatible with MIC extension.
PRODUCT DECSRIPTION
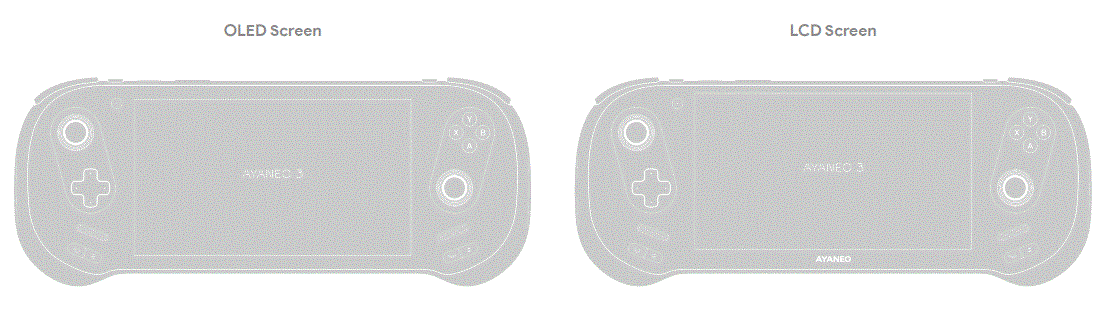 Note: AYANEO 3 is available in two versions: LCD screen and OLED screen, with differences in the display area and logo placement. The illustrations in this manual are based on projection diagrams of the OLED screen version. Please refer to the actual device you purchased for details. The images are for reference only.
INSTRCUTIOSN FOR USE
Power On / Off / Restart
- Power On
When the device is off, press and hold the power button “ ” for about 2 seconds, then release it to start AYANEO 3.
 - Power Off
When the device is on, click “ ” > a menu will appear, click ”
  ” > select ” Shut down “↑ to shut down AYANEO 3.
Restart
Click “ ” in the window > a menu will appear, click “
![]() ” > select ”
” > select ” ![]() Restart “↑ to restart.
Restart “↑ to restart.
Note: When the device is on, pressing and holding the power button for about 8 seconds will forcefully shut down AYANEO 3. This operation is not recommended for normal use, as it may risk data corruption.
Sleep / Wake
- Sleep
Click “ ” in the window > a menu will appear, click “ ” > select ”  Sleep”↑ ” to put AYANEO 3 to sleep.
 - Wake
When in sleep mode, press the power button “” to wake up AYANEO 3. If fingerprint security login is configured in Windows Hello, after the screen lights up, gently touch the power button for fingerprint recognition to enter the OS interface without needing to input a PIN or password. Depending on the interface and scenario, it may take 1–3 seconds to complete the screen wake-up process, depending on the impact of background processes during sleep mode. - Fingerprint
The power button integrates a fingerprint recognition function. After logging into a Microsoft account or setting up a local account with a password, enable Windows Hello biometric recognition to set up and use the fingerprint function. - Volume Adjustment
Press the volume up button “ ” to gradually increase the volume, and press the volume down button “
 ” to gradually decrease the volume. Press and hold the volume button to continuously increase or decrease the volume.
Click the “![]() ” area at the bottom-right corner of the Windows 11 desktop to open the quick settings menu, where you can manage WLAN network connections, configure Bluetooth settings, enable flight mode, adjust screen brightness, volume, and more.
” area at the bottom-right corner of the Windows 11 desktop to open the quick settings menu, where you can manage WLAN network connections, configure Bluetooth settings, enable flight mode, adjust screen brightness, volume, and more.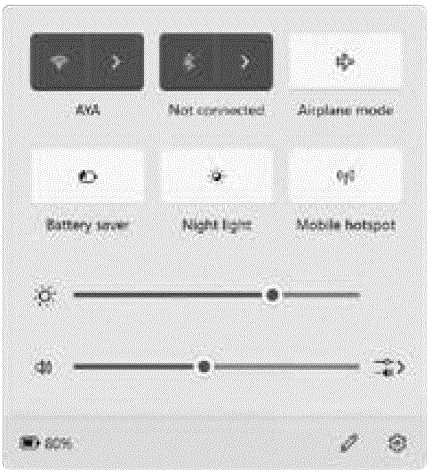
Note: The attached image is for reference only. Please refer to the actual Windows system update for specific function settings.
CONNECTION
Network Connection
To connect to a WLAN network, click the “ ” area in the quick settings menu > “
 ” to enter the WLAN connection management interface. Select the desired network name > enter the corresponding network security key, and then connect to the network.
Bluetooth Connection
To connect a Bluetooth device, click the “ ” area in the quick settings menu > “ ” to enter the Bluetooth device management interface. Under “New Devices,” find the device you want to connect to and follow the on-screen instructions to connect.
Brightness Adjustment
Slide the brightness slider in the quick settings menu to adjust the screen brightness.

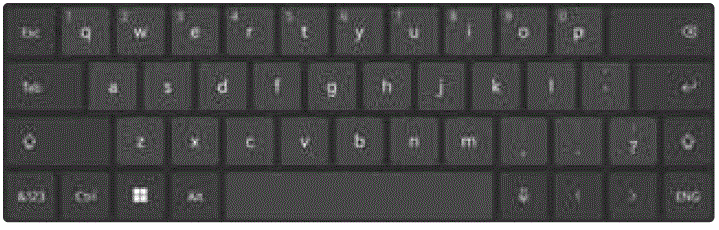
Touch Keyboard / Text Input
Touch Keyboard Settings
On the Windows 11 desktop, long press the taskbar at the bottom of the screen, select “ Taskbar settings↑ ” from the pop-up menu to enter taskbar settings, and set the touch keyboard
 ![]() ” displaying it in the system tray at the bottom-right corner of the taskbar.
” displaying it in the system tray at the bottom-right corner of the taskbar.
Text Input
When text input is needed, click the “![]() ” in the system tray to bring up the touch keyboard and use touch input to enter text.
” in the system tray to bring up the touch keyboard and use touch input to enter text.
Storage Expansion
The AYANEO 3 is equipped with a Micro SD card expansion slot. Press the![]() ” on the slot to open the dust ” cover, allowing you to install or replace the Micro SD card.
” on the slot to open the dust ” cover, allowing you to install or replace the Micro SD card.
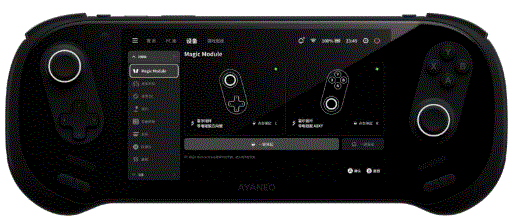
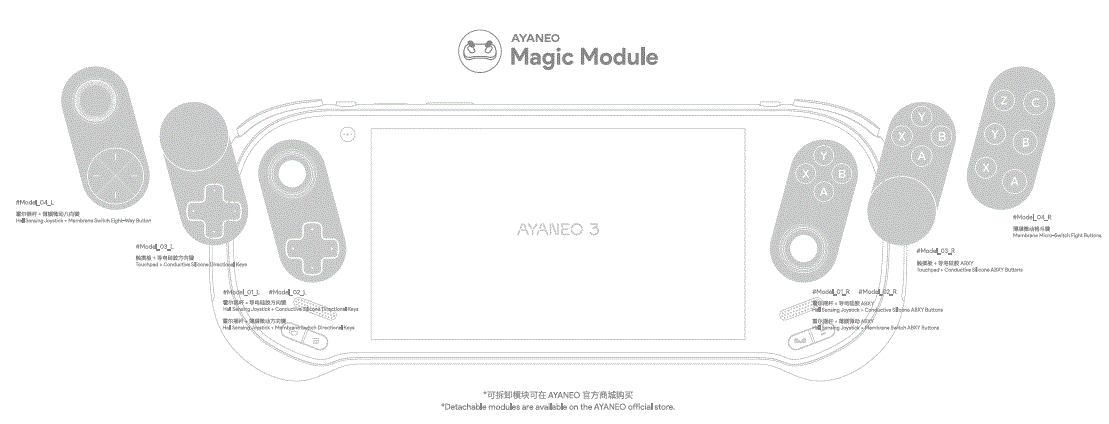
Magic Module
AYANEO 3 Supports Magic Module Combinations with Classic Layout, Fighting, and Touch Functions.
- Module Types: The Magic Modules are divided into left and right modules and cannot be swapped between sides.
- Reversible Installation: Modules support 180° rotation for single-side installation (the six-button module on the right side of the fighting module does not support upside-down installation).
- Module Combinations: Modules can be combined as needed. For example, you can install a classic directional pad and joystick module on the left and a touch module on the right (the touch module needs to be purchased separately).
- ABXY Interchangeability: The interchangeability function is only supported by modules containing ABXY buttons. The button caps can be removed and reattached using the included keycap puller. Adjust the positions of the ABXY buttons as needed. When the module is installed in a 180° reversed orientation, the A/Y and B/X button positions must be swapped accordingly.
Magic Module is managed and interacted with through AYASpace, which identifies the type of installed modules and provides corresponding function configurations.
- Module Unlocking: Before unlocking the modules, ensure the AYANEO 3 is placed horizontally. Short press the AYA button in the bottom-right corner of the device to open the AYASpace quick settings window, allowing you to quickly unlock and replace Magic Modules. You can unlock both modules simultaneously with one click or unlock a single module. Alternatively, long press the mode switch button at the bottom of the device to quickly unlock and eject the Magic Modules.
- Module Installation: To install a new module, unlock and remove the existing module, place the new module into the corresponding slot, and press it down. The module will lock automatically once properly installed.
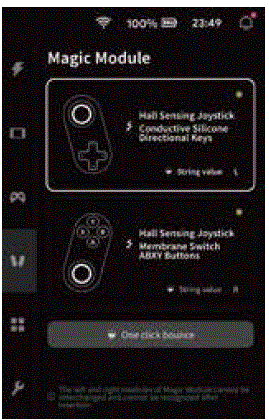
Note: The pre-installed Magic Module features a classic layout with a hall joystick and conductive silicone trigger buttons ( #Model_01_L / R ) . Other combinations, such as the hall-effect joystick with thin-film microswitch buttons, the six-button fighting module, and the touchpad module, must be purchased separately. The management and functional configurations of Magic Modules may vary with updates to AYASpace versions. Please refer to the actual situation for details.
Important Notes
Operating System
The AYANEO 3 operates on Windows 11 64-bit Home Edition from Microsoft, and basic operations of Windows can be performed via the touchscreen.
Magic Module
- The AYANEO 3 Magic Module supports flexible combinations. Modules are categorized as left and right types, which are not interchangeable. Single-side modules support 180° reversible installation (the six-button module on the right side of the fighting module does not support reversible installation).
- Magic Modules are configured, managed, and interacted with through AYASpace. For the latest features and updates, please refer to the AYASpace version iterations.
- Magic Modules are ejected via a motorized unlocking mechanism. When unlocking and replacing a module, ensure the AYANEO 3 is placed horizontally. Operating at improper angles may cause the module to drop and result in damage.
- AYANEO 3 requires both left and right slots to be correctly fitted with Magic Modules for the controller functions to operate properly. Installing only a single module will disable the controller functions.
Charging Instructions
Please use the included adapter and USB-C cable for charging. Do not use uncertified adapters for charging, as this may damage internal components and pose unpredictable risks.
Battery Replacement Warning
Do not attempt to replace the AYANEO 3 battery yourself, as you may damage the battery, leading to overheating, fire, or personal injury risks. The lithium-ion battery in the AYANEO 3 should only be serviced or recycled by AYANEO. It must be recycled separately from household waste, in accordance with local environmental regulations. The battery can only be replaced by AYANEO or authorized service providers. Replacing the battery with an incorrect model could result in an explosion risk.
Heat and Noise Warning
During use, this product may generate heat and fan noise, which is normal. The actual temperature and noise levels may vary depending on performance. You can adjust the performance strategy in AYASpace according to your current environment and needs.
Software Updates
Please refer to the updates provided by AYANEO for the latest software features.
Cleaning Instructions
Use a lint-free cloth to clean the device. Do not use any chemical solvents or abrasives for cleaning.
Environmental and Recycling
Do not disassemble the product yourself. It must be recycled separately from household waste, in accordance with local environmental regulations.
Physical Damage Protection
Avoid dropping, crushing, or causing any other physical damage to the device.
Accessory Differences
Some accessories may differ based on the purchase configuration and country or region.
Medical Device Interference
- The internal components of AYANEO 3 include magnets and electromagnetic fields, which may interfere with medical devices, pacemakers, defibrillators, or other medical equipment. Please maintain an adequate safety distance between your medical devices and AYANEO 3.
- Please consult your doctor and the manufacturer of your medical devices for more information. If you suspect that AYANEO 3 is interfering with your pacemaker, defibrillator, or other medical devices, please stop using it immediately.
Support
- For more support, troubleshooting information, and driver updates, please visit www.ayaneo.com.
- Names and Contents of Hazardous Substances in the Product
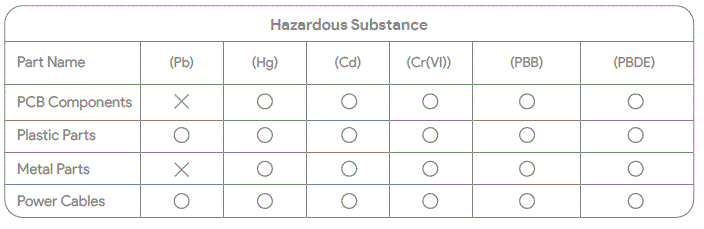
This table is compiled according to SJ/T11364 regulations.
- 〇: Indicates that the content of the hazardous substance in all homogeneous materials of the part is below the limit requirement specified in GB/T26572.
- X: Indicates that the content of the hazardous substance in at least one homogeneous material of the part exceeds the limit requirement specified in GB/T26572.
Note: This product applies an environmentally friendly design concept and effectively controls hazardous substances. The “x” indicates that the hazardous substance is primarily due to the limitations of technological development, making substitution of the hazardous substance impossible.
 Environmental Protection Use Period
The symbol indicates the period (ten years) during which the hazardous substances contained in the electronic and electrical products will not leak or undergo abrupt changes under normal use conditions. During this period, the use of these electronic and electrical products will not cause severe pollution to the environment or cause serious harm to the user’s health and property.
Warranty Service
- AYANEO guarantees the quality of the hardware products and accessories from the date of original retail purchase for one year.
- This warranty does not cover normal wear and tear or damage caused by accidents or improper use.
- For service, please visit the AYANEO official website or contact an AYANEO authorized service provider. Available service options depend on the country or region where the service is requested and may be limited to the product’s original sales area. Service may incur call and international shipping fees.
- After submitting a valid warranty claim, AYANEO will, at its discretion, provide repair, replacement, or refund services for your AYANEO 3.
- Warranty rights are in addition to the rights provided by local consumer laws. Warranty claims may require proof of purchase.
FCC Statement
This equipment has been tested and found to comply with the limits for a Class B digital device, pursuant to part 15 of the FCC rules. These limits are designed to provide reasonable protection against harmful interference in a residential installation. This equipment generates, uses and can radiate radio frequency energy and, if not installed and used in accordance with the instructions, may cause harmful interference to radio communications. However, there is no guarantee that interference will not occur in a particular installation. If this equipment does cause harmful interference to radio or television reception, which can be determined by turning the equipment off and on, the user is encouraged to try to correct the interference by one or more of the following measures:
- Reorient or relocate the receiving antenna.
- Increase the separation between the equipment and receiver.
- Connect the equipment into an outlet on a circuit different from that to which the receiver is connected.
- Consult the dealer or an experienced radio/TV technician for help.
- To assure continued compliance, any changes or modifications not expressly approved by the party.
- Responsible for compliance could void the user’s authority to operate this equipment. (Example- use only shielded interface cables when connecting to computer or peripheral devices).
- This equipment complies with Part 15 of the FCC Rules. Operation is subject to the following two conditions:
- This device may not cause harmful interference, and
- This device must accept any interference received, including interference that may cause undesired operation.
- Specific Absorption Rate (SAR) information: This device meets the government’s requirements for exposure to radio waves. The guidelines are based on standards that were developed by in dependent scientific organizations through periodic and thorough evaluation of scientific studies. The standards include a substantial safety margin designed to assure the safety of all persons regardless of age or health.
- FCC RF Exposure Information and Statement the SAR limit of USA (FCC) is 1.6 W/kg averaged over one gram of tissue. Device types: device has also been tested against this SAR limit. This device was tested for typical body-worn operations with the back of the Tablet computer kept 5mm from the body. To maintain compliance with FCC RF exposure requirements, use accessories that maintain an 5mm separation distance between the user’s body and the back of the Tablet computer.
- The use of belt clips, holsters and similar accessories should not contain metallic components in its assembly. The use of accessories that do not satisfy these requirements may not comply with FCC RF Exposure requirements, and should be avoided.
FAQ How do I customize the functions of the LC and RC buttons? To customize the functions of the LC and RC buttons, please refer to the latest version of AYASpace for detailed instructions on configuring these buttons as per your requirements.
Documents / Resources
 | AYANEO 3 AB07 Portable Gaming Computer [pdf] User Manual AB07, 2A233-AB07, 2A233AB07, 3 AB07 Portable Gaming Computer, 3 AB07, Portable Gaming Computer, Gaming Computer, Computer |