![]() USER MANUAL
USER MANUAL
3-Channel Monitor KVM Switch 2×3
8K60Hz USB3.0
Features
- Using only 1 set of keyboard, mouse to control 2 computer devices and 3 monitor.
- Available to use keyboard and mouse without any delay after switch input sources.
- With 4 USB 3.0 hub port, it is possible to connect bar code scanner, USB hard drive or other USB devices to KVM.
- Support resolution up to 7680*4320@60Hz.
- Support USB 3.0 transmission rate up to 5Gbps.
- Support front panel buttons and External switch button to control KVM to switch inputs.
- Support Windows/Vista/XP and Mac OS, Linux and Unix ,Plug and Play.
Specifications
Support Resolution ………………………… 7680*4320@60Hz
Video bandwidth ………………………… up to 48Gbps
USB transfer rate ………………………… up to 5Gbps
Power consumption ………………………… MAXI 2W
Input voltages ………………………… DC/12V
Operating Temperature range ………………………… (-5 to +45 C )
Operating Humidity range ………………………… 5 to 90% RH (No Condensation)
Storage Temperature ………………………… -20°C ∼ 60°C / -4°F ∼ 140°F
Dimension (L x W x H) ………………………… 150X65X48.5 (mm)
Package Contents
| 1. KVM Switcher | 1PC |
| 2. DC12V power adapter | 1PC |
| 3. USB_A type cable | 2PC |
| 4. External controller kits | 1PC |
| 5. User manual | 1PC |
Connection Diagram
(Front Panel) 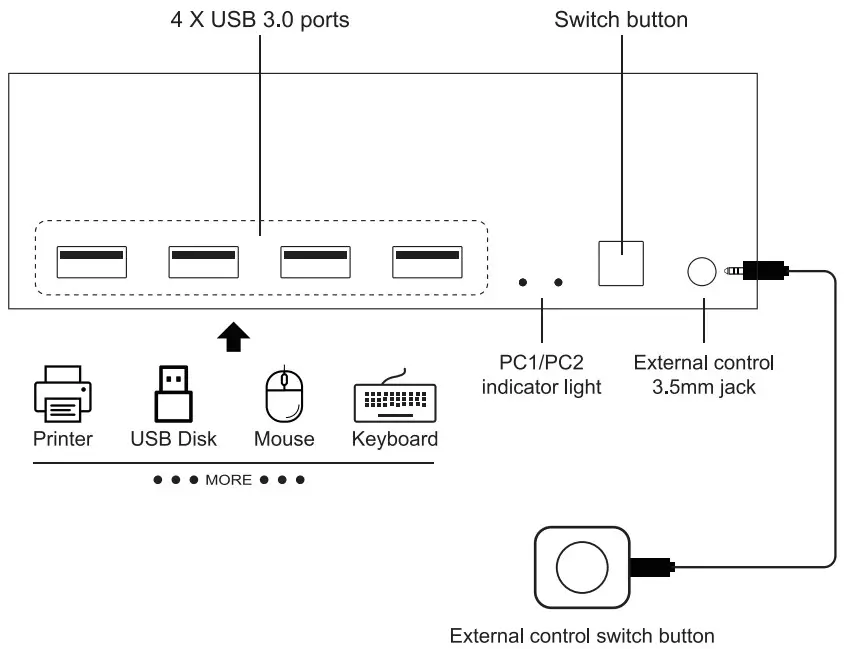
Notes:
- 4xUSB3.0 Ports: Connect devices such as mouse, keyboard, printer, etc.
- Switch button: PC1 and PC2 input switching.
- External control: Connect external control switch.
(HDMI KVM Switch) 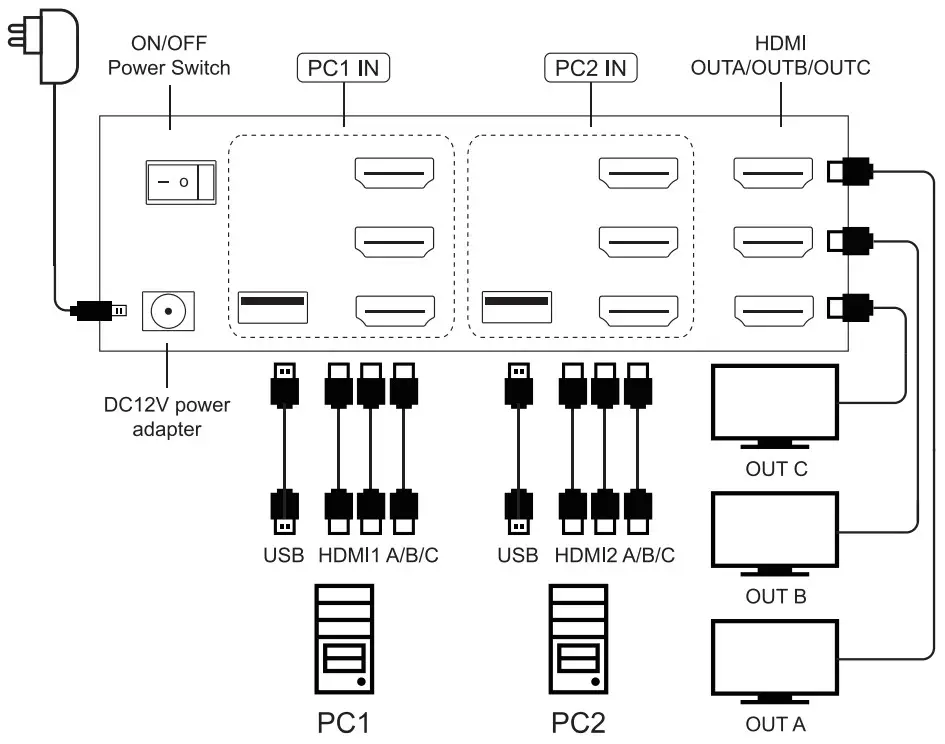
Notes:
- PC1 IN: USB and HDMI1 A/B/C cables, device connected to computer 1.
- PC2 IN: USB and HDMI2 A/B/C cables, device connected to computer 2.
- OUTA/B/C: HDMI OUT A/B/C, connected to 3 HDMI display devices.
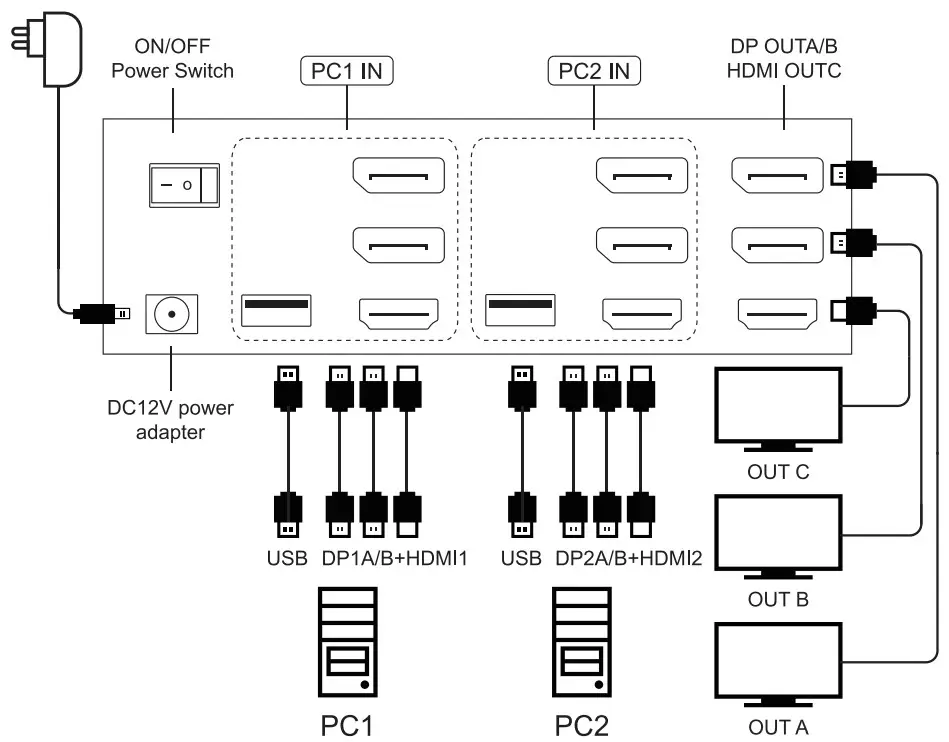
(HDMI&DP KVM Switch)
Notes:
- PC1 IN: USB and DP1 A/B+HDMI1 cables, device connected to computer 1.
- PC2 IN: USB and DP2 A/B+HDMI2 cables, device connected to computer 2.
- OUTA/B/C: OUTA/B connected to DP display,OUTC connected to HDMI display.
(DP KVM Switch) 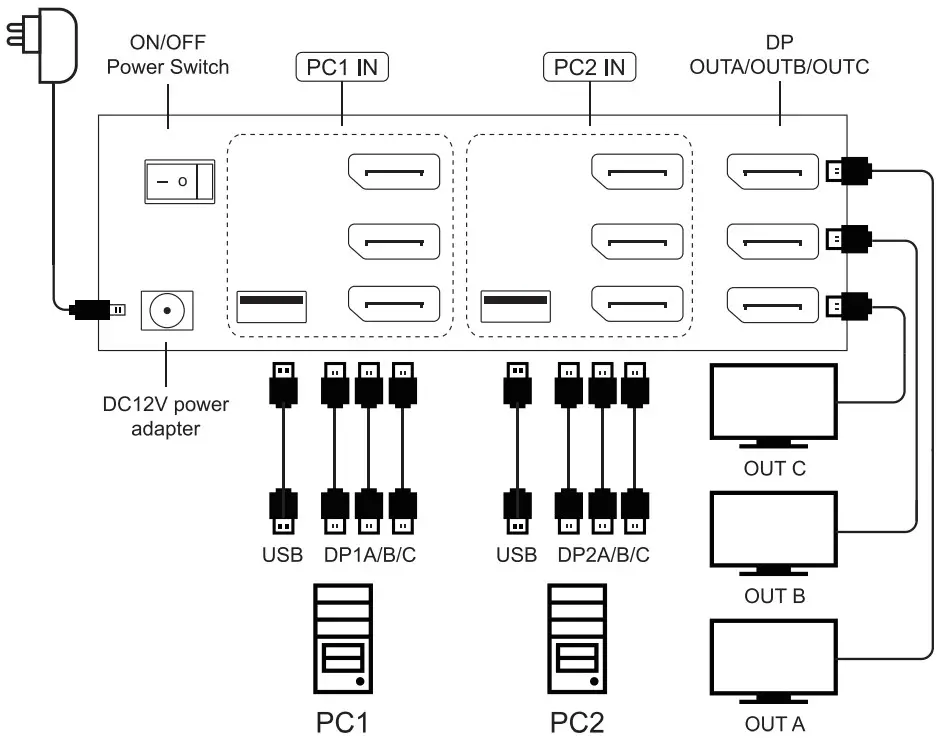
Notes:
- PC1 IN: USB and DP1 A/B/C cables, device connected to computer 1.
- PC2 IN: USB and DP2 A/B/C cables, device connected to computer 2.
- OUTA/B/C: DP OUT A/B/C, connected to 3 DP display devices.
Before power on, please check the connection line carefully. And make sure that all interfaces are normally connected. The common troubles shooting way shows below:
| No. | Trouble Description | Causes and solutions |
| 1 | Non Power Connected | 1. Check that the power adapter head is truly and correctly plugged into the power outlet. 2. Check whether the cable is correctly connected to the host computer. 3. Whether the host computer is powered on normally. |
| 2 | Display has no image | 1. Please check whether the connection between the switcher and the monitor is correct. 2. Please check whether the host computer is properly powered on. 3. Please check whether the computer host has the correct output image. |
| 3 | USB not working | 1. Please check whether the switcher is connected to the USB port of the computer correctly. 2. Please check whether the computer USB port can work normally. 3. Please check whether the USB driver is correctly installed on the computer. |
![]()
Documents / Resources
 | SW SW231 3 Channel Monitor KVM Switch [pdf] User Manual SW231 3 Channel Monitor KVM Switch, SW231, 3 Channel Monitor KVM Switch, Monitor KVM Switch, KVM Switch, Switch |