SMATRUL Smart Home WI-FI Smart Socket

App Installation
- Connect Your Smartphone Or Tablet To The WLAN Router.
- Download The “SMART LIFE” Or “TUYA” App From The App Store/Google Player /Official Website To Your Smartphone Or Tablet. Or Scan The QR Code Via Your Smartphone To Install The App Download on the App Store

- Google Play
- Start The Setting Up Process By Opening the “SMART LIFE” App
- Enter Your Username And Password To Get The Verification Code To Log Into “SMART LIFE” App To Get Connected With Your Devices.
- Set Up Your Desired Password To Log Into The App Directly

Our Service: 2 Years Warranty From The Date Of Purchase
The Item Tip: Only 2.4GHz WIFI Standard Is Supported Not Supports 5.0GHz
Safety Instructions
- Turn Off Power Supply Before Installing
- Use An Electrical Tester To Ensure The Safety
- Check The Terminal Connections Before Wiring
- Take Off The Socket Cover Frame
- Connect The Device In Accordance With The Relevant Diagrams
- Insert The Device With The Mounting Frame Bracket Into The Mounted Box
- Ensure No Bare Wires From Terminals
- Push The Cover Frame To The Device
- Screw The Device Carefully
- Turn On The Main Supply
- For Indoor Dry Location Use Only
Caution:
Electrical Devices Should Be Mounted And Connected Bye A Qualified Electrician
Warning:
Don’t Apply Device Directly To Freshly Plastered It May Tarnish. Over Tighten The Screws May Cause Damage To The Device
Wall Installing Boxes:
® = 76mm, Width 71mm, Depth ≥ 45mm
Specifications
| Input | AC 90-240V 50/60HZ |
| RF Frequency | 433.92MHZ |
| Life Time | 100,000 Times |
| Operating System | IOS / Android |
| WIFI Frequency | IEEE 802.11 b/g/n |
| WIFI Standard | 2.4G 802.11 b/g/n |
| Operating Temp | -2o·c to 1o·c |
| Ambient Humidity | S95% |
| WIFI Consumption | S0.2W |

Know Your Device
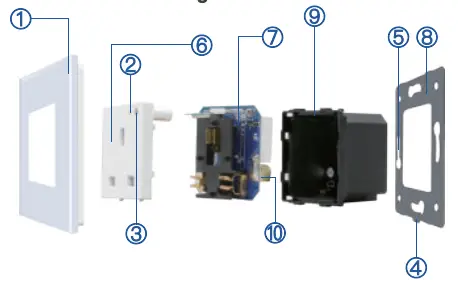
Ensure That You Have All Of The Required Parts When Installing:

- Front Panel Frame
- Indicator Light
- Operating Button
- Short Slot
- Screw Fitting
- Socket Front Cover
- PCBA Module Board
- Mounting Metal Frame
- Fire Retarding PC Base
- Wiring Terminals
Technical Features
- The WIFI Smart Device Designed To Control, Schedule And Monitor Your Home Electrical Appliances Via Your Smartphone Or Manually Power On / Off
- The WIFI Smart Device Enables You To Perfectly Perform The Following Features:
- APP Control
- Timing & Schedule Function
- Sharing Control
- Sync Status
- Voice Control
- Integrate With IF 111
- No Hub Required All Earth Wires Should Be Sleeved And Connected To The Socket Earth Terminal
Tip: The Factory Default Status Initial- ization Is ON. You Can Change The Initialization Status In “Setting” Button
Device Appearance
The WIFI Socket Has A Small LED Indicator Light On The Front Which Enable You To Discover Whether The Device Is On Or Off

Tip: To keep The Finish Of The Device, Wipe With A Soft Dry Cloth Periodically
Fixed Installation Methods

- Place A Screwdriver Into The Short Slot And Gently Lift Up Until Release
- Screw To Fix The Socket To The Wall Mounted Box
- Push The Front Frame Into The Installed Device Carefully
Wiring Connection

Wifi Single Pole
- The Diagrams Are Simplified For Clarity
Connect The Devices According Below. - Tip: Do Not Switch On The Appliance
- Before Completely Assembling It To The
Wall Mounted Box
- All Wires Should Be Sleeved And Connected To The Earth Terminal
- Example Of Wiring Diagram Connection Of Wifi Single Pole
- DIMEN (H x w x D)
- 86 x 86 x 45 mm
- 146 x 86 x 45 mm DIMEN (H xwx D)
- 157 x 86 x 45 mm
Wifi Double Pole (146)
Do Not Connect The Appliances Which Are Not Compliant With The Specifications And Safety Standards

Wifi Double Pole (157)
Install The Socket Into the Mounted Wall Box And Connect Each Wire To The Accurate Terminals
Device Basic Operation
- Read The Device’s Operating Instructions
- Before Starting Any Electrical Work To Avoid
- Any Damage May Caused Via Improper Use
- Connect The Device To The Power
- Connect Your Smartphone To The WIFI
- Hold On The Front Buton For
- The LED Indicator Will Glow Rapidly
- Release The Button When Glows
- Start To Add Your Devices

- Input Your Password To Start Adding
- Wait For The Adding Process To End
- Successful Pairing Will Be Confirmed

Home Centre Icons:
- Icon “
 ” Refers To Device Options
 - Icon ” + ” Refers To Device Adding Process
- Icon ”
 ” Refers To Device Rename Option
 - Note: After Pairing, the Front LED Indicator changes to Blue When ‘ON’ And Red While ‘OFF’
RF Default Operation

- Click On A To Turn On/Off Socket ‘A’
- Click On B To Turn On/Off Socket ‘B’
- Click On C To Turn On/Off Socket
- Click On D To Turn AliOff o.
RF Pairing Mode:
- Hold On The Front Button Of The Device
- For Seconds Till The Blue LED Indicator
- Light Starts Blinking. Press Any Button Of
- The Remote Control To Successfully Pairing
RF Canceling Sync Mode:
- Hold On The Device’s Front Button For Seconds Till The Blue LED Indicator Starts Blinking. Release And Hold Again On The Front Button Till The LED Light ‘On’ Canceling Mode Will Be Successfully Confirmed
- Tip: Long Press On The Button To
- Reset To The Factory Defaults, While
- Resetting LED Change To Red Colour
Related Device Features
- APP Control:
Allows You To Control All Of Your Devices Via Your Smartphone Wherever You Are - Timing & Schedule Function:
- Enables you to Set Up The Accurate Time Of Your Devices Automatically On/Off Whether You’re Home Or Not
- Save Energy And Money On Your Bills It’s Secure And Power Saving!
- Enables You To Turn The Device On/Off When Sunset Or Sunrise Starts
- Allows You To turn the Device On/Off Under Climate Conditions
Sharing Control:
- Enables You To Share Your Devices With Your Family And Friends.
Sync Status:
Enables You To Track Status To Change All Of Your Devices Via Your Smartphone
Voice Control:
- Compatible With Google Assistant And Amazon Echo
- Tum Your Home Devices On/Off With Just The Power Of Your Voice
Integrate With IFTTT:
Compatible With IFTTT App Which Has The Possibility To Control Your Device Via Your Smartphone And Voice Control
No Hub Required:
You Can Entirely Connect Your Devices Over Wifi Without Needing Any Additional
Accessories
Note: During The Adding Process, The Smartphone Should Be In A Direct Range Of The Device
Tip: To Avoid Any Damage May Leads To The Panel And Border, Carefully Lift Up The Screwdriver While Removing
Limited Warranty
- The Limited Warranty Does Not Cover Any Failures And Operating Difficulties Due To Abuse, Misuse, Alteration, Misapplication, Improper Installation, And Maintenance Or Service By You Or Any Third Party
- The Limited Warranty Does Not Cover Damages To The Finish, Such As Scratches, Dents, Discoloration Or Rust After Purchase
- In Case Of Problems While Adding The Device. Reset The Appliance And Repeat The Adding Process
- Our Mission Is To Provide You The Best Smart Devices Ever
Documents / Resources
 | SMATRUL Smart Home WI-FI Smart Socket [pdf] User Manual Smart Home WI-FI Smart Socket, Smart Home, WI-FI Smart Socket, Smart Socket, Socket |