![]()
 User Manual
![]() ST19
ST19
ST19 Watt Equivalent Smart
Manufacturer: Guangzhou Lige Watch Industry Co., Ltd
Address: Room 201, Building 12, No.684, Shibei Industrial Road, Dashi Street,Panyu District, Guangzhou
This device complies with part 15 of the FCC Rules. Operation is subject to the following two conditions:
(1) This device may not cause harmful interference , and
(2) this device must accept any interference received, including interference that may cause undesired operation
 | Name:SUCCESS COURIER SL Add:CALLE RIO TORMES NUM. 1, PLANTA 1, DERECHA, OFICINA 3, Fuenlabrada, Madrid,28947 Spain E-Mail:successservice2@hotmail.com |
 | Name:EVATOST CONSULTING LTD Add:Offce 101 32 Threadneedle Street, London, United Kingdom, EC2R 8AY E-Mail:contact@evatost.com |
We simply act as UK/EU representative for cross-border sellers, and are not manufac-turers/importers/distributors for the product, nor involved in the manufacture/im-port/sale of the product. Therefore, we are not responsible for any after-sales ser-vices related to the product. In case of any product quality or infringement issues,the manufacturer/importer/seller shall be solely held responsible.

![]()
Scan the QR code for a video guide on using the smartwatch.
Charging and Activation
a. Connect the ST19 charging cable to a 5V-1A adapter and plug it in. Ensure proper alignment of the cable with the metal contact pins on the back cover of the watch. The built-in magnets will automatically attach to the correct poles for charging.
b. If the watch is newly received or has not been used for a long time, the battery may be in a 0 voltage protection state. Charge the watch for at least 15 minutes to accumulate enough power to activate it.The built-in magnets will automatically attach to the correct poles for charging.
c. It is recommended to charge the device once a month. Keep the device fully charged and power it off when not in use to ensure longevity and optimal performance.

App Download
- Download the ”
 ” app from the App Store or Google Play.
 - Scan QR code to download.
 http://fitcloud.hetangsmart.com/qrcode/_cn/
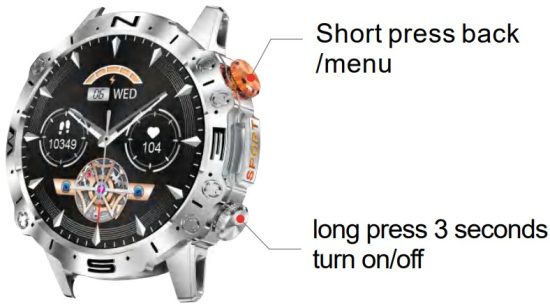
Watch Button Functions
Pair as Follows-IOS
a. Upon first use of the FitCloudPro app, enable it to access Bluetooth, wireless data, and notifications on your compatible smartphone by granting all necessary permissions through your phone’s settings.

b. Use the app with “Visit As Guest” or “Sign In”.

Connecting Bluetooth-IOS
a. Select ‘Search Now’ to discover and connect to the ST19 Bluetooth device. and tap the watch to ‘agree’ grant access and complete the pairing process.

b. “Allow Bluetooth Pairing” and “Allow Notifications”

Setting Up FitCloudPro App on Android: Permissions and Agreement
a .”Agree”FitCloudPro Privacy Policy & User Agreement , Login or Use Without Account:

b. Fill in your personal information and Search/ connect nearby permissions Bluetooth request.

c. Allow FitCloudPro to discover and connect to ST19 devices.Tap the watch and select ‘agree’ to grant access and complete the pairing process.

d. Allow Bluetooth pairing requests and Access to Contacts:

Turning on Push Notifications

a. Note that the watch cannot receive notifications when the phone is in Do Not Disturb mode.
b. Ensure the mobile phone’s Bluetooth is active, the FitCloudPro app is running, and the watch is connected to the phone’s Bluetooth.
c. Make sure that notifications are visible on the notification bar of your phone.

Turning on weather locator
Turn on the weather reports feature in the FitCloudPro app to get weather forecasts.

Setting the Display Unit of the Watch

Setting/Download Watch Faces
a. Press and hold the watch face for 2 seconds, then quickly swipe to switch between watch faces.

b. Download watch faces through FitCloudPro’s watch face UI market. Note that only one watch face UI can be saved at a time. A new download will replace the previously saved watch face UI.

c. Displaying touchscreen functionality

Resetting the Watch

If the exercise, sleep, and heart rate data are inaccurate, or if the Bluetooth connection or call functionality fails, try resetting the watch as shown below and rebind. Alternatively, you can reset or update the firmware through the app!
Setting up Always-On Display
a. Tap “![]() Settings” and enter “
Settings” and enter “![]() Display”.
Display”.

b.Tap “![]() AOD clock” to enable either “Digital clock” or “Analog clock”.
AOD clock” to enable either “Digital clock” or “Analog clock”.

NOTE:To extend battery life, the watch may disable the raise-to-wake function to reduce unnecessary power consumption when we open AOD feature.
Turning on/off Call Audio and Media Audio
a. Tap ![]() to enable or disable Bluetooth Calling.
to enable or disable Bluetooth Calling.

b. To prevent the watch from playing media sounds or making/answering calls, simply turn off the media audio and call audio settings.
![]() NOTE
NOTE
When media audio is enabled, the call audio feature must also be activated.
Adding and Syncing Favotite Contacts
a. Add contacts to the watch via FitCloudPro

b. Note some phones require manual activation of Bluetooth contact syncing due to privacy considerations.

Key Safety Tips
a. Do not expose the watch to extremely high-temperature environments ike scorching sun rays or around high-temperature devices like heaters,ovens, microwave ovens, or water heaters.
High-temperature environments may cause battery explosions or other safety accidents.
b. The productincludes an irremovable pure cobalt battery. Non-profes-sionals are not allowed to disassemble it in case of a safety accident.
c. This product has passed multiple waterproof tests before launch.Considering different using habits, its internal parts may experience wear and tear, which affects its sealing performance. Therefore please wear and use the smartwatch carefullyduring swimming and diving, but avoid wearing it in a sauna room or for a hot shower.
d. Our products do not belong to medical apparatus. The heart rate, blood oxygen, sleep, calories, and steps. and other health data collected by it are only for referencerather than clinical basis.
Enabling App Auto Launch
XIAOMI
Setting-apps-permissions-Autostart-open the FitCloudPro
HUAWEI
Setting-apps&services-app launch-open the FitCloudPro
SAMSUNG
“Smart Manager “- find the “Auto-Run Application” option, –enter the “Auto-Start Application” setting interface – open the auto-start setting program.
![]()
Documents / Resources
 | SMART ST19 Watt Equivalent Smart [pdf] User Manual ST19 Watt Equivalent Smart, ST19, Watt Equivalent Smart, Equivalent Smart, Smart |