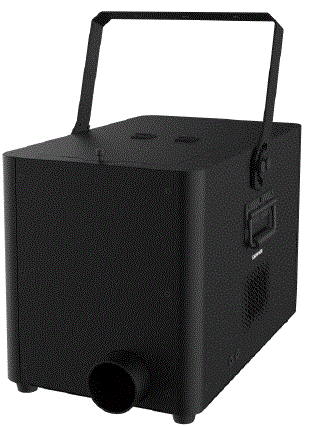
SHOWVEN CB16 Dmx Controllable Acompact Confetti Launcher
Thanks for choosing SHOWVEN uFetti Blower, we wish it will bring you lots of exciting moments. Please read the following user’s manual carefully before operating this product.
Safety Instructions
Safety icons explanation
Safety instructions warn of hazards when handling equipment and provide information on how to avoid those hazards. They are classified according to the severity of the hazard and are divided into the following groups. Please do follow all safety instructions in this document!
- DANGER: Indicates a hazardous situation that, if not avoided, will result in death or serious injury. (This signal word is limited to the most extreme situations)
- WARNING: Indicates a hazardous situation that, if not avoided, could result in serious injury
- CAUTION: Indicates a hazardous situation that, if not avoided, could result in minor or moderate injury.
- NOTICE: Provide additional or supplementary information.
General Safety Instructions
- Make sure power supply in consistent with the rated voltage of the equipment, and the socket must well grounded. Unplug and turn off the machine when not use.
- Please pay attention to the use environment and safety distance, check this manual for details.
- After turning on the device, no person allows to stay in the danger area. Ensure all persons that are part of the show be informed about the safety distance, risks and functions of the device.
- Always have a CO2 fire extinguisher and an extinguishing blanket in case of needed.
- If there be any doubt as to the safety operation of the device, the device should be taken out of service immediately. Check the power switch, cable connections and power plug carefully. If you can’t solve it, please always contact SHOWVEN (info@showven.cn) for help.
- Use only SHOWVEN original confetti, otherwise, may leads to failure or danger.
- The operator responsible for the control of uFetti Blower must always have a clear view of the device, so that he/she can stop the show immediately when there is danger. The main AC power switch should near operator. So that operator can turn off the power of all devices in case of abnormal.
- The device shall not be altered and applied to other use purpose.
Disclaimers
SHOWVEN technologies Co., Ltd excludes liability for unsafe situations, accidents and damages resulting from:
- Ignoring warnings or regulations as shown on product manual or this manual.
- Use for other applications or circumstances other than those indicated herein.
- Changes to the device, including use of non-original spare parts, lack of maintenance etc.
- Dismantling device without authorization from SHOWVEN.
- Use this machine by unqualified or untrained personnel.
- Improper use of machine
Description
uFetti Blower CB16 is DMX controllable acompact confetti launcher, equipped with high speed blower and a 9L automatic confetti dosing hopper. Operator can adjust the confetti output density by DMX even under running status. It can be widely used in indoor, outdoor and various special applications.
Features
- DMX controllable
- 4kg (metallic confetti) automatic confetti dosing hopper
- Upto 10m output distance
- DMX controllable confetti output density, support 2-15min continuous output
- Adjustable confetti output angles
- Color touch screen
Technical Specifications
- Model: uFetti Blower CB16
- Dimension: 573 324 384mm
- Weight: 19kg
- Input: AC100-120V / AC200-240V, 50/60Hz
- Work Power: 1600W
- ARM Indicator Light: Yes
- Control: DMX, MANUAL
- DMX: 3-pin and 5-pin DMX IN / OUT, 5-pin DMX IN support DC5V power supply for DMX receiver
- Interface: Color touch screen
- Output Direction: adjustable via handle
- Output Distance: 10m
- Output Density Adjustable: Yes
- Consumable: SHOWVEN Confetti
- Confetti Hopper: 1
- Hopper Capacity: 2kg paper confetti; 4kg metallic confetti
- Max. Consumption Rate: 1kg/min (paper confetti); 2kg/min (metallic confetti)
Structure
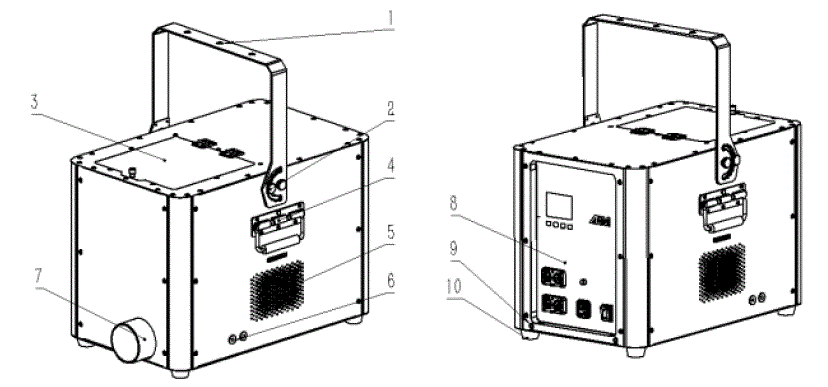
- Mount bracket (3-
 12mm holes for clamp)
 - Angle adjustment knob screw
- Confetti hopper lid
- Handle
- Side air Inlet
- Mount bracket installation hole M6
- Output nozzle
- Rear panel
- Safety loop hole(2-M8)
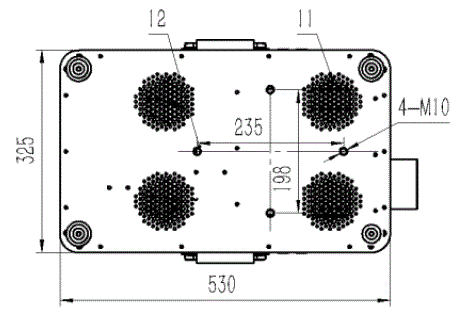
- Feet
- Bottom air inlet
- M10 hole for clamp (20mm in depth)
Rear Panel 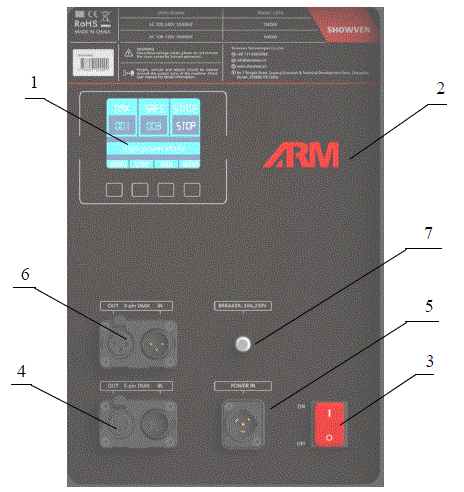
- LCD Screen
- ARM Indicator Light
- Power Switch
- 5-pin XLR IN/OUT (5-PIN XLR IN can charge for wireless DMX pen through pin1 and 4, pin4 with DC5V power supply)
- Power IN
- 3-pin XLR IN/OUT
- Fuse (20A, 250V)
Display and setting
ARM indicator light
Operators can enable/disable the arm indicator light by set the “ARM STATE” in Advanced menu. If “ARM STATE” is ON, there will be three status:
- ON: no DMX signal
- OFF: DMX signal input
- BLINK: DMX armed
Welcome Interface
| Software Version | CB16-A20240615 |
| Serial Number | *********** |
| Blower Running Time | 0Hour 0Min |
Main Interface
- uFetti Blower can be controlled by DMX or manually. Manual control disabled when there is DMX signal in.
- Click “MENU” in main interface, press and hold “RUN” to start the machine manually, press “STOP” to stop the machine, click “MONI” enter monitoring interface.
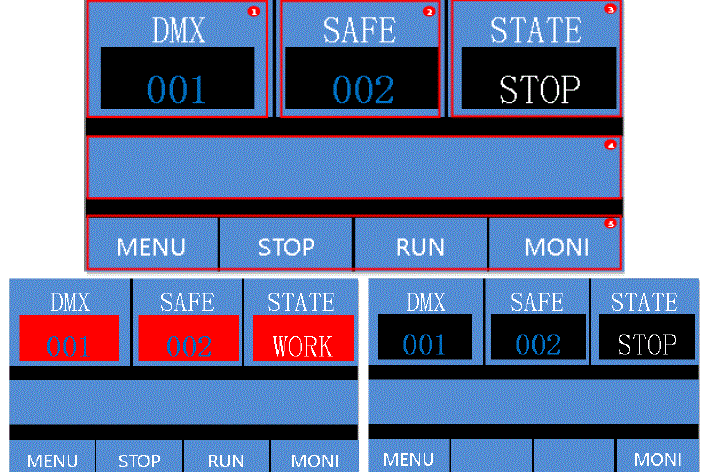
| REGION | ITEMS | RANGE | DEFAULT | EXPLANATION |
| 1 | DMX address | 1~512 | 1 | When there is DMX signal in, background color changes from black to red |
| 2 | Safety address | 1~512 | 2 | When safety channel DMX value between 50-200, background color changes from black to red |
| 3 | Device status | STOP / WORK | STOP | When blower is working, STATE changes from “STOP” to “WORK”, and background color changes from black to red |
| 4 | Information | — | — | Three types of contents will displayed here:
|
| 5 | Key instruction | — | — | When there is DMX signal in, STOP and RUN are hidden and disabled |
Error Message
| Error Message | Why it appears | How to remove |
| E2 Hopper Running Error | Feeding motor blocked, device stops working | Check the hopper and feeding motor, solve the block problem |
Monitor Interface
Press “MONI” can enter monitor interface, press “BACK” switch back to main interface.
| Menu | Explanation |
| Hopper Roll Motor Current | Hopper feeding motor status monitoring |
Menu Interface
Press “MENU” enter menu interface, press “LEFT”, “RIGHT” enter different items, press “BACK” switch back to main interface.
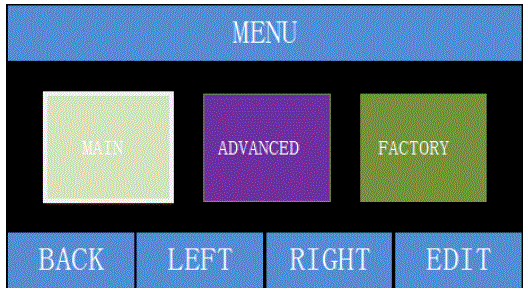
| Menu | Explanation |
| MAIN | Main menu |
| ADVANCED | Advanced menu |
| FACTORY | Factory menu (for factory use only, password is required to enter) |
| BACK | Back to main interface |
| LEFT | Left item |
| RIGHT | Right item |
| EDIT | Select |
Main Menu
Select “MAIN” in menu interface, press “EDIT” to enter main menu.
| Items | Contents | Default | Description |
| Set DMX Address | 1-512 | 1 | Device DMX address |
| Set Safety Addr | 1-512 | 2 | Safety DMX address |
| Duration (s) | 10-600 | 600 | Firing duration when manual firing |
| Interval (s) | OFF-600 | OFF | Firing interval when manual firing |
| Hopper Roll Speed | 1-100 | 100 | Hopper feeding roller speed when manual firing |
Advanced Menu
Select “ADVANCED” in menu interface, press “EDIT” to enter advanced menu.
| Items | Contents | Default | Description |
| ARM State | ON/OFF | ON | ARM indicator light ON/OFF setting |
| LCD Backlight | ON/OFF | ON |
|
| Key Sound | ON/OFF | ON | Keypad sound ON/OFF setting |
| DMX Lock | ON/OFF | OFF | ON: Keypad function disabled when there is DMX signal in |
| Motor Protect | ON/OFF | ON | ON: Turn on the error message prompt function of the feeding motor |
| Default Parameter | ON/OFF | OFF | Reset default parameter settings |
| Language | /English | English | Language switch |
| Auto Run After Power On | ON/OFF | OFF | ON: The machine runs automatically when it is powered on. |
DMX CONTROL
uFetti Blower CB16 occupies 1 functional channel CH1 and a separate safety channel CH-S (this channel is independent from functional channel, can be shared with other machine).
2CH-N
| Channel | Function | Value |
| CH1 | Output (feeding motor) |
|
| CH-2 | Blower speed |
|
2. 3CH-P
| Channel | Function | Value |
| CH1 | Output (feeding motor) |
|
| CH2 | Blower speed |
|
| CH-S | Device enable / disable | 0~ 49 and 201~255: Device disabled 50~200: Device enabled |
NOTE: feeding motor works only when blower is on.
Operation
Safety instructions
- DANGER: Make sure that confetti cannot come into contact with high-voltage lines/power pylons, as this can result in electrocution.
- WARNING: All operations must be performed by professionals, and non-professionals are prohibited from operating.
- WARNING: Use of a damaged or improperly installed machine could result in death, serious injury, or property damage. Always inspect the machine thoroughly before operating it.
- WARNING: Do not use the uFetti Blower if alterations have been made other than by or on behalf of SHOWVEN.
- WARNING: Make sure there are no objects that can be damaged by the machine within the output distance. And no people or animals are allowed to stay in the direct output.
- WARNING: Make sure power supply in consistent with the rated voltage of the equipment, and the socket must well grounded. Do not connect more units to a single electrical circuit than the installed fuse is able to handle. Recommended to connect only a single unit of device to a power supply cable.
- WARNING: Make sure there are no objects near the air inlet port that can block the air to be sucked in.
- WARNING: The red cone area shown in below picture is the safe isolation range of this product, and unauthorized persons or objects are strictly prohibited from entering. A=2m, B=40 .

Install uFetti Blower
- Install on flat surface.
- Install the mount bracket

- Place the uFetti Blower CB16 to desired angle by rotating the bracket to the bottom side of the machine and tighten the knobs on both sides.
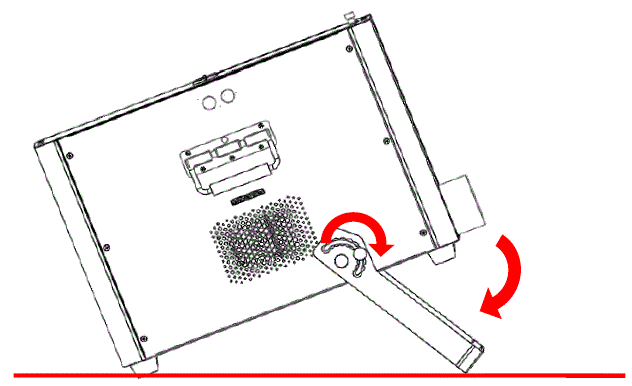 CB16 can be located on the surface at the angle betweet 0 ~37 .
- Install the mount bracket
- Mount below a truss
- Install the mount bracket on top of machine as below, screw a clamp on top of the braket through M10 hole. Make sure that the clamp is strong enough for machine and confetti inside it.
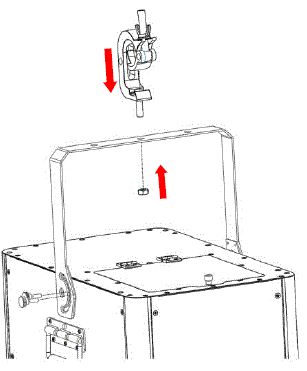
- Mount the clamp on a truss and secure with a qualified safety rope.
- Install the mount bracket on top of machine as below, screw a clamp on top of the braket through M10 hole. Make sure that the clamp is strong enough for machine and confetti inside it.
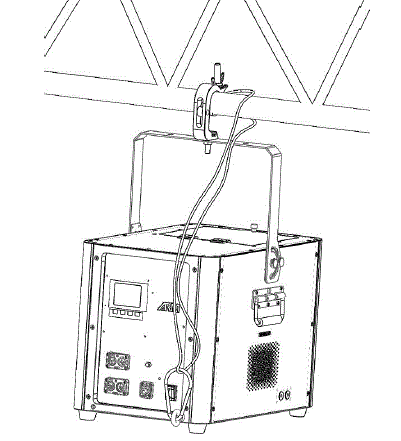
- Mount on a truss
- Screw the clamps to the threaded M10 holes on the bottom of machine.

- Mount the clamps on a truss and secure with a qualified safety rope.

- Screw the clamps to the threaded M10 holes on the bottom of machine.
Fill the machine with confetti
- Open the hopper lid and fill hopper with confetti
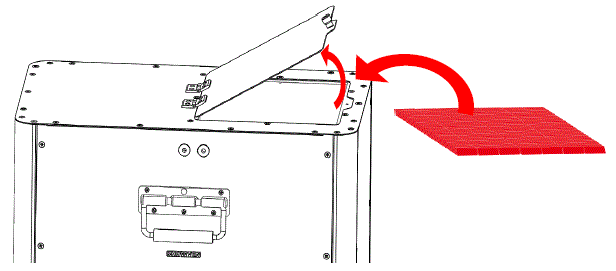
- Close the hopper lid please fill the hopper with SHOWVEN original confetti accordingly.
| Consumable | Size | Max. load each hopper | Max. Consumption Rate |
| Paper Confetti | 55×17 mm | 2KG | 1kg/min |
| Metallic Confetti | 55×17 mm | 4KG | 2kg/min |
- WARNING: Using any other objects other than SHOWVEN® CONFETTI can lead to death or serious injury.
- NOTICE: Do not fill machine with used confetti, it may cause the machine block.
Connecting uFetti Blower
- Connect a power cable to the POWER IN socket of uFetti Blower. Connect the other end of power cable to the power source. Make sure power supply in consistent with the rated voltage of the equipment, and the socket must well grounded.
- Power ON uFetti Blower
DMX control, Please follow below steps: - Connect a DMX cable to the DMX IN socket of first unit of uFetti Blower, another head of this DMX cable connect to DMX console (such as FXcommander). Make sure the DMX console is powered off.
- Connect a DMX cable to the DMX OUT socket of previous uFetti Blower, and the other end to the DMX IN of next machine. Connect all devices in series in this way.
- Suggest to plug in a DMX terminator into the DMX OUT in last unit of machine to improve signal reliability. For distance >200m please use SHOWVEN DMX splitter 8 to amplify the signal.
- Assign DMX address for each unit of uFetti Blower. If use SHOWVEN host controller or FXcommander to control the machine please allocate a unique DMX address for each unit of machine.
- Power ON DMX console
Firing (DMX or Manual control)
Double confirm the prescribed safety isolation zone is clear, no person, animal or other property within this region. Make sure no objects block the air inlet ports.
DMX Control:
- Activate the safety channel and enable device, the ARM indicator light blinking.
- Activate the effect by setting the DMX value of hopper. The output density will increase as DMX value increase from 10 to 255. By activating the hopper, the fan will start blowing.
- Adjust the effect density by adjust DMX value during firing if desired.
- Change the DMX value below 10 to stop firing, then deactivate the enable address of safety channel. The ARM indicator light will OFF.
Manual Control:
To blow uFetti Blower manually please disconnect DMX connection, press “RUN” button on LCD screen to start the machine. Press “STOP” to stop the output.
Output distance
The output height, width and distance depend on the type of confetti, the output angle, the operation mode of the blower etc. 
| Consumable | Confetti Size | Max. Output Distance (X) | Max. Output Width (Y) |
| Paper Confetti | 55×17 mm | 10m | 5m |
| Metallic Confetti | 55×17 mm | 8m | 4m |
Note: Z=30 ; the CB16 is located at 30 upward, and 2m high .
NOTICE: The above parameters are test parameters with SHOWVEN original confetti under ideal conditions. .
Power OFF and clean up
- Power OFF uFetti Blower, disconnect power and/or DMX cables.
- Remove any remaining confetti from the hopper and from outside of the machine.
Maintenance
- To maintain the machine in good performance and running status, it is recommended to running the device at least once per month.
- To maintain the best performance of machine the hopper rollers (Part No. SFMET1163) need to be replaced after a period of use. Please contact SHOWVEN or your direct supplier for operation procedures.
Optional Parts
| Part. No. | Description | pcs / unit |
| SFCAB258 | EU NEUTRIK PowerCON TRUE1 cable – 3m | 1 |
| SFCAB051 | US NEUTRIK PowerCON TRUE1 cable – 3m | 1 |
| SFCAB055 | AU NEUTRIK PowerCON TRUE1 cable – 3m | 1 |
| SFCAB056 | UK NEUTRIK PowerCON TRUE1 cable – 3m | 1 |
| RMBOT036 | Safety loop M8 | 1 |
| SFMET1163 | Hopper feeding roller | 2 |
| SFMET1363 | 2in1 CB16 flight case (premium) | 1 |
| SFMET1377 | 2in1 CB16 flight case | 1 |
Warranty Instructions
- Sincere thanks for your choosing our products, you will receive quality service from us
- The product warranty period is one year. If there are any quality problems within 7 days after shipping out from our factory, we can exchange a brand new same model machine for you
- We will offer free of charge maintenance service for machines which with hardware malfunction (except for the instrument damage caused by human factors) in warranty period. Please don’t repair machine without factory permission
Below situations NOT included in warranty service:
- Damage caused by use unqualified consumables;
- Damage caused by improper transportation, usage, management, and maintenance, or damage caused by human factors;
- Disassemble, modify or repair products without permission;
- Damage caused by external reasons (lightning strike, power supply etc.)
- Damage caused by improper installation or use;
- For product damage not included in warranty range, we can provide paid service.
- Invoice is necessary when applying for maintenance service from SHOWVEN

Showven Technologies Co., Ltd.
- Tel: +86-731-83833068
- Web: www.showven.cn
- E-mail: info@showven.cn
- Add: No.1 Tengda Road, Liuyang
- Economic & Technical Development
- Zone, Changsha, Hunan, 410300,
- P.R.China
Frequently Asked Questions
- Q: Can the output distance be adjusted?
- A: Yes, the output distance can be adjusted up to 10m.
- Q: What is the maximum consumption rate for metallic confetti?
- A: The maximum consumption rate for metallic confetti is 2kg/min.
Documents / Resources
 | SHOWVEN CB16 Dmx Controllable Acompact Confetti Launcher [pdf] User Manual CB16 Dmx Controllable Acompact Confetti Launcher, CB16, Dmx Controllable Acompact Confetti Launcher, Acompact Confetti Launcher, Confetti Launcher, Launcher |