Shenzhen TCP8050 Wi-Fi Bulb Camera

Interface description
This manual is suitable for various types of cameras. (The appearance may be different due to different batches. The details are subject to the receipt. This manual is only for the installation instructions of this series of equipment)

Description
- Reset button
The working state of the device, long press 5 seconds to restore the factory settings, the camera will have a voice prompt broadcast. - 2. SD card slot
TF card, storage video and playback viden - Power supply Power input.
Installation and placement
 Connected to an E27 connector for AC110V-240V
Software Installation
Users can search”EseeCloud(IP Pro, VR Cam)” on the APP store or Google Play, or scan the QR code below to install the APP.
Note: For the iOS system, it requires an iOS 9.0 version or above. For Android, Android 5.1 or above.
 Step 1 If you are prompted to open certain permissions (such as location, message notification, etc.) during APP installation, click Allow (agree).
Account register: Open the APP, click”Register” “, enter your email or phone number to create an account.
Account login: On the login interface, enter the account/ phone number/email, and the corresponding password, and click the “OK” button to log in.
Third-party login: APP supports third-party login. Click the third-party social software icon, jump to the APP to complete the authorization and log in.

Bluetooth adding process with network
Before adding a camera, please make sure that the Bluetooth function of the mobile phone has been turned on, and do not turn off the Bluetooth during the adding process. If a prompt box pops up during the adding process to enable Bluetooth or Bluetooth authorization, please follow the steps in the prompt to enable it;
Step 1 After the camera is powered on, open the “EseeCloud “APP\ and click the “+” icon in the upper right corner to enter the interface of adding devices.(If the permission prompt pops up, click agree)
 Step 2 The APP will automatically search for a new device and click the Add button when it finds the device.

(If you do not see the pop-up device box, please click “scan to add” to scan the QR code on the camera body)
 If you can’t find the device in the above steps, press and hold the reset button for 5 seconds, restoring the camera to factory settings. and try again.
Step 3 Enter the WIFI name and password on the distribution network screen.
Step 4 After the network is configured successfully, the system prompts you to enter the device\ name. Click Next.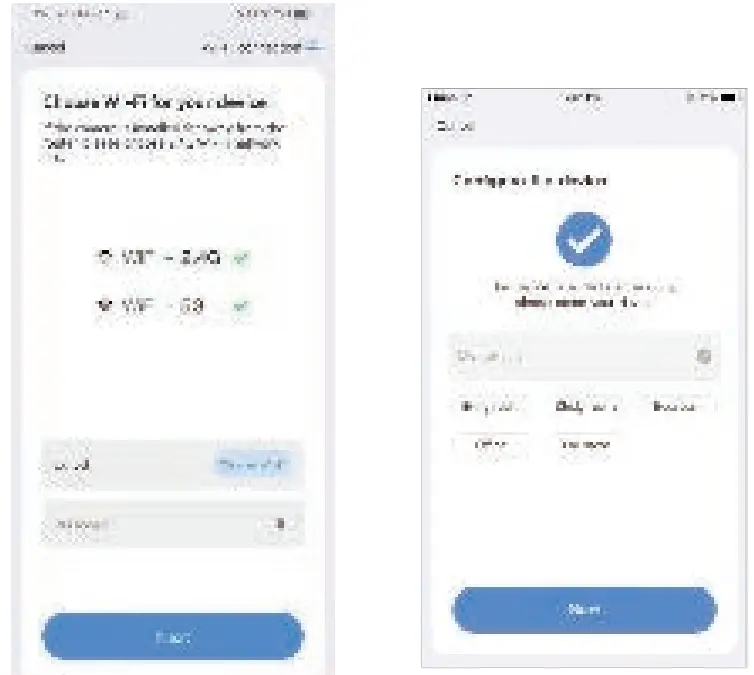
Step 5 Users can choose to enable or disable message push according to your own preferences (generally recommended to enable)
Step 6 Congratulations, you have successfully connected the device.
Or you can add camera by WiFi configuration
Step 1 Open the APP, click the “+” icon in the middle of the interface to enter the scan code interface;
Step 2 Click “Camera scan code add” method
Step 3 Check whether the camera light is blinking

Step 4 Select the WiFi that the camera needs to connect to, enter the password, and click Next;

Step 5 Point the camera at the QR code that appears on the screen of the phone

Step 6 After the network configuration is successful, set a name for the camera.

FAQ
Q1: Why is the pairing network unsuccessful?
- Please make sure that the distance between the camera, the router, and the mobile phone is close enough when configuring the network.
- Please make sure that the WIFI signal connected to the mobile phone 2.4G Wifi and 5G WiFi are both ok.
- Please check whether the WIFI name and password are correct.
- Please long-press the reset button for 5 seconds and try again after restoring the camera to the factory settings.

Q2: Why is there no playback?
- Make sure that the TF card has been inserted into the camera and try to turn on/off the camera.
- Enter the camera settings menu to check the storage status ‘in good condition’ ( if the status is abnormal, click to “Format the memory card”.)

Q3: Why is the camera offline?
- It may caused by router WiFl signal interference or network reasons. Power off and restart the optical modem, router or camera.
- The camera may be too far away from the WIFI router, try to get the camera next to the WIFI router.
- Whether the WIFI password has been changed, try to reset the camera and try pairing again.
Q4: Why my phone does not have an alarm push function or two-way audio?
- Check your mobile phone permission settings, and make sure that enable the notification permission of the “EseeCloud” App.
- Open your phone’s Settings > Apps and Notifications, select Apps and Notification Management respectively, find the “EseeCloud” app, and turn on all permissions.

After Service
- Thanks for your purchase and support, we appreciate all your valuable feedback.
- If you have any questions about our products, please feel free to contact us.
FCC STATEMENT
FCC Warning
This device complies with part 15 of the FCC rules. Operation is subject to the following two conditions:
- this device may not cause harmful interference, and
- this device must accept any interference received, including interference that may cause undesired operation. Changes or modifications not expressly approved by the party responsible for compliance could void the user’s authority to operate the equipment.
NOTE: This equipment has been tested and found to comply with the limits for a Class B digital device, pursuant to part 15 of the FCC Rules. These limits are designed to provide reasonable protection against harmful interference in a residential installation. This equipment generates uses and can radiate radio frequency energy and, if not installed and used in accordance with the instructions, may cause harmful interference to radio communications. However, there is no guarantee that interference will not occur in a particular installation. If this equipment does cause harmful interference to radio or television reception, which can be determined by turning the equipment off and on, the user is encouraged to try to correct the interference by one or more of the following measures:
- Reorient or relocate the receiving antenna.
- Increase the separation between the equipment and the receiver.
- Connect the equipment to an outlet on a circuit different from that to which the receiver is connected.
- Consult the dealer or an experienced radio/TV technician for help.
Radiation Exposure Statement
This equipment complies with FCC radiation exposure limits set forth for an uncontrolled
environment. This equipment should be installed and operated with a minimum distance of 20cm
between the radiator and your body.
CONTACT
- Email: usservice@isecugroup.com
bulb camera uses Instructional video

Documents / Resources
 | Shenzhen TCP8050 Wi-Fi Bulb Camera [pdf] User Guide 2BMOF-TCP8050, 2BMOFTCP8050, tcp8050, TCP8050 Wi-Fi Bulb Camera, TCP8050, Wi-Fi Bulb Camera, Bulb Camera, Camera |


