![]()
![]()
User Guide

What is Wave Intercom?
Wave Intercom enables communication via cellular data, offering two types of communication.
Geo Wave
Open communication based on the distance between users

Friends Wave
Private communication among selected users

How to Start Geo Wave

- Open the Wave Intercom App.
- Start Wave Intercom by double tapping the Mesh Intercom button on your compatible Sena device.
- When the map appears, you can start talking to anyone using Wave Intercom.
- You can switch between Wave Intercom and Mesh
Intercom by tapping the Jog Dial or the Center button once.
*Note: You can also start by tapping the Geo Wave button in the App.
How to Start Friends Wave
⚫ Start on Friends Tab
- Tap the Create
Friends Wave button on the Friends Tab. - Select the people you want to chat with.
- Tap the Start button.

⚫ Instant Start from Geo Wave
- Tap the Grouping button on the Geo Wave map.
- The Friends Wave will be instantly created with users within the Wave Zone.

How to Add Friends on Wave Intercom
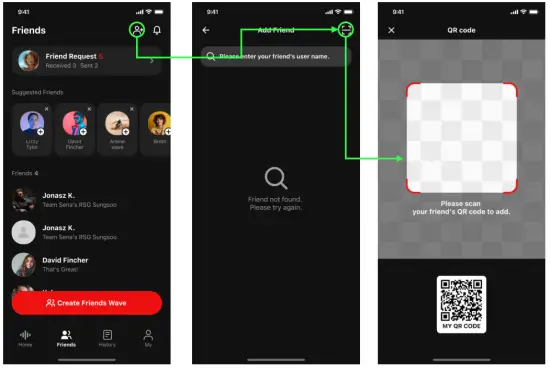
- Go to the Friends tab.
- Tap
 , and then
  in the upper right corner.
 - Scan the QR code on your friend’s screen.
What’s good about adding friends?
- Even if you move out of the Wave Zone, the connection won’t drop.
- The Wave Zone extends to a 5-mile(8-km) radius.
- Users who’re not on your Friends list will lose connection beyond a 6-mile (10-kim) radius.
Tab Overview
![]() Home
Home

① Wave Intercom users near me
② My profile
③ Mic mute/unmute
④ Start Geo Wave
⑤ Recently connected device
⑥ List of Wave Intercom users near me
⑦ Connected device with battery level
⑧ My current location
⑨ Compass
⑩ Start Friends Wave
![]() Friends
Friends

① Add friend
② Notifications
③ Users added on my friends list
④ Settings (Group name, invitation link)
⑤ Selected members
⑥ Number of the members

① Friends Wave history
② Share my profile
③ General settings
④ Edit
⑤ Nickname with a random ID number
⑥ Motorcycle name
⑦ Device information
Detailed Instructions
⚫ Start Geo Wave Intercom
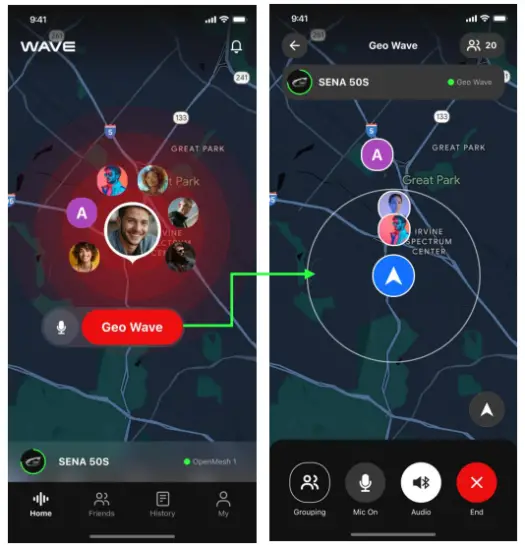
- Open the App.
- Double tap the Mesh Intercom button on your device, or tap the Geo Wave button on the screen.
- A map will appear.
- Now you can talk to anyone within the circle.
⚫ End Wave Intercom
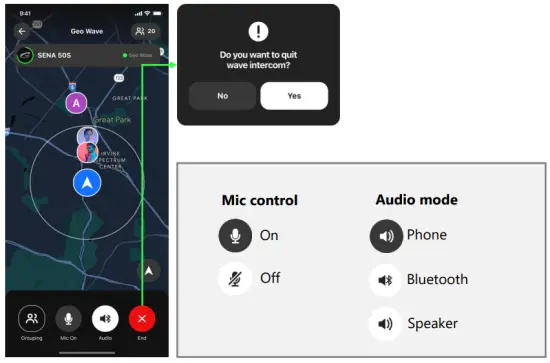
- Single tap the Mesh button on your device, or tap the End button on the screen.
- Tap Yes to confirm.
⚫ Add friends

Suggested friends
1. Tap the profile picture.
2. Tap the Add as a Friend button.

Search nicknames
- Tap in the upper right corner.
- Enter the username and tap the Add button.
⚫ Add friends

- Tap in the upper right corner.
- Tap in the upper right corner.
- Scan your friend’s QR code to automatically send a request.
⚫ Create a Friends Wave

- Go to the Friends tab and tap the Create Friends Wave button.
- Navigate the tabs to select the members.
- Tap the Start button and wait until the process is complete.
- Start the conversation when the map appears.
*Note: You can choose the members from three different tabs.

⚫ Switch to Friends Wave from Geo Wave

- Tap the Grouping button on the Geo Wave map.
- The Friends Wave will be instantly created with the users within the Wave Zone.
*Note: Only the users on your Friends list can be grouped. Users who are in the wave zone but not on your Friends list won’t be joined through this process.
⚫ Add new members to the group
You can still invite new members to the existing group after starting a conversation.

- Tap
 in the upper right corner.
 - Tap the Invite button on the right.
- Select the people you want to chat with.
- Tap the Invite button at the bottom.
⚫ Resend the invitation
You can reinvite members who haven’t responded to the invitations yet.

- Tap a profile picture on the left panel.
- Tap Yes to confirm.
*Note: The left panel shows users who haven’t joined the conversation.
The icons indicate two types of status.
– 3 dots: The member hasn’t responded to your invitation.
– Single dot in the bottom right: The member has joined the group but is not in the conversation now.
⚫ Restart a Friends Wave
Once you’ve joined a Friends Wave, it will be listed in the History tab. You can restart the conversation with the same group anytime.

- Tap the group you want to chat with.
- Tap the Friends Wave button.
⚫ Share your Friends Wave

- Swipe up the bottom sheet or tap in the upper right corner.
- Tap
 and share the generated link.
*Note: Using the bottom sheet, You can toggle off to expire the link or regenerate the link by tapping ![]() .
.
⚫ Customize your Friends Wave
When you’re in a Friends Wave
- Swipe up the bottom sheet.
- Tap to
 change the group name or to
  change the profile picture.

When creating a Friends Wave
- Tap
 in the upper right corner.
 - Tap to change the group name or to change the profile picture.

⚫ Check your location on the map
There are two types of compass icons in the bottom right corner to show your location on the map. You can switch the icons by tapping them.

⚫ Relocate to your current location
If you zoom, rotate, and pan the map to check the surrounding areas, the compass icon will turn into ![]() .
.

- Tap the Re-center button.
- The map will adjust to show your current location.
End of Document
![]()
Documents / Resources
 | SENA Wave Intercom [pdf] User Guide Wave Intercom, Wave, Intercom |
 | SENA Wave Intercom [pdf] User Guide Wave Intercom, Intercom |