Instruction Manual for DS18 models including: 2AYOQ-MRX300, 2AYOQMRX300, MRX300 Car USB Media Player, Car USB Media Player, USB Media Player, Media Player
SPIRIT LLC MRX300 Radio 2AYOQ-MRX300 2AYOQMRX300 mrx300
2024-02-10 — the presence of important instructions. Failure to heed the instructions could result in injury or unit damage. To prevent injury and damage to the unit, ...
File Info : application/pdf, 12 Pages, 363.18KB
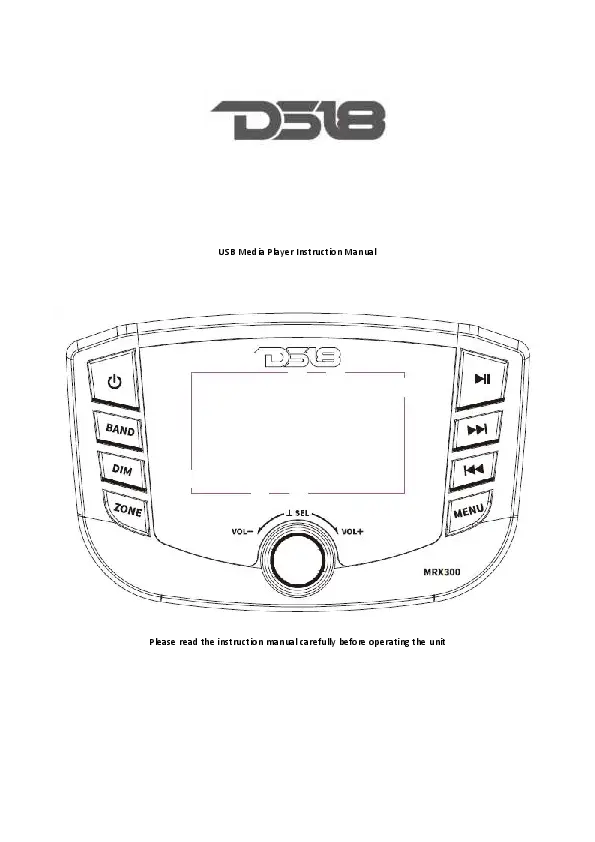
DocumentDocumentUSB Media Player Instruction Manual Please read the instruction manual carefully before operating the unit Table of Contents 1. Safety Instruction.......................................................................... 01 2.Specifications................................................................................. 02 3.Installation/ Mounting.................................................................. 03 4.Wiring Connection........................................................................ 05 5.Basic Operation.............................................................................. 07 6.Function setting/Operation......................................................... 09 Setting............................................................................................. 09 Radio (AM/FM/WB) Operation................................................... 09 USB Operation.............................................................................. 09 AUX (Auxiliary Input) Operation................................................ 10 Bluetooth Operation..................................................................... 10 7.Troubleshooting........................................................................... 11 Safety Instruction This symbol with `'CAUTION is intended to alert the user to the presence of important instructions. Failure to heed the instructions could result in injury or unit damage. To prevent injury and damage to the unit, please read and follow the instructions in this manual.If you feel unsure about installing this system yourself, have it installed by a qualified DS18 technician. Before installation, disconnect the battery negative (-) terminal to prevent damage to the unit, fire and/or possible injury. Specifications Model Operating Voltage Power Output Max. RCA Output Voltage Output Impedance Frequency Response Receipt FM Frequency Range Receipt AM Frequency Range Receipt WB Frequency Range Tuner Presets Display Bluetooth USB Compatibility USB Capacity USB Charger Audio File Compatibility MRX300D 10.5V-16V 25 W X 4 @ 4 Ohms RMS 50 W x 4 @ 2 Ohms Peak 4V 500 20 20 KHz 87.5 - 107.9 MHz 530 1710 KHz 162.40-162.55 MHz 18 FM / 12 AM/6WB 3" Full TFT Gorilla Glass 5.0+EDR, A2DP 2.0 64 GB max 2A MP4,MP3, WMA Installation/ Mounting Installation 1. Main Unit 2. Power/Speaker Harness 3. Screws X 2PCS 4. Hex Head Screws X 2PCS 5. U Bracket 6. Instruction Manual 1. This player should be installed by professional technician. 2. Please read the instruction and operation of equipment carefully before installing. 3. Make sure to connect other wires before power connection. 4. To avoid short circuit. Please make sure all the exposed wires are insulating. 5. Please fix all the wires after installation. 6. Please make connection to the player accordingly to this instruction manual. Wrong connection may cause damage. 7. This player only fit for 12V DC device and please make sure your boat belongs to this kind of cathode grounding electrical system. 8. Please connect the wires rightly. Wrong connection will cause malfunction or damage the electrical system. Mounting (Using U Bracket) To mount the unit, you will need to find a flat surface with adequate clearance behind it that provides enough clearance for the unit and all it's necessary wiring. 1.Once you have determined a mounting location, you will need to cut a circular hole 3 (77mm) in diameter. 2. After the hole is cut slide the unit and wiring through the hole. 3. Take the U bracket and slide over the two studs on the back of the unit. Tighten down with supplied nuts. 4. Plug in all wiring harnesses and cables. Refer to the wiring diagram for wire harness connection types. 1. This player can only be used by the 12V DC cathode grounding electrical system. 2. Don't connect the terminals of the battery until the player is absolutely with well erection joint. 3. Please make sure to connect the yellow wire to the positive of the battery(+). 4. When change the fuse. Please make sure the specifications are same. 5. Using good quality speaker with 4 ohm can result in the best effect of the equipment. Basic Operation POWER/ button Press button to turn on. Press the key again to turn off the unit. BAND / button Press BAND button to FM1/FM2/FM3/AM1/AM2/WB. Press and hold BAND button for 3 seconds to auto store the stations. DIM button Press the DIM key to control the brightness of the light. ZONE button Press ZONE button to ZONE1 / ZONE2 / ZONE3. PLAY/PAUSE button In RADIO/AUX source press button for MUTE on/off function. In USB/BT source, press button for Pause/Play function. Seek UP button In RADIO source, shortly press button to Seek up, press and hold the button to show next station. In USB/BT source press button to next song / file, press and hold the button to fast forward play. Seek down button In RADIO source, shortly press button to Seek down, press and hold the button to show back to the previous station. In USB/BT source press button to previous song / file, and press and hold the button to play back quickly. MENU button Press the MENU key to display the main interface. VOL/SEL button Rotate the Vol to adjust the volume. Bluetooth Operation After your device is paired to the source unit, this feature allows you to control playback your device directly from the unit. Press SRC button to select the BLUETOOTH source option. Then searching and selecting the Bluetooth device "MRX" from your phone and input password "0000" If it needs. When paired successfully, the BT symbol will be shown on TFT. To play or pause a song, short press the PLAY/PAUSE button. To skip a track forward, short press the FWD button. To skip a track backwards, short press the REV button. To access USB specific settings, Press and hold SEL button for the list of settings (Random play>Repeat). Use the encoder to select the option to change FCC WARNING This device complies with part 15 of the FCC Rules. Operation is subject to the following two conditions: (1) this device may not cause harmful interference, and (2) this device must accept any interference received, including interference that may cause undesired operation. Any changes or modifications not expressly approved by the party responsible for compliance could void the user's authority to operate the equipment. NOTE: This equipment has been tested and found to comply with the limits for a Class B digital device, pursuant to Part 15 of the FCC Rules. These limits are designed to provide reasonable protection against harmful interference in a residential installation. This equipment generates, uses and can radiate radio frequency energy and, if not installed and used in accordance with the instructions, may cause harmful interference to radio communications. However, there is no guarantee that interference will not occur in a particular installation. If this equipment does cause harmful interference to radio or television reception, which can be determined by turning the equipment off and on, the user is encouraged to try to correct the interference by one or more of the following measures: -- Reorient or relocate the receiving antenna. -- Increase the separation between the equipment and receiver. -- Connect the equipment into an outlet on a circuit different from that to which the receiver is connected. -- Consult the dealer or an experienced radio/TV technician for help. To maintain compliance with FCC's RF Exposure guidelines, This equipment should be installed and operated with minimum distance between 20cm the radiator your body: Use only the supplied antenna.WPS 文字