1. Продукт закончилсяview
The GIGABYTE B760M DS3H WIFI6E GEN5 is an M-ATX motherboard designed to support 14th and 13th Generation Intel Core Processors. It features an LGA 1700 socket and is built with a focus on performance and connectivity for modern computing needs.
Основные характеристики:
- Разъем Intel LGA 1700: Поддерживает процессоры Intel Core 14-го и 13-го поколений.
- Совместимость с DDR5: Features Dual Channel DDR5 memory support across 4 DIMM slots.
- Прочная конструкция питания: Equipped with a Hybrid 8+2+1 Phases Digital VRM Solution for stable power delivery.
- Возможности подключения нового поколения: Includes PCIe 5.0, M.2 slots, and USB 3.2 Gen 2x2 Type-C ports.
- Высокоскоростные сети: Integrated Intel Wi-Fi 6E and 2.5GbE LAN for fast and reliable network connections.
- Удобные функции: Incorporates Smart Fan 6 for advanced cooling control and Q-Flash Plus for BIOS updates without CPU, memory, or GPU installation.

Рисунок 1.1: Сверху вниз view of the GIGABYTE B760M DS3H WIFI6E GEN5 motherboard, showing the LGA 1700 socket, DDR5 DIMM slots, PCIe slots, and M.2 slots.
2. Настройка и установка
This section provides general guidelines for installing your GIGABYTE B760M DS3H WIFI6E GEN5 motherboard. Always refer to the detailed instructions provided with your CPU, cooler, and other components for specific installation steps.
2.1 Порядок установки компонентов
- Установка процессора: Carefully open the LGA 1700 socket lever, align the CPU with the triangular mark on the socket, place the CPU gently, and close the lever to secure it.
- Установка кулера процессора: Install your chosen CPU cooler according to its manufacturer's instructions. Ensure proper thermal paste application.
- Установка памяти (ОЗУ): Insert DDR5 memory modules into the DIMM slots. For dual-channel operation, refer to the motherboard manual for recommended slot configurations (typically slots A2 and B2 first). Press firmly until the clips on both ends lock the module in place.
- Установка твердотельного накопителя M.2: Locate the M.2 slots on the motherboard. Insert the M.2 SSD at an angle and secure it with the provided screw or EZ-Latch mechanism.
- Установка графической карты (GPU): Insert your graphics card into the primary PCIe 5.0 x16 slot. Ensure it is fully seated and secured by the PCIe EZ-Latch.
- Подключение источника питания: Подключите 24-контактный разъем питания ATX и 8-контактный разъем питания процессора от блока питания к материнской плате.
- Устройства SATA: Connect SATA data cables to your storage drives (HDDs/SSDs) and the SATA 6Gb/s ports on the motherboard.
- Разъемы на передней панели: Connect the case's front panel headers (power button, reset button, USB ports, audio jacks) to the corresponding pins on the motherboard. Refer to the motherboard's silkscreen labels for correct orientation.
- Установка антенны: For Wi-Fi functionality, screw the included Wi-Fi antennas onto the rear I/O panel's antenna connectors (WiFi EZ-Plug).

Figure 2.1: Motherboard layout diagram highlighting key connectors such as USB ports, Wi-Fi antenna connectors, HDMI, DisplayPort, LAN, and audio jacks.
3. Инструкция по эксплуатации
3.1 Initial Boot-Up and BIOS/UEFI Access
- После сборки системы подключите монитор, клавиатуру и мышь.
- Включите систему. Во время загрузки несколько раз нажмите кнопку ДЕЛ клавиша для входа в утилиту настройки BIOS/UEFI.
- In the BIOS/UEFI, you can configure boot order, enable/disable features, adjust fan speeds (Smart Fan 6), and monitor system status.
3.2 Установка драйвера
- После установки операционной системы установите необходимые драйверы для компонентов материнской платы.
- Драйверы можно найти на официальном сайте GIGABYTE website for your specific motherboard model. Key drivers include chipset, LAN, Wi-Fi, audio, and USB drivers.
3.3 BIOS Update with Q-Flash Plus
- The Q-Flash Plus feature allows you to update the BIOS without installing the CPU, memory, or graphics card.
- Загрузите последнюю версию BIOS file от GIGABYTE webи переименуйте его в GIGABYTE.bin.
- Скопируйте переименованный BIOS file to a USB flash drive (FAT32 format).
- Вставьте USB-флеш-накопитель в предназначенный для этого USB-порт Q-Flash Plus на задней панели ввода-вывода.
- With the power supply connected and turned on (but the system off), press the Q-Flash Plus button. The LED will flash, indicating the update process. Wait until the LED stops flashing.
4. Техническое обслуживание
Регулярное обслуживание поможет обеспечить долговечность и оптимальную производительность вашей материнской платы и системы.
- Удаление пыли: Periodically clean dust from inside your computer case, especially from heatsinks, fans, and motherboard surfaces, using compressed air. Ensure the system is powered off and unplugged before cleaning.
- Обновления BIOS: Keep your BIOS updated to the latest version to benefit from performance improvements, bug fixes, and support for new hardware. Use the Q-Flash Plus feature or the BIOS utility.
- Обновления драйверов: Регулярно проверяйте GIGABYTE website for updated drivers for your motherboard's components.
- Физический осмотр: Occasionally inspect all cable connections (power, SATA, front panel) to ensure they are secure.
5. Поиск Неисправностей
В этом разделе рассматриваются распространенные проблемы, с которыми вы можете столкнуться.
5.1 Общие проблемы и решения
- Нет питания / Система не включается:
- Убедитесь, что блок питания подключен к материнской плате (24-контактный разъем ATX и 8-контактный разъем для процессора) и к розетке.
- Check if the power supply switch is in the ON position.
- Убедитесь, что кабель кнопки питания передней панели правильно подключен к материнской плате.
- Нет изображения / Нет POST (самотестирование при включении питания):
- Confirm that the monitor is connected to the graphics card (or integrated graphics if applicable) and powered on.
- Плотно вставьте модули оперативной памяти в соответствующие слоты. Попробуйте загрузиться только с одним модулем оперативной памяти.
- Reseat the graphics card in its PCIe slot. Ensure any required PCIe power cables are connected to the GPU.
- Clear the CMOS by removing the CMOS battery for 5-10 minutes or using the Clear CMOS jumper (refer to the full manual for location).
- Операционная система не загружается:
- Check the boot order in the BIOS/UEFI to ensure your primary storage drive is selected.
- Verify that the SATA data and power cables are securely connected to your storage drive.
- If using an M.2 SSD, ensure it is properly seated and detected in the BIOS.
- Проблемы с сетевым подключением:
- For wired LAN, ensure the Ethernet cable is securely connected and the LAN driver is installed.
- For Wi-Fi, ensure the antennas are properly attached to the WiFi EZ-Plug connectors and the Wi-Fi driver is installed.
- Проверьте сетевые настройки в вашей операционной системе.
If issues persist, consult the comprehensive GIGABYTE user manual or contact technical support.
6. Технические характеристики
| Особенность | Деталь |
|---|---|
| Бренд | ГИГАБАЙТ |
| Название модели | B760M DS3H WIFI6E GEN5 |
| Сокет ЦП | ЛГА 1700 |
| Совместимые процессоры | 14th, 13th Gen Intel Core Series Processors |
| Чипсет | Чипсет Intel B760 Express |
| Технология оперативной памяти | DDR5 |
| Слоты памяти | 4 разъема DDR5 DIMM (двухканальный режим) |
| Максимальная скорость памяти | До 5600 МГц (OC) |
| Слоты PCIe | 1 слот PCIe 5.0 x16, 2 слота PCIe 3.0 x1 |
| Разъемы M.2 | 2 разъема M.2 (PCIe 4.0 x4) |
| SATA-порты | 4 x разъема SATA 6 Гбит / с |
| USB-порты (сзади) | 1 x USB 3.2 Gen 2x2 Type-C, 1 x USB 3.2 Gen 2, 2 x USB 3.2 Gen 1, 4 x USB 2.0/1.1 |
| Нетворкинг | Intel Wi-Fi 6E, локальная сеть 2.5GbE |
| Аудио | Аудиокодек Realtek (аудио высокой четкости) |
| Видеовыходы | 1 x HDMI, 1 x DisplayPort (requires CPU with integrated graphics) |
| Форм-фактор | Micro ATX (M-ATX) |
| Размеры (ДxШxВ) | 8.82 x 8.82 x 1 дюйма |
| Вес товара | 2 фунта |
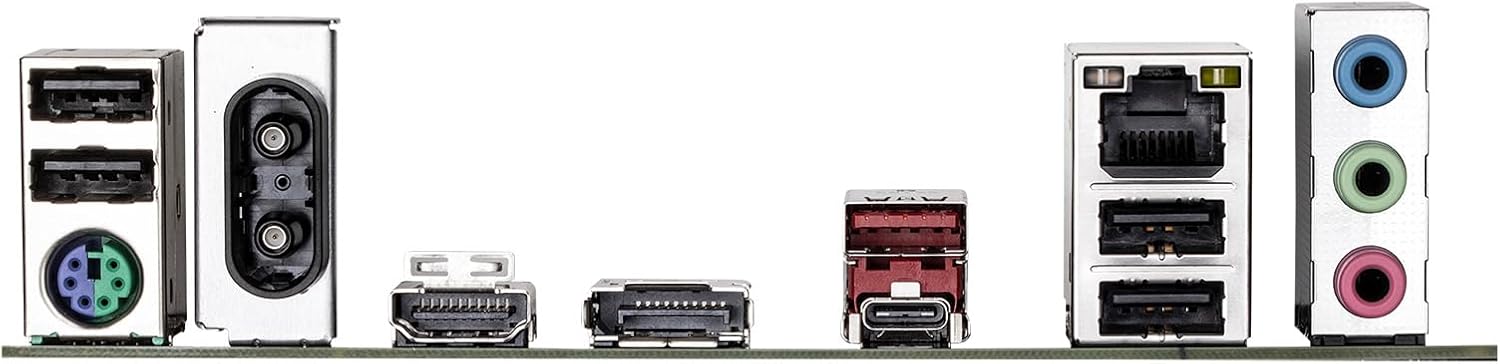
Figure 6.1: Rear I/O panel showing various ports including USB, LAN, Wi-Fi antenna connectors, HDMI, DisplayPort, and audio jacks.
7. Информация о гарантии
GIGABYTE products are covered by a limited warranty. For detailed and up-to-date warranty terms, conditions, and registration procedures, please refer to the official GIGABYTE website or the warranty card included with your product. Warranty periods may vary by region and product type.
8. Техническая поддержка
For technical assistance, driver downloads, BIOS updates, FAQs, and further product information, please visit the official GIGABYTE support webсайт:
Before contacting support, please have your motherboard model name (B760M DS3H WIFI6E GEN5) and serial number ready.