1. Введение
This manual provides instructions for the assembly, operation, and maintenance of the MONTECH X5M Micro ATX Gaming PC Case. The X5M is designed for high airflow and features pre-installed ARGB fans, a glass side panel, and an integrated GPU holder.
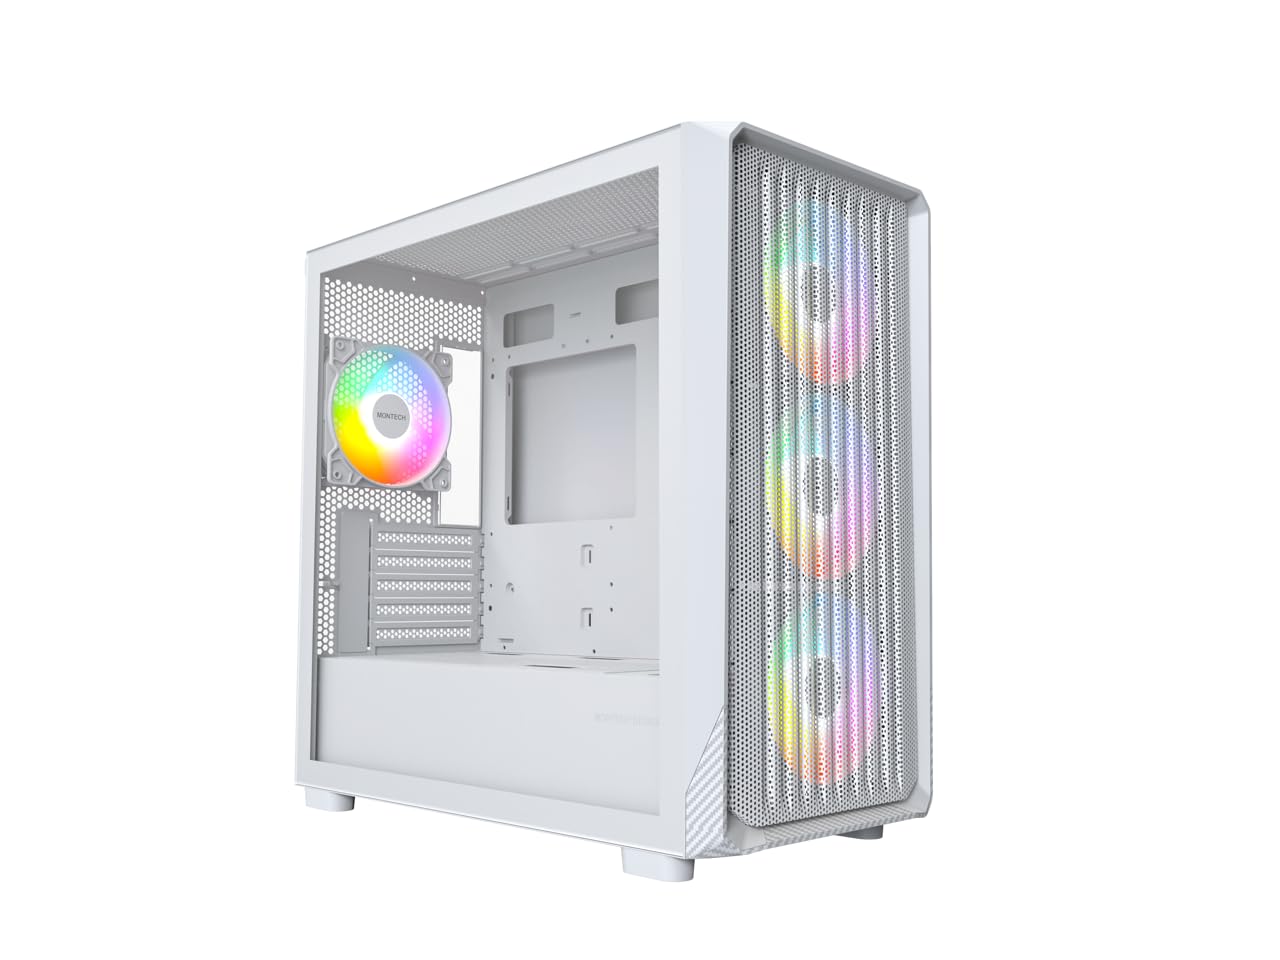
Figure 1: MONTECH X5M Micro ATX Gaming PC Case (White variant).
2.Основные характеристики
- Integrated GPU Holder: An adjustable GPU support stand is included to provide physical support for graphics cards.
- Конструкция с высокой пропускной способностью: Optimized structure for efficient cooling.
- Предустановленные ARGB-вентиляторы: Four 120mm ARGB fans are pre-installed for immediate cooling and customizable lighting.
- Боковая панель из закаленного стекла: Обеспечивает четкое view внутренних компонентов.
- Carbon Fiber Print Accents: Aesthetic detailing on the front panel.
- Универсальные возможности подключения: Front I/O panel includes USB 2.0, USB 3.0, USB Type-C, and audio ports.

Рисунок 2: Болееview of the MONTECH X5M case highlighting internal layout and ARGB fans.
3. Технические характеристики
| Бренд | Монтеч |
| Название модели | Х5М |
| Тип корпуса | Корпус Micro ATX Mid Tower |
| Совместимость с материнской платой | Микро ATX |
| Предустановленные вентиляторы | 4 x 120-мм вентилятора ARGB |
| Поддержка длины графического процессора | До 405 мм |
| Опора для регулировки высоты процессорного кулера | До 165 мм |
| Поддержка длины блока питания | До 230 мм |
| Отсеки для хранения | Up to 2 HDDs & 4 SSDs |
| Передние порты ввода / вывода | 1x USB 2.0, 1x USB 3.0, 1x USB Type-C, Mic & Audio, LED Button, Power Button |
| Метод охлаждения | Воздух |
| Поддержка радиатора AIO | Top: Up to 360mm; Front: Up to 360mm |
| Материал | Plastic with Carbon Fiber Accents, Tempered Glass |
| Вес товара | 14.3 фунтов (6.49 кг) |

Figure 3: Close-up of the carbon fiber print detailing on the front panel of the X5M case.
4. Настройка и установка
Follow these steps for installing components into your MONTECH X5M PC case. Ensure your system is powered off and unplugged before beginning any installation.
4.1. Подготовка дела
- Аккуратно снимите боковую панель из закаленного стекла, открутив винты с накатанной головкой и сдвинув ее вниз.
- Для доступа к месту для укладки кабелей снимите заднюю боковую панель.
4.2. Установка материнской платы
- Установите заглушку для разъемов ввода/вывода (если она не прикреплена к материнской плате) в заднее отверстие корпуса.
- Align your Micro ATX motherboard with the standoffs inside the case.
- Закрепите материнскую плату с помощью прилагаемых винтов.
4.3 Установка блока питания (БП)
- Place the PSU into the dedicated compartment at the bottom rear of the case.
- Закрепите блок питания винтами с задней стороны корпуса.
4.4. Установка устройств хранения данных (HDD/SSD)
The X5M supports up to 2 HDDs and 4 SSDs.
- 2.5-дюймовые твердотельные накопители: Mount SSDs onto the designated brackets behind the motherboard tray or on the PSU shroud.
- 3.5-дюймовые жесткие диски: Install HDDs into the drive cage located under the PSU shroud.
4.5 Установка видеокарты (GPU)
- Снимите необходимые заглушки слотов PCIe с задней части корпуса.
- Вставьте видеокарту в соответствующий слот PCIe на материнской плате.
- Закрепите видеокарту винтами.
- Adjust the integrated GPU support stand to provide stability for your graphics card.
4.6. Установка вентилятора и радиатора
The X5M comes with four 120mm ARGB fans pre-installed. Additional fans or AIO radiators can be installed as follows:
- Вершина: Supports 3x 120mm or 2x 140mm fans, or AIO radiators up to 360mm.
- Передний: Supports 3x 120mm or 2x 140mm fans, or AIO radiators up to 360mm.
- Задний: Поддерживает 1 вентилятор 120 мм.
- Кожух блока питания: Поддерживает 2 вентилятора 120 мм.

Figure 4: Illustration of airflow within the MONTECH X5M case and the pre-installed ARGB fans.

Figure 5: Diagram detailing fan and radiator support locations and sizes within the X5M case.
4.7. Организация кабелей.
Используйте отверстия для прокладки кабелей и точки крепления за лотком материнской платы, чтобы упорядочить провода. Это улучшит циркуляцию воздуха и внешний вид.
4.8. Разъемы на передней панели ввода/вывода
Connect the front panel cables (USB 2.0, USB 3.0, USB Type-C, HD Audio, Power Switch, Reset Switch, LED) to the corresponding headers on your motherboard. Refer to your motherboard manual for specific header locations.

Figure 6: Front I/O panel of the MONTECH X5M, showing USB 2.0, USB 3.0, USB Type-C, Mic & Audio jacks, LED button, and Power button.
5. Операция
5.1. Включение
After all components are installed and cables connected, replace the side panels. Connect your monitor, keyboard, mouse, and power cable. Press the Power Button on the front I/O panel to start your system.
5.2. Управление вентилятором ARGB
Предустановленные вентиляторы ARGB можно контролировать двумя способами:
- Специальная светодиодная кнопка: Use the LED button on the front I/O panel to cycle through 25 built-in lighting modes.
- Синхронизация материнской платы: Connect the ARGB cables to a compatible 5V 3-pin ARGB header on your motherboard. Use your motherboard's RGB software (e.g., ASUS Aura Sync, MSI Mystic Light Sync, GIGABYTE RGB Fusion, ASRock Polychrome Sync) to synchronize and customize lighting effects.
6. Техническое обслуживание
Регулярное обслуживание помогает обеспечить оптимальную производительность и долговечность компонентов вашего ПК.
- Очистка пылевого фильтра: Periodically remove and clean the dust filters (located on the top, front, and bottom) to maintain optimal airflow. Use compressed air or a soft brush.
- Внешняя очистка: Протрите внешние поверхности мягкой, damp ткань. Избегайте абразивных чистящих средств.
- Чистка салона: При выключенной и отсоединенной от сети системе используйте сжатый воздух для удаления пыли с внутренних компонентов и вентиляторов.
7. Поиск Неисправностей
- Система не включается:
- Убедитесь, что кабель питания надежно подключен к блоку питания и к розетке.
- Убедитесь, что переключатель блока питания находится в положении «ВКЛ».
- Verify all front panel connectors (especially the Power Switch) are correctly attached to the motherboard.
- Confirm the 24-pin ATX and 8-pin CPU power cables are securely connected to the motherboard.
- Вентиляторы не вращаются / RGB-подсветка не горит:
- Check that all fan power cables are securely connected to the fan hub or motherboard headers.
- Ensure ARGB cables are properly connected to the fan hub or a compatible 5V 3-pin ARGB header on the motherboard.
- If using motherboard synchronization, verify that the RGB software is installed and configured correctly.
- Try cycling through modes using the dedicated LED button on the front panel.
- Нет вывода на дисплей:
- Ensure your monitor cable is connected to the graphics card (GPU) and not the motherboard's integrated graphics port (unless you are using integrated graphics).
- Переустановите графическую карту в слот PCIe.
- Check that the GPU power cables are securely connected.
8. Гарантия и поддержка
8.1. Информация о гарантии
The MONTECH X5M PC Case comes with a Гарантия производителя 1 года. This warranty covers defects in materials and workmanship under normal use. For specific terms and conditions, please refer to the official Montech webсайт или обратитесь в службу поддержки клиентов.
8.2. Поддержка клиентов
For further assistance, technical support, or warranty claims, please visit the official Montech website or contact their customer service department. You can find contact information on the Montech webсайт: www.montechpc.com